
Related Manuals for HPRT TP801


Summary of Contents for HPRT TP801
- Page 1 User Manual TP801/TP805/TP806 TP801 TP806 TP805 Xiamen Hanin Electronic Technology Co.,Ltd. ADD: 5F, 8#, Aide Airport Industrial Park, Gaoqi South 12 Road, Huli District, Xiamen Tel: +86-(0)592-5885993 Web: www.hprt.com...
- Page 2 2. Modify the description of print self-test page 3. Modify the layout of user manual 1. Modify the printer’s driver(P20~P25) 2014.08.15 2. Modify the layout of user manual 1.TP801 add STATUS indicator. 2014.11.20 2.Add Bluetooth function. 2014.12.19 1.Update driver(P20) 1.Delete Driver Orientation (Chapter4.9).
- Page 3 REV. DATE DESCRIPTION 2018.9.30 Add the description of BT...
-
Page 4: Table Of Contents
1.2 The Main Features ......................3 2. GETTING STARTED ........................4 2.1 Packing List ........................4 2.2 Appearance and Components ................... 6 2.2.1 TP801 ........................6 2.2.2 TP805 ........................7 3 Specification ..........................10 3.1 Printer Specification......................10 3.2 Media Specification ......................14 3.2.1 Continuous Thermal Paper Specification ............... - Page 5 5 Interfaces Signal ........................31 5.1 USB ..........................31 5.2 Cash Drawer ........................32 5.3 Power Port Definition ..................... 33 5.4 Other Optional Interface ....................34 5.4.1 Serial Interface ..................... 34 5.4.2 Parallel Interface ....................36 5.4.3 Ethernet Interface ....................37 5.5 Bluetooth Interface ......................
-
Page 6: Statement
TP801/TP805/TP806 User Manual Statement This manual content would be changed without permission, and Xiamen Hanin Electronic Technology Co., Ltd. reserves the right to make changes without notice in technology, spare parts, hardware and software of the products. If more information is needed about the products, please contact Xiamen Hanin Electronic Technology Co., Ltd. -
Page 7: Important Safety Instructions
TP801/TP805/TP806 User Manual Important Safety Instructions 1. Safety warning Warnings: The print head will become very hot during printing, please do not touch the printhead and peripheral parts during printing and printing just finished. Warning: Please do not touch the printhead and connectors, in case that static damages the printer head. -
Page 8: Overview
1 OVERVIEW 1.1 Introductions TP801/805/806 is a thermal receipt printer with auto-cutter, featured by high print quality, high print speed, high stability, etc. It can be used in commercial POS system, food industry and occasions which need real-time field print receipts. -
Page 9: Getting Started
TP801/TP805/TP806 User Manual 2. GETTING STARTED 2.1 Packing List After receiving your printer, please check for possible shipping damage: 1. Inspect the outside of both the box and the printer for possible damage. 2. Check whether you have received the following accessories together with the printer, if there is any items missing, please contact your local dealer. - Page 10 TP801/TP805/TP806 User Manual ◼ Optional Accessories: USB Cable Serial Cable Parallel Cable ◼ Optional Accessories (Only for TP805/TP806): ◼ Note: 1.The power cord and power adapter vary by local or region. 2.Some customers may require not packing some parts of the standard accessories for special, if...
-
Page 11: Appearance And Components
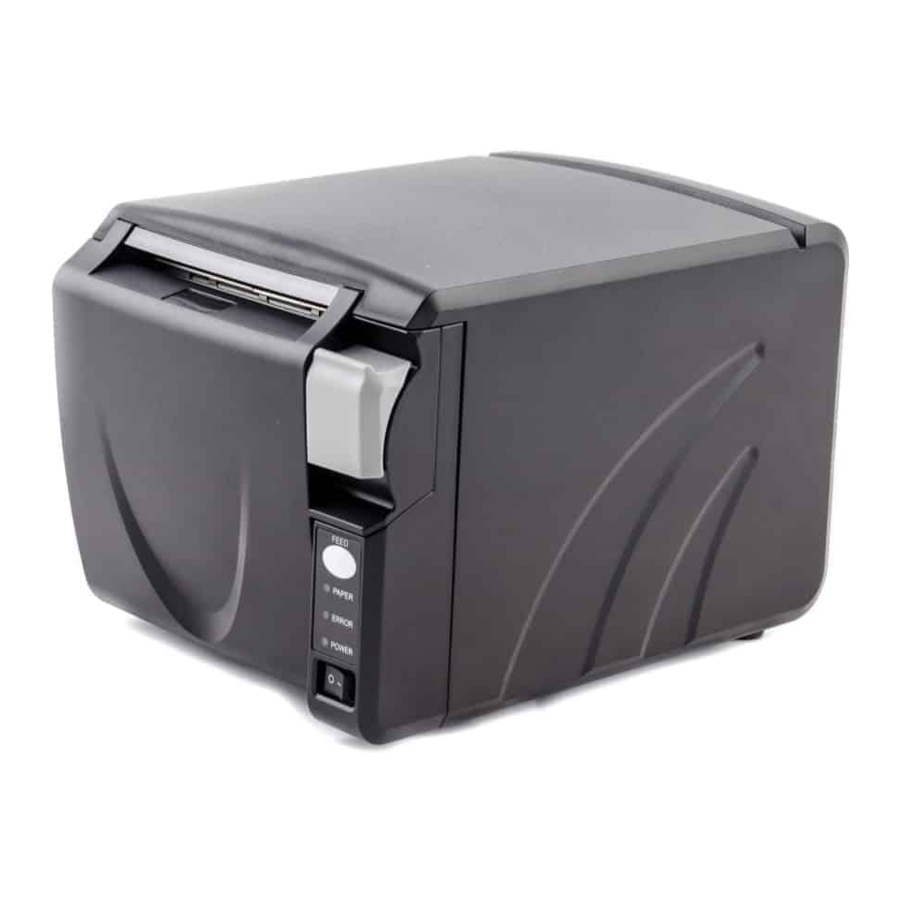
TP801/TP805/TP806 User Manual 2.2 Appearance and Components 2.2.1 TP801... -
Page 12: Tp805
TP801/TP805/TP806 User Manual 2.2.2 TP805... - Page 13 TP801/TP805/TP806 User Manual 2.2.3 TP806...
- Page 14 Please turn off the power immediately. 6) Paper guide In paper storehouse, paper guide can change the position to adapt to different paper width. ①TP801 storehouse has 3 paper guide slots. paper guide slot 1/3 adapt to mm print −...
-
Page 15: Specification
TP801/TP805/TP806 User Manual 3 Specification 3.1 Printer Specification Table 2-1 General Specification (1/2) Model TP801 TP805 TP806 Print Method Direct thermal line printing Resolution 203dpi (8dots/mm) Printing Width 48mm/72mm Printing 200~300mm/s 200~250mm/s 250~300mm/s Print Speed Interface Serial, Parallel, Ethernet, USB, Cash drawer, Bluetooth, Wi-Fi... - Page 16 TP801/TP805/TP806 User Manual...
- Page 17 TP801/TP805/TP806 User Manual Model TP801 TP805 TP806 Support bitmap printing with different density and user defined bitmap Graphics printing. (Max size of each bitmap is 40K, the total size of bitmap is 256k) UPC-A、UPC-E、EAN8、EAN13、CODE39、ITF、CODEBAR、CODE128、 CODE93 Barcode PDF417、QR code Take paper, paper out,...
- Page 18 TP801/TP805/TP806 User Manual Table2-1 General Specification(Continued) (2/2) Model TP801 TP805 TP806 Power LED Green LED Green LED Green LED Paper LED Blue LED Red LED Red LED LED Indicator Error LED Red LED Red LED Red LED Status LED Multicolor LED...
-
Page 19: Media Specification
TP801/TP805/TP806 User Manual 3.2 Media Specification 3.2.1 Continuous Thermal Paper Specification Paper Type :Specified Thermal Paper Paper Width − − Paper Outer Diameter :Max. 83 mm. Roll Paper Core :13mm(Internal Diameter) :18mm(Outer Diameter) :0.065 ~ 0.090mm Paper Thickness Paper Type... -
Page 20: Printing And Cutting Position
TP801/TP805/TP806 User Manual 3.3 Printing and Cutting Position 3.3.1 Printing Position mm Print Paper mm Print Paper... -
Page 21: Cutting Position
TP801/TP805/TP806 User Manual 3.3.2 Cutting Position Figure 3.3.2 Type Paper Cutting Position(L1) TP801 14.5mm TP805 11.8mm TP806 15.4mm... -
Page 22: Installation And Usage
TP801/TP805/TP806 User Manual 4 Installation and Usage 4.1 Unpacking When open the package, check if any items are missing or damaged according to the packing list, if so, contact the local dealer or manufacturer. 4.2 Installation Site and Direction of Printer 1) TP805/TP806 have two ways to install: wall-hanging (optional: wall-hanging carrier) and horizontal installation. -
Page 23: Power Adapter Connection
TP801/TP805/TP806 User Manual 4.3 Power Adapter Connection 1) Make sure the printer's power switch is turned off. 2) Connect the AC adapter to power receptacle. 3) Connect the power cord to AC adapter. 4) Connect the other end of power cord to the outlet. - Page 24 TP801/TP805/TP806 User Manual The plug of power adapter is designed with a switch button type. When it connects power adapter and uttered the voice "click", which means the adapter is locked by the interface switch, otherwise please connect it again.
-
Page 25: Cable Interface Connection
TP801/TP805/TP806 User Manual 4.4 Cable Interface Connection 1) Make sure the printer's power switch is turned off. 2) Put the interface cable into the matched interface and fixed with screws (or spring) on the plug. 3) Connect the other end of the interface cable to the host. -
Page 26: Procedure Of Loading
TP801/TP805/TP806 User Manual 4.6.2 Procedure of Loading 1) Turn off printer. 2) Pressing the open button, open the top cover of TP805\TP806 or front cover of TP801. (Like figure 4.5.1) TP806 TP805 TP801 Figure 4.6.1 3) Put the paper into printer. Pay attention to the direction of the paper. (Like figure 4.6.2) Figure 4.6.2... - Page 27 TP801/TP805/TP806 User Manual Figure 4.6.3 5) Tear the redundant paper. (Like figure 4.6.4) Figure 4.6.4 Notes: ► Adjust the paper guide according to the paper size. ► Make sure the paper inside is at tight status, or it will cause paper or other obstacle.
-
Page 28: Specification Of Led Indicator And Beeper
TP801/TP805/TP806 User Manual 4.7 Specification of LED Indicator and Beeper 4.7.1 Specification of LED Indicator Name Status Specification POWER LED The printer work well (Green) The printer powers off. ERROR LED Flash The printer in an error state (Red) The printer in a normal state... -
Page 29: Multi-Color Status Led
TP801/TP805/TP806 User Manual 4.7.3 Multi-color Status LED STATUS LED Specification Printer power on White Printer is ready and in idle condition Green Wrong status (out of paper, cover open, and so TP801 Paper near end and printer is in normal Purple Printer is busy. -
Page 30: Setting Dip Switch
TP801/TP805/TP806 User Manual 4.8 Setting DIP switch 4.8.1 Serial interface (RS-232C) DIP Switch 1 Switches Functions Default Automatic line feed Enable Disable Handshake XON/XOFF DTR/DSR Bit length 7 bits 8 bits Parity check Parity selection EVEN Baud rate selection Reference form 1... - Page 31 TP801/TP805/TP806 User Manual DIP Switch 2 Switches Functions Default Chinese/English mode English Chinese Internal beeper Disable Enable control Auto cutter Disable Enable Printer off-line Receive buffer Busy conditions Receive buffer full full Printer density Reference form 2 Printing dots quantity...
-
Page 32: Interfaces Of Parallel, Usb, Bluetooth And Ethernet
TP801/TP805/TP806 User Manual 4.8.2 Interfaces of parallel, USB, Bluetooth and Ethernet DIP Switch 1 Switches Function Default Automatic line Enable Disable feed Reserve 1-2~1-8 DIP Switch 2 Switches Functions Default Chinese/English mode English Chinese Internal beeper control Disable Enable Auto cutter... - Page 33 TP801/TP805/TP806 User Manual Form 1—Baud Rate Selection Baud rate Default 2400 4800 9600 19200 9600 38400 57600 115200 Form 2—Print Density Selection Printer Default density 1(diluted) Reserve Reserve Reserve 4(dense) Reserve...
-
Page 34: Auto Cutter Enable/Disable Selection
TP801/TP805/TP806 User Manual 4.8.3 Auto Cutter Enable/Disable Selection DIP Switch setting 2 Auto cutter disable Switch2-3 Auto cutter enable Application program Ignore auto cutter error for continuous printing 4.9 Print Test 4.9.1 Print Self-Test 1. Make sure the printer has been installed roll paper and turn off the top cover. -
Page 35: Hexadecimal Dumping
TP801/TP805/TP806 User Manual 4.10 Hexadecimal Dumping This function allows experienced users to know exactly what data is coming to the printer. This can be useful in finding software problems. When you turn on the hexadecimal dump function, the printer prints all commands and data in hexadecimal format along with a guide section to help you find specific commands. -
Page 36: Interfaces Signal
TP801/TP805/TP806 User Manual 5 Interfaces Signal Printer TP801/TP805/TP806 supports cash drawer interface and many other various communicate interfaces, such as serial interface, parallel interface, USB interface, Ethernet interface bluetooth interface, Wi-Fi interface. The printer has the communication board with the default USB interface and cash drawer interface, and the other communication boards with the Ethernet interface, parallel interface, RS232 interface are optional. -
Page 37: Cash Drawer
TP801/TP805/TP806 User Manual 5.2 Cash Drawer Figure 5.2 PIN NO. Signal Name Drawer 1 DRSW Drawer 2 Electrical characteristics Driving voltage:DC 24 V ⚫ Driving current:maximum 0.8 A ( In 510 ms) ⚫ Drawer check signal:“L” = 0~0.5 V “H” = 3~5 V... -
Page 38: Power Port Definition
TP801/TP805/TP806 User Manual 5.3 Power Port Definition Figure 5.3 PIN NO. Signal Name +24V SHELL Note: ➢ Do not unplug the cable while the printer is power on. ➢ When arranging the line of communication, you have to avoid paralleling with the strong current. -
Page 39: Other Optional Interface
TP801/TP805/TP806 User Manual 5.4 Other Optional Interface 5.4.1 Serial Interface Printer TP805 serial interface is compatible with RS-232 standard, with 9 pin sockets. Figure 5.4.1 a PIN NO. Signal Name... - Page 40 TP801/TP805/TP806 User Manual Printer TP801 and TP806 serial interface are compatible with RS 232 standard, with 25pin socket. User can gain the setting of interface via printing configuration sample. the default setting of serial interface is as follow, 9600bps (baud rates), 8 bits (data bit), 1 bit (stop bit), no parity, support RTS/CTS handshaking protocol.
-
Page 41: Parallel Interface
TP801/TP805/TP806 User Manual 5.4.2 Parallel Interface Parallel interface supports protocol with 36 pin CENTRONICS sockets. Note: H indicates that signal comes from Host computer, P indicates that signal comes from Printer. Figure 5.4.2 Signal Signal Definition Pin No. Source Data latch pulse, latch the data to the printer at the rising edge of the negative pulse... -
Page 42: Ethernet Interface
TP801/TP805/TP806 User Manual 5.4.3 Ethernet Interface Figure 5.4.3 PIN NO. Signal Name... -
Page 43: Bluetooth Interface
TP801/TP805/TP806 User Manual 5.5 Bluetooth Interface 1. Bluetooth Connection: PDA with Bluetooth interface, laptop and other information terminals can drive the mobile thermal printer. Instructions as follows: 1) Power on the printer. 2) Primary device search for outer Bluetooth devices. - Page 44 TP801/TP805/TP806 User Manual 2.Parameter Setting: Item Parameter BT Name BT Printer Svcmask Default: 00D2 ■ON: When you connect Bluetooth, you do not need to enter a password to connect Bluetooth. Simple Pairing ■OFF: When you connect to Bluetooth, you need to enter a password to connect to Bluetooth.
-
Page 45: Troubleshooting
TP801/TP805/TP806 User Manual 6 Troubleshooting Your printer is very reliable, but occasionally problems may occur. This chapter provides information on some common problems you may encounter and how to solve them. If you encounter problems that you can not resolve, contact your dealer for assistance. -
Page 46: Troubles During Printing
TP801/TP805/TP806 User Manual 6.3 Troubles During Printing Problem description Probable reason Solution Coloured stripe in the Paper near end Reinstall the roll paper paper Incorrect roll paper installation Check if the roll paper is installed Unqualified roll paper Use recommended thermal roll paper... -
Page 47: Problems Emerge During The Paper Cutting Processes
TP801/TP805/TP806 User Manual 6.4 Problems Emerge During The Paper Cutting Processes Problem description Probable reason Resolution Cutter abrasion, replace the cutter insufficient cutting Cutter jam, the Worm gear and worm Replace the worm gear and worm wheel movable cutter cannot... -
Page 48: Remove Jammed Paper
TP801/TP805/TP806 User Manual 6.5 Remove Jammed Paper Warning: Do not touch the thermal print head because it becomes very hot after printing. If the top cover (TP805/TP806) can be opened, operate it according to the next steps. 1)Turn off the printer and press open cover button.
Need help?
Do you have a question about the TP801 and is the answer not in the manual?
Questions and answers