Promise Technology Smartstor NS4600 Product Manual
Hide thumbs
Also See for Smartstor NS4600:
- Product manual (370 pages) ,
- Quick start manual (362 pages)
Table of Contents
Advertisement
Advertisement
Table of Contents

Subscribe to Our Youtube Channel
Related Manuals for Promise Technology Smartstor NS4600


Summary of Contents for Promise Technology Smartstor NS4600
- Page 1 MART NS4600 Product Manual Version 1.0...
- Page 2 You should back up all data before installing any drive controller or storage peripheral. Promise Technology is not responsible for any loss of data resulting from the use, disuse or misuse of this or any other Promise Technology product. Notice...
-
Page 3: Table Of Contents
Chapter 2: Installation and Setup ......5 Unpacking the SmartStor NS4600 ......5 Installing Disk Drives . - Page 4 SmartStor NS4600 Product Manual Chapter 3: Connecting to the SmartStor, cont. Connecting a USB Printer to SmartStor .....41 Setting up the Print Server on SmartStor ....42 Setting up Windows Printing .
- Page 5 Contents Chapter 6: SmartNAVI ........75 Working with SmartNAVI .
- Page 6 SmartStor NS4600 Product Manual Chapter 6: SmartNAVI, cont. Managing Backups, cont. Deleting a Scheduled Backup ......93 Restoring Backed-up Files .
- Page 7 Contents Chapter 6: SmartNAVI, cont. Managing Downloads ........109 Adding a Link .
- Page 8 SmartStor NS4600 Product Manual Chapter 7: PASM, cont. Navigating in PASM ........129 Logging out of PASM .
- Page 9 Contents Chapter 7: PASM, cont. Managing File & Print Services, cont. Enabling and Disabling Plug-ins ..... . .143 Enabling Plug-ins .......143 Disabling Plug-ins .
- Page 10 SmartStor NS4600 Product Manual Chapter 7: PASM, cont. Making Management Settings, cont. Deleting an Email Alert Recipient ..... .161 Upgrading the System Firmware ..... .161 Adding Application Plug-ins .
- Page 11 Contents Chapter 9: Troubleshooting .......181 Responding to an Audible Alarm ......181 Checking the System Status LED .
- Page 12 SmartStor NS4600 Product Manual...
-
Page 13: Chapter 1: Introduction To Smartstor
Client OS Support (page 4) • Browser Support (page 4) Promise Technology’s SmartStor NS4600 is a network attached storage (NAS) solution for external storage targeted for small and medium business (SMB) users and small office/home office (SOHO) users. With a NAS product, users can save their work and have access to files over the network without having to carry around a disk drive or memory stick. -
Page 14: Architecture
Architecture The SmartStor NS4600’s architecture is based on the Intel IOP321, 600 MHz microprocessor and the Promise PDC42819 Serial ATA RAID Controller. The Gigabit Ethernet port is used for the data transfer and management. The USB ports are used for a printer, expansion drives, and Uninterruptable Power Supply (UPS). -
Page 15: Specifications
Chapter 1: Introduction to SmartStor Specifications • Disk drive support: • Four 1.5 Gb/s or 3 Gb/s SATA 3.5-inch disk drives • Conforms to Serial ATA 1.0 specification and Serial ATA II: Extensions to Serial ATA 1.0 specification (SATA II, phase I specification) •... -
Page 16: Compatible Backup Software
Dimensions (H x W x D): 188.2 x 152.5 x 229.6 mm (7.4 x 6.0 x 9.0 in) • Weight: 2.5 kg (5.5 lbs) without drives Compatible Backup Software SmartStor NS4600 is compatible with the following backup software products: • Symantec Backup Exec System Recovery Server Edition •... -
Page 17: Chapter 2: Installation And Setup
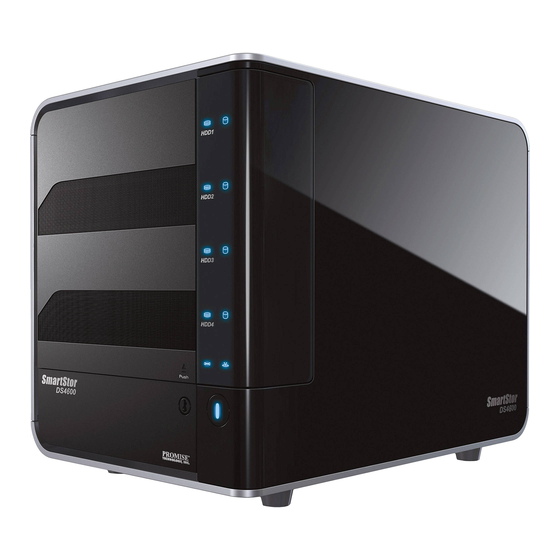
Setting up the SmartStor (page 17) • Connecting to PASM (page 22) • Shutting Down the SmartStor (page 28) Unpacking the SmartStor NS4600 The SmartStor NS4600 box contains the following items: • SmartStor NS4600 Unit • Ethernet cable • Quick Start Guide •... - Page 18 SmartStor NS4600 Product Manual Figure 1. SmartStor NS4600 Front View Disk Drive Drive Carrier Disk Status Disk Activity System Status Front Door Lock Ethernet Activity LED One Touch Backup Button Note: This SmartStor is shown without the front door. Figure 2. SmartStor NS4600 Rear View...
-
Page 19: Installing Disk Drives
Chapter 2: Installation and Setup Installing Disk Drives You can populate the SmartStor NS4600 with SATA 1.5 Gb/s or 3.0 Gb/s disk drives. For optimal performance, install disk drives of the same model and capacity. Your disk drives will become a RAID Volume on the SmartStor. -
Page 20: Connecting To The Network
SmartStor NS4600 Product Manual Insert the screws through the holes in the drive carrier and into the sides of the disk drive. • Install only the counter-sink screws supplied with the SmartStor. • Install four screws per drive. • Snug each screw. Be careful not to over-tighten. -
Page 21: Installation: Windows
Chapter 2: Installation and Setup Installation: Windows To install the SmartNAVI on a Windows PC: Insert the CD into your PC’s CD-ROM. Double-click the SmartNAVI installer icon (right). Click the Next button to begin installation. The License Agreement screen appears. - Page 22 SmartStor NS4600 Product Manual Click the “I accept the terms...” option, then click the Next button. The Choose Destination Location screen appears. Optional. Click the Browse... button to choose a new install location for the software. Click the Next button.
- Page 23 Chapter 2: Installation and Setup Click the Install button to proceed with installation. When the installation is finished, the final installation screen appears. Click to Finish button to close the installer. With the Online Registration box checked, your browser will open and go directly to the Promise product registration website.
-
Page 24: Installation: Macintosh
SmartStor NS4600 Product Manual The installer adds a SmartNAVI icon to the: • Start menu • Application tray SmartNAVI loads automatically every time your Windows OS starts. Installation: Macintosh To install the SmartNAVI on a Macintosh PC: Insert the CD into your PC’s CD-ROM. - Page 25 Chapter 2: Installation and Setup Click the Next button to begin installation. The License Agreement screen appears. Click the “I accept the terms...” option, then click the Next button.
- Page 26 SmartStor NS4600 Product Manual The Pre-Installation Summary screen appears. Click the Install button to begin the installation. The Install Complete screen appears.
- Page 27 Chapter 2: Installation and Setup Click the Next button to continue. The Online Registration screen appears.
- Page 28 SmartStor NS4600 Product Manual Click to Done button to close the installer. With the Online Registration box checked, your browser will open and go directly to the Promise product registration website. Thank you for taking the time to register. The installer adds a SmartNAVI icon to the: •...
-
Page 29: Setting Up The Smartstor
Chapter 2: Installation and Setup Setting up the SmartStor The SmartNAVI performs the setup procedures on your SmartStor. After the procedure is done, you will have a default folder on the SmartStor, set up as a network drive on your PC. You can change the network settings, create RAID SmartNAVI in volumes, add and mount folders on your SmartStor after... - Page 30 SmartStor NS4600 Product Manual Double-click the NS4600 in the NAS list. Type admin in the Username, Password, and Confirm fields, then click the Login button. This action creates a default user and logs the default user into SmartNAVI. The Main Window opens.
- Page 31 Chapter 2: Installation and Setup Choose a Setup Mode and click the button: • One Click Setup – Loads a collection of default settings. Recommended for most users. • Advanced Setup – Enables you to make your own settings. Recommended for advanced users. Click the OK button to continue.
- Page 32 SmartStor NS4600 Product Manual Choose the following values from their respective dropdown menus: • Timezone • Year • Month • • Time in Hours, Minutes, and Seconds 10. Click the Next button to continue. 11. Choose Automatic or Manual RAID Volume creation.
- Page 33 Chapter 2: Installation and Setup You can now copy files to and from the folder on the SmartStor. To access this folder from other PCs, see “Chapter 3: Connecting to the SmartStor” on page 29. To create additional RAID Volumes and folders, see “Chapter 7: PASM” on page 123.
-
Page 34: Connecting To Pasm
SmartStor NS4600 Product Manual Connecting to PASM The Promise Advanced Storage Manager (PASM) software is factory-installed on the SmartStor system. PASM runs in the browser on your PC. You can access PASM: • Directly in your browser. See page 23. -
Page 35: Pasm In Your Browser
Chapter 2: Installation and Setup PASM in your Browser To log into PASM in your browser: Start your Browser. In the Browser address field, type in the IP address of the SmartStor. See “Finding the SmartStor’s IP Address” on page 22. Note that the IP address shown below is only an example. -
Page 36: Pasm In Smartnavi
SmartStor NS4600 Product Manual Type admin in both the User Name and Password fields, then click the Login button. The user name and password are case sensitive. For more information about PASM, see “Chapter 7: PASM” on page 123. PASM in SmartNAVI... - Page 37 Chapter 2: Installation and Setup Your default browser starts and the PASM login screen displays. Type admin in both the User Name and Password fields, then click the Login button. The user name and password are case sensitive. For more information about PASM, see “Chapter 7: PASM” on page 123.
-
Page 38: Pasm In Bonjour
SmartStor NS4600 Product Manual PASM in Bonjour Bonjour is a service discovery protocol for local area networks. To use Bonjour, you must have a Bonjour-capable browser. Method 1 To log into PASM from Bonjour: Start your Browser. Click the Show all bookmarks icon. - Page 39 Chapter 2: Installation and Setup The PASM login screen displays. Type the user name and password in the respective fields, then click the Login button. The default user name is admin. The default password is admin. The user name and password are case sensitive. For more information about PASM, see “Chapter 7: PASM”...
-
Page 40: Shutting Down The Smartstor
SmartStor NS4600 Product Manual Shutting Down the SmartStor To shut down the SmartStor, press and hold the power button for five seconds. The system status LED turns red, then goes dark. Figure 4. Press and hold the Power button for 5 seconds Power Button Figure 5. -
Page 41: Chapter 3: Connecting To The Smartstor
Chapter 3: Connecting to the SmartStor • Setting up a Network Drive on a Windows PC (page 29) • Setting up a Network Drive on a UNIX or Linux PC (page 33) • Setting up a Network Drive on a Macintosh PC (page 37) •... - Page 42 SmartStor NS4600 Product Manual In the Computer name field, type the IP address of the SmartStor and click the Search button. See “Finding the SmartStor’s IP Address” on page 22. The SmartStor appears in the search results list. SmartStor (NS4600)
- Page 43 Chapter 3: Connecting to the SmartStor Right-click the folder you want and choose Map Network Drive from the dropdown menu. The Map Network Drive dialog box appears. In the Map Network Drive dialog box, choose a drive letter and click the Finish button.
- Page 44 SmartStor NS4600 Product Manual The folder on the SmartStor appears under My Computer as a network drive. SmartStor (NS4600) under Network Drives You can now copy files to and from the folder on the SmartStor.
-
Page 45: Setting Up A Network Drive On A Unix Or Linux Pc
Chapter 3: Connecting to the SmartStor Setting up a Network Drive on a UNIX or Linux PC Before you can access the SmartStor from a UNIX or Linux PC, you must configure the SmartStor to communicate with UNIX and Linux. On a Windows or Macintosh PC Setting up UNIX/Linux Service To set up access from a UNIX or Linux PC:... -
Page 46: On The Unix/Linux Pc With Command Line Interface
SmartStor NS4600 Product Manual To set up UNIX/Linux file sharing: In the Tree, click the Sharing Setup icon, then click the UNIX/Linux Sharing tab. Choose a folder from the Folder Name dropdown menu. In the New IP Address field, type the IP address of the UNIX or Linux PC from which you will access this folder, then click the Add button. -
Page 47: On The Linux Pc With Graphic Desktop
Chapter 3: Connecting to the SmartStor On the Linux PC with Graphic Desktop This procedure is for a RedHat Enterprise Linux 4 configuration. If you run a different version of Linux, you might have to adapt the procedure. See your OS documentation. - Page 48 SmartStor NS4600 Product Manual Type the user name and password in the respective fields, then click the OK button. The default user name is admin. The default password is admin. The user name and password are case sensitive. Leave the Domain field blank.
-
Page 49: Setting Up A Network Drive On A Macintosh Pc
Chapter 3: Connecting to the SmartStor Setting up a Network Drive on a Macintosh PC Before you can access the SmartStor from a Macintosh (Mac OS X) PC, you must configure the SmartStor to communicate with the MacOS. In PASM Start PASM. - Page 50 SmartStor NS4600 Product Manual To set up Macintosh file sharing: In the Tree, click the Sharing Setup icon, then click the Windows/ Macintosh/FTP Sharing tab. Check the Macintosh protocol box. Choose a folder from the Folder Name dropdown menu. In the User/Group list, highlight the name of a user or group.
-
Page 51: On The Macintosh Desktop
Chapter 3: Connecting to the SmartStor On the Macintosh Desktop From the Go menu, choose Connect to Server. In the Connect to Server dialog box, type afp://192.168.1.214 and click the Connect button. Note that the IP address shown below is only an example. The IP address you type in the dialog box on your Macintosh will be different. - Page 52 SmartStor NS4600 Product Manual The user name and password are case sensitive. In the NS4600 dialog box, click the folder you want, then click the OK button. In the NS4600 Welcome screen, click the OK button.
-
Page 53: Connecting A Usb Printer To Smartstor
Chapter 3: Connecting to the SmartStor A window opens on the Macintosh desktop to access the folder on the SmartStor. You can now copy files to and from the folder on the SmartStor. Connecting a USB Printer to SmartStor To connect a USB printer to the SmartStor: Set up your printer and install the printer drivers onto your PC as described in the printer’s Setup Guide or User Manual. -
Page 54: Setting Up The Print Server On Smartstor
SmartStor NS4600 Product Manual Setting up the Print Server on SmartStor To set up the SmartStor’s print server: Start PASM. See “PASM in your Browser” on page 23, “PASM in SmartNAVI” on page 24, or “PASM in Bonjour” on page 26. -
Page 55: Setting Up Windows Printing
Chapter 3: Connecting to the SmartStor Setting up Windows Printing If your printer came with automatic configuration software, you might have to complete this procedure first to create a connection path. Then use the configuration software. To set up printing on a Windows PC: On the Windows desktop, double-click the My Network Places icon. - Page 56 SmartStor NS4600 Product Manual When the warning message about printer drivers appears, click the OK button to continue. In the Add Printer Wizard, click the Manufacturer and model name of your USB printer, then click the OK button. To verify printer installation, in the Windows Start menu, choose Settings, then Printers and Faxes.
- Page 57 Chapter 3: Connecting to the SmartStor...
-
Page 58: Setting Up Linux Printing
SmartStor NS4600 Product Manual Setting up Linux Printing This procedure is for a RedHat Enterprise Linux 4 configuration. If you run a different version of Linux, you might have to adapt the procedure. See your OS documentation. From the Applications menu, choose System Settings, then Printing. - Page 59 Chapter 3: Connecting to the SmartStor Highlight USBPTR01 and click the Forward button. The Authentication dialog box opens. In the User name and Password fields, type admin, then click the OK button. The user name and password are case sensitive. The Printer Model dialog box opens.
- Page 60 SmartStor NS4600 Product Manual 10. Click the Finish button. USBPTR01 is added to your printer list.
-
Page 61: Setting Up Macintosh Printing
Chapter 3: Connecting to the SmartStor Setting up Macintosh Printing To set up printing on a Macintosh PC: From the Apple Menu, choose System Preferences. Double-click the Print & Fax icon. Click the Setup Printers button. In the Printer List, click the Add icon. The Printer List displays a new panel. - Page 62 SmartStor NS4600 Product Manual The printer list displays a new panel. Highlight the USBPTR01 in the list. USBPRT01 represents the USB printer connected to the SmartStor. In the Printer Model popup menu, choose the make of your printer. 10. In the Model Name list, choose the model of your printer.
-
Page 63: Connecting A Usb Drive
Chapter 3: Connecting to the SmartStor Connecting a USB Drive To connect a USB drive to the SmartStor, attach the USB cable from your external drive to one of the USB connections on the back of the SmartStor. If you have a USB memory stick, attach it directly to one of the USB connections or use a USB cable, whichever is more convenient. -
Page 64: Windows Pc
SmartStor NS4600 Product Manual Windows PC The USB drive appears as a folder on the SmartStor when you create a network drive on a Windows PC. USB drive connected to the SmartStor Follow the procedure “Setting up a Network Drive on a Windows PC” on page 29, but choose the usbdisk folder instead of the public folder. -
Page 65: Macintosh Pc
Chapter 3: Connecting to the SmartStor Follow the procedure “Setting up a Network Drive on a UNIX or Linux PC” on page 33, but choose the USBDISK folder instead of the PUBLIC folder. Macintosh PC The USB drive appears as a folder on the SmartStor when you create a network drive on a Macintosh PC. -
Page 66: Setting-Up Apple Itunes
SmartStor NS4600 Product Manual Setting-up Apple iTunes The Firefly Media Server plug-in enables SmartStor to be a shared resource in the Apple iTunes user interface. You must perform the setup operation on the PC where you installed SmartNAVI. Downloading the Firefly Plug-in... - Page 67 Chapter 3: Connecting to the SmartStor After a few moments, the plug-in is added. Warning Do not disconnect the power or shut down the SmartStor while the plug-in installation is running! Click the Configure Plugin button. The newly added plug-in appears in the list. Its Service Status is OFF. Click the plug-in to choose it.
-
Page 68: Installing And Configuring Apple Itunes
SmartStor NS4600 Product Manual Note You can also install the Firefly plug-in using PASM. See “Enabling and Disabling Plug-ins” on page 143 and “Adding Application Plug-ins” on page 161. Installing and Configuring Apple iTunes After you have installed the Firefly plug-in, your system is ready to install and configure iTunes. - Page 69 Chapter 3: Connecting to the SmartStor SmartStor...
- Page 70 SmartStor NS4600 Product Manual...
-
Page 71: Chapter 4: One Touch Backup
Chapter 4: One Touch Backup • Enabling One Touch Backup (page 60) • Creating a Backup Schedule (page 62) • Performing a One Touch Backup (page 64) • Viewing Your Backup Files (page 65) • Restoring Backed-up Files (page 67) One Touch Backup enables you to make a quick, automated backup of a selected folder on your PC, at the touch of a button. -
Page 72: Enabling One Touch Backup
SmartStor NS4600 Product Manual Enabling One Touch Backup To enable One Touch Backup on the SmartStor: SmartNAVI in Windows Double-click the SmartNAVI icon in the Windows application tray or Macintosh Dock (right). The MSN Window opens. Click the NS4600 in the NAS list. - Page 73 Chapter 4: One Touch Backup Type admin in both the User Name and Password fields, then click the Login button. The user name and password are case sensitive. In the Tree, click the + beside the Backup icon, then click the Easy Backup icon.
-
Page 74: Creating A Backup Schedule
SmartStor NS4600 Product Manual Creating a Backup Schedule For each folder you want to backup, you must create a backup schedule. To create a Backup Schedule in SmartNAVI: SmartNAVI in Windows Double-click the SmartNAVI icon in the Windows application tray or Macintosh Dock (right). - Page 75 Chapter 4: One Touch Backup Do any of the following actions to select your backup folders: • Check the Backup My Data box – Selects the My Documents, Favorites, and Desktop folders with all their contents. • Click the Add to Backup icon (right) – Opens the My Documents folder.
-
Page 76: Performing A One Touch Backup
SmartStor NS4600 Product Manual Choose the corresponding values from the dropdown menus: • Number of hours • Time of day in hours and minutes • Time of day and day of the week Click the Add button. The newly created schedule appears in the Schedule List. -
Page 77: Viewing Your Backup Files
Chapter 4: One Touch Backup Viewing Your Backup Files To view your backup files on the SmartStor: On the Windows PC desktop, double-click the My Computer icon. Under Network Drives, double-click the SmartStor. On the SmartStor, find the Backup folder. The Backup folder contains the results of the One Touch Backup: •... - Page 78 SmartStor NS4600 Product Manual Backup folder of a USB Disk Backup folder of Backup folder of account name “Billy” account name “admin”...
-
Page 79: Restoring Backed-Up Files
Chapter 4: One Touch Backup Restoring Backed-up Files You can restore all or any portion of the files in the BACKUPDATA_your username folder on the NAS system. You can also choose to restore the files to their original location on your PC or an alternative location. - Page 80 SmartStor NS4600 Product Manual Click the Restore button. Click the folder whose contents you want to restore. Click the arrow icons to expand the tree and narrow your choices. Click an option button for: • Restore to original folder – The backup files will overwrite the files on your PC •...
-
Page 81: Chapter 5: Media Center
Chapter 5: Media Center • Accessing Media Center (page 69) • Picture Files (page 71) • Video Files (page 71) • Music Files (page 71) Media Center enables you to play your picture, video, and music files from the SmartStor and to download those files to your PC. Note that there are two features called Media Center. - Page 82 SmartStor NS4600 Product Manual The browser opening screen displays. Click the Media Center icon. The Media Center login screen displays. Type the user name and password in the respective fields. The default user name is admin. The default password is admin. The user name and password are case sensitive.
-
Page 83: Picture Files
Chapter 5: Media Center Picture Files Click the picture icon to access the files in the SmartStor PICTURE folder. Displaying a Picture File To display a picture, click the picture file icon or the display icon for the picture file. Downloading a Picture File To download a picture, click the download icon for the picture file. -
Page 84: Downloading A Music File
SmartStor NS4600 Product Manual Downloading a Music File To download a music file: Choose and click a music folder by Browse, Artist, Album, or Genre to view your music files. Click the download icon for the music file. Making a New Playlist... -
Page 85: Deleting A Playlist
Chapter 5: Media Center Click the Play All icon to play all of the music files in the Playlist. Deleting a Playlist To delete a Playlist: Click the Playlist folder icon to view your Playlists. Click the delete icon for the Playlist. - Page 86 SmartStor NS4600 Product Manual...
-
Page 87: Chapter 6: Smartnavi
Chapter 6: SmartNAVI • Working with SmartNAVI (page 75) • Managing Users and Groups (page 80) • Managing RAID Volumes (page 86) • Managing Backups (page 89) • Managing Share Folders (page 96) • Making Management Settings (page 100) • Managing Downloads (page 109) •... -
Page 88: Opening The Main Window
SmartStor NS4600 Product Manual The MSN Window lists all SmartStor units on the network by their system name and IP address. Opening the Main Window To open the Main Window, do one of the following SmartNAVI in actions: Windows •... -
Page 89: Choosing A Smartnavi Language
Chapter 6: SmartNAVI Choosing a SmartNAVI Language On Windows PCs, SmartNAVI chooses the display language automatically based on your OS language setting. On Macintosh PCs, you choose the display language. To choose a language: Open the MSN Window. From the dropdown menus, choose Function > Language, then choose the the language you prefer. -
Page 90: Starting The Advanced Storage Manager (Pasm)
SmartStor NS4600 Product Manual Starting the Advanced Storage Manager (PASM) This feature opens Promise Advanced Storage Manager (PASM) in your default browser. See the PASM online help or “Chapter 7: PASM” on page 123 for more information. MSN Window Click the system in the NAS List that you want to open in PASM. -
Page 91: Locking The Smartnavi Window
Chapter 6: SmartNAVI Locking the SmartNAVI Window You can lock the MSN window without closing SmartNAVI. Click the lock icon at the top of the MSN window. The lock icon turns red. Before you can access the MSN window again, you must click the red lock icon and enter your user name and password. -
Page 92: Managing Users And Groups
SmartStor NS4600 Product Manual Managing Users and Groups This category includes the following topics: • Creating a User (page 80) • Creating the Default User (page 81) • Changing User Passwords (page 81) • Changing User Permissions (page 82) •... -
Page 93: Creating The Default User
Chapter 6: SmartNAVI Creating the Default User This feature creates the default user for SmartNAVI. Important If you change to a new default user, the previous default user’s network drives, backup schedules, username, and password information all will be deleted. To create the default user: Go to the MSN Window. -
Page 94: Changing User Permissions
SmartStor NS4600 Product Manual Changing User Permissions The Admin user always has read and write permission. All other users have read- only permission by default. To change permissions: Go to the Main Window. Click the Share Folder icon. Click the Share Folder Permission button. -
Page 95: Viewing A List Of Groups
Chapter 6: SmartNAVI Click the User Management icon. Click the Create New Group button. Type a Group name in the field provided. Up to 16 characters, A-Z, 0-9, and _. No spaces. Optional. Move members to the Selected User list to add them. Or add them later. -
Page 96: Deleting A Group
SmartStor NS4600 Product Manual Click the User Management icon. Click the Modify Group Member button. Click the Group whose membership you want to change. Move members to the Available User list to delete them. Click the OK button. Deleting a Group Before you can delete a Group, you must first delete all of the Members from the Group. - Page 97 Chapter 6: SmartNAVI To set a quota: Go to the Main Window. Click the User Management icon. Click the Quota icon. Click the user or group whose quota you want to assign. From the dropdown menu, choose the RAID Volume to which the quota applies.
-
Page 98: Managing Raid Volumes
SmartStor NS4600 Product Manual Managing RAID Volumes This category includes the following topics: • Creating a RAID Volume (page 86) • Expanding a RAID Volume (page 86) • Viewing RAID Volume Status (page 87) • Viewing a List of RAID Volumes (page 87) •... -
Page 99: Viewing Raid Volume Status
Chapter 6: SmartNAVI The RAID volume can take up to two hours to expand and initialize, depending on the size of your disk drives. Notes Expansion is only available when your NAS system has the proper combination of RAID volume and free disk drives. For additional expansion options or to change the RAID level of your volume, use PASM. -
Page 100: Recreating A Raid Volume
SmartStor NS4600 Product Manual Recreating a RAID Volume Caution When you recreate a RAID volume, you delete all the data saved in the volume. Back up any important data before you recreate a volume. To recreate a RAID volume: Go to the Main Window. -
Page 101: Managing Backups
Chapter 6: SmartNAVI Managing Backups This category includes the following topics: • Doing a Backup Now (page 89) • Scheduling a Backup (page 91) • Viewing Backup Schedules (page 92) • Changing a Scheduled Backup (page 92) • Deleting a Scheduled Backup (page 93) •... -
Page 102: Msn Window
SmartStor NS4600 Product Manual Click the Backup button. The backup begins immediately. MSN Window Before you can do a backup from the SmartNAVI MSN Window, you must create a backup schedule. See “Scheduling a Backup” on page 91. Click the system in the NAS List whose backup you want to run. -
Page 103: Scheduling A Backup
Chapter 6: SmartNAVI Scheduling a Backup You can schedule backups by the hour, day, or week. To set a schedule for backing up files from your PC to the NAS system (SmartStor): Go to the Main Window. Click the SmartSYNC icon. Click the Backup/Schedule –... -
Page 104: Viewing Backup Schedules
SmartStor NS4600 Product Manual The newly created schedule appears in the Schedule List. The backed up files will appear on the NAS in a folder named BACKUPDATA_your username. Viewing Backup Schedules To view the list of current schedules: Go to the Main Window. -
Page 105: Deleting A Scheduled Backup
Chapter 6: SmartNAVI Deleting a Scheduled Backup Deleting a scheduled backup has no effect upon any files previously backed-up to the NAS system (SmartStor). To delete a scheduled backup: Go to the Main Window. Click the SmartSYNC icon. Click the Schedule List button. Click the schedule you want to delete. -
Page 106: Viewing The Backup Event Log
SmartStor NS4600 Product Manual • Type the name of an new folder in the field provided • Click the Folder icon – Opens the My Documents folder. Click a folder you want to use for a target, then click the Open button Click the Restore button. -
Page 107: Clearing The Event Log
Chapter 6: SmartNAVI Click the SmartSYNC icon. Click the Event Log button. Click the Save button. Optional. Change the file name or save to a different location. Click the Save button in the Save dialog box. Clearing the Event Log Note Before you clear the Backup Event Log, consider saving a copy for future reference. -
Page 108: Managing Share Folders
SmartStor NS4600 Product Manual Managing Share Folders This category includes the following topics: • Creating a Share Folder (page 96) • Opening a Share Folder (page 96) • Viewing a List of Share Folders (page 97) • Changing Share Folder Permissions (page 97) •... -
Page 109: Viewing A List Of Share Folders
Chapter 6: SmartNAVI Viewing a List of Share Folders To view a list of Share Folders: Go to the Main Window. Click the Share Folder icon. Double-click the individual share folder to view its contents. Changing Share Folder Permissions The Admin user always has read and write permission. All other users have read- only permission by default. -
Page 110: Mounting A Share Folder / Creating A Network Drive
SmartStor NS4600 Product Manual Click the OK button. Click the Delete button. Click the Yes button in the first confirmation box. Type Yes then click the OK button in the second confirmation box. Mounting a Share Folder / Creating a Network Drive To mount a share folder (Linux) or create a network drive (Windows): Go to the Main Window. - Page 111 Chapter 6: SmartNAVI On SmartNAVI To set up a SmartStor folder for Time Machine backups: Go to the Main Window. Click the Share Folder icon. Click the Mount Share Folder button. Click the share folder you want to use for Time Machine backups. Check the Support TimeMachine box.
-
Page 112: Making Management Settings
SmartStor NS4600 Product Manual Making Management Settings This category includes the following topics: • Configuring a NAS System (page 100) • Changing Network Settings (page 102) • Locating the SmartStor (page 103) • Choosing a Default NAS System (page 103) •... -
Page 113: Advanced Setup
Chapter 6: SmartNAVI Advanced Setup To configure your NAS system using Advanced Setup: Go to the Main Window. Click the Setup Wizard icon. Click the Advanced Setup button. Choose Automatic (DHCP) or Manual network settings. If you chose Manual settings, type entries for each of the following parameters in the fields provided: •... -
Page 114: Changing Network Settings
SmartStor NS4600 Product Manual Note When you create your RAID volume in PASM, you can choose additional options, such as Multiple RAID volumes. See “Setting up SmartStor with the Setup Wizard” on page 130. Changing Network Settings Caution If your NAS system is on a network, check with your Network Administrator before you change the network settings. -
Page 115: Locating The Smartstor
Chapter 6: SmartNAVI Locating the SmartStor This feature helps you to physically locate a NAS system. To locate a SmartStor: Go to the MSN Window. Click the system in the NAS List that you want to locate. Click the Locate NAS icon (right). On the NAS system you chose: System Status LED •... -
Page 116: Disabling Event Notification
SmartStor NS4600 Product Manual Disabling Event Notification To disable event notification: Right-click the SmartNAVI icon in the application tray. Uncheck Event Notice in the popup menu. Viewing the System Event Log NAS events report functions and status of the NAS system. The Event Log displays the 20 most recent events. -
Page 117: Viewing A List Of Plug-Ins
Chapter 6: SmartNAVI Click the Add Plugin button. Do one of the following actions: • Type the name of the plug-in file • Click the folder icon, navigate to the plug-in file, click it, then click the Open button Click the OK button. After a few moments, the plug-in is added. -
Page 118: Enabling And Disabling Plug-Ins
SmartStor NS4600 Product Manual Enabling and Disabling Plug-ins Enabling Plug-ins You must add a plug-in to SmartStor before you can use this function. To enable a plug-in: Go to the Main Window. Click the NAS Management icon. Click the Configuration Plugin button. -
Page 119: Rebooting The Smartstor
Chapter 6: SmartNAVI Click the Configuration Plugin button. Click the Plug-in you want to remove. The plug-in’s name turns red. Click the Remove button. Click the Yes button in the confirmation box. The plug-in is removed from SmartNAVI. If you need the plug-in later, you can reinstall it. See “Adding Application Plug-ins”... -
Page 120: Directly
SmartStor NS4600 Product Manual Click the Shutdown button. Click the Shutdown option. Click the OK button. In the confirmation box, click the Close button. Power Button Directly To shut down the SmartStor, press and hold the power button on the back of the SmartStor enclosure for five seconds (top, right. -
Page 121: Managing Downloads
Chapter 6: SmartNAVI Managing Downloads This category includes the following topics: • Adding a Link (page 109) • Drag and Drop Files (page 110) • Batch Downloading Files (page 110) • Viewing the Download List (page 111) • Removing a Link (page 111) •... -
Page 122: Drag And Drop Files
SmartStor NS4600 Product Manual The Torrent files are added to the Download List and begin to download automatically. The Torrent files are saved to the download folder on the NAS system. Drag and Drop Files Drag and drop supports HTTP, FTP, and Torrent files. The process includes two actions: •... -
Page 123: Viewing The Download List
Chapter 6: SmartNAVI To add a series of sequential download links: Go to the Main Window. Click the Download Station icon. Click the Batch button. A dialog box appears. In the field provided, type the URL of the file server. Then type a slash (/) and the file name with an asterisk (*). -
Page 124: Pausing And Resuming A Download
SmartStor NS4600 Product Manual Pausing and Resuming a Download Pausing a Download To pause a Torrent file download: Go to the Main Window. Click the Download Station icon. Click the Download List button. Click the link of the file download you want to pause. -
Page 125: Deleting A Downloaded File
Chapter 6: SmartNAVI Click the Open button. Deleting a Downloaded File Caution The feature deletes Torrent files from the download folder on the NAS system. To delete a downloaded Torrent file: Go to the Main Window. Click the Download Station icon. Click the Downloaded List button. -
Page 126: Using Media Center
SmartStor NS4600 Product Manual Using Media Center Media Center contains the Media Library, which enables you to organize and play your music and video files that are saved on the NAS system. Note that there are two features called Media Center. This section deals with Media Center in SmartNAVI. -
Page 127: Playing A Playlist
Chapter 6: SmartNAVI Type a name for the playlist in the highlighted box and press Enter. Click and drag files from the folder list to the Playlist icon. The playlist is stored in the DLNA database on the NAS system. Playing a Playlist To play a Playlist: Go to the Main Window. -
Page 128: Deleting A Playlist
SmartStor NS4600 Product Manual Type a name for the playlist in the highlighted box and press Enter. Deleting a Playlist This function requires a LAN connection to the NAS system. To delete a Playlist: Go to the Main Window. Click the Media Center icon. - Page 129 Chapter 6: SmartNAVI Right-click on the file you want to play and choose Play from the dropdown menu.
-
Page 130: Managing Photo Albums
SmartStor NS4600 Product Manual Managing Photo Albums This category includes the following topics: • Making an Album (page 118) • Viewing an Album (page 120) • Editing an Album (page 120) • Deleting an Album (page 121) Making an Album An album is a collection of photo files that you can browse by means of Adobe Flash®... -
Page 131: Part 2: Exporting Or Uploading Your Album
Chapter 6: SmartNAVI • To delete a photo, click the photo, then click the delete icon. When you finish your selection of photos, click the Next button. The Album Style Setting screen appears. Type a title for your album in the Title field. Or accept the default title. -
Page 132: Viewing An Album
SmartStor NS4600 Product Manual Viewing an Album To view an album: Go to the Main Window. Click the Photo Album icon. Click the Manage Album button. The Manage Album screen appears. Choose the location, year, and month in the dropdown menus. -
Page 133: Deleting An Album
Chapter 6: SmartNAVI Click the album you want to edit and click the Edit button. The Make Album screen appears. To continue, go to “Making an Album” on page 118. Deleting an Album Caution Deleting an album deletes all of the photo files saved in the album itself. - Page 134 SmartStor NS4600 Product Manual...
-
Page 135: Chapter 7: Pasm
Chapter 7: PASM • Connecting to PASM (below) • Choosing a Language (page 129) • Navigating in PASM (page 129) • Logging out of PASM (page 129) • Setting up SmartStor with the Setup Wizard (page 130) • Managing Users and Groups (page 132) •... - Page 136 SmartStor NS4600 Product Manual Click the WebPASM icon. The PASM login screen displays. Type the user name and password in the respective fields, then click the Login button. The default user name is admin. The default password is admin. The user name and password are case sensitive.
-
Page 137: Pasm In Smartnavi
Chapter 7: PASM PASM in SmartNAVI To log into PASM from SmartNAVI: SmartNAVI in Windows Double-click the SmartNAVI icon in the Windows application tray or Macintosh Dock (right). The MSN Window opens. Click the NS4600 in the NAS list. Click the WWW icon to start the browser and open PASM. - Page 138 SmartStor NS4600 Product Manual Type the user name and password in the respective fields, then click the Login button. The default user name is admin. The default password is admin. The user name and password are case sensitive.
-
Page 139: Pasm In Bonjour
Chapter 7: PASM PASM in Bonjour Bonjour is a service discovery protocol for local area networks. To use Bonjour, you must have a Bonjour-capable browser. Method 1 To log into PASM from Bonjour: Start your Browser. Click the Show all bookmarks icon. The Collections list appears. - Page 140 SmartStor NS4600 Product Manual The PASM login screen displays. Type the user name and password in the respective fields, then click the Login button. The default user name is admin. The default password is admin. The user name and password are case sensitive.
-
Page 141: Choosing A Language
Chapter 7: PASM Choosing a Language To choose a language, click the Language menu in the PASM Header and choose the language you prefer. Navigating in PASM The Tree is the primary navigation tool in PASM. Categories of functions listed with a + sign before the icon. -
Page 142: Setting Up Smartstor With The Setup Wizard
SmartStor NS4600 Product Manual Setting up SmartStor with the Setup Wizard If you used the SmartNAVI Setup Wizard to set up your SmartStor, you do not need to run the Setup Wizard in PASM. If you have not yet set up your SmartStor: In the Tree, click the + beside the Wizard icon, then on the Setup Wizard icon to display the Setup Wizard screen. -
Page 143: Step 3 Screen
Chapter 7: PASM Step 3 Screen Check the Enable box to the right of the services you plan to use. • Windows – Enables file access from Windows PCs. Also required to use the SmartStor as a print server. • Unix/Linux –... -
Page 144: Managing Users And Groups
SmartStor NS4600 Product Manual Managing Users and Groups This category includes the following topics: • Viewing a List of Users (page 132) • Creating a User (page 132) • Changing the Administrator’s Password (page 132) • Changing a User's Password (page 133) •... -
Page 145: Changing A User's Password
Chapter 7: PASM Click the User Management icon. Click the Change Password tab. Type a new password into the fields provided. Click the OK button. In the confirmation box, click the OK button. If you forget your new password, you reset the SmartStor to the default Administrator’s password. -
Page 146: Creating A Group
SmartStor NS4600 Product Manual Creating a Group Groups are composed of users. You can assign permissions to a group, the same as you would do with individual users. You can create up to 256 groups. To create a group: In the Tree, click the + beside the Users & Groups icon. -
Page 147: Deleting A Group
Chapter 7: PASM Deleting a Group You must remove all members from the group before you can delete the group. See “Removing Members from a Group” on page 134. To delete a group: In the Tree, click the + beside the Users & Groups icon. Click the Group Management icon. - Page 148 SmartStor NS4600 Product Manual From the dropdown menu, choose the RAID Volume to which the quota applies. Click one of the following options: • Unlimited • Limited Quota If you chose Limited Quota, type a number into the field provided.
-
Page 149: Managing File & Print Services
Chapter 7: PASM Managing File & Print Services This category includes the following topics: • Setting up Windows Access (page 137) • Setting up UNIX/Linux Access (page 139) • Setting up Macintosh Access (page 140) • Setting up FTP Access (page 141) •... -
Page 150: Setting Up File Sharing
SmartStor NS4600 Product Manual Optional. If you chose an AD Domain, enter the following in the fields provided: • Domain Name • Domain Controller • Administrator Name • Administrator Password See your Network Administrator for help with this information. Optional. If you chose an Workgroup, enter the Workgroup name into the field provided: See your Network Administrator for help with this information. -
Page 151: Setting Up Unix/Linux Access
Chapter 7: PASM Setting up UNIX/Linux Access Setting up UNIX/Linux Service To set up access from a UNIX or Linux PC: In the Tree, click the + beside the File & Print icon to expand the Tree. Click the Protocol Control icon, then click the UNIX/Linux tab. Click the Enable option button. -
Page 152: Setting Up Macintosh Access
SmartStor NS4600 Product Manual Setting up Macintosh Access Setting up Macintosh Service To set up access from a Macintosh PC: In the Tree, click the + beside the File & Print icon. Click the Protocol Control icon, then click the Macintosh tab. -
Page 153: Setting Up Ftp Access
Chapter 7: PASM Setting up FTP Access Setting up FTP Service To set up FTP access for your folders: In the Tree, click the + beside the File & Print icon to expand the Tree. Click the Protocol Control icon, then click the FTP Sharing tab. Click the Enable option button. -
Page 154: Setting Up Your Print Server
SmartStor NS4600 Product Manual • Read and Write – Default Click the OK button to save your settings. In the confirmation box, click the OK button. You can now access the specified folder from your PC using FTP. Setting up your Print Server... -
Page 155: Viewing A List Of Plug-Ins
Chapter 7: PASM • Movie – avi, mpg, mpeg, wmv, tts, vob Viewing a List of Plug-ins To view a list of installed plug-ins: In the Tree, click the + beside the File & Print icon to expand the Tree. Click the Protocol Control icon. -
Page 156: Viewing A List Of Folders
SmartStor NS4600 Product Manual Viewing a List of Folders A folder is the entity that appears as a Network Drive on your PC. To view the list of folders: In the Tree, click the + beside the File & Print icon. -
Page 157: Deleting A Folder
Chapter 7: PASM In the Folder Name field, type a name for your new folder. Check the boxes beside the services you want to use. Click the OK button. In the confirmation box, click the OK button. To access the new folder from a Windows PC, see “Setting up Folder Sharing: Windows, Macintosh, FTP”... -
Page 158: Setting Up Folder Sharing: Unix And Linux
SmartStor NS4600 Product Manual Check the boxes for the protocols you want for this folder: • Windows • Macintosh • In the Permission list, click the option button for one of the following permissions for each group and user: •... -
Page 159: Managing Raid Volumes
Chapter 7: PASM Managing RAID Volumes This category includes the following topics: • Viewing RAID Volume Status (page 147) • Viewing Disk Drive Information (page 148) • Creating a RAID Volume (page 148) • Designating a Spare Drive (page 149) •... -
Page 160: Viewing Disk Drive Information
SmartStor NS4600 Product Manual Viewing Disk Drive Information To view information about a disk drive: In the Tree, click the + beside the RAID & File System icon. Click the RAID Management icon. The RAID Status tab displays the current RAID system and its status. -
Page 161: Designating A Spare Drive
Chapter 7: PASM Designating a Spare Drive If you have an unassigned disk drive, you can assign it as a spare drive. For more information, see “Spare Drive” on page 177 and “Automatic Rebuilding” on page 178. To assign a spare drive: In the Tree, click the + beside the RAID &... -
Page 162: Deleting A Raid Volume
SmartStor NS4600 Product Manual Deleting a RAID Volume Caution When you delete a RAID Volume, you delete all the folders in the RAID volume and all the data saved in the folders. Back up any important data before you delete a RAID Volume. -
Page 163: Viewing An External Usb Drive Or Memory Stick
Chapter 7: PASM Viewing an External USB Drive or Memory Stick To view a USB drive or memory stick attached to the SmartStor: In the Tree, click the + beside the RAID & File System icon. Click the RAID Management icon. The USB drive or memory stick appears as a USB External Disk Click the File System Management icon. -
Page 164: Managing Backups
SmartStor NS4600 Product Manual Managing Backups This category includes the following topics: • Viewing a List of Snapshot Backups (page 152) • Setting up a Snapshot Backup (page 152) • Scheduling a Snapshot Backup (page 153) • Recovering Snapshot Backups (page 153) •... -
Page 165: Scheduling A Snapshot Backup
Chapter 7: PASM Scheduling a Snapshot Backup To schedule a Snapshot Backup: In the Tree, click the + beside the Backup icon. Click the Snapshot Backup icon. Click the Schedule tab. Click the option you want from the Schedule Type list. •... -
Page 166: Viewing The Nas Replication Schedule
SmartStor NS4600 Product Manual Viewing the NAS Replication Schedule NAS Replication is a feature that uses one SmartStor to backup the data on another SmartStor. The two SmartStor systems must be on the same network. To view the NAS Replication schedule: In the Tree, click the + beside the Backup icon. -
Page 167: Enabling One Touch Backup
Chapter 7: PASM • Time interval by hour – Set an hourly interval for NAS Replications to happen. • Daily – Sets the time of day when the NAS Replications happen. • Weekly – Sets the time of day and day of the week when the NAS Replications happen. -
Page 168: Managing The Network Connection
SmartStor NS4600 Product Manual Managing the Network Connection This category includes the following topics: • Viewing Network Setup Information (page 156) • Making Network Settings (page 156) • Working with Jumbo Frames (page 157) • Working with DDNS (page 157) -
Page 169: Working With Jumbo Frames
Chapter 7: PASM • Primary Domain Name Server IP Address • Secondary Domain Name Server IP Address See your Network Administrator for help in making these settings. Click the OK button. 10. In the confirmation box, click the OK button. Working with Jumbo Frames The term jumbo frame refers to a frame on a local area network that is larger than the standard 1518 byte size. -
Page 170: Making Ddns Settings
SmartStor NS4600 Product Manual Making DDNS Settings PASM requires the DDNS domain name, user name, and password to work with the DDNS server. See your Network Administrator or the online DDNS service for this information. To make DDNS settings: In the Tree, click the + beside the Network icon. -
Page 171: Making Management Settings
Chapter 7: PASM Making Management Settings This category includes the following topics: • Viewing the Event Log (page 159) • Setting up SMTP Authentication (page 159) • Sending a Test Message (page 160) • Viewing the Email Alert List (page 160) •... -
Page 172: Sending A Test Message
SmartStor NS4600 Product Manual In the SMTP Server field, type the IP address or the DNS name of your SMTP server. Optional. Type a new number in the Command Port field. 25 is the default number. In the From field, the sender’s email address that you want to appear in the alert messages. -
Page 173: Adding An Email Alert Recipient
Chapter 7: PASM Adding an Email Alert Recipient You can have up to 32 Email Alert recipients. To add an Email Alert recipient: In the Tree, click the + beside the Management icon. Click the Mail Alert icon. Click the Add tab. In the E-Mail Address field, type the recipient’s email address. -
Page 174: Removing Plug-Ins
SmartStor NS4600 Product Manual To add a plug-in to SmartStor: In the Tree, click the + beside the Management icon. Click the System Upgrade icon, then click the Application Plug-in tab. From the Volume dropdown menu, choose the Volume that has the folder with the plug-in file. -
Page 175: Viewing Ups Status
Chapter 7: PASM To disable the buzzer: In the Tree, click the + beside the Management icon. Click the Buzzer icon. Click the Disable option button. Click the OK button. In the confirmation box, click the OK button. Click the Enable option button, then click the OK button to enable the buzzer, then click the OK button in the confirmation box. -
Page 176: Setting Up System Standby
SmartStor NS4600 Product Manual Setting up System Standby This feature enables the SmartStor to shut down the disk drives in order to save power. You choose the interval of inactivity on the SmartStor after which the drives are powered down. System standby is disabled by default. -
Page 177: Managing The System
Chapter 7: PASM Managing the System This category includes the following topics: • Setting System Date and Time (page 165) • Adjusting for Daylight Saving Time (page 165) • Running the Network Time Protocol (page 166) • Viewing the Results of NTP Synchronization (page 166) •... -
Page 178: Running The Network Time Protocol
SmartStor NS4600 Product Manual Running the Network Time Protocol You can use the Network Time Protocol (NTP) to set the system date and time on your SmartStor to synchronize itself with an external Time Server. To run the Network Time Protocol: In the Tree, click the + beside the System icon. -
Page 179: Rebooting The Smartstor
Chapter 7: PASM Rebooting the SmartStor Normally you will only need to reboot the SmartStor is after a firmware upgrade or a plug-in installation. See “Upgrading the Firmware” on page 213. During the reboot, none of your folders will be accessible from your networked PCs. To reboot the SmartStor: In the Tree, click the + beside the System icon. -
Page 180: Restarting The Smartstor
SmartStor NS4600 Product Manual Restarting the SmartStor Power Button To restart the SmartStor after a shutdown, press the power button on the front of the SmartStor chassis (right). When the SmartStor is fully booted: • The system status LED turns blue (right) •... -
Page 181: Viewing Enclosure Information
Chapter 7: PASM Viewing Enclosure Information To view enclosure information: In the Tree, click the + beside the System icon. Click the System Information icon. Click the Enclosure Information tab. Enclosure Information includes: • CPU temperature • System Fan Speed •... - Page 182 SmartStor NS4600 Product Manual...
-
Page 183: Chapter 8: Technology Background
Chapter 8: Technology Background • Introduction to RAID (below) • Choosing a RAID Level (page 176) • Spare Drive (page 177) • Automatic Rebuilding (page 178) • Partition and Format (page 178) • RAID Volume Migration (page 179) Introduction to RAID RAID (Redundant Array of Independent Disks) allows multiple disk drives to be combined together into a RAID Volume. -
Page 184: Raid 0 - Stripe
SmartStor NS4600 Product Manual RAID 0 – Stripe When a RAID Volume is striped, the read and write blocks of data are interleaved between the sectors of multiple disk drives. Performance is increased, since the workload is balanced between drives or “members” that form the RAID Volume. -
Page 185: Raid 1 - Mirror
Chapter 8: Technology Background RAID 1 – Mirror When a RAID Volume is mirrored, identical data is written to a pair of disk drives, while reads are performed in parallel. The reads are performed using elevator seek and load balancing techniques where the workload is distributed in the most efficient manner. -
Page 186: Raid 5 - Block Striping With Distributed Parity
SmartStor NS4600 Product Manual RAID 5 – Block Striping with Distributed Parity RAID 5 organizes block data and parity data across the disk drives. Generally, RAID level 5 tends to exhibit lower random write performance due to the heavy workload of parity recalculation for each I/O. RAID 5 works well for file, database, application and web servers. -
Page 187: Raid 10 - Mirror / Stripe
Chapter 8: Technology Background RAID 10 – Mirror / Stripe Mirror/Stripe combines both of the RAID 0 and RAID 1 types. RAID 10 can increase performance by reading and writing data in parallel while protecting data with duplication. At least four disk drives are needed for RAID 10 to be installed. With a four-disk-drive RAID Volume, one drive pair is mirrored together then striped over a second drive pair. -
Page 188: Choosing A Raid Level
SmartStor NS4600 Product Manual Choosing a RAID Level There are several issues to consider when choosing the RAID level for your Volume. The following discussion summarizes some advantages, disadvantages and applications for each choice. RAID 0 Advantages Disadvantages Implements a striped disk RAID... -
Page 189: Raid 5
Chapter 8: Technology Background RAID 5 Advantages Disadvantages High Read data transaction rate Disk failure has a medium impact on throughput Medium Write data transaction rate Good aggregate transfer rate Most versatile RAID level Recommended applications for RAID 5: • File and Application servers •... -
Page 190: Automatic Rebuilding
SmartStor NS4600 Product Manual You must designate a disk drive as a Spare. By default, and unassigned disk drive is Free. Use PASM to designate the Free disk drive as a Spare. See Maintaining a spare drive is a good precaution to protect your RAID Volume integrity in the event of disk drive failure. -
Page 191: Raid Volume Migration
Chapter 8: Technology Background RAID Volume Migration Migration is the process of: • Changing the RAID level • Adding disk drives but keeping the same RAID level In the migration process, the existing RAID Volume is called the Source. The proposed RAID Volume is called the Target. - Page 192 SmartStor NS4600 Product Manual RAID 5 A RAID 5 source Volume can only add a drive. Target Requirements RAID 5 Add a disk drive. RAID 10 A RAID 10 source Volume cannot migrate or add more disk drives.
-
Page 193: Chapter 9: Troubleshooting
Chapter 9: Troubleshooting • Responding to an Audible Alarm (page 181) • Checking the System Status LED (page 182) • Checking Disk Status LEDs (page 182) • Replacing a Failed Disk Drive (page 183) • Checking RAID Volume Status in PASM (page 184) •... -
Page 194: Checking The System Status Led
SmartStor NS4600 Product Manual Checking the System Status LED The SmartStor system status LED (see Figure 1.) reports the condition of the Enclosure fan and power supply: • Blue – Normal Enclosure function • Amber – There is a problem with the fan or power supply •... -
Page 195: Replacing A Failed Disk Drive
Chapter 9: Troubleshooting Figure 1. SmartStor Disk and System Status LEDs Disk Status Disk Activity System Status Replacing a Failed Disk Drive If a disk drive fails, the Disk Status LED is red. See Figure 1. If the disk drive belongs to a RAID Volume, the Volume goes Critical or Offline. -
Page 196: Checking Raid Volume Status In Pasm
SmartStor NS4600 Product Manual Checking RAID Volume Status in PASM To view RAID Volume status: Start PASM. See “PASM in your Browser” on page 123. Or see “PASM in SmartNAVI” on page 125. Or see “PASM in Bonjour” on page 127. -
Page 197: Responding To An Invalid Raid Volume
Chapter 9: Troubleshooting • When you replace the failed disk drive with a new disk drive, the new disk drive becomes a Free Drive. Responding to an Invalid RAID Volume The SmartStor considers a RAID Volume invalid when the RAID Volume was created by a different SmartStor. -
Page 198: Checking File System Status In Pasm
SmartStor NS4600 Product Manual Important Running the Recover function might erase some or all of your SmartStor settings. If that condition happens, run the NAS Setup Wizard. See “Setting up the SmartStor” on page 17. Checking File System Status in PASM Typically the first indication of a problem with the SmartStor’s file system is when... -
Page 199: Checking The Event Log In Pasm
Chapter 9: Troubleshooting In the confirmation box, type yes into the field provided, then click the OK button. During the File System Check or Rebuild, the System Status LED blinks amber and the Disk Activity LEDs blink blue. See page 183, Figure 1. The time needed to check and rebuild the File System depends on the amount of data on the SmartStor. -
Page 200: Responding To Events
SmartStor NS4600 Product Manual Figure 4. The PASM Event Log Check the Event Log for reports of disk drive failure or other problems. Responding to Events All events are reported in the Event Log. Most events are simply reports that the SmartStor is responding to your commands. - Page 201 Chapter 9: Troubleshooting Reported Event Corrective Action File system capacity Reduce the number or size of the files or expand the usage of volume X is over volume size. See “Migrating a RAID Volume” on 90%. page 149. File system capacity usage of volume X is 100%.
- Page 202 SmartStor NS4600 Product Manual Reported Event Corrective Action System was shut down The SmartStor shut down incorrectly the last time. abnormally. See “Shutting Down the SmartStor” on page 167. CPU temperature is Allow the SmartStor to cool for several minutes. Then higher than 58°C/138°F.
-
Page 203: Checking Enclosure Status In Pasm
Chapter 9: Troubleshooting Reported Event Corrective Action Migration or Rebuilding RAID Volume Migration or Rebuild was paused on array X paused at Y%. temporarily by user action. Migration or Rebuilding RAID Volume Migration or Rebuild was paused and on array X resumed at then resumed by user action. -
Page 204: Solving Network Connection Problems
SmartStor NS4600 Product Manual Figure 5. The Enclosure Information tab with malfunctions shown Overheat icon Failed fan icon Out-of-spec power icon The corrective action you take depends on the nature of the problem: • If CPU temperature is above specification: •... - Page 205 Chapter 9: Troubleshooting Network service connections generally do not have LEDs to verify whether they actually are connected to the network. See your Network Administrator for assistance. • Be sure the network cable is firmly attached to the SmartStor network connector at one end and to the network switch, hub, or facility network connection at the other.
-
Page 206: Verifying Connections With Smartnavi
SmartStor NS4600 Product Manual • Be sure that SmartNAVI is looking on the same network where you connected the SmartStor. • If you are running a personal firewall on your Windows PC, the firewall might prevent you from accessing folders on the SmartStor. You must do one of the following actions: •... -
Page 207: Smartstor Lockup
Chapter 9: Troubleshooting SmartStor Lockup On rare occasions, SmartNAVI or PASM become unresponsive to your inputs. If that happens, check the SmartNAVI MSN window on your PC. See Figure 7. Figure 7. SmartNAVI MSN window The SmartStor appears here when it is working properly If the SmartStor used to appear in the MSN window previously but is no longer there, the SmartStor is probably locked up or frozen and requires a hard reboot. - Page 208 SmartStor NS4600 Product Manual Figure 8. SmartStor front and back views Disk Activity LED System Status LED Power Button Power Connection Disconnect the power cable from the SmartStor. Wait 10 seconds, then reconnect the power cable. Press the Power button.
-
Page 209: Checking Your Email Inbox
Chapter 9: Troubleshooting Checking Your Email Inbox If you enabled Mail Alert in PASM, the SmartStor will send you an email message when a problem arises. Look for a message from “root.” Figure 9. Email message from the SmartStor. See “Adding an Email Alert Recipient” on page 161 for more information about email alerts. -
Page 210: Resolving A Windows Firewall Issue
SmartStor NS4600 Product Manual Figure 10.Reset button and System Status LED Reset button System Status LED Resolving a Windows Firewall Issue If you a running a personal firewall on your Windows PC, the firewall might prevent the you from accessing the SmartStor over your network. - Page 211 Chapter 9: Troubleshooting Click the Settings button. The Windows Firewall dialog box opens. Click the Advanced tab. Under Network Connection Setting, click the Settings button. The Advanced Settings dialog box opens. Click the Add button. The Service Settings dialog box opens. In the Description of service field, type Promise NAS utility.
- Page 212 SmartStor NS4600 Product Manual...
-
Page 213: Chapter 10: Support
Chapter 10: Support • Frequently Asked Questions (below) • Contacting Technical Support (page 205) • Limited Warranty (page 208) • Returning Product For Repair (page 210) Frequently Asked Questions Also see “Chapter 9: Troubleshooting” on page 181. The SmartStor worked OK until I turned it off. When I turned it on again, my Windows network drive connection no longer works. - Page 214 SmartStor NS4600N Product Manual I tried to connect my SmartStor as a network drive using SmartSYNC, but Windows displayed an error message. There might be an IP address conflict between the SmartStor and another device on your network. See your Network Administrator for assistance. I cannot log into the SmartStor with through the AD Domain.
- Page 215 Chapter 10: Support Can I do a One Touch Backup or a regular Backup on a protected folder or file on my Windows PC? No. Windows does not allow SmartSYNC to access protected folders and files. If you want to perform a backup, you must first disable protection on your folders and files.
- Page 216 SmartStor NS4600N Product Manual I created a share folder and gave it the same name as a local user. This action caused a conflict. The system does not check share folder names against user names, therefore it is possible to create two folders with the same name. If this happens, delete the share folder, so that only the user’s home folder remains.
-
Page 217: Contacting Technical Support
(technical documents, drivers, utilities, etc.) United States E-mail Support e-Support On-Line Fax Support (408) 228-1100 Attn: Technical Support Phone Support (408) 228-1400 option 4 If you wish to write us for Promise Technology, Inc. support: 580 Cottonwood Drive Milpitas, CA 95035, USA... -
Page 218: The Netherlands
Fax Support +31 (0) 40 256 9463 Attn: Technical Support Phone Support +31 (0) 40 235 2600 If you wish to write us for Promise Technology Europe B.V. support: Science Park Eindhoven 5542 5692 EL Son, The Netherlands Germany E-mail Support... - Page 219 +86 10 8857 8015 Attn: Technical Support Phone Support +86 10 8857 8085 or 8095 If you wish to write us for Promise Technology China – Beijing support: Room 1205, Tower C Webok Time Center, No.17 South Zhong Guan Cun Street Hai Dian District, Beijing 100081, China China –...
-
Page 220: Limited Warranty
SmartStor NS4600N Product Manual Limited Warranty Promise Technology, Inc. (“Promise”) warrants that this product, from the time of the delivery of the product to the original end user: all components for a period of two (2) years; will conform to Promise’s specifications;... -
Page 221: Your Responsibilities
Chapter 10: Support No other document, statement or representation may be relied on to vary the terms of this limited warranty. Promise’s sole responsibility with respect to any product is to do one of the following: replace the product with a conforming unit of the same or superior product;... -
Page 222: Returning Product For Repair
Return ONLY the specific product covered by the warranty (do not ship cables, manuals, diskettes, etc.), with a copy of your proof of purchase to: USA and Canada: Promise Technology, Inc. Customer Service Dept. Attn.: RMA # ______ 47654 Kato Road... - Page 223 Chapter 10: Support You are responsible for the cost of insurance and shipment of the product to Promise. Note that damage incurred due to improper transport or packaging is not covered under the Limited Warranty. When repairing returned product(s), Promise may replace defective parts with new or reconditioned parts, or replace the entire unit with a new or reconditioned unit.
- Page 224 SmartStor NS4600N Product Manual...
-
Page 225: Appendix A: Maintenance
Appendix A: Maintenance • Upgrading the Firmware (below) • Connection Problems After Restart (page 216) Upgrading the Firmware Follow this procedure to upgrade the firmware on your SmartStor. Downloading the Firmware Upgrade File To download the upgrade file: Point your browser to http://www.promise.com/support/support_eng.asp. Download the NS4600 firmware upgrade file to your PC. -
Page 226: Booting The Smartstor In Safe Mode
SmartStor NS4600 Product Manual Error During Upgrade If an error occurs during the firmware upgrade, the SmartStor cannot reboot in mormal mode. You must boot the SmartStor in Safe Mode and repeat the firmware installation. See “Booting the SmartStor in Safe Mode” below. - Page 227 Appendix A: Maintenance It takes about a minute to boot the SmartStor. When fully booted: • The System Status LED turns blue. • The buzzer beeps one time. Verify that the SmartStor now appears in SmartNAVI MSN window. The SmartStor automatically runs a File System Check due to the abnormal shutdown.
-
Page 228: Connection Problems After Restart
SmartStor NS4600 Product Manual Connection Problems After Restart If your SmartStor’s network settings were set to Obtain an IP address automatically, your DHCP server might assign a different IP address to the SmartStor when you restart the SmartStor after is was shutdown for repairs. -
Page 229: Appendix B: Important Information
Appendix B: Important Information GNU General Public License This product includes copyrighted third-party software licensed under the terms of the GNU General Public License. Please see the GNU General Public License (“GPL”) for the exact terms and conditions of this license at www.gnu.org. The GPL source code incorporated into the product is available for free download at our web site www.promise.com/support/download/download_eng.asp. - Page 230 SmartStor NS4600N Product Manual...
-
Page 231: Index
Index about this manual background activity action status, RAID Volume progress 138, 202 AD domain RAID Volume backup album change schedule email alert recipient clear event log 131, 144 folder delete schedule 82, 134 67, 93 group files, restore 83, 134 group member files, view network drive... - Page 232 SmartStor NS4600 Product Manual device name 19, 101, 102, 130, DHCP server cable, network clear backup event log dimensions 4, 8 client OS support disconnect network drive close disconnect USB drive PASM disk drive SmartNAVI assign to RAID Volume codec...
- Page 233 Index email alert list, view cooling notification power supply recipients Smart Fan 169, 190, 192 enable/disable speed One Touch Backup FAT16 file format 51, 202 service FAT32 file format Smart Fan file protocol support enclosure file system events events status rebuilding error message status...
- Page 234 SmartStor NS4600 Product Manual formatting IP address, cont. 19, 101, memory stick SmartStor, setting 102, 130, 156 RAID Volume USB drive SMTP server 34, 139, 146 free disks UNIX/Linux PC 54, 104, 161 frozen SmartStor iTunes plug-in iTunes, installing and configuring...
- Page 235 Index mail alerts network, cont. Main Window, open connections, multiple 102, 156 Map Network Drive settings maximum transmission unit (MTU) view information network drive Media Center could not reconnect all in SmartNAVI create logging in disconnect on SmartStor error message memory stick in My Computer format...
- Page 236 SmartStor NS4600 Product Manual 25, 27, 60, 124, logging in 125, 128 174, 177 parity RAID logging out partition and format Macintosh access, setup PASM migrate RAID Volume 26, 127 access from Bonjour NAS replication access from SmartNAVI navigating the interface...
- Page 237 Index permissions 82, 97 share folders RAID level 38, 138, 140, 141 Windows change 194, 201 personal firewall 147, 148, 176 choosing picture files, downloading and view- 172, 176 RAID 0 173, 176 RAID 1 Picture folder 175, 177 RAID 10 player, music or video, download 174, 177 RAID 5...
- Page 238 SmartStor NS4600 Product Manual recover setup, cont. 185, 203 RAID volume snapshot backup Windows access 137, 204 Recycle Bin Windows printing replace a disk drive Setup Wizard in PASM 67, 93 restore backup files Setup, one-click or advanced RJ45 connector...
- Page 239 Index 159, 203 SmartNAVI, cont. SMTP authentication expand RAID volume snapshots group list events 12, 16 icon recover backups 152, 153 information setup backups 9, 12 installer icon status installing view 104, 161 language SoundBridge plug-in language setting spare drive locate SmartStor network settings explained...
- Page 240 SmartStor NS4600 Product Manual UDP option in Windows video files, downloading and view- Unicode support Unicode, folder name support view UNIX backup event log 34, 139 export access list backup files setup access backup schedules setup network drive disk drive...
Need help?
Do you have a question about the Smartstor NS4600 and is the answer not in the manual?
Questions and answers