Table of Contents
Advertisement
Quick Links
Advertisement
Table of Contents

Related Manuals for ADLINK Technology LitleBoard 800


Summary of Contents for ADLINK Technology LitleBoard 800
-
Page 1: Reference Manual
™ LittleBoard Single Board Computer Reference Manual P/N 5001816B Revision A... - Page 2 This reference manual is for the person who designs computer related equipment, including but not limited to hardware and software design and implementation of the same. ADLINK Technology, Inc. assumes you are qualified in designing and implementing your hardware designs and their related software into your prototype computer equipment.
-
Page 3: Table Of Contents
Contents Chapter 1 About This Manual ....................1 Purpose of this Manual ........................1 References ............................1 Chapter 2 Product Overview......................3 EBX Architecture..........................3 Product Description..........................4 Board Features ..........................4 Block Diagram ..........................7 Major Components (ICs)......................7 Header Definitions ........................10 Jumper Definitions ........................13 Specifications..........................13 Physical Specifications ......................13 Environmental Specifications....................14 Power Specifications ........................14 Thermal/Cooling Requirements ....................14... - Page 4 Contents Serial Console.......................... 35 Serial Console Setup ......................36 Hot (Serial) Cable ......................36 Watchdog Timer........................36 Optional CPU Fan ........................37 LAN LED ..........................37 Chapter 4 BIOS Setup ......................39 Introduction............................ 39 Entering BIOS Setup (VGA Display) ..................39 Entering BIOS Setup (Serial Console) ..................
- Page 5 Contents Table 3-15. Power On Button and Reset Switch Header Pin/Signal Descriptions (J29)...34 Table 3-16. Power On Header Pin/Signal Descriptions (J30) ...........34 Table 3-17. Optional CPU Fan (J21) ..................37 Table 3-18. Ethernet External LED Pin/Signal Descriptions (J28) ..........37 Table A-1. Technical Support Contact Information..............41 LittleBoard 800 Reference Manual...
- Page 6 Contents Reference Manual LittleBoard 800...
-
Page 7: Chapter 1 About This Manual
Chapter 1 About This Manual Purpose of this Manual This manual is for designers of systems based on the LittleBoard™ 800 single board computer (SBC). This manual contains information that permits designers to create an embedded system based on specific design requirements. - Page 8 Chapter 1 About This Manual • Intel Corporation and the 82855GME and 82801DB chips, used for the Memory Hub/Video controller and I/O Hub, respectively. Web site: http://www.intel.com/products/chipsets/855gme/index.htm = Memory Hub Web site: http://www.intel.com/design/chipsets/datashts/290744.htm = I/O Hub • Intel Corporation and the 82551ER and 82541(GI/PI) chips, used for the Fast Ethernet and Gigabit Ethernet controllers respectively.
-
Page 9: Chapter 2 Product Overview
Chapter 2 Product Overview This introduction presents general information about the EBX architecture and the LittleBoard 800 single board computer (SBC). After reading this chapter you should understand: • EBX Architecture • LittleBoard 800 description • LittleBoard 800 features • Major components •... -
Page 10: Product Description
Chapter 2 Product Overview 4-40 screws (4) PC/104 Module 0.6 inch spacers (4) PC/104 Plus Module ISA Bus Stackthrough Expansion PCI Stack through Headers Headers Little Board 800 0.6 inch spacers (4) 4-40 nuts (4) LittleBoard 800 Figure 2-1. Stacking PC/104 Modules with the Product Description The LittleBoard 800 is an exceptionally high integration, high performance, rugged, and high quality single- board system, which contains all the component subsystems of a PC motherboard plus the equivalent of up... - Page 11 Chapter 2 Product Overview 400MHz FSB ♦ • Memory Single standard 184-pin DDR DIMM slot ♦ Supports non-ECC or unbuffered ECC memory ♦ Supports +2.5V DDR RAM up to 1GB ♦ Supports up to PC2700 DDR 333 (166MHz) ♦ • PC/104-Plus Bus Interfaces PCI Bus up to 33MHz ♦...
- Page 12 Chapter 2 Product Overview • Keyboard/Mouse Interface Provides PS/2 keyboard interface ♦ Provides PS/2 mouse interface ♦ • Audio interface Provides AC’97 CODEC on board ♦ Supports AC’97 standard ♦ • Ethernet Interface Provides two fully independent Ethernet ports ♦ Provides integrated LEDs on each port (Link/Activity and Speed) ♦...
-
Page 13: Block Diagram
Chapter 2 Product Overview Block Diagram Figure 2-2 on page 7 shows the functional components of the board. Clock Intel Pentium M or Celeron M LVDS Connector Connector Memory Hub (Northbridge) SDRAM 855GME DIMM SM Bus PC/104 PC/104-Plus Connector Bus Connector IDE Primary IDE Secondary I/O Hub... -
Page 14: Major Components (Ics)
Chapter 2 Product Overview Major Components (ICs) Table 2-1 on page 8 lists the major ICs, including a brief description of each, on the LittleBoard 800. Figures 2-3 show the locations of the chips. Table 2-1. Major Integrated Circuit Description and Function Chip Type Mfg. -
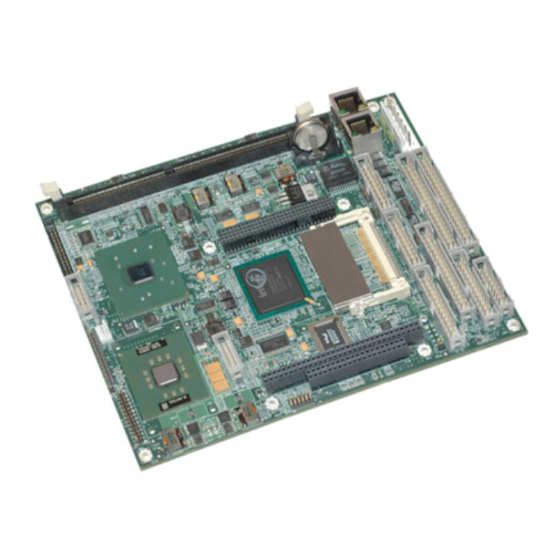
Page 15: Figure 2-3. Component Locations (Front View)
Chapter 2 Product Overview Figure 2-3. Component Locations (Front view) LittleBoard 800 Reference Manual... -
Page 16: Header Definitions
Chapter 2 Product Overview Figure 2-4. Component Locations (Back view) Headers and Connectors Table 2-2 describes the headers and connectors shown in Figure 2-6 on page 12. All I/O headers use 0.100" (2.54mm) pin spacing unless otherwise indicated. Table 2-2. Header and Connector Descriptions Jack # Name Description... -
Page 17: Figure 2-5. Connector Pin-Out Identification
Chapter 2 Product Overview Table 2-2. Header and Connector Descriptions (Continued) Primary IDE 40-pin connector for the primary IDE interface Secondary IDE 40-pin connector for the secondary IDE interface Compact Flash 50-pin, .050" (1.27mm), socket accepts Type I or Type II Compact Flash cards Audio In/Out 26-pin, .079"... -
Page 18: Figure 2-6. Connector Locations (Top View)
Chapter 2 Product Overview DIMM1 Ethernet Grounding Figure 2-6. Header and Connector Locations (Front view) CAUTION The two Ethernet ports share a common ground (transformer center tap), that is floating until you determine how the common ground is connected. The grounding holes (8) of the LittleBoard 800 are connected to ground potential (return) of the DC power supply connected to the board through J19. -
Page 19: Jumper Definitions
Chapter 2 Product Overview Jumper Headers Table 2-3 describes the jumper headers shown in Figure 2-6 on page Table 2-3. Jumper Settings Jumper # Installed Removed/Installed JP1 – LVDS Voltage Select Enable +3.3V (pins 1-2) Default Enable +5V (pins 2-3) JP2 –... -
Page 20: Environmental Specifications
Chapter 2 Product Overview Environmental Specifications Table 2-5 provides the most efficient operating and storage condition ranges required for this board. Table 2-5. Environmental Requirements Parameter 800MHz Celeron M 1.0GHz Celeron M 1.4GHz Pentium M Conditions Conditions Conditions Operating –20° to +70°C –20°... -
Page 21: Figure 2-7. Littleboard 800 Dimensions
Chapter 2 Product Overview Mechanical Specifications Figure 2-7 shows the top view of the LittleBoard 800 with the mechanical mounting dimensions. 0.20 0.20 2.65 2.80 5.70 5.80 7.22 7.60 7.80 Figure 2-7. LittleBoard 800 Dimensions NOTE All dimensions are given in inches. LittleBoard 800 Reference Manual... - Page 22 Chapter 2 Product Overview Reference Manual LittleBoard 800...
-
Page 23: Chapter 3 Hardware
Chapter 3 Hardware Overview This chapter discusses the following features of the connectors: • Interrupt Channel Assignments • Memory Map • I/O Address Map • Floppy Interface • Serial Interfaces • Parallel Interface • Utility Interfaces Keyboard ♦ Mouse ♦ Battery ♦... -
Page 24: Interrupt Channel Assignments
Chapter 3 Hardware NOTE ADLINK Technology, Inc. only supports the features/options tested and listed in this manual. The main integrated circuits (chips) used in the LittleBoard 800 may provide more features or options than are listed for the LittleBoard 800, but some of these chip features/options are not supported on the board and may not function as specified in the chip documentation. -
Page 25: Memory Map
Chapter 3 Hardware Memory Map The following table provides the common PC/AT memory allocations. Memory below 000500h is used by the BIOS. Table 3-2. Memory Map Base Address Function 00000000h - 0009FFFFh Conventional Memory 000A0000h 000AFFFFh Graphics Memory 000B0000h - 000B7FFFh Mono Text Memory 000B8000h - 000BFFFFh... -
Page 26: Floppy Drive Interface
Chapter 3 Hardware Table 3-3. I/O Address Map (Continued) 0093-009F System reserved 00A0-00A1 Slave Interrupt Controller 00A2-00BF System reserved 00C0-00DF Slave DMA Controller #2 00E0-00EF System reserved 0F0-00FF Math Coprocessor 0170-0177 Secondary IDE Hard Disk Controller 01F0-01F7 Primary IDE Hard Disk Controller 0278-027F Parallel Printer 02E8-02EF... -
Page 27: Serial Interfaces
Chapter 3 Hardware Table 3-4. Parallel Interface Pin/Signal Descriptions (J16) (Continued) Parallel Port Data 0 – These pins (0 to 7) provide parallel port data. ERR* Error* – This is a status output signal from the printer. A Low State indicates an error condition on the printer. -
Page 28: Figure 3-1. Rs485 Serial Port Implementation
Chapter 3 Hardware • Serial A Interface (J11) Serial Port 1 (COM1) supports RS232/RS485/RS422 and full modem support ♦ Serial Port 2 (COM2) supports RS232/RS485/RS422 ♦ • Serial B Interface (J12) Serial Port 3 (COM3) supports RS232/RS485/RS422 and full modem support ♦... - Page 29 Chapter 3 Hardware Table 3-5. Serial A Interface Pin/Signal Descriptions (J11) (Continued) CTS1* Clear to Send 1 – Indicates external serial communications device is ready to receive data. Used as hardware handshake with RTS1 for low level flow control. RX1+ RX1+ –...
-
Page 30: Table 3-6. Serial B Interface Pin/Signal Descriptions (J12)
Chapter 3 Hardware Table 3-6. Serial B Interface Pin/Signal Descriptions (J12) Pin # Pin # Signal Description DCD3* Data Carrier Detect 3 – Indicates external serial communications device is detecting a carrier signal (i.e., a communication channel is (COM3) currently open). In direct connect environments, this input will be driven by DTR3 as part of the DTR/DSR handshake. - Page 31 Chapter 3 Hardware Table 3-6. Serial B Interface Pin/Signal Descriptions (J12) CTS4* Clear To Send 4 – Indicator to serial port 4 that external serial communications device is ready to receive data. Used as hardware handshake with RTS4 for low level flow control. RX4+ RX4+ –...
-
Page 32: Utility Interfaces
Chapter 3 Hardware Utility Interfaces The Utility interfaces consist of three connectors that provide the standard interface signals for the following devices: • Utility 1 (J15) Keyboard ♦ External battery connection ♦ Reset Switch ♦ Speaker ♦ • Utility 2 (J13) PS/2 Mouse ♦... -
Page 33: Speaker
Chapter 3 Hardware Speaker The signal lines for a speaker port with 0.1-watt drive are provided through a Utility 1 interface (J15). Table 3-7. Utility 1 Interface Pin/Signal Descriptions (J15) Pin # Signal Description -12V -12 Volts – Supplied from external power source. Ground -5 Volts –... -
Page 34: System Management Bus (Smbus)
Chapter 3 Hardware System Management Bus (SMBus) The I/O Hub, 82801DB, (Southbridge) contains both a host and slave SMBus port; but the host cannot access the slave internally. The slave port allows an external master access to the I/O Hub through the connector (J13). -
Page 35: Table 3-9. Utility 2 Interface Pin/Signal Descriptions (J13)
Chapter 3 Hardware Table 3-9. Utility 2 Interface Pin/Signal Descriptions (J13) Pin # Signal Description LIDSW Lid Switch – This signal (Suspend Status on I/O Hub) is asserted by the I/O Hub to indicate the system will be entering a low power state soon. This signal is not shared with other devices on the LittleBoard. -
Page 36: Utility 3 Interface
Chapter 3 Hardware Utility 3 Interface The Utility 3 (J14) interface is a 10-pin connector used to provide two of the four USB port signals to an external board with USB connections or directly to the respective USB connector for the USB ports. Table 3-10 gives the pin signals for the Utility 3 interface, which uses 10 pins, 2 rows, odd/even, (1, 2) with 0.100"... -
Page 37: Video Interfaces
Chapter 3 Hardware • True Line Level Output with volume control independent of Line Out Table 3-11 describes the pin signals of the audio interface, which uses 26 pins, 2 rows, odd/even, (1, 2) with 2mm pitch. Table 3-11. Audio Interface Pin/Signal Descriptions (J9) Pin # Signal Description... -
Page 38: Crt Interface
Chapter 3 Hardware Flat Panel features: • Supports (+3.3V or +5V, and +12V) output to LCD flat panels through an LVDS interface • Supports panel sizes from VGA (640 x 480) up to UXGA+ (1600 x 1200). • Supports 1-channel (18-bit) or 2-channel (36-bit) LVDS outputs CRT Interface Table 3-12 describes the pin signals of the CRT interface, which uses 10 pins, 2 rows, odd/even, (1, 2) with... -
Page 39: Power Interfaces
Chapter 3 Hardware Table 3-13. LVDS Interface Pin/Signal Descriptions (J26) (Continued) CLK_LVDS_IYBP Clock Positive Output Clock CLK_LVDS_IYBM Clock Negative Output LVDS_IYBP3 Data Positive Output LVDS_IYBM3 Data Negative Output Channel 2 LVDS_IYBP2 Data Positive Output LVDS_IYBM2 Data Negative Output LVDS_IYBP1 Data Positive Output LVDS_IYBM1 Data Negative Output LVDS_IYBP0... -
Page 40: Table 3-14. Power Supply Input Pin/Signal Descriptions (J19)
Chapter 3 Hardware Table 3-14. Power Supply Input Pin/Signal Descriptions (J19) Pin # Signal Description +5.0 Volts – This +5.0 volts DC +/- 5% is the only voltage required for operation. Ground Ground +12V +12 Volts – This +12 volts is for the PC/104, PC/104-Plus, and LVDS power only. +3.3V +3.3 Volts –... -
Page 41: Miscellaneous
Chapter 3 Hardware Miscellaneous Real Time Clock (RTC) The LittleBoard 800 contains a Real Time Clock (RTC). The BIOS (CMOS) RAM is backed up with a Lithium Battery. If the battery is not present, the BIOS has a battery-free boot option to complete the boot process. -
Page 42: Serial Console Setup
Chapter 3 Hardware Serial Console Setup The serial console feature is implemented by connecting a standard null modem cable or modified serial cable (or “Hot Cable”) between one of the serial ports, such as Serial 1 (J11A) and the serial terminal, or a PC with communications software. -
Page 43: Optional Cpu Fan
Chapter 3 Hardware Optional CPU Fan Table 3-17 lists the pin signals of the optional CPU Fan, which uses 3 pins, single row, with 0.100" pitch. Table 3-17. Optional CPU Fan (J21) Pin # Signal Description Fan_Tach Fan Tachometer – This signal indicates Fan speed +5.0 volts DC +/- 5% Ground Note: The shaded area denotes power or ground. -
Page 44: Reference Manual Littleboard
Chapter 3 Hardware Reference Manual LittleBoard 800... -
Page 45: Chapter 4 Bios Setup
Chapter 4 BIOS Setup Introduction This section assumes the user is familiar with BIOS Setup and does not attempt to describe the inner workings of BIOS functions. Refer to the appropriate PC reference manuals for information about the on- board, ROM-BIOS software interface. If ADLINK has added to or modified the standard functions, these functions will be described. -
Page 46: Pci-Isa Bridge Mapping
Chapter 4 BIOS Setup Use the <Enter> key to select the screen menus listed in the Opening BIOS screen. NOTE The serial console port is not hardware protected, and is not listed in the COM table within BIOS Setup. Diagnostic software that probes hardware addresses may cause a loss or failure of the serial console functions. -
Page 47: Appendix A Technical Support
Appendix A Technical Support ADLINK Technology, Inc. provides a number of methods for contacting Technical Support listed in the Table A-1 below. Requests for support through the Ask an Expert are given the highest priority, and usually will be addressed within one working day. - Page 48 Appendix A Technical Support Reference Manual LittleBoard 800...
-
Page 49: Index
Index RTC ...............35 LittleBoard 800 ATX Power in audio AC’97 interface ........30 pin-out list ............. 34 block diagram ..........7 audio interface Celeron M CPU ..........4 pin-out list ............. 31 connectors ............10 console redirection feature ......35 BIOS Setup CPU features ............4 accessing BIOS setup (VGA) ....... - Page 50 Index parallel port ........... 20 parallel port (1) ..........5 serial A PC 'Beep' speaker interface ......27 pin-out list ............. 22 PC/104 bus ............5 serial B PC/104-Plus bus ..........5 pin-out list ............. 24 Pentium M CPU ..........4 Serial Communications Software .......
Need help?
Do you have a question about the LitleBoard 800 and is the answer not in the manual?
Questions and answers