Table of Contents
Advertisement
Advertisement
Table of Contents

Related Manuals for Contec CMS800G


Summary of Contents for Contec CMS800G
- Page 1 CMS800G FETAL MONITOR CONTEC MEDICAL SYSTEMS CO., LTD...
-
Page 2: Table Of Contents
TABLE OF CONTENTS 1 Safety Guidance ………………………………………………………………………………….2 1.1 Introduction For The Safe Operation ……………………………………………………2 1.2 Ultrasound Safety Guide ……………………………………………………………………2 1.3 Safety Precautions ………………………………………………………………………...3 2 Introduction………………………………………………………………………………………5 2.1 Intended Use and Application………………………………………………………………5 2.2 Features………………………………………………………………………………………5 3 Monitor and Setup………………………………………………………………………………..6 3.1 The Monitor…………………………………………………………………………………..6 3.2 Setup………………………………………………………………………………………….11 4 Installation………………………………………………………………………………………..16 4.1 Open the Package and Check………………………………………………………………16 4.2 Connect the Power Cable…………………………………………………………………...16... - Page 3 CONTEC. CONTEC assumes no responsibility for any errors that may appear in this document, or for incidental or consequential damage in connection with the furnishing, performance or use of this material.
-
Page 4: Safety Guidance
1 Safety Guidance 1.1 Introduction For the Safe Operation The CMS800G Ultrasonic Fetal Doppler Monitor (Monitor) is Class I equipment and designed to comply with IEC 60601-1. Switching within 1 minute, at ambient temperatures between 5℃ and 40℃ . Ambient ... -
Page 5: Safety Precautions
: SHOCK HAZARD-Do not remove the top panel covers during operation or while power is connected. WARNING : Only connect the device to Contec supplied or recommended accessories, to avoid the injury of the doctors and patient. WARNING : Do not switch on device power until all cables have been properly connected and verified. - Page 6 IEC 60601-1-1. Everybody who connects additional equipment to the signal input connector or signal output connector configures a medical system, and is therefore responsible that the system complies with the requirements of the valid version of the system standard IEC 60601-1-1. If in doubt, consult our technical service department or your local distributor.
-
Page 7: Introduction
CAUTION : The device and reusable accessories could be sent back to the manufacturer for recycling or proper disposal after their useful lives. 2 Introduction The Fetal Monitor can provide different configurations according to different user requirements: FHR1 (Ultrasonic Channel ), FHR2 (Ultrasonic Channel ),TOCO, FMOV (Fetal Movement Ⅰ... -
Page 8: Monitor And Setup
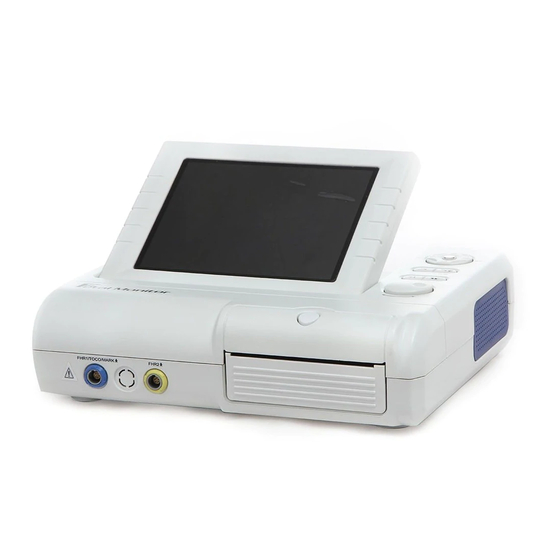
Single, Twins Monitoring optional 9 chip pulse width beam probe Extra-long life, high-resolution built-in thermal printer matrix, the output waveform, text, and other information Built-in communication port, can be connected with central monitoring system. 3 Monitor and Setup 3.1 The Monitor Figure 3.1 Appearance (Twins configuration, only for reference) 3.1.1 Transducer Introduction... - Page 9 to push down the switch when feeling fetal movement. Ultrasound TransducerⅠ④TOCO Transducer④Remote Marker are three in one transducers, their sockets are marked FHR1/TOCO/MARK on the monitor panel. ④4④Ultrasound TransducerⅡ is the transducer for FHR 2(Twins Configuration), it’s socket is marked FHR2 on the monitor panel. 3.1.2 Left Side Sockets Figure 3.2 Left Side Sockets 3.1.3 Interfaces and Symbols...
- Page 10 status④alarm on /off; It displays FHR 1 from Ultrasound Transducer I ④FHR 2 from Ultrasound Transducer II (Twins monitoring) and TOCO④ Fetal Movement data; parameter section displays the important parameter of current settings; time④bed number④time of pregnancy and age of pregnant woman are displayed in indicate bar;...
- Page 11 ④F④Alarm on/off status ④Alarm on ④Alarm off (2(Data Section FHR 1 Data of Ultrasound Transducer I ④ 3-digit data, it is in green color under normal status, it will be in red when alarm occurs; it displays “―――” when there is no data. FHR 2 Data of Ultrasound Transducer II: this data will show in twins monitoring mode, the display format is the same with the FHR 1.
- Page 12 Figure 3.4 Buttons (1( Menu Button Push Menu Button to enter setup menu, push it again to return monitor screen. When operating in other menu, push this button to return this menu. Only turning knob button can exit wave review mode.
-
Page 13: Setup
(4( Print Button Function: Enable/Disable printing. Press PRINT button in normal situation, if it not works, it begins real-time printing Press PRINT button in frozen situation, it prints the waveform on the screen. (5( Volume Control Button : Volume down :Volume up Function: adjust the audio volume of the Fetal heart Sound. - Page 14 Figure 3.5 Setup Revolving knob key to select different function. The Corresponding function and the adjustable ranges are showed in table3.1. Table 3.1 The setup function and adjustable ranges Function Adjustable Ranges ALM SET(Alarm Setup) Enter Alarm Setup PAT SET(Patient Setup) Enter Patient Setup SYSTEM SET(System Setup) Enter System Setup...
- Page 15 Figure 3.6 Alarm Setup Revolving the knob key to setup alarm function. The Corresponding function and the adjustable ranges are showed in the table3.2: Table 3.2 The alarm setup function and adjustable ranges Function Adjustable Range FHR ALM(FHR Alarm) Optional: Turn on, shut off The default situation is alarm on.
- Page 16 ROOM(Ward No.) Optional: 5 letter or numeral. The default is blank LENGTH(Time of Pregnancy) Optional: 1-100.The unit is week. The default is 0 BLOOD(Blood Type) Optional: A, B, AB, O, and N(unknown). The default is N. PARTUS NUM(Times of Giving Birth Optional: 0-20, the default is 0 FETAL NUM.(Quantity of Fetus) Optional: 0-20, the default is 1...
- Page 17 This device supports system update service. In system setup menu, revolving the knob key to enter System update. Note: Please enter password under the item “USR KEY” before click “CONFIRM”. This password is provided by manufacturer or distributor when Contec add new function to upgrade the system. ④Version...
-
Page 18: Installation
Figure 3.11Print Setup Revolving the knob key to setup print function. The Corresponding function and the adjustable ranges are showed in the table3.5: Table 3.5 The print setup function and adjustable ranges Function Adjustable Range SPEED(Print 1cm/min, 2cm/min, and 3cm/min. The default value is 3cm/min. Speed) LENGTH(Print 0④24(hours) ,the interval is 10 minutes. -
Page 19: Connect With Network
Connect with Network If the network has been ready, insert the network cable into the RJ45 interface of the monitor. 4.4 Feeding Paper and Removing Paper Jam If the paper is used up or paper jam happens, you have to feed paper into the recorder, the operation procedure is as follows: Open the paper cabinet Take out the “Z”... - Page 20 Acquiring Twins’ Heart Rates Signal CMS800G is able to monitoring twins’ heart rates through two ultrasound transducers during the whole pregnant time. Follow the step②mentioned above to acquire the heart rate for the first fetus.
- Page 21 Determine the location of the second fetal signal using palpation or a fetoscope. Attach the buckle of the ultrasound transducer to the belt. Apply aquasonic coupling gel to the face of the transducer. Place the second ultrasound transducer on the abdomen over fetal site and move it slowly until the characteristic hoof-beat sound of the fetal heart is heard.
-
Page 22: Print Operation
Acquiring Uterine Contraction Data Fix the transducer. The transducer is retained on the midline half-way between the mother’s fundus and the umbilicus. The position is shown as figure5.1 The display of external pressure is shown as a percentage % of full scale. The uterine activity reading at this point should be greater than 30 units and less than 90 units. -
Page 23: Operation After Monitoring
The print output content contains: BED NO. ④ NAME ④ WEEKS ④ PATIENT NO. ④ FHR1 trend ④FHR2 trend④Twins Monitoring④④TOCO wave④print speed④date④time. It also contains other icons like④auto zero mark ④alarm mark ④FMOV mark “↑”④event mark “↓” etc. Note(① when paper is used out, printing will stop, and the data will be saved in memory, when paper reloaded, operator can use wave review function to print the saved data. -
Page 24: Care And Cleaning Of Monitor
(3) Mechanical Inspection Make sure all exposed screws are tight. Make sure all models and connector are in proper positions. Check the external cables for splits; cracks or signs of twisting replace any cable that shows serious damage. WARNING: Failure on the part of the responsible individual hospital or institution employing the use of this equipment to implement a satisfactory maintenance schedule may cause undue equipment failure and possible health hazards. -
Page 25: Care Of Recorder And Paper
Wipe the remained humidity with clean and dried cloth. 6.4 Care of Recorder and Paper Note: Please do not use paper not recommended by CONTEC or we will not warrant to repair if any damage occurs. When storing recorder paper (including used paper with traces): Do not store in plastic envelopes. -
Page 26: Disinfection
The sterilization the manufacturer recommended to cleaning the monitor and accessories are ethanol and Acetaldehyde. CAUTION: To avoid damaging the monitor: Follow the manufacturer’s instruction to dilute the solution, or adopt the lowest possible density. Do not let liquid enter the monitor. No part of this monitor can be subjected to immersion in liquid. -
Page 27: Attachment 1 Product Specification
negligence or accident. This warranty shall not extend to any instrument from which the manufacturer’s original serial number tag or product identification marking have been altered or removed. The product were operated and used not properly. Attachment 1 Product Specification A1.1 Monitor Physical Characteristics Size: 320 (length) ×... -
Page 28: A 1.2 Transducers
Record Content: bed No. ,name, pregnancy age, single/twins type, case No., paper speed, date, time , FHR data and wave, Contraction data and wave, Fetal move times and mark etc. Signal Interface: RJ 45 Ultrasound probe: Nominal Frequency: 1.0MHz Work Frequency: 1.0MHz±10④ Negative peak sound pressure : P_④1MPa Output beam intensity : Iob④20mW/cm 2④... - Page 29 2 Noises Symptom Possible Cause Solution Noise Too high volume sets Adjust the volume down Interfered handset other Keep handset other interfering source interfering source far away 3 Recorder Errors Symptom Possible Cause Solution Paper jam Wrong feeding paper or paper is Feed paper correctly and keep affected with damp paper from moist...
-
Page 30: Attachment 3 Monitoring Figure
5 Monitoring Contractions (External) Symptom Possible Cause Solution Worse trace quality Too tight or too loose Ensure the abdomen belt has been fluctuant TOCO baseline abdomen belt or no used accurately and neither too elasticity tight, nor too loose Maternal Movement Relax patient’s spirit Fetal Movement Wait for a moment then monitor... - Page 31 CONTEC MEDICAL SYSTEMS CO., LTD Address:#2-1 Hengshan Road, Qinhuangdao Economic & Technical Development Zone, Hebei Province, PRC Tel: +86-335-8015433 Fax: +86-335-8015432 E-mail: cms@contecmed.com.cn Website: http://www.contecmed.com.cn EC REPRESENTATIVE Shanghai International Holding Corp. GmbH (Europe) Address: Eiffestrasse 80, D-20537, Hamburg, Germany Tel: &49-40-2513175 Fax: &49-40-255726...
Need help?
Do you have a question about the CMS800G and is the answer not in the manual?
Questions and answers