Contec CMS-50F User Instructions
Hide thumbs
Also See for CMS-50F:
- User manual (17 pages) ,
- User manual (17 pages) ,
- User manual (3 pages)
Table of Contents
Advertisement
Advertisement
Table of Contents

Related Manuals for Contec CMS-50F


Summary of Contents for Contec CMS-50F
- Page 1 CMS-50F User Instructions By: Contec Medical Systems Distributed By:...
- Page 2 Instructions to User Dear users, thank you very much for purchasing the Pulse Oximeter. This Manual is written and compiled in accordance with the council directive MDD93/42/EEC for medical devices and harmonized standards. In case of modifications and software upgrades, the information contained in this document is subject to change without notice.
-
Page 3: Table Of Contents
Please refer to the correlative literature about the clinical restrictions and caution. This device is not intended for treatment. The User Manual is published by our company. All rights reserved. CONTENTS 1 Safety..............................1 1.1 Instructions for Safe Operations ....................1 1.2 Warning............................1 1.3 Attention............................1 2 Overview ............................2 2.1 Features............................2... -
Page 4: Safety
1 Safety 1.1 Instructions for Safe Operations Check the main unit and all accessories periodically to make sure that there is no visible damage that may affect patient’s safety and monitoring performance about cables and transducers. It is recommended that the device should be inspected once a week at least. When there is obvious damage, stop using the device. -
Page 5: Overview
with medical alcohol by soft material. Do not spray any liquid on the device directly. When cleaning the device with water, the temperature should be lower than 6 0 ℃ . As to the fingers which are too thin or too cold, it would probably affect the normal measure of the patients' SpO and pulse rate, please clip the thick finger such as thumb and middle finger deeply enough into the probe. -
Page 6: Major Applications And Scope Of Application
B. The product is small in volume, light in weight and convenient in carrying. C. Low power consumption 2.2 Major Applications and Scope of Application The Pulse Oximeter can be used in measuring the pulse oxygen saturation and pulse rate through finger. -
Page 7: Technical Specifications
4 Technical Specifications 4.1 Main Performance A. SpO value display B. Pulse rate value display, bar graph display C. Pulse waveform display D. Low-voltage indication: low-voltage indicator appears before working abnormally which is due to low-voltage E. The display mode can be changed F. -
Page 8: Installation
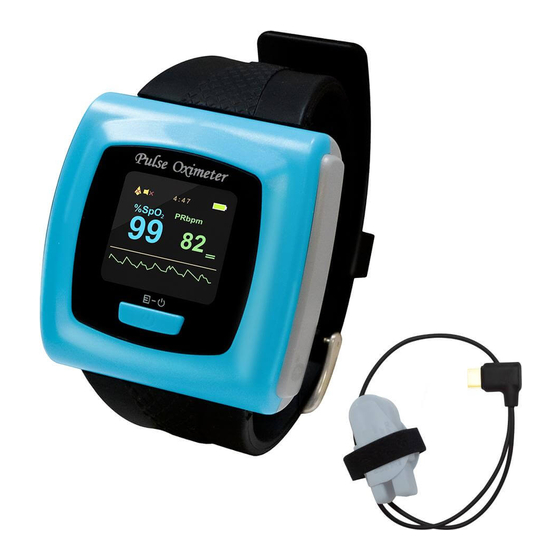
5 Installation 5.1 View of the Front Panel Figure 2. Front view (Actual probe may be different with the probe as figure 4,please accept the actual probe with the device ) Figure 3. Left view 1. This port can be used as an USB port. It is used to connect a personal computer to export the trend data, charge the lithium battery via a data line.Or it is used to connect a SpO sensor to measure the oxygen saturation and pulse rate. -
Page 9: Accessories
as the following figure after installation. Figure 4. 5.3 Accessories A. a User Manual B. a power adapter C. a data line D. a disk (PC software) E. An adult-oximeter probe An infant-oximeter probe (May purchase selectively) 6 Operating Guide 6.1 Application Method A. - Page 10 Figure 5. (Actual probe may be different with the probe as figure 4,please accept the actual probe with the device ) Attention: CLICK = short press of power button and PRESS = prolonged push of power button (1sec) B. Change display direction On the measuring interface, enter the clock interface by Click the button, and then Click the button to change the display direction within 30 seconds.
- Page 11 Figure 6. Main Menu Interface a) Backlight adjustment On the main menu interface, Click the button to select "Brightness", Press the power button and hold to adjust the backlight brightness. b) Alarm setting On the main menu interface, click the button to select "Alarm", Press the power button (1sec) to enter the alarm setting interface as shown in Figure 6: a.
- Page 12 Figure 7.Alarm Setting Menu c. Pulse sound indication setting Click the button to select "Pulse Sound", and then Press the button to choose to have the Pulse Sound (heart beat) alarm "on" or "off ". d. Exit the Alarm settings Click the button to select "EXIT", then Press the button to exit the Alarm Settings Menu.
-
Page 13: Attention For Operation
would be displayed on the screen, then it returns to the main menu; if you didn’t reset the time and date, when exiting the clock setting menu, the device would return to the main menu directly. d) Uploading the saved Data Connect the device to computer with data line, then open the PC software.Please refer to <SpO Assistant user manual>... -
Page 14: Clinical Restrictions
E. Do not fix the SpO sensor with adhesive or else it may result in venous pulsation and inaccurate measure of SpO and pulse rate. F. Excessive ambient light may affect the measuring result. It includes fluorescent lamp, dual ruby light, infrared heater, direct sunlight and etc. -
Page 15: Troubleshooting
8 Troubleshooting Trouble Possible Reason Solution 1. Place the finger properly and try 1. The finger is not properly again. The SpO and Pulse positioned. 2. Try again; Go to a hospital for a Rate can not be 2. The patient’s SpO is too low to be diagnosis if you are sure the device displayed normally... -
Page 16: Function Specification
Pause the alarm sound indication Open the alarm sound indication Close the pulse sound indication Open the pulse sound indication menu button/power button/function button Type BF Serial number 1. the finger clip falls off ( no finger inserted) 2. Probe error 3. - Page 17 ’ Moving calculate the Average pulse rate every 4 cardio-beat cycle. Average pulse rate The deviation between average value and true value does not exceed 1% Safety Type Interior Battery, B F T ype Pulse Intensity Continuous bar-graph display, the higher display indicates the Range stronger pulse.
- Page 18 Appendix 1 State Alarm condition delay Alarm signal generation delay Low voltage alarm 0.6s 20ms alarm 400ms 20ms Pulse rate alarm 400ms 20ms Probe error alarm 400ms 20ms...
Need help?
Do you have a question about the CMS-50F and is the answer not in the manual?
Questions and answers