Table of Contents
Advertisement
Quick Links
- 1 Solution 2.5-Zc Specifications
- 2 Zone Heating and How to Make It Work for You
- 3 Fire Baffle Removal Prior to Cleaning the Chimney
- 4 Framing, Facing, Mantel, and Combustible Shelf
- 5 Appendix 2: Blower Maintenance or Replacement
- 6 Appendix 7: Exploded Diagram and Parts List
- Download this manual
See also:
Instruction and Installation Manual
Solution 2.5-ZC
Listed to standards ULC-S610 and UL 127
by Intertek Testing Services
READ AND KEEP THIS MANUAL FOR REFERENCE
This manual is available for free download on the manufacturer's web site. It is a
copyrighted document. Re-sale is strictly prohibited. The manufacturer may update this
manual from time to time and cannot be responsible for problems, injuries, or damages
arising out of the use of information contained in any manual obtained from unauthorized
sources.
Printed in Canada
INSTALLATION
AND OPERATION
MANUAL
US ENVIRONMENTAL PROTECTION
AGENCY PHASE II CERTIFIED WOOD
FIREPLACE
www.enerzone-intl.com
Stove Builder International Inc.
250, rue de Copenhague,
St-Augustin-de-Desmaures (Quebec)
Canada G3A 2H3
Tel: (418) 878-3040
Fax: (418) 878-3001
45728A
11-03-2014
Advertisement
Table of Contents

Related Manuals for Enerzone Solution 2.5-ZC


Summary of Contents for Enerzone Solution 2.5-ZC
- Page 1 INSTALLATION AND OPERATION MANUAL US ENVIRONMENTAL PROTECTION Solution 2.5-ZC AGENCY PHASE II CERTIFIED WOOD FIREPLACE Listed to standards ULC-S610 and UL 127 www.enerzone-intl.com by Intertek Testing Services Stove Builder International Inc. 250, rue de Copenhague, St-Augustin-de-Desmaures (Quebec) Canada G3A 2H3...
- Page 2 Any modification or alteration of construction may void the warranty, listings and approvals of this system. In that case, Stove Builder International (SBI) will not be responsible for damages. Install the fireplace only as described in these instructions. 2 Solution 2.5-ZC Fireplace Installation and Operation Manual...
-
Page 3: Table Of Contents
4.4.4 Firing Each New Load Hot ................22 4.4.5 Turning Down the Air Supply ................22 4.4.6 Building Different Fires for Different Needs ............23 Solution 2.5-ZC Fireplace Installation and Operation Manual... - Page 4 Chimney Installation Instructions ................57 8.6.1 Examples of Typical Chimney Installation ............57 8.6.2 Offset Chimney Installation ................62 Angled Wall Radiation Shield ................65 4 Solution 2.5-ZC Fireplace Installation and Operation Manual...
- Page 5 Keep your sales invoice. We also recommend that you register your warranty online at: http://enerzone-intl.com/warranty-registration.aspx Registering your warranty online will help us to quickly track the information we need about your stove. Solution 2.5-ZC Fireplace Installation and Operation Manual...
-
Page 6: Part A - Operation And Maintenance
TO START A FIRE IN THIS FIREPLACE. KEEP ALL SUCH LIQUIDS OR AEROSOLS WELL AWAY FROM THE FIREPLACE WHILE IT IS IN USE. • DO NOT STORE FUEL WITHIN HEATER MINIMUM INSTALLATION CLEARANCES. • BURN ONLY SEASONED NATURAL FIREWOOD. 6 Solution 2.5-ZC Fireplace Installation and Operation Manual... - Page 7 WILL CAUSE THE FIREPLACE TO OVERHEAT. WARNING: DO NOT USE MATERIALS OTHER THAN THOSE LISTED IN THE REPLACEMENT PARTS SECTION DURING INSTALLATION AS THEY MAY BE SAFETY HAZARDS AND A FIRE COULD RESULT. Solution 2.5-ZC Fireplace Installation and Operation Manual...
- Page 8 Buildings built on fixed wheels and those transported on temporary wheels/axles and set on a permanent foundation. PLEASE NOTE THAT THE PICTURES SHOWN IN THIS MANUAL ARE GENERIC AND MAY NOT MATCH EXACTLY THE LOOK OF YOUR FIREPLACE. 8 Solution 2.5-ZC Fireplace Installation and Operation Manual...
-
Page 9: General Information
We also test using the same procedure except using split hardwood firewood to reflect real-world heat output. This fireplace is not intended to operate at its peak heat output continuously. *** East-west: through the door you see the sides of the logs. Solution 2.5-ZC Fireplace Installation and Operation Manual... - Page 10 10 Solution 2.5-ZC Fireplace Installation and Operation Manual...
- Page 11 Solution 2.5-ZC Fireplace Installation and Operation Manual...
-
Page 12: Zone Heating And How To Make It Work For You
2.2 Zone Heating and How to Make it Work for You Your new Solution 2.5-ZC wood fireplace is a space heater, which means it is intended to heat the area it is installed in, as well as spaces that connect to that area, although to a lower temperature. -
Page 13: The Sbi Commitment To You And The Environment
Ceramic glass cannot be recycled in the same way as normal glass, so it should not be disposed of with your regular household products. Disposal at a landfill is recommended. Solution 2.5-ZC Fireplace Installation and Operation Manual... -
Page 14: Fuel
Harder woods are best for colder winter weather when more heat and longer burn cycles are desirable. 14 Solution 2.5-ZC Fireplace Installation and Operation Manual... -
Page 15: Log Length
Even when dried, unsplit logs are difficult to ignite because they don’t have the sharp edges where the flames first catch. Logs as small as 3” (75 mm) should be split to encourage drying. Solution 2.5-ZC Fireplace Installation and Operation Manual... -
Page 16: How To Dry Firewood
20% by weight • and will allow your fireplace to produce its highest possible efficiency 16 Solution 2.5-ZC Fireplace Installation and Operation Manual... -
Page 17: Judging Firewood Moisture Content
Start with one manufactured log and see how the fireplace reacts. Never use more than two manufactured logs at a time. Solution 2.5-ZC Fireplace Installation and Operation Manual... -
Page 18: Operating Your Fireplace
A fire that starts fast produces less smoke and deposits less creosote in the chimney. Here are three popular and effective ways to start wood fires. 18 Solution 2.5-ZC Fireplace Installation and Operation Manual... -
Page 19: Conventional Fire Starting
Or you can make newspaper knots by rolling up single sheets corner to corner and tying a knot in them. The advantage Solution 2.5-ZC Fireplace Installation and Operation Manual... -
Page 20: Two Parallel Logs
When you burn in cycles, you rarely need to open the fireplace’s loading door while the wood is flaming. This is an advantage because there is more chance that smoke will leak from the fireplace when the door is opened as a full fire is burning. 20 Solution 2.5-ZC Fireplace Installation and Operation Manual... -
Page 21: Ash Removal
Remove ash first, and then rake charcoal towards the front of the firebox before loading so that it will ignite the new load. Solution 2.5-ZC Fireplace Installation and Operation Manual... -
Page 22: Firing Each New Load Hot
With good fuel and correct air control use, the flames should slow down, but should stay large and steady, even as the air supply is reduced. 22 Solution 2.5-ZC Fireplace Installation and Operation Manual... -
Page 23: Building Different Fires For Different Needs
In this case use soft wood species and place the logs compactly in the firebox so the pieces are packed tightly together. You will need to fire the load hot for long enough to Solution 2.5-ZC Fireplace Installation and Operation Manual... - Page 24 Shorter burn cycles make it easier to match the heat output of the fireplace to the heat demand of the space. 24 Solution 2.5-ZC Fireplace Installation and Operation Manual...
- Page 25 East-west loads are excellent for long, low output fires for relatively mild weather. North-south loads break down more quickly, but much more wood can be loaded at a time. This makes north-south loading good for high output, long lasting fires for cold weather. Solution 2.5-ZC Fireplace Installation and Operation Manual...
-
Page 26: Maintaining Your Wood Heating System
If you see brown streaks coming from the edge of the glass, it is time to replace the gasket around the glass. Visit your fireplace retailer to get the self-adhesive glass gasket and follow the instructions below for installation. 26 Solution 2.5-ZC Fireplace Installation and Operation Manual... -
Page 27: Door Adjustment
2. Turn the handle counter clock wise one turn to increase pressure. To reduce pressure, when installing gasket example, turn clock wise. 3. Re-install the split pin with a small hammer. Solution 2.5-ZC Fireplace Installation and Operation Manual... -
Page 28: Door Alignment
To align, open the fireplace’s doors and loosen the pressures screws located on the lower and upper hinges of each door using a 3/32” Allen key to free the adjustable hinge rods. 28 Solution 2.5-ZC Fireplace Installation and Operation Manual... - Page 29 Using a flat screwdriver, turn the adjustable hinge rods in the direction shown to adjust the doors. Tighten all door hinge pressure screws when they are at the desired positions. Solution 2.5-ZC Fireplace Installation and Operation Manual...
-
Page 30: Replacing The Door Gasket
(E). Lift out the glass (D) and pull off the old gasket. Do the same for the other door. This is a good time to clean the glass thoroughly. 30 Solution 2.5-ZC Fireplace Installation and Operation Manual... -
Page 31: Cleaning And Painting The Fireplace
To change the glass, perform the same operation described above. Both glasses used in the SOLUTION 2.5-ZC are 5 mm thick of dimension: 12" x 13,625" and tested to reach temperatures up to 1400º F. If the glass breaks, it must be replaced with one having the same specification. -
Page 32: Chimney And Chimney Liner Maintenance
Use a plastic or steel brush. Contact your local municipal or provincial fire authority for information on how to handle a chimney fire. Have a clearly understood plan to handle a chimney fire. 32 Solution 2.5-ZC Fireplace Installation and Operation Manual... -
Page 33: Cleaning The Chimney
3) Sweep the chimney. 4) Clean the inside of the firebox. 5) Re-install the baffle, the air tubes and the rain cap. CAUTION: OPERATION OF YOUR SOLUTION 2.5-ZC WITHOUT THE BAFFLE MAY CAUSE UNSAFE AND HAZARDOUS TEMPERATURE CONDITIONS AND WILL VOID THE WARRANTY. -
Page 34: Fire Baffle Removal Prior To Cleaning The Chimney
5. Check outside to ensure that sparks and hot embers coming out of the chimney are not igniting the roof; 6. Do not use the fireplace again until your chimney and fireplace have been inspected by a qualified chimney sweep or a Fire Department Inspector; 34 Solution 2.5-ZC Fireplace Installation and Operation Manual... -
Page 35: Part B - Installation
WRITING BY THE TESTING AUTHORITY VIOLATES CSA B365 (CANADA), AND ANSI NFPA 211 (USA). • CONNECTION BETWEEN A 2100 INSULATED CHIMNEY AND A LISTED STAINLESS STEEL CHIMNEY LINER IS ALLOWED IF A LISTED CONNECTOR IS USED. FOLLOW INSTRUCTIONS IN SECTION 8.9 FOR THAT KIND OF INSTALLATION. Solution 2.5-ZC Fireplace Installation and Operation Manual... -
Page 36: Regulations Covering Fireplace Installation
MASONRY CHIMNEY. 6.2 Regulations Covering Fireplace Installation When installed and operated as described in these instructions, the Solution 2.5-ZC wood fireplace is suitable for use in residential installations. The Solution 2.5-ZC wood fireplace is not intended for installation in a bedroom of a mobile home. -
Page 37: Fireplace Installation
6.3.1.1 Raised base installation of more than 4" (R value for the hearth extension not required) The SOLUTION 2.5-ZC may be installed directly on the floor or on a raised combustible or non combustible base. If the fireplace is elevated more than 4" (B), an R value for the hearth extension is not required. - Page 38 MINIMUM CLEARANCES MEASUREMENTS 80" (2032 mm) 2" (51 mm) 4" (102 mm) minimum 38 Solution 2.5-ZC Fireplace Installation and Operation Manual...
- Page 39 Solution 2.5-ZC Fireplace Installation and Operation Manual...
- Page 40 In the case where (F) would be equal to 4", it is suggested that the sheet metal between the base of the fireplace and floor be in one piece. 40 Solution 2.5-ZC Fireplace Installation and Operation Manual...
- Page 41 (E) must be protected by a non- combustible material. For example, a sheet metal (not included). Note that the floor under of the fireplace should match or exceed the height of the floor protection. MINIMUM MEASUREMENT 2" (51 mm) Solution 2.5-ZC Fireplace Installation and Operation Manual...
- Page 42 K values to R by dividing the thickness of each material by its K value. Add the R values of your proposed materials as shown in the previous example. Example: K value = 0.75 Thickness = 1 R value = Thickness/K = 1/0.75 = 1.33 42 Solution 2.5-ZC Fireplace Installation and Operation Manual...
-
Page 43: Minimum Heart Extension Requirements
8" (20 cm) on each side of the door opening (D). The joint between the hearth extension and the fireplace hearth needs to be made of non-combustible material such as sheet metal (not included). Solution 2.5-ZC Fireplace Installation and Operation Manual... - Page 44 CLEARANCES 16" (406 mm) 41.5" (1054 mm) 8" (203 mm) 44 Solution 2.5-ZC Fireplace Installation and Operation Manual...
-
Page 45: Framing, Facing, Mantel, And Combustible Shelf
WARNING: THE FIREPLACE MUST NOT BE IN CONTACT WITH ANY INSULATION OR LOOSE FILLING MATERIAL. FOR THIS PURPOSE, COVER THE INSULATION WITH DRYWALL PANELS OR ANY OTHER FINISHING MATERIAL INSIDE THE CHASE AROUND THE FIREPLACE. Solution 2.5-ZC Fireplace Installation and Operation Manual... - Page 46 7/8" (22 mm) MAX 5" (127 mm) 80" (2032 mm) *When drywall panels or any other finishing material inside the chase around the fireplace is to be used, add its thickness to the measurement. 46 Solution 2.5-ZC Fireplace Installation and Operation Manual...
- Page 47 *When drywall panels or any other finishing material inside the chase around the fireplace is to be used, add its thickness to the measurement. ** The fresh air intake kit and the forced air kit may be installed either on the sides or on the back. Solution 2.5-ZC Fireplace Installation and Operation Manual...
- Page 48 51 5/8" (1311 mm) 7/8" (22 mm) MAX 73" (1854 mm) 18” (457 mm) *When drywall panels or any other finishing material inside the chase around the fireplace is to be used, add its thickness to the measurement. **Values M and N are minimum measurements. They may need to be increased to alloy installation of a Fresh air intake kit or forced air kit, or depending on the finish material used. 48 Solution 2.5-ZC Fireplace Installation and Operation Manual...
- Page 49 CLEARANCES 3" (76 mm) maximum 5 5/8" (143 mm) minimum 17" (432 mm) minimum Solution 2.5-ZC Fireplace Installation and Operation Manual...
- Page 50 For example, for a 9" (229 mm) mantel shelf, the safe positioning would be 53" (1346 mm) above the bottom of the fireplace 44" (1118 mm) + 9" (229 mm)). 50 Solution 2.5-ZC Fireplace Installation and Operation Manual...
- Page 51 SHELF POSITIONING CLEARANCES 80" (2032 mm) 50" (1270 mm) 6" (152 mm) 52" (1321 mm) 8" (203 mm) 54" (1372 mm) 10" (254 mm) 56" (1422 mm) 12" (305 mm) Solution 2.5-ZC Fireplace Installation and Operation Manual...
-
Page 52: Clearances To Combustible Material
In addition, you will find information about your fireplace (model, serial number, etc.). You can find the certification label under the fireplace, behind the bottom louver. 52 Solution 2.5-ZC Fireplace Installation and Operation Manual... -
Page 53: The Venting System
If there is no fire burning in a heater connected to a chimney that is shorter than the warm space inside the house, the slight negative pressure low in the house will compete against the desired upward flow in the chimney. Solution 2.5-ZC Fireplace Installation and Operation Manual... -
Page 54: Chimney Installation Notes
Installations, which are located on lower floors in the house, such as in a basement, in combination with outside chimney, are especially prone to flow reversal. 2. The SOLUTION 2.5-ZC is listed only with chimney systems described in TABLE 2 - LISTED CHIMNEYS FOR YOUR SOLUTION 2.5-ZC. - Page 55 Do not fill this 2 space with insulation or any other combustible material. 11. Portions of the chimney which may extend through accessible spaces must be enclosed to avoid contact with combustible materials or damage the chimney. Solution 2.5-ZC Fireplace Installation and Operation Manual...
- Page 56 16" (410 mm) horizontally, and 18" (460 mm) vertically. This separation is to prevent smoke migrating from one chimney to another. 18" 18" 457.2mm 457.2mm 18" 457.21mm 16" 16" 406.4mm 406.4mm 56 Solution 2.5-ZC Fireplace Installation and Operation Manual...
-
Page 57: Chimney Installation Instructions
However, starting using a 30° or 45° elbow is also approved. Mandatory measure of 15 ft. from the bottom of the fireplace to the top of the outside chimney. Solution 2.5-ZC Fireplace Installation and Operation Manual... - Page 58 Direct installation Exterior offset installation 58 Solution 2.5-ZC Fireplace Installation and Operation Manual...
- Page 59 2. From below, install a firestop (B) supplied by the chimney manufacturer in each ceiling/floor separation through which the chimney will pass. At the attic level, install a radiation shield from above (D). You must build framing to support the radiation shields as per (C). Solution 2.5-ZC Fireplace Installation and Operation Manual...
- Page 60 7. Install the chimney cap (G). 8. When a ventilated roof flashing is installed, precautions are to be taken not to caulk or seal the ventilating openings. 60 Solution 2.5-ZC Fireplace Installation and Operation Manual...
- Page 61 THE STRUCTURAL INTEGRITY OF THE FLOOR, WALL, AND CEILING/ROOF MUST BE MAINTAINED NOTE: THE FLOOR AND WALLS BELOW THE ATTIC MUST BE INSULATED USING THE SAME INSULATION.. Solution 2.5-ZC Fireplace Installation and Operation Manual...
-
Page 62: Offset Chimney Installation
5. From below, install a firestop supplied by the chimney manufacturer (see preceding figure). 6. A support must be used on the first 15' section (4.6 m). 7. Continue with the regular installation. 62 Solution 2.5-ZC Fireplace Installation and Operation Manual... - Page 63 TABLE 2 - LISTED CHIMNEYS FOR YOUR SOLUTION 2.5-ZC CHIMNEY BRAND TYPE INNER DIAMETER MANUFACTURER Selkirk Ultra-Temp (UT) 1” Solid Pack 6" (15 cm) Selkirk Super Pro (SPR) 1” Solid Pack 6" (15 cm) Selkirk Super Vent (JSC) 1” Solid Pack 6"...
- Page 64 Security insulation insulation insulation insulation bellow. Chimneys) (ASHT+) (S2100+) (ASHT+) (S2100+) Anchor Plate (6SP) Anchor Plate (6XSP) Screws 6″ à 7″ Chimney adaptor (6AW7) 7″Chimney adaptor, 1″ insulation to 2″ insulation (7UCA) 64 Solution 2.5-ZC Fireplace Installation and Operation Manual...
-
Page 65: Angled Wall Radiation Shield
Chimney cannot be enclosed at Triple wall American Metal AC Triple wall HSS the attic level. *You can get a kit of four (4) rafter protector (AC03510) from your dealer. Each rafter is made of 22GA galvanized steel (10.44”W x 5.126”H). 1.530” 5.126” 10.44” .512” Solution 2.5-ZC Fireplace Installation and Operation Manual... -
Page 66: Chimney Support Installation
2. It may be used on a floor, ceiling or roof above an offset to support the chimney above the offset. 3. It may be used on a floor, ceiling or roof as a supplementary support. 66 Solution 2.5-ZC Fireplace Installation and Operation Manual... -
Page 67: Universal Offset Support
For connection at 30 or 45° angle, a special connector (B) must be used to connect the liner (C) to the insulated chimney (A). Verify availability and installation instructions for this connector with the chimney manufacturer. Solution 2.5-ZC Fireplace Installation and Operation Manual... -
Page 68: Supply Of Combustion Air
(CO) detector/alarm is required in the room in which the fireplace is installed. The CO detector will provide warning if for any reason the wood fireplace fails to function correctly. 68 Solution 2.5-ZC Fireplace Installation and Operation Manual... -
Page 69: Air Supply In Conventional Houses
Check the outdoor air duct for soot deposits when the full system is cleaned and inspected at least once each year. Solution 2.5-ZC Fireplace Installation and Operation Manual... -
Page 70: Appendix 1: Hot Air Ducting Installation
Appendix 1: Hot Air Ducting Installation Different hot air ducting systems can be installed with the SOLUTION 2.5-ZC: Gravity kit Forced air kit Gravity Kit (AC01309) The kit includes: 2 x hot air outlets (grilles and frames); 2 x 90 elbows with brackets;... - Page 71 The hot air grilles can be installed in the same room as the fireplace, or one or both of the grilles can be installed in adjacent or upper rooms. Installing the ducts at different elevations will tend to exhaust more heat out of the higher grilles. Solution 2.5-ZC Fireplace Installation and Operation Manual...
- Page 72 10. The hot air outlet grilles must be installed with the louvers pointing downwards in order to prevent overheating adjacent ceilings. 11. Always install the two outlet grilles when using the hot air outlet kit and blocking the upper louver of the fireplace. 72 Solution 2.5-ZC Fireplace Installation and Operation Manual...
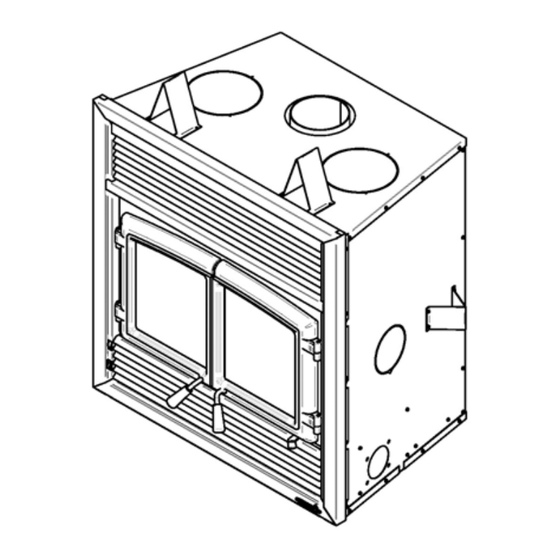
- Page 73 Central Forced Air Kit (not tested to EPA Standards) (AC01340) The knock-outs provided on the back and on the sides of the SOLUTION 2.5-ZC allow the connection of insulated flexible pipe which enables you to heat adjacent rooms up to 50 feet from the fireplace.
-
Page 74: Appendix 2: Blower Maintenance Or Replacement
Appendix 2: Blower Maintenance or Replacement 1. Remove the bottom louver (A). 2. With a short square head screwdriver, remove the 4 screws (C) holding in place the heat shield (B). 74 Solution 2.5-ZC Fireplace Installation and Operation Manual... - Page 75 3. Remove and keep the heat shield screws (C). 4. Cut the Tie wrap (D) Solution 2.5-ZC Fireplace Installation and Operation Manual...
- Page 76 (F) and (G). 6. Lift the blower (E) located under the firebox towards the back. 7. Turn 90° to pull out. Repeat the steps in reverse order to reinstall the fan. 76 Solution 2.5-ZC Fireplace Installation and Operation Manual...
- Page 77 Connect the black wire with the black wire of the terminal block. The ground (green or skinned wire) must be attached to the fireplace metal frame. Solution 2.5-ZC Fireplace Installation and Operation Manual...
-
Page 78: Appendix 3: Installing The Door Overlay
Appendix 3: Installing the Door Overlay In order to complete the assembly of your Solution 2.5-ZC wood fireplace, you need to install the door overlay. See figure below for installation instructions: Position the overlays (A) door frames and secure them... - Page 79 A 3” or 4” insulated flexible pipe (This HVAC type pipe must comply to ULC S110 and/or UL 181, Class 0 or Class 1 Standards and must withstand temperatures up to 250 °F. Solution 2.5-ZC Fireplace Installation and Operation Manual...
- Page 80 2 or 3 has been chosen, use pliers to remove the knock- out. (2) Secure the fresh air intake kit adapter (B) on the fireplace jacket using the 4 screws provided with the kit. 80 Solution 2.5-ZC Fireplace Installation and Operation Manual...
- Page 81 30 ft (9 m). To avoid condensation, it is recommended insulated pipe long enough and containing a "P-Trap" loop. This configuration can be found inside the chase, but must at all times maintain clearances combustibles. Solution 2.5-ZC Fireplace Installation and Operation Manual...
- Page 82 For a better seal, you may also use aluminum tape. Wrap the tape around the joint between the flexible pipe and the air inlets. Carefully push the insulation and plastic cover back over the pipe. Fix the plastic in place using aluminum tape. 82 Solution 2.5-ZC Fireplace Installation and Operation Manual...
-
Page 83: Appendix 5: Installing The Fire Screen (Ac01308)
Warning: Never leave the stove unattended while in use with the fire screen. Solution 2.5-ZC Fireplace Installation and Operation Manual... -
Page 84: Appendix 6: Installation Of Secondary Air Tubes And Baffle
Then, lift and push the tube towards the right inside the hole in the right channel. 84 Solution 2.5-ZC Fireplace Installation and Operation Manual... - Page 85 Then, install the two front tubes. 5. To remove the tubes use the above steps in reverse order. Note that secondary air tubes can be replaced without removing the baffle board. Solution 2.5-ZC Fireplace Installation and Operation Manual...
- Page 86 Type of tube SOLUTION 2.5-ZC fireplace Front ► 95 holes of 0.141" Middle front ► 67 holes of 0.125’’ Middle rear ► 67 holes of 0.109’’ Rear ► 67 holes of 0.101’’ 86 Solution 2.5-ZC Fireplace Installation and Operation Manual...
-
Page 87: Appendix 7: Exploded Diagram And Parts List
Appendix 7: Exploded Diagram and Parts List Solution 2.5-ZC Fireplace Installation and Operation Manual... - Page 88 AC01309 HOT AIR GRAVITY KIT 49066 90 DEGREE X 8" 26Ga. GALVANISED ELBOW 30640 GAKLVANISED BOX FOR AIR GRAVITY KIT 8" 30540 GRAVITY AIR KIT GRILL PL53064 TOP SPACER PL53139 FACEPLATE TOP 88 Solution 2.5-ZC Fireplace Installation and Operation Manual...
- Page 89 REAR REINFORCEMENT 21296 C-CAST BAFFLE 24 3/16" x 20 5/8" x 14 3/4" x 1 1/4" 21148 BAFFLE INSULATION 24 3/16" x 20 5/8" x 14 3/4" x 1" PL34026 BAFFLE INSULATION WEIGHT Solution 2.5-ZC Fireplace Installation and Operation Manual...
- Page 90 1. Remove all bricks (A) surrounding the combustion chamber. 2. Remove brick (D) and the andiron (C) held in place by the two torx screws (B). Use a ratchet with a T- 30 torx socket. 90 Solution 2.5-ZC Fireplace Installation and Operation Manual...
- Page 91 3. Remove the floor bricks (E) & (F). To install the new bricks, follow the above steps in reverse. Solution 2.5-ZC Fireplace Installation and Operation Manual...
-
Page 92: Enerzone Limited Lifetime Warranty
Paint (peeling), gaskets, insulation, firebrick, and ceramic fibre blankets. 1 year *Pictures required Shall your unit or a components be defective, contact immediately your ENERZONE dealer. Prior to your call make sure you have the following information necessary to your warranty claim treatment: ...
Need help?
Do you have a question about the Solution 2.5-ZC and is the answer not in the manual?
Questions and answers