Table of Contents
Advertisement
Available languages
Available languages
Advertisement
Chapters
Table of Contents

Related Manuals for Fora V12


Summary of Contents for Fora V12
- Page 1 Blood Glucose Monitoring System Owner’s Manual...
-
Page 3: Monitoring System
Thank you for choosing the V12 NO-CODING BLOOD GLUCOSE MONITORING SYSTEM Dear FORA V12 No-Coding System Owner: This manual contains important information you must know about the system. Please read it thoroughly and carefully. For other questions regarding this system, please contact your local Customer Care Line. -
Page 4: Important Safety Instructions
IMPORTANT SAFETY INSTRUCTIONS READ THIS BEFORE USING ● The meter and lancing device are for single patient use. Do not share them with anyone including other family members! Do not use on multiple patients! ● All parts of the kit are considered biohazardous and can potentially transmit infectious diseases, even after you have performed clean- ing and disinfection. - Page 5 5.Do NOT use the equipment where aerosol sprays are being used, or where oxygen is being administered. 6.Do NOT use device if it is not working properly, or if it has suf- fered any damage. 7.Read all instructions thoroughly and practice the test before us- ing the product to test your blood glucose.
-
Page 6: Table Of Contents
TABLE OF CONTENTS IMPORTANT INFORMATION ABOUT ALTERNATIVE SITE TESTING (AST) INTRODUCTION TO THE SYSTEM Intended Use Principle of Measurement Contents of the System Appearance and Key Function of the Meter Meter Display Speaking Function Test Strip BEFORE USE Setting the Meter and Deleting the Memory THE TWO MEASURING MODES CONTROL TEST Important Control Solution Test Information... - Page 7 MAINTENANCE Battery Replacement Caring for Your Meter Caring for Your Lancing Device Caring for Your Test Strips PROBLEM-SOLVING GUIDE Special Message Error Message Operational Problem SPECIFICATIONS SUMMARY OF OPERATION...
-
Page 8: Important Information
IMPORTANT INFORMATION Severe dehydration and excessive water loss may cause readings which are lower than actual values. If you believe you are suffering from severe dehydration, consult a healthcare professional immediately. If your blood glucose results are lower or higher than usual, and you do not have symptoms of illness, first repeat the test. -
Page 9: About Alternative Site Testing (Ast)
Alternative Site Testing (AST) Important: There are limitations for doing AST (Alternative Site Testing). * AST results should not be used for CGM calibration. * AST results should not be used for insulin dosing calculations. Please consult your health care profes- sional before you do AST. - Page 10 We strongly recommend you do AST in the following intervals: ˙In a pre-meal or fasting state (more than 2 hours since the last meal). ˙Two hours or more after taking insulin. ˙Two hours or more after exercise. Do NOT use AST if: ˙You think your blood glucose is low.
-
Page 11: Introduction To The System
INTRODUCTION TO THE SYSTEM Intended Use The system is intended for use outside the body (in vitro diagnostic use). It should be used only for testing glucose (sugar) and only with fresh capillary whole blood samples (from the finger, the palm, the forearm, the upper arm, the calf and the thigh). -
Page 12: Contents Of The System
These products have been designed, tested, and proven to work together as a system to pro- duce accurate blood glucose test results. Use only the FORA V12 No-Coding Blood Glucose Test Strips and a control solution with the blood glucose meter. -
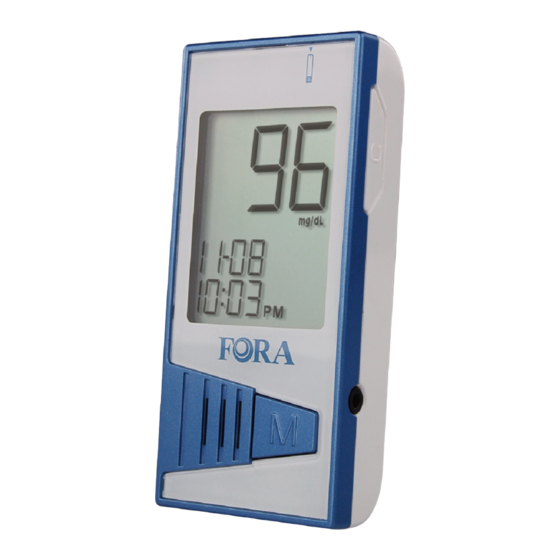
Page 13: Appearance And Key Function Of The Meter
Appearance and Key Function of the Meter TEST SLOT is where you insert the test strip. The meter will turn on automatically after insertion. LCD SCREEN guides you through the test using symbols and simple messages. MAIN BUTTON located in front of the meter with "M" on it, is used to tum on the meter, enter the memory mode and control steps of setting. -
Page 14: Meter Display
Meter Display VOICE SYMBOL TEST STRIP SYMBOL Appears when the meter is turned Indicates speaking function is on/off. LOW BATTERY SYMBOL BLOOD DROP SYMBOL Appears when the battery power is Flashes when it is ready to apply low. the sample. TEST RESULT AREA TEMPERTURE SYMBOL Displays glucose results. -
Page 15: Speaking Function
When the test result is outside The blood glucose out of range, measurement range, which is 20-600 unable to measure. mg/dL. NOTE FORA V12 No-Coding blood glucose monitoring system contains some speaking functions but has not been validated for use by visually impaired users. -
Page 16: Test Strip
Test Strip This system measures the amount of sugar (glucose) in whole blood. Blood is applied to the absorbent hole of the test strip and is automatically drawn into the reaction cell where the reaction takes place. The test strip consists of the following parts: Contact Bars Insert this end of the test strip into the meter. -
Page 17: Before Use
BEFORE USE Setting the Meter and Deleting the Memory Your meter comes with the time, date, memory deletion, voice vol- ume and language preset. If you need to set these parameters, please follow below steps. Start with the meter off. Then press the set button located in the battery compartment. - Page 18 STEP 3. Set the Date Press and release the M button until you see the correct date. To move faster, keep pushing the M button down. When the desired date is displayed, press the set button and then the hour will be shown on the screen. STEP 4.
- Page 19 STEP 7. Select Speaking Function The meter displays “VOL”, “ ” and flashing number. Press M button to select speaking volume from 0 to 7. Then press the set button to proceed to the next step. Number 0 indicates that the speaking function is turned off. “ ”...
-
Page 20: The Two Measuring Modes
THE TWO MEASURING MODES The meter provides you with two modes for measuring, General and CTL. MODES USE WHEN General (Not display) any time of day without regard to time since last meal testing with the control solution You can switch between each mode by: 1. -
Page 21: Control Test
CONTROL TEST FORA control solutions contain a known amount of glucose that reacts with test strips. By comparing your control solution test results with the expected range printed on the test strip vial label, it is able to check that the meter and the test strips are working together as a system and that you are performing the test correctly. -
Page 22: Important Control Solution Test Information
Important Control Solution Test Information ˙ Use only FORA control solutions. ˙ Check the expiration date on the control solution vial. Do not use if expired. ˙ Control solution, meter, and test strips should come to room temperature (68 to 77°F/20 to 25°C) before testing. -
Page 23: Performing A Control Solution Test
Performing a Control Solution Test STEP 1. Insert Test Strip Fully insert test strip, face up with control bars end first, into test slot. The meter will turn on automatically and display the followings in sequence: → CH” and ” ”... - Page 24 STEP 3. Obtain Control Solution Shake the control solution vial well. Remove the cap from the control solution bottle. Place cap on flat surface. Squeeze the vial, discard the first drop, and wipe off the dispenser tip to prevent contamination. Squeeze the vial again to produce another drop and place this drop on the top of cap.
-
Page 25: Testing Your Blood Sugar
TESTING YOUR BLOOD SUGAR Be sure to read this section and the test strip package insert found in the test strip box carefully before testing. Make sure you have all items needed to test: A. Blood glucose meter B. Test strip C. -
Page 26: Test Procedure
Test Procedure Wash and dry your hands before starting. Step 1. Set the Lancing Device Screw off the cap of the lancing device. Insert a lancet into the lancet holder and push down firmly until it is fully seated. Twist the protective disk until it separates from the lancet. Replace the lancet device cap. -
Page 27: Fingertip Testing
STEP 2. Insert Test Strip Fully insert test strip face up with contact bars end first, into the test slot. The Meter will turn on automatically and display the following in sequence: → "CH" and " " → flashing “ ”... - Page 28 ˙ Sites Other Than Fingertip Please refer to the section of “About Alternative Site Testing (AST)” for possible punctured sites. PLEASE NOTE ˙Choose a different spot each time you test. Repeated punctures at the same spot may cause soreness and calluses. ˙Before you decide to begin AST, please consult your health professional.
- Page 29 STEP 6. Obtain an Accurate Result in 7 Seconds The result of your blood glucose test will appear after the meter counts to 0. This reading will automatically be stored in the meter. Take the strip out from the meter by hand and the meter will show “OFF”...
- Page 30 STEP 7 Remove the used test strip and lancet Remove the test strip by hand, throw the strip into a disposal container. The meter will turn itself off automatically after the test strip is removed. Always use caution when removing the lancet. Take the lancet out carefully.
-
Page 31: Expected Test Results
60%.*¹ The results provided by the FORA V12 No-Coding system can help you and your healthcare professional monitor and adjust your treatment plan to gain better control of your diabetes. -
Page 32: Comparing Meter And Laboratory Results
COMPARING METER AND LABORATORY RESULTS The meter provides you with plasma equivalent results. The result you obtain from your meter may differ somewhat from your laboratory result due to normal variation. Meter results can be affected by factors and conditions that do not affect laboratory results in the same way (See test strip package insert for typical accuracy and precision data, and for important informa- tion on Limitations). -
Page 33: Using The Meter Memory
USING THE METER MEMORY Viewing Results on the Meter Your meter stores the 450 most recent blood glucose test results along with their repective dates and times in its memory. It also provides you with 7-, 14-, 21-, 28-, 60- and 90-day averages of your blood glucose test results. You can review these averages test results in memory through these easy steps. - Page 34 ˙Recall the Stored Test Results 1. When the meter is off, press and release the M button. The screen shows “ ”. Press the M button again, “01” appears first and then the latest glucose result along with date and time will be shown on the screen.
- Page 35 PLEASE NOTE ˙ The control solution results are NOT stored in the memory (please refer to WARNING on the section, CONTROL TEST, for more information). The list of past results and the result averages are for blood glucose results only. ˙...
-
Page 36: Viewing Results On A Personal Computer
Results in memory can be transmitted to a personal computer. Health Care System Software and an interface cable are required before installation. The software can be downloaded from the home page of Fora Care Inc. To learn more about Health Care System Software or to obtain an Interface Cable sepa- rately, please contact the Customer Care Line at 1-888-307-8188 for help. -
Page 37: Maintenance
MAINTENANCE Battery Replacement Your meter comes with two 1.5V AAA alkaline batteries. The meter will alert you when the power is getting low by displaying two differ- ent messages: 1. With symbol appears on the display: the meter is functional and the result re- mains accurate, but it is time to change the battery. - Page 38 To replace the battery, make sure that the meter is turned off. STEP1 STEP2 STEP3 STEP1 STEP2 STEP3 Press the buckle on Remove the old bat- Close the battery battery cover and lift tery and replace with cover. up to remove cover. two 1.5V AAA alkaline batteries.
-
Page 39: Caring For Your Meter
We recommend using the disinfecting wipes/towelettes below for meter cleaning and disinfection because the active ingredients have been tested to be effective against Hepatitis B Virus (HBV) for FORA V12 No-Coding blood glucose monitoring system. ▲ Micro-Kill+™ (Micro-Kill Plus™) by Medline (EPA Reg. No. - Page 40 Disinfecting Procedures 1. Take out one disinfecting wipe from the package and squeeze out any excess liquid in order to prevent damage to the meter. 2. Wipe all meter’s exterior surface display and buttons. Hold the meter with the test strip slot pointing down and wipe the area around the test slot but be careful not to allow excess liquid to get inside.
-
Page 41: Caring For Your Lancing Device
NOTE • Do NOT clean and disinfect the meter while performing tests. • Please follow the instructions on the package label of Micro-Kill disin- fecting wipes for safe use of the wipes • If the meter is being operated by a second person, the meter and lanc- ing device should be decontaminated prior to use by the second person. -
Page 42: Caring For Your Test Strips
Caring for Your Test Strips ˙ Storage condition: 39.2°F to 104°F (4°C to 40°C), below 85% relative humidity. Do not freeze. ˙ Store your test strips in their original vial only. Do not transfer to other container. ˙ Store test strip packages in a cool and dry place. Keep away from direct sunlight and heat. -
Page 43: Problem-Solving Guide
PROBLEM-SOLVING GUIDE The following is a summary of various display messages. These messages help to identify certain problems but do not always appear in all cases when a problem has occurred. Improper use may cause an inaccurate result without producing an error message. In the event of a problem, refer to the information under the row “ACTION”. -
Page 44: Special Message
Special Message Special symbols and messages appear together with your test result. MESSAGE WHAT IT MEANS WHAT TO DO Your result is below mea- surement limit, which is You should seek immediate less than 20 mg/dL . medical assistance. This indicates hypoglycemia (low blood glucose). -
Page 45: Error Message
Error Message MESSAGE WHAT IT MEANS WHAT TO DO Appear when the battery Replace the battery im- can not provide enough mediately. power for a test. Review the instructions Problem with the meter. and re-test with a new test strip. You need to remove the Re-test with a new test strip after applying blood to... -
Page 46: Operational Problem
Operational Problem 1. If the meter does not display a message after inserting a test strip: PROBABLE CAUSE WHAT TO DO Battery exhausted. Replace the battery. Battery incorrectly installed Check that the battery is correctly or absent. installed. Test strip inserted upside Insert the test strip face up with the con- down or incompletely. - Page 47 3. If the control solution test result is out of range: PROBABLE CAUSE WHAT TO DO Error in performing the test. Read the instructions thoroughly and repeat the test again. Control solution poorly Shake the control solution vigorously shaken. and repeat the test again. Expired or contaminated Check the expiration date or the dis- control solution.
-
Page 48: Specifications
SPECIFICATIONS ˙Model No.: FORA V12 ˙Dimension & Weight: 96mm(L) x 45mm(W) x 23mm(H), 76.15g ˙Power source: two 1.5V AAA alkaline batteries ˙Memory: 450 measurement results with respective dates and times ˙Auto electrode inserting detection ˙Auto sample loading detection ˙Auto reaction time countdown ˙Auto shutdown after 3 minutes of idleness... -
Page 49: Summary Of Operation
SUMMARY OF OPERATION This summary is intended only for quick reference only. It is not a substitute for the owner’s manual. Please read the entire manual before you begin testing. STEP 1. Insert Test Strip The meter will automatically turn on and display the followings in sequence: “... - Page 50 STEP 3. Obtain Accurate Results in 7 Seconds The meter will begin to count down. The result of your blood glucose test will appear after the meter counts to 0. STEP 4. Remove the used test strip and lancet Always use caution when removing the lancet. Place the disk on a hard surface and push the exposed tip into the protective disk.
- Page 51 NOTE...
- Page 52 NOTE...
- Page 53 SISTEMA DE VIGILANCIA DE GLUCOSA EN SANGRE V12 Sin-Codificación Querido Usuario del Sistema FORA V12 Sin-Codificación: Este producto le puede ayudar a usted a monitorizar el nivel de glucosa en sangre. Para más información sobre el producto u otras instrucciones actualizadas, puede visitar nuestra pagina de web www.foracare.com...
- Page 54 INSTRUCCIONES IMPORTANTES DE SEGURIDAD LEA LO SIGUIENTE ANTES DE UTILIZAR ● El medidor y la lanceta son para su uso en un único paciente. ¡No los comparta con nadie, ni siquiera con sus familiares! ¡No usar en más de un paciente! ●...
- Page 55 5. No utilice el dispositivo en el mismo lugar que un rocio de aero- sol ni donde se administra el oxígeno. 6. No utilice el dispositivo si no funciona bien o si ha sufrido algún daño. 7. Lea todas las instrucciones detenidamente y practique la prueba antes de usar el producto para probar su glucosa en sangre.
- Page 56 TABLA DE CONTENIDO INFORMACIÓN IMPORTANTE SOBRE EL LUGAR ALTERNATIVO DE PRUEBA (LAP) INTRODUCCION AL SISTEMA Uso Previsto Principios de la Medición Contenido del Sistema Apariencia y Funciones Principales del Medidor Pantalla del Medidor Función Hablante Tira Reactiva ANTES DEL USO Ajustando el Medidor y Borrando la Memoria LOS DOS MODOS DE MEDICIÓN ANTES DE PROBAR LA GLUCOSA EN SANGRE...
- Page 57 MANTENIMIENTO Cambio de Pila Cuidado del Medidor Cuidado del Dispositivo de Punción Cuidado de Las Tiras Reactivas GUÍAS PARA RESOLVER PROBLEMAS Mensaje Especial Mensaje de Error Problema Operacional ESPECIFICACIONES RESUMEN DE LA OPERACIÓN...
-
Page 58: Información Importante
INFORMACIÓN IMPORTANTE ·La deshidratación severa y excesiva pérdida de agua puede cau- sar resultados incorrectos. Si usted cree que está sufriendo de deshidratación severa, consulte a su médico inmediatamente. ·Si usted no tiene síntomas de enfermedad y los resultados de la glucosa en sangre son más bajos o altos que lo normal, repita la prueba. -
Page 59: Sobre El Lugar Alternativo De Prueba (Lap)
SOBRE EL LUGAR ALTERNATIVO DE PRUEBA (LAP) Importante: Existen limitaciones para realizar SOBRE EL LUGAR ALTERNATIVO DE PRUEBA (LAP) * Los resultados de los LAP no deberán usarse para la calibración del CGM. * Los resultados de los LAP no deberán usarse para los cálculos de las dosis de insulina. - Page 60 Le recomendamos a usted que realice el LAP SOLAMENTE en los siguientes intervalos: ˙Antes de una comida o en ayuna (más de 2 horas desde la última comida). ˙Dos horas o más después de tomar insulina. ˙Dos horas o más después de ejercitar. NO utilice el LAP si: ˙Usted cree que su glucosa en sangre está...
-
Page 61: Introduccion Al Sistema
INTRODUCCION AL SISTEMA Uso Previsto El sistema es previsto para el uso externo (de diagnóstico in-vitro). Se debe usarlo solamente para la prueba de la glucosa (azúcar) con muestras de la fresca sangre capilar (del dedo, la palma, el antebrazo, el brazo superior, la pantorrilla y el muslo). No debe ser usado para diagnosticar la diabetes, ni para probar los recién naci- dos. -
Page 62: Contenido Del Sistema
Utilice solamente las tiras reactivas FORA V12 Sin-Codificación y la solución de control con el medidor de la glucosa en sangre. -
Page 63: Apariencia Y Funciones Principales Del Medidor
Apariencia y Funciones Principales del Medidor RANURA DE PRUEBA es donde introduces la tira reactiva. El medidor se encendera automáticamente después de la inserción. PANTALLA LCD le dirige a través de la prueba usando símbolos y mensajes sencillos. BOTÓN PRINCIPAL situado en el frente del medidor con la letra “M”... -
Page 64: Pantalla Del Medidor
Pantalla del Medidor SÍMBOLO DE VOZ SÍMBOLO DE TIRA REACTIVA Indica si la función hablante está Aparece cuando el medidor se enciende. encendido/apagado. SÍMBOLO DE GOTA DE SÍMBOLO DE PILA BAJA SANGRE Aparece cuando la batería está baja. Parpadea cuando esta listo para AREA DEL RESULTADO DE aplicar la muestra. -
Page 65: Función Hablante
Función Hablante FORA V12 “habla” para dirigir a usted paso a paso a través del procedimiento de probar la glucosa en sangre. La siguiente tabla le informa cuándo y qué “habla” el medidor. Esos mensajes también se puede encontrar en la sección final de este manual “RESUMEN DE LA OPERACIÓN.”... -
Page 66: Tira Reactiva
Tira Reactiva El sistema mide la cantidad de azúcar (glucosa) en la sangre en- tera. La sangre es aplicada al canal absorbente de la tira reactiva donde es retraída automáticamente a la célula reactiva donde toma lugar la reacción. La tira reactiva consiste en los siguientes partes: Barras de Contacto Inserte este extremo de la tira reactiva en el medidor. -
Page 67: Antes Del Uso
ANTES DEL USO Ajustando el Medidor y Borrando la Memoria Su medidor viene con la hora, la fecha, borrar la memoria, el volumen de la voz y seleccion de idioma. Si necesita ajustar la hora o cambiar las pilas, usted debera entrar a la configuracion y reajustar. - Page 68 PASO 3. Ajustar la Fecha Presione y suelte el botón M hasta que vea la fecha correcta. Para avanzar más rápido mantenga presionado el botón M. Con la fecha correcta en la pantalla presione el botón set y la hora aparecerá parpadeando en la pantalla. PASO 4.
- Page 69 PASO 7. Ajustar el Volumen de la Voz El medidor visualiza “VOL”, “ ” y un número parpadeante. Presione el botón M para seleccionar el volumen de la voz de 0 a 7. Luego presione el botón de seteo para seguir al próximo paso.
-
Page 70: Los Dos Modos De Medición
LOS DOS MODOS DE MEDICIÓN El medidor le proporciona dos modos para medir, General y CTL. MODOS General (sin en cualquier momento del día, independientemente del visualización) tiempo transcurrido desde la última comida al realizar el análisis con la solución de control Para cambiar de un modo al otro: 1. -
Page 71: Antes De Probar La Glucosa En Sangre
ANTES DE PROBAR LA GLUCOSA EN SANGRE Prueba de Control Las soluciones de control FORA contienen una cantidad conocida de glucosa que reacciona con las tiras reactivas. Usted puede verificar si el medidor y las tiras reactivas están funcionando juntos como un sistema y que usted está ha- ciendo la prueba correctamente, comparando los resultados de la prueba de solución de control y el rango de los resultados impreso en la etiqueta del frasco... -
Page 72: Información Importante Sobre La Solución De Control
FAVOR DE NOTAR El rango impreso en el frasco de las tiras reactivas es solamente para las soluciones de control FORA. Se usa para probar la ejecución del medidor y las tiras reactivas. No es el rango recomendado para su nivel... -
Page 73: Realizando Una Prueba De La Solución De Control
Realizando una Prueba de la Solución de Control PASO 1. Inserte la Tira Reactiva Inserte la tira reactiva en la ranura de prueba con las barras de contacto primero y hacia arriba. El medidor se encenderá automáticamente y visual- izará lo siguiente en secuencia: →... - Page 74 PASO 3. Obtenga la Solución de Control Agite bien el frasco de la solución de control. Remueva el casquillo y póngalo en una superficie plana. Apriete el frasco, deseche la primera gota, y limpie la punta del dispen- sador para evitar contaminación. Apriete el frasco otra vez para sacar otra gota de san- gre y aplique esa gota a la parte superior del casquillo.
-
Page 75: Probando Su Glucosa En Sangre
PROBANDO SU GLUCOSA EN SANGRE No se olvide de leer detenidamente esta sección y el encarte del paquete de las tiras reactivas en la caja de las tiras reactivas antes de probar. Asegúrese de que tenga todos los artículos necesarios para la prueba: A. - Page 76 ADVERTENCIA Para reducir la posibilidad de infecciones ˙El medidor y el dispositivo de punción son para su solo uso. Nunca comparta una lanceta o el dispositivo de punción. ˙Siempre utilice una nueva lanceta estéril. Son para utilizarse una sola vez. ˙Evite ensuciar las lancetas y el dispositivo de punción con loción de manos, aceites, mugre y desechos.
-
Page 77: Procedimiento De La Prueba
Procedimiento de la Prueba Lave y limpie sus manos antes de comenzar. PASO 1. Ajustar el Dispositivo de Punción Destape el casquillo del dispositivo de punción. Inserte una lanceta dentro del agarre de lanceta y empújela firmemente hacia abajo hasta que entre completamente. Retuerza el disco protectivo hasta que separe de la lanceta. - Page 78 PASO 2. Insertar la Tira Reactiva Inserte la tira reactiva con las barras de contacto primero y hacia arriba. El medidor se encenderá automáticamente y visualizará lo siguiente en secuencia: → CH” y ” ” → el símbolo “ ” parpadeando con la fecha y hora STEP 3.
- Page 79 ˙ Lugares Aparte de la Yema del Dedo Por favor de referir a la seccion de “Sobre el Lugar Alternativo de Prueba (LAP)” para los posibles lugares de puncion. FAVOR DE NOTAR ˙Elija un punto diferente cada vez que se haga la prueba. Repitiendo las punciones en el mismo lugar puede causar dolor muscular y callosidad.
- Page 80 PASO 6. Obtener un Resultado Exacto en 7 Segundos El resultado de su prueba aparecerá después de que el medidor cuente a 0. Será guardado automáticamente en la memoria del medidor. Remueva la tira del medidor con la mano y el medidor mostrará “OFF” antes de apagarse. FAVOR DE NOTAR ˙No empuje el dedo puncionado (con sangre) contra la tira reactiva o intentar aplicar una muestra de sangre corrida a la tira reactiva.
- Page 81 PASO 7. Retire la tira reactiva y la lanceta usadas Retire a mano la tira reactiva y deseche la tira en un contenedor de residuos. El medidor se apagará au- tomáticamente cuando se retire la tira reactiva. Siempre tenga precaución al remover la lanceta. Remueva el casquillo del dispositivo de punción y la lanceta cuidadosamente.
-
Page 82: Resultados Esperados De La Prueba
60%.*¹ Los resultados proporcionados por el sistema FORA V12 Sin-Codificaión puede ayudarles a usted y a su pro- fesional sanitario a seguir y ajustar su plan de tratamiento para conseguir mejor control de su diabetes. -
Page 83: Comparando Resultados Entre En Medidor Y El Laboratorio
COMPARANDO RESULTADOS ENTRE EL MEDIDOR Y EL LABORATORIO El medidor proporciona resultados equivalentes en plasma. El resultado que obtiene de su medidor puede diferir de alguna manera de sus resulta- dos de laboratorio debido a variación normal. Los resultados del medidor pueden ser afectado por factores y condiciones que no afectan los resul- tados del laboratorio de la misma forma (Vea la información en el encarte del paquete de las tiras reactivas para exactitud típica y precisión de datos,... -
Page 84: Utilizando La Memoria Del Medidor
UTILIZANDO LA MEMORIA DEL MEDIDOR Viendo Resultados en el Medidor El medidor almacena los 450 resultados de prueba de la glucosa en sangre más recientes además de sus fechas y horas respectivas en la memoria. También le proporciona con promedios de sus resultados de prueba de la glucosa en sangre de 7, 14, 21, 28, 60 y 90 días. - Page 85 ˙Recordar los Resultados de la Prueba 1. Cuando el medidor esta apagado, presione y libere el boton M. La pantalla visulizara “ ”. Presione nuevamente el boton M, aparecera primero “01” y luego el resultado de glucosa más reciente aparecerá en la pantalla junto con la fecha y hora.
- Page 86 FAVOR DE NOTAR ˙ El medidor guarda los resultados de las pruebas de la solución de control (por favor refierase a la pagina 23 para más ADVERTENCIA información). La lista de resultados y promedios pasados solamente pertenecen a las pruebas de glucosa en sangre. ˙...
-
Page 87: Viendo Resultados En La Computadora
Software de Health Care System y un cable de transmisión. El software puede ser bajado de la página web de Fora Care Inc. El cable de transmisión es requerido para transmitor los datos pero no esta incluido en el estandard kit. -
Page 88: Mantenimiento
MANTENIMIENTO Cambio de Pila El medidor viene con dos pilas alcalinas de 1.5V AAA. El medidor le alertará cuando la bateria está baja exhibiendo dos diferente men- sajes: 1. Cuando aparece el símbolo en la pan- talla: el medidor es funcional y el resultado sigue siendo exacto, sin embargo, es tiempo de cambiar las pilas. - Page 89 Asegúrese que el medidor esté apagado cuando cambie las pilas. PASO 1 PASO 2 PASO 3 PASO1 PASO2 PASO3 Presione la hebilla Remueva las pilas Cierre la cubierta de de la cubierta de pila usada y reemplácela pila. y arránquela para con dos pilas alcali- remover la tapa.
-
Page 90: Cuidado Del Medidor
Hepatitis B (VHB) para el sistema de control de glucosa en sangre FORA V12 No-Coding. ▲ Micro-Kill+™ (Micro-Kill Plus™), de Medline (EPAReg. nº 59894-10- 37549) Para obtener paños desinfectantes y otra información, póngase en contacto... - Page 91 Procedimientos para la desinfección 1. Saque un paño desinfectante del paquete y escúrralo para quitarle el posible exceso de líquido, con el fin de evitar dañar el medidor. 2. Limpie la pantalla y botones de la superficie externa del medidor. Sujete el medidor con la ranura para tiras reactivas hacia abajo y limpie la zona que la rodea, cuidando no mojar en exceso el interior de la ranura.
- Page 92 NOTA • NO limpie ni desinfecte el medidor mientras realiza análisis. • Siga las instrucciones de la etiqueta del envase de los paños desinfec- tantes Micro-Kill para un uso seguro de los paños. • Si el medidor es usado por otra persona, será necesario descontaminar tanto el medidor como el dispositivo de punción antes de su uso por la segunda persona.
-
Page 93: Cuidado Del Dispositivo De Punción
Cuidado del Dispositivo de Punción El dispositivo de punción se puede reutilizar. Desinfecte periódicamente su dispositivo de punción. ˙ Para limpiar el dispositivo de punción, use un paño desinfectante. ˙ Desinfecte el tapón colocándolo en alcohol al 70% durante 10 minutos y dejando a continuación que se seque al aire. -
Page 94: Guías Para Resolver Problemas
GUÍAS PARA RESOLVER PROBLEMAS Lo siguiente es un resumen de varios mensajes que pueden aparecer en la pan- talla. Estos mensajes le ayudan a identificar ciertos problemas, pero no siempre aparecen en todos casos de problema. El uso inapropiado puede causar un resultado inexacto sin producir un mensaje de error. -
Page 95: Mensaje Especial
Mensaje Especial Símbolos especiales y mensajes aparecen juntos con el resultado de prueba. MENSAJE QUÉ SIGNIFICA ACCIÓN Su resultado esta bajo el Debe tratar hipoglicemia limite de la medida, menor inmediatamente según las de 20 mg/dL. recomendaciones de su profesional sanitario. Esto indica hipoglicemia (glucosa en sangre bajo). -
Page 96: Mensaje De Error
Mensaje de Error MENSAJE QUÉ SIGNIFICA ACCIÓN Las pilas no tienen energia Reemplace las pilas inme- para hacer otra prueba. diatamente. Repase las instrucciones Problema con el medidor. y vuela a hacer la prueba con una nueva tira reactiva. Necesita remover la tira Hacer la prueba otra vez despues de aplicar la con una nueva tira. -
Page 97: Problema Operacional
Problema Operacional 1. Ningún mensaje aparece en la pantalla del medidor después de introducir una tira. POSIBLE CAUSA ACCIÓN Pilas agotadas. Reemplace las pilas. Pilas instaladas incorrecta- Revise que las pilas se encuentren cor- mente o inexistentes. rectamente instaladas. Tira reactiva colocada al Inserte la tira reactiva correctamente con las revés o de modo incompleto. - Page 98 3. Si el resultado de la prueba de la solución de control está fuera del rango. POSIBLE CAUSA ACCIÓN Error en la realización de Lea las instrucciones minuciosamente y la prueba. repita nuevamente la prueba. No se agitó bien la Agite vigorosamente la solución de con- solución de control.
-
Page 99: Especificaciones
ESPECIFICACIONES ˙N°º modelo: FORA V12 ˙Dimensiones y peso: 96mm(L) x 45mm(W) x 23mm(H), 76.15g ˙Fuente de energía: dos pilas alcalinas de 1.5V AAA ˙Memoria: 450 resultados con sus fechas y horas respectivas ˙Auto detección al insertar electrodo ˙Auto detección en la muestra de carga ˙Auto reacción de tiempo en cuenta regresiva... -
Page 100: Resumen De La Operación
RESUMEN DE LA OPERACIÓN Este resumen es previsto solamente para la referencia rápida. No sirve como sustituto para el manual del usuario. Por favor de leer el manual entero antes de empezar la prueba. PASO 1. Insertar la Tira Reactiva El medidor se encenderá... - Page 101 PASO 3. Obtener Resultados Exactos en 7 Segundos El medidor empezará a contar de manera regresiva. En este momento, si encuentra que la ventana de confirmación no está llena completa- mente, no añada sangre a la tira. Deseche la tira y haga la prueba otra vez con una nueva tira.
- Page 102 NOTA...
- Page 104 Distributed by ForaCare Read instructions before use. Fora Care Inc. 893 Patriot Dr., Suite D, Moorpark, CA 93021 USA Products made in Taiwan Toll Free: 1-888-307-8188 (8:30am-5:00pm PST, Mon.-Fri.) 1-866-469-2632 (24 Hours, 7 days/ week) www.foracare.com...
Need help?
Do you have a question about the V12 and is the answer not in the manual?
Questions and answers