
Related Manuals for Fora Premium V10a


Summary of Contents for Fora Premium V10a
- Page 1 Blood Glucose Monitoring System Sistema de vigilancia de glucose sanguinea Owner’s Manual Manual del Propietario...
- Page 3 Regular monitoring of your blood glucose levels can help you and your doctor gain better control of your diabetes. Due to its compact size and easy operation, you can use the FORA Premium V10 Blood Glucose Monitoring System to easily monitor your blood glucose levels.
- Page 4 IMPORTANT SAFETY PRECAUTIONS READ BEFORE USE ● The meter and lancing device are for single patient use. Do not share them with anyone including other family members or use on multiple patients! ● All parts of the kit are considered biohazardous and can potentially transmit infectious diseases, even after you have cleaned and disinfected the components in the kit.
- Page 5 9. Do not under any circumstances use the device on neonates or infants. 10. Keep the device and testing equipment away from young children. Small items such as the battery cover, batteries, test strips, lancets and vial caps are choking hazards. 11.
-
Page 6: Table Of Contents
TABLE OF CONTENTS BEFORE YOU BEGIN Important Information Intended Use Test Principle Contents of System Meter Overview Display Screen Test Strip Setting the Meter THE FOUR MEASURING MODES Control Solution Testing Performing a Control Solution Test TESTING WITH BLOOD SAMPLE Preparing the Puncture Site Alternative Site Testing Performing a Blood Glucose Test... -
Page 7: Before You Begin
BEFORE YOU BEGIN Important Information ● Severe dehydration and excessive water loss may cause readings which are lower than actual values. If you believe you are suffering from severe dehydration, consult a healthcare professional immediately. ● If your blood glucose results are lower or higher than usual, and you do not have any symptoms of illness, repeat the test. -
Page 8: Intended Use
It is intended to be used by a single person and should not be shared. The alternative site testing in the FORA Premium V10 Blood Glucose Monitoring System can be used only during steady-state blood glucose conditions. -
Page 9: Contents Of System
Intended Use Contents of System The FORA Premium V10 system kit includes: Meter Protective Wallet Owner’s Manual Daily Log Book Quick Start User Guide / Two AAA Batteries Warranty Card Test strips, control solution, sterile lancets and lancing device may be purchased separately. -
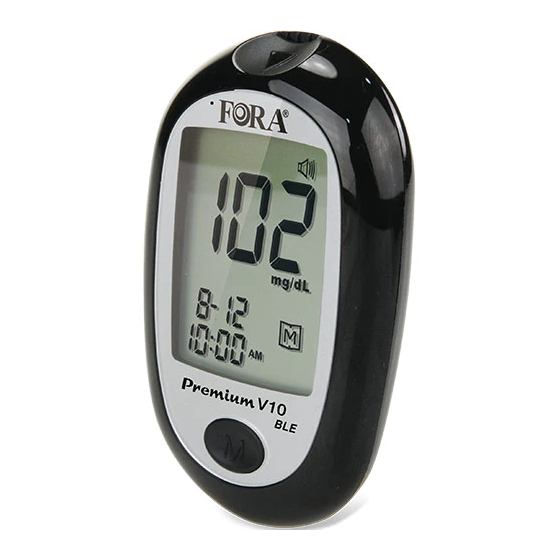
Page 10: Meter Overview
Meter Overview Test Strip Slot Insert test strip here to turn the meter on for testing. Test Strip Ejector Eject the used strip by sliding up this button. Display Screen M Button Enter the meter memory and silence a reminder alarm. Data Port Download test results with a cable connection. -
Page 11: Display Screen
Display Screen Volume Symbol Time Test Strip Symbol Control Solution Mode Blood Drop Symbol Measuring Mode Low Battery Symbol Memory Symbol Test Result Day Average Alarm Symbol Ketone Warning Date Measurement Unit... -
Page 12: Test Strip
Test results might be wrong if the contact bar is not fully inserted into the test slot. NOTE: The FORA Premium V10 monitor should only be used with FORA Premium V10 Test Strips. Using other test strips with this meter can produce inaccurate results. -
Page 13: Setting The Meter
Setting the Meter Before using your meter for the first time or if you change the meter battery, you should check and update the settings. Make sure you complete the steps below to change your settings. Entering the Setting Mode Start with the meter off (no test strip inserted). - Page 14 3. Deleting the memory With “dEL” and “ ” on the display, press and select “no” to keep the results in memory then press SET to skip. To delete all the results, press select “yes” to delete all the memory records.
- Page 15 5. Choosing a language Press to select L1/L2/L3. L1: English. L2: Spanish. L3: Chinese. To confirm your selection, press SET. 6. Setting the reminder alarm Your meter has four reminder alarms. The meter will display "OFF" , " " and "A-1".
-
Page 16: The Four Measuring Modes
THE FOUR MEASURING MODES The meter provides you with four modes for measuring, General, AC, PC and QC. USE WHEN MODES any time of day without regard to time since last meal General no food intake for at least 8 hours 2 hours after a meal testing with the control solution You can switch between the two modes by:... -
Page 17: Control Solution Testing
Control Solution Testing Our control solutions contain a known amount of glucose that reacts with the test strips, and is used to ensure that the meter and test strips are working together correctly. Test strips, control solutions, or sterile lancets may not be included in the kit (please check the contents on your product box). - Page 18 2. Press until “QC” is displayed. With “QC” displayed, the meter will not store your test result in memory. If you again, the “QC” will disappear press and this test is no longer a control solution test. WARNING: When doing the control solution test “QC” must be displayed so that the test results will not be stored in the memory.
- Page 19 4. Read and compare the result After counting down to 0, the control solution test result will appear on the display. Compare this result with the range printed on the test strip vial. It should fall within the range. If not, please read the instructions again and repeat Normal 100~165...
-
Page 20: Testing With Blood Sample
TESTING WITH BLOOD SAMPLE Preparing the Lancing Device for Blood Testing Please follow the instructions in the lancing device insert for collecting a blood sample. WARNING: To reduce the chance of infection: • Never share a lancet or the lancing device. •... - Page 21 Please follow the suggestions below before obtaining a drop of blood: Wash and dry your hands before starting. ● Select the puncture site either at fingertips or another body part (please see section “Alternative Site Testing” (AST) on how to select the appropriate sites).
-
Page 22: Alternative Site Testing
Alternative Site Testing Upper Arm Forearm Suggested Test Areas for the Hand Important: There are limitations with Alternative Site Testing (AST). ● AST results should not be used for CGM calibration. ● AST results should not be used for insulin dosing calculations. Please consult your health care professional before you perform AST. -
Page 23: Performing A Blood Glucose Test
We strongly recommend that you perform AST ONLY at the following times: ● In a pre-meal or fasting state (more than 2 hours since the last meal). ● Two hours or more after taking insulin. ● Two hours or more after exercise. Do NOT use AST if: ●... - Page 24 3. Obtaining a blood sample Use the pre-set lancing device to puncture the chosen site. After lancing wipe away the first drop of blood with a clean cotton swab. Gently squeeze the punctured area to obtain another drop of blood. Be careful NOT to smear the blood sample.
- Page 25 5. Read your result The result of your blood glucose test will appear after the meter counts down to 0. This blood glucose result will automatically be stored in the memory. Voice Guide Your blood glucose is (number) milligrams per deciliter. 6.
-
Page 26: Meter Memory
METER MEMORY The meter stores up to 450 most recent blood glucose test results with date and time stamp in its memory. To enter the meter memory function, start with the meter turned off. Reviewing Test Results “ ” will 1. -
Page 27: Reviewing Blood Glucose Day Average Results
Reviewing Blood Glucose Day Average Results . When “ ” 1. Press and release appears on the display, keep pressing M for 3 seconds until the flashing “ ” appears. Release and then your 7-day average result measured in general mode will appear on the display. -
Page 28: Downloading Results Onto A Computer
Downloading Results onto a Computer Data Transmission Via RS232 Cable You can use the meter with FORA 4-pin RS232 cable and the Health Care System Software to view your test results on your personal computer. To learn more about the Health Care System Software or to obtain an RS232 cable, please visit www.foracare.com, or call our customer care service... -
Page 29: Maintenance
MAINTENANCE Battery Your meter comes with two 1.5V AAA size alkaline batteries. Low Battery Signal The meter will display the message below to alert you when the meter power is getting low. The “ ” appears with E-b and low: The power is not enough to perform testing. -
Page 30: Caring For Your Meter
Do NOT use organic solvents to clean the meter. We recommend using the product listed below to clean and disinfect your meter. The recommended product contains isopropyl alcohol as its active ingredient. It has been shown to be safe when used on the FORA... - Page 31 Premium V10 blood glucose meter. ► Micro-Kill+™ (Micro-Kill Plus™) by Medline (EPA Reg. No. 59894-10-37549) To obtain disinfecting wipes and other information, please contact Medline at 1-800-MEDLINE (1-800-633-5463) or visit www.medline.com. Disinfecting Procedures 1. Take out one disinfecting wipe from the package and squeeze out any excess liquid in order to prevent damage to the meter.
- Page 32 Each cleaning and disinfection cycle includes a pre-cleaning step with one wipe and a disinfection step with a second wipe. Improper system cleaning and disinfection may result in meter malfunction. If you have a question, please contact customer service at 1-888-307-8188 for assistance.
-
Page 33: Caring For Your Test Strips
Meter Storage ● Storage conditions: -4°F to 140°F (-20°C to 60°C), below 95% relative humidity. ● Always store or transport the meter in its original storage case. ● Avoid dropping and heavy impact. ● Avoid direct sunlight and high humidity. Cleaning and Disinfection of Your Lancing Device For home users, the lancing device is reusable. -
Page 34: Important Control Solution Information
● Do not use test strips beyond the expiration date. This may cause inaccurate results. ● Do not bend, cut, or alter a test strip in any way. ● Keep the strip vial away from children since the cap and the test strip may be a choking hazard. -
Page 35: System Troubleshooting
SYSTEM TROUBLESHOOTING If you follow the recommended action but the problem persists, or error messages other than the ones below appear, please call your local customer service. Do not attempt to repair the meter yourself and never try to disassemble the meter under any circumstances. Result Readings MESSAGE WHAT IT MEANS... -
Page 36: Error Messages
Error Messages MESSAGE WHAT DOES WHAT IT MEANS WHAT TO DO METER SAY? Only Error Beep Only Error Beep Review the instructions and repeat the test. If Problem with the the meter still does not meter. work, contact the local Only Error Beep distributor for assistance. - Page 37 MESSAGE WHAT DOES WHAT IT MEANS WHAT TO DO METER SAY? Appears when test Repeat the test with a Only Error Beep strip is removed while new test strip. counting down. Appears when a used Repeat with a new test test strip is inserted.
-
Page 38: Troubleshooting
Troubleshooting 1. If the meter does not display a message after inserting a test strip: POSSIBLE CAUSE WHAT TO DO Batteries exhausted. Replace the batteries. Test strip inserted upside down or Insert the test strip with contact incompletely. bars end first and facing up. Defective meter or test strips. -
Page 39: Detailed Information
DETAILED INFORMATION The meter provides you with plasma equivalent results. Time of day Normal plasma glucose range for people without diabetes (mg/dL) Fasting and before meal < 100 mg/dL (5.6 mmol/L) 2 hours after meals < 140 mg/dL (7.8 mmol/L) Source: American Diabetes Association. -
Page 40: Specifications
SPECIFICATIONS Model No.: Premium V10 Dimension & Weight: 88.67 x 55.61 x 23.07 mm, 48.8 g Power Source: Two 1.5V AAA alkaline batteries Display: LCD Memory: 450 measurement results with respective date and time External output: RS232 Auto electrode insertion detection Auto reaction time count-down Auto switch-off after 3 minutes without action Temperature Warning... - Page 41 Gracias a su tamaño compacto así como a su fácil operación, usted podrá usar el Sistema de Vigilancia de Glucosa en la Sangre FORA Premium V10 para examinar los niveles de la glucosa por usted mismo y en cualquier lugar.
- Page 42 IMPORTANTES MEDIDAS DE SEGURIDAD LEÁSE ANTES DE SER USADO ● El medidor y la lanceta son para su uso en un único paciente. ¡No los comparta con nadie, ni siquiera con sus familiares! ¡No usar en más de un paciente! ●...
- Page 43 8. NO use este instrumento cerca de fuentes de radiación electromagnéticas, ya que podrían interferir en su operación. 9. Bajo ninguna circunstancia, utilice el dispositivo en neonatos o niños. 10. Mantenga el dispositivo y los equipos de pruebas alejados del alcance de los niños.
- Page 44 TABLA DE CONTENIDO ANTES DE EMPEZAR Información Importante Uso Previsto Principios de la Prueba Contenido del Sistema Apariencia y Funciones Principales del Medidor Pantalla de Visualización Tira Reactiva Configurando el Medidor LAS CUATRO MODALIDADES DE MEDICIÓN Probando la Solución de Control Realizando una Prueba de la Solución HACIENDO UNA PRUEBA CON MUESTRA DE SANGRE Preparando el Lugar de Punción...
-
Page 45: Antes De Empezar
ANTES DE EMPEZAR Información Importante ● La excesiva pérdida de agua y la deshidratación severa puede causar lecturas por debajo de los valores reales. Si usted cree que está sufriendo de deshidratación severa, consulte con su medico inmediatamente. ● Si usted obtiene resultados de la glucosa en la sangre más altos o más bajos de lo usual y no presenta síntomas que lo evidencien, repita la prueba. -
Page 46: Uso Previsto
Uso Previsto El Sistema de control de glucosa en sangre FORA Premium V10 se ha diseñado para su uso en la medición cuantitativa de glucosa en sangre entera y fresca de capilar, del dedo y de los siguientes sitios alternativos: palma de la mano, antebrazo y brazo. -
Page 47: Contenido Del Sistema
Intended Use Contenido del Sistema El kit del sistema FORA Premium V10 incluye: Medidor Funda protectora Manual del propietario Libro de registro diario Guia de referencia 2 baterías de AAA / Tarjeta de garantía Las tiras de prueba, solución de control, lancetas estériles y el dispositivo de punción deberán adquirirse por separado. -
Page 48: Apariencia Y Funciones Principales Del Medidor
Apariencia y Funciones Principales del Medidor Ranura de Prueba Puerto de Datos Inserte la tira reactiva aquí para Descargue los resultados encender el medidor y empezar del análisis con un cable de la prueba. conexión. Expulsión de la Tira Reactiva Botón SET Expulse la tira reactiva usada Entrada y confirmación de la... -
Page 49: Pantalla De Visualización
Pantalla de Visualización Símbolo de Volumen Hora Símbolo de Tira Reactiva Modo de Control de Solución Símbolo de Gota de Sangre Modos de Medición Símbolo de Batería Agotada Modos de Memoria Resultados de la Prueba Promedio Diario Indicator de Funcion de Alarma Advertencia Cetona Fecha Unidad de Medición... -
Page 50: Tira Reactiva
La parte frontal de la tira reactiva debe ser colocada hacia arriba cuando es insertada. NOTA: El medidor FORA Premium V10 debe ser usado solamente con tiras reactivas FORA Premium V10. Si usa otras tiras reactivas producirán resultados incorrectos. -
Page 51: Configurando El Medidor
Configurando el Medidor Antes de usar el medidor por primera vez o si desea cambiarle las baterías, debe verificar y actualizar estas configuraciones. Asegúrese de completar los pasos descritos a continuación y guardar los nuevos cambios deseados. Entrando a la función de configuración Comience con el medidor apagado (sin haber insertado la tira reactiva) Mantenga presionando el botón SET. - Page 52 Con el minuto parpadeando, presione hasta que el minuto correcto aparezca. Presione SET. 3. Borrando la Memoria Con los símbolos “dEL” y “ ” en pantalla, presione y seleccione “no” para conservar los resultados en memoria y entonces presione SET para salir.
- Page 53 5. Seleccionando el lenguaje Presione para seleccionar el L1/L2/ L1: Inglés. L2: Español. L3: Chino. Para confirmar la selección presione SET. 6. Configuración de la alarma de recuerdo El dispositivo de medición posee 4 alarmas recordatorias. El dispositivo de medición mostrará "OFF" , " "...
-
Page 54: Las Cuatro Modalidades De Medición
LAS CUATRO MODALIDADES DE MED ICIÓN El medidor le provee de cuatro modalidades para la medición, General, AC, PC y el QC. Cuándo usarlas Modalidades A cualquier hora del día sin tomar en cuenta cuándo fue General su última comida sin la ingesta de alimentos durante por lo menos 8 horas 2 horas después de una comida Probando la solución de control... -
Page 55: Probando La Solución De Control
Probando la Solución de Control La Solución de Control contiene una cantidad conocida de glucose que reacciona con las tiras reactivas y es usada para asegurarle que su medidor y las tiras reactivas trabajan juntas correctamente. Es posible que en el kit no se incluyan tiras reactivas, soluciones de control o lancetas estériles (compruebe el contenido de la caja del producto). - Page 56 favor, relájese mientras se realiza su medición. Por favor aplique sangre en la tira reactiva. hasta que aparezca “QC” 2. Pulse Cuando se muestra “QC”, el medidor no almacenará el resultado del análisis en otra vez, “QC” la memoria. Si presiona desaparecerá...
- Page 57 confirmación esté llena, el medidor empezará el conteo regresiv. Para evitar la contaminación de la solución de control, no aplique directamente solución de control sobre una tira ni toque de ningún otro modo la boquilla de la botella. 4. Lea y compare los resultados Después del conteo regresivo hasta 0, el resultado de la solución de control aparecerá...
-
Page 58: Haciendo Una Prueba Con Muestra De Sangre
HACIENDO UNA PRUEBA CON MUESTRA DE SANGRE Preparando el Dispositivo de Punción para Hacer la Prueba Por favor, siga las instrucciones en el manual del dispositivo de punción para obtener una muestra de sangre. ADVERTENCIA: Para reducir el riesgo de infección: •... - Page 59 concentración distinta en la medición que la sangre que ha sido extraída del dedo. Cuando el punto de punción ha sido frotado previamente a la extracción de la sangre, la diferencia se ve significativamente reducida. Por favor siga las siguientes sugerencias antes de obtener la gota de sangre: Lávese y séquese bien las manos antes de empezar.
-
Page 60: Lugar Alternativo De Prueba (Lap)
NOTA: • Escoja una área diferente cada vez que hace el examen. Repetir la punción en el mismo lugar puede causarle dolor o crearle callosidades. • Antes de realizar la prueba LAP, por favor primero consulte con su profesional médico. •... - Page 61 superior del brazo con resultados equivalentes a aquellos realizados en las yemas de los dedos. ¿Cuál es la ventaja? Las yemas de los dedos sufren un dolor más fácilmente debido a que existen muchísimas terminaciones nerviosas (receptores). En otras partes del cuerpo, puesto que las terminaciones nerviosas no se encuentran tan comprimidas, no sentirá...
-
Page 62: Realizando La Prueba De Glucosa En La Sangre
Realizando la Prueba de Glucosa en la Sangre 1. Inserte la tira reactiva para encender el medidor Espere hasta que el medidor muestre los símbolos de la tira reactiva “ ” y la gota de sangre “ ”. Guía de voz Gracias por usar este producto. - Page 63 4. Aplicando la muestra Sujete el medidor con la tira hacia abajo, de modo que el orificio absorbente de la tira reactiva toque la gota de sangre. La sangre llegará a la tira. Una vez que la ventana de confirmación está totalmente llena, el medidor comienza la cuenta atrás.
- Page 64 5. Leyendo sus resultados El resultado de la glucosa en la sangre aparecerá en su medidor después del conteo regresivo llegue a 0. Este resultado de glucosa en la sangre será almacenado en la memoria automáticamente. Guía de voz La glucosa en la sangre es (número) por miligramos de decilitro.
-
Page 65: Memoria Del Medidor
MEMORIA DEL MEDIDOR Su medidor almacena en la memoria los 450 resultados de las pruebas de la glucosa en la sangre más recientes, junto con sus respectivas fechas y horas. Para ingresar en la memoria de su medidor comience con el medidor apagado. Revisando los Resultados de la Prueba “... -
Page 66: Revisando Los Resultados Del Promedio Diario De La Glucosa
Revisando los Resultados del Promedio Diario de la Glucosa . Cuando “ ” 1. Pulse y suelte aparezca en pantalla, mantenga el botón “ ” Libere el botón y el resultado del promedio de 7 días en function general, aparecerá en la pantalla. 2. -
Page 67: Descargando Los Resultados A La Computadora
Descargando los Resultados a la Computadora Transmisión de datos por RS232 Cable Usted puede usar su medidor con un FORA 4-pin RS232 cable y el software del Sistema de Cuidados de la Salud (Health Care Software System) para mirar los resultados de las pruebas en su computadora personal. -
Page 68: Mantenimiento
MANTENIMIENTO Baterías Su medidor viene con dos baterías alcalinas AA A 1.5V. Señal de batería agotada o baja El medidor mostrará el mensaje siguiente para avisarle cuando se estén agotando las baterías. El símbolo “ ” aparecerá con E-b y low: batería no tiene suficiente batería para ejecutar la prueba. -
Page 69: Cuidados De Su Medidor
• Como con todas las baterías pequeñas, éstas deben estar fuera del alcance de niños pequeños. En caso de que ser ingeridas, por favor busque ayuda médica lo más pronto posible. • Las baterías podrían derramar químicos si el aparato no se usa por mucho tiempo. - Page 70 Recomendamos el uso del producto indicado a continuación para limpiar y desinfectar el medidor. El producto recomendado contiene alcohol isopropílico como ingrediente activo. Se ha demostrado que se puede usar con seguridad en el medidor de glucosa en sangre FORA Premium V10. ► Micro-Kill+™ (Micro-Kill Plus™) de Medline (EPA Reg.
- Page 71 3. Retire el paño. Deje que se seque totalmente la superficie del medidor. 4. Deseche las toallitas usadas y nunca las vuelva a utilizar. Lávese correctamente las manos con agua y jabón después de manipular el dispositivo de medición, dispositivo de punción y tiras de prueba para evitar un posible contaminación.
-
Page 72: Cuidados De Las Tiras Reactivas
• NO permita que la solución de limpieza y desinfección acceda a la ranura para tiras reactivas, al compartimiento de las baterías o al botón de expulsión de tiras. • Si moja la ranura para tiras reactivas, límpiela con el pico de un tissue. •... -
Page 73: Información Importante Sobre La Solución De Control
● Cierre bien el envase inmediatamente después de remover la tira reactiva. ● Siempre manipule la tira reactiva con las manos limpias y secas. ● Use cada tira reactiva inmediatamente después de sacarla del envase. ● Escriba la fecha de expiración en la etiqueta cuando abra el frasco por primera vez. -
Page 74: Localizacion Y Resolucion De Problemas En El Sistema
LOCALIZACION Y RESOLUCION DE PROBLEMAS EN EL SISTEMA Si usted sigue las acciones recomendadas pero el problema persiste, o hay mensajes de error distintos a los que aparecen a continuación, por favor llame a su agente de servicio al cliente local. No trate de reparar por sí... -
Page 75: Mensajes De Error
Mensajes de Error MENSAJE QUÉ DICE EL QUÉ SIGNIFICA ACCIÓN MEDIDOR Solo pitido de error. Repase las Solo pitido instrucciones y repita de error. el análisis. Si el Problema con el medidor. problema cont nua, por favor contacte con Solo pitido el servicio al cliente de error. -
Page 76: Localización Y Resolución De Problemas
MENSAJE QUÉ DICE EL QUÉ SIGNIFICA ACCIÓN MEDIDOR Aparece cuando la tira Haga la prueba Solo pitido reactiva se retira durante con una nueva tira de error. la cuenta atrás. reactiva. Aparece cuando se inserta Haga la prueba Solo pitido una tira reactiva que está... -
Page 77: Información Detallada
2. Si la prueba no comienza después de colocar la muestra: CAUSAS POSIBLES ACCIÓN Tira reactiva defectuosa. Repita la prueba con una nueva tira reactiva. Muestra aplicada después del apagado Repita la prueba con una nueva tira automático (3 minutos después de la reactiva. -
Page 78: Especificaciones
Source: American Diabetes Association. Standards of medical care in diabetes- 2016; 39 (supp.1 Diabetes Care): S16. Por favor consulte con su médico para determinar cual es el rango que mejor se adapta a sus necesidades. ESPECIFICACIONES Modelo No.: Premium V10 Dimensiones y peso: 88.67 (L) x 55.61 (W) x 23.07(H) mm, 48.8 g Fuente de energía: dos baterías alcalinas AA A 1.5V Pantalla: LCD... - Page 80 Distributed by ForaCare, Inc. / Distribuido por ForaCare, Inc. 893 Patriot Drive Suite D, Moorpark, CA 93021 USA Products made in Taiwan / Productos hecho en Taiwán Toll Free / Número de Teléfono Gratuito : 1-888-307-8188 (8:30am-5:00pm PST, Monday-Friday / 8:30am~5:00pm PST, Lunes a Viernes) For assistance outside of these hours, please contact your healthcare professional.
Need help?
Do you have a question about the Premium V10a and is the answer not in the manual?
Questions and answers