Table of Contents
Advertisement
Advertisement
Table of Contents
Troubleshooting

Related Manuals for Fora Diamond PRIMA


Summary of Contents for Fora Diamond PRIMA
- Page 1 PRIMA Blood Glucose Monitoring System Owner’s Manual...
- Page 3 Regular monitoring of your blood glucose levels can help you and your doctor gain better control of your diabetes. Due to its compact size and easy operation, you can use the FORA Diamond PRIMA Blood Glucose Monitoring System to easily monitor your blood glucose levels by yourself anywhere, any time.
-
Page 4: Before Use
IMPORTANT SAFTY INSTRUCTIONS READ BEFORE USE 1. Use this device ONLY for the intended use described in this manual. 2. Do NOT use accessories which are not specified by the manufacturer. 3. Do NOT use the device if it is not working properly or if it is damaged. -
Page 5: Table Of Contents
TABLE OF CONTENTS BEFORE YOU BEGIN Important Information Intended Use Test Principle Meter Overview Display Screen Test Strip Setting the Meter THE FOUR MEASURING MODES Control Solution Testing Performing a Control Solution Test TESTING WITH BLOOD SAMPLE Preparing the Puncture Site Alternative Site Testing Performing a Blood Glucose Test METER MEMORY... -
Page 6: Before You Begin
BEFORE YOU BEGIN Important Information ● Severe dehydration and excessive water loss may cause readings which are lower than actual values. If you believe you are suffering from severe dehydration, consult a healthcare professional immediately. ● If your blood glucose results are lower or higher than usual, and you do not have any symptoms of illness, first repeat the test. -
Page 7: Intended Use
Intended Use This system is intended for use outside the body (in vitro diagnostic use) by people with diabetes at home and by health care professionals in clinical settings as an aid to monitoring the effectiveness of diabetes control. It is intended to be used for the quantitative measurement of glucose (sugar) in samples of venous whole blood and fresh capillary whole blood (from the finger, palm, forearm, upper arm, calf and thigh). -
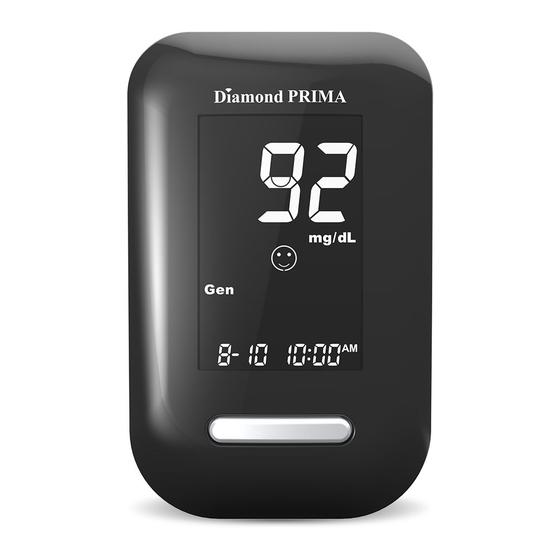
Page 8: Meter Overview
Meter Overview Test Slot Insert test strip here to turn the meter on for testing. Test Strip Ejector Eject the used strip by pushing up this button. Display Screen Main Button Enter the meter memory and silence a reminder alarm. Data Port/USB Download test results with a cable connection. -
Page 9: Display Screen
Display Screen Test Result Day Average Ketone Warning Alarm Symbol Warning Symbol Face/Low/High Symbol Testing Mode Symbol Measurement Unit Memory Symbol Low Battery Symbol Control Solution Mode Test Strip Symbol Date Blood Drop Symbol Time... -
Page 10: Test Strip
Test results might be wrong if the contact bar is not fully inserted into the test slot. NOTE: The FORA Diamond PRIMA monitor should only be used with FORA Diamond PRIMA Test Strips. Using other test strips with this meter can produce inaccurate results. -
Page 11: Setting The Meter
Setting the Meter Before using your meter for the first time or if you change the meter battery, you should check and update these settings. Make sure you complete the steps below and have your desired settings saved. Entering the Setting Mode Start with the meter off (no test strip inserted). - Page 12 3. Setting the time With the hour flashing, press Main button until the correct hour appears. Press SET. With the minute flashing, press Main button until the correct minute appears. Press SET. 4. Deleting the memory With dEL and a flashing on the display, press Main button and select no to keep the results in memory then press...
- Page 13 hour. Press SET to confirm and go to minutes, press Main button to add one minute. Hold Main button longer to add faster. Press SET to confirm and go to the next alarm setting. If you do not want to set an alarm, press SET to skip this step.
-
Page 14: The Four Measuring Modes
THE FOUR MEASURING MODES The meter provides you with four modes for measuring, General, AC, PC and QC. USE WHEN MODES any time of day without regard to time since last General meal (displays as Gen ) no food intake for at least 8 hours 2 hours after a meal testing with the control solution You can switch between each mode by:... -
Page 15: Control Solution Testing
Control Solution Testing Our Control Solution contains a known amount of glucose that reacts with test strips and is used to ensure your meter and test strips are working together correctly. Test strips, control solutions, or sterile lancets may not be included in the kit (please check the contents on your product box). - Page 16 1. Insert the test strip to turn on the meter Insert the test strip into the meter. Wait for the meter to display 2. Press Main button to mark this test as a control solution test With displayed, the meter will not store your test result in memory.
- Page 17 3. Apply control solution Shake the control solution vial thoroughly before use. Squeeze out a drop and wipe it off, then squeeze out another drop and place it on the tip of the vial cap. Hold the meter to move the absorbent hole of the test strip to touch the drop.
-
Page 18: Testing With Blood Sample
TESTING WITH BLOOD SAMPLE WARNING: To reduce the chance of infection: • Never share a lancet or the lancing device. • Always use a new, sterile lancet. Lancets are for single use only. • Avoid getting hand lotion, oils, dirt, or debris in or on the lancets and the lancing device. -
Page 19: Fingertip Testing
● Fingertip testing Press the lancing device s tip firmly against the lower side of your fingertip. Press the release button to prick your finger, then a click indicates that the puncture is complete. ● Blood from sites other than the fingertip Replace the lancing device cap with the clear cap for AST. -
Page 20: Alternative Site Testing
Alternative Site Testing You can test on a variety of locations on your body. Upper Arm Forearm Thigh Suggested Test Areas Calf for the Hand Important: There are limitations with AST (Alternative Site Testing). Please consult your health care professional before you perform AST. When to use AST? Capillary blood at the fingertip reflects these changes faster than capillary blood at other sites. -
Page 21: Performing A Blood Glucose Test
Performing a Blood Glucose Test You will need: Meter Test Strip Lancing Device Lancet 1. Insert the test strip to turn on the meter Wait for the meter to display 2. Select the appropriate measuring mode by pressing Main button For selecting the measurement mode, please refer to the FOUR MEASURING MODES . - Page 22 4. Apply the sample Gently apply the drop of blood to the absorbent hole of the test strip at a titled angle. Confirmation window should be completely filled if enough blood sample has been applied. Do NOT remove your finger until you hear a beep sound. NOTE: •...
- Page 23 5. Read your result The result of your blood glucose test will appear after the meter counts down to 0. The blood glucose result will be stored in the memory automatically. (100 mg/dL = 5.6 mmol/L) 6. Eject the used test strip Eject the test strip by pushing the eject button on the side.
-
Page 24: Meter Memory
METER MEMORY The meter stores the 450 most recent blood glucose test results along with respective dates and times in its memory. To enter the meter memory, start with the meter switched off. Reviewing Test Results 1. Press and release Main button will appear on the display. -
Page 25: Reviewing Blood Glucose Day Average Results
Reviewing Blood Glucose Day Average Results 1. Press and release Main button. When appears on the display, keep pressing Main button for 3 seconds until the flashing appears. Release Main button and then your 7-day average result measured in general mode will appear on the display. -
Page 26: Downloading Results Onto A Computer
Downloading Results onto a Computer Data Transmission Via Cable You can use the meter with an USB cable and the Health Care Software System to view test results on your personal computer. To learn more about the Health Care Software System or to obtain an USB cable separately, please contact local customer services or the place of purchase for assistance. -
Page 27: Maintenance
MAINTENANCE Battery Your meter comes with one 1.5V AAA size alkaline battery. Low Battery Signal The meter will display one of the messages below to alert you when the meter power is getting low. 1. The appears along with display messages: The meter is functional and the result remains accurate, but it is time to change the battery. -
Page 28: Caring For Your Meter
1. Press the edge of the battery cover and lift it up to remove. 2. Remove the old batteries and replace with one 1.5V AAA size alkaline batteries. 3. Close the battery cover. If the battery are inserted correctly, you will hear a beep afterwards. -
Page 29: Caring For Your Test Strips
Caring for Your Test Strips ● Storage conditions: 2°C to 32°C (35.6°F to 89.6°F), below 85% relative humidity. Do NOT freeze. ● Store your test strips in their original vial only. Do not transfer to another container. ● Store test strip packages in a cool dry place. Keep away from direct sunlight and heat. -
Page 30: Important Control Solution Information
Important Control Solution Information ● Use only our control solutions with your meter. ● Do not use the control solution beyond the expiry date or 3 months after first opening. Write the opening date on the control solution vial and discard the remaining solution after 3 months. ●... -
Page 31: System Troubleshooting
SYSTEM TROUBLESHOOTING If you follow the recommended action but the problem persists, or error messages other than the ones below appear, please call your local customer service. Do not attempt to repair yourself and never try to disassemble the meter under any circumstances. Result Readings MESSAGE WHAT IT MEANS... -
Page 32: Error Messages
Error Messages MESSAGE WHAT IT MEANS WHAT TO DO Repeat the test with a new test strip. Problem with the meter. If the meter still does not work, please contact the customer service for assistance. Appears when the batteries Replace the batteries cannot provide enough immediately. -
Page 33: Troubleshooting
Troubleshooting 1. If the meter does not display a message after inserting a test strip: POSSIBLE CAUSE WHAT TO DO Battery exhausted. Replace the battery. Test strip inserted upside down or Insert the test strip with contact incompletely. bars end first and facing up. Defective meter or test strips. -
Page 34: Detailed Information
DETAILED INFORMATION The meter provides you with plasma equivalent results. Time of day Normal plasma glucose range for people without diabetes (mg/dL) Fasting and before meal < 100 mg/dL (5.6 mmol/L) 2 hours after meals < 140 mg/dL (7.8 mmol/L) Source: American Diabetes Association (2010). -
Page 35: Symbol Information
SYMBOL INFORMATION SYMBOL REFERENT SYMBOL REFERENT Use within 3 months after In vitro diagnostic medical first opening device Batch code Do not reuse Consult instructions for use Manufacturer Serial number Keep away from sunlight Caution, consult Keep dry accompanying documents Sterilized using irradiation Temperature limitation Do not use if package is... -
Page 36: Specifications
SPECIFICATIONS Model No.: FORA DM10 Dimension & Weight: 86 x 53.6 x 19.5 mm, 52.4 g (without battery) Power Source: One 1.5V AAA alkaline battery Display: LCD Memory: 450 measurement results with respective date and time External Output: USB Auto electrode insertion detection... - Page 40 PRIMA Blood Glucose Monitoring System ForaCare Suisse AG For self-testing CH-9000 St. Gallen www.foracare.ch 0459...
Need help?
Do you have a question about the Diamond PRIMA and is the answer not in the manual?
Questions and answers