
Related Manuals for Fora V10


Summary of Contents for Fora V10
- Page 1 FORA V10 BLOOD GLUCOSE MONITORING SYSTEM English 311-4244100-016 Version 5.0 2010/07...
- Page 2 Thank you for choosing BLOOD GLUCOSE MONITORING SYSTEM Dear FORA V10 System Owner: This product can assist you in monitoring your blood glucose level. Please visit our website www.foracare.com/usa to view other up- dated instructions or product information. This manual contains important information you must know about the system.
- Page 3 IMPORTANT SAFETY INSTRUCTIONS READ THIS BEFORE USE The following basic safety precautions should always be taken. 1. Close supervision is necessary when the device is used by, on, or near children, handicapped persons or invalids. 2. Use the device only for the intended use described in this manual.
-
Page 4: Table Of Contents
TABLE OF CONTENTS IMPORTANT INFORMATION ABOUT ALTERNATIVE SITE TESTING (AST) INTRODUCTION TO THE SYSTEM Intended Use Principle of Measurement Contents of the System Appearance and Key Function of the Meter Meter Display Speaking Function Test Strip BEFORE USE Battery Replacement Setting the Meter and Deleting the Memory BEFORE TESTING BLOOD SUGAR Control Test... - Page 5 TAKING CARE OF YOUR METER AND TEST STRIPS Cleaning Storage TROUBLESHOOTING GUIDE Risk Message Error Message Operational problem SPECIFICATIONS...
-
Page 6: Important Information
IMPORTANT INFORMATION Severe dehydration and excessive water loss may cause readings which are lower than actual values. If you believe you are suffering from severe dehydration, consult a healthcare professional immediately. If your blood glucose results are lower or higher than usual, and you do not have symptoms of illness, first repeat the test. -
Page 7: About Alternative Site Testing (Ast)
Alternative Site Testing (AST) Important: AST results serve as references only. Please consult your healthcare professional before you begin AST. What is AST? Alternative site testing (AST) refers to when individuals check their blood glu- cose levels using areas of the body other than the fingertip. - Page 8 We strongly recommend you do AST in the following intervals: ˙In a pre-meal or fasting state (more than 2 hours since the last meal). ˙Two hours or more after taking insulin. ˙Two hours or more after exercise. Do NOT use AST if: ˙You think your blood glucose is low.
-
Page 9: Introduction To The System
INTRODUCTION TO THE SYSTEM Intended Use The system is intended for use outside the body (in vitro diagnostic use). It should be used only for testing glucose (sugar) and only with fresh capillary whole blood samples (from the finger, the palm, the forearm, the upper arm, the calf and the thigh). -
Page 10: Contents Of The System
2. Control solutions, lancing device, and lancets are optional. They are not included in the standard kit. Please contact the Customer Care Line at 1-888-307-8188, 1-866-469-2632 or place of purchase for availability. 3. Only use the FORA V10 Blood Glucose Test Strip with this meter for accurate measurement results. -
Page 11: Appearance And Key Function Of The Meter
Appearance and Key Function of the Meter TEST SLOT is where you insert the test strip. The meter will turn on automatically after insertion. LCD SCREEN guides you through the test using symbols and simple messages. MAIN BUTTON located in front of the meter with "M" on it, is used to turn on the meter, enter the memory mode and control steps of setting. -
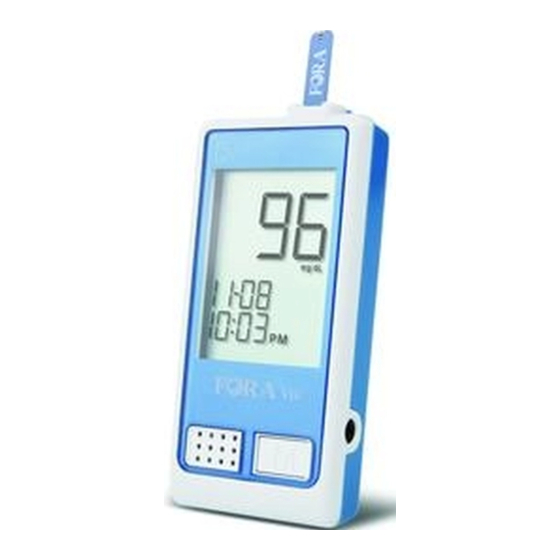
Page 12: Meter Display
Meter Display VOICE SYMBOL TEST STRIP SYMBOL Appears when the meter is turned Indicates speaking function is on/off. LOW BATTERY SYMBOL BLOOD DROP SYMBOL Appears when the battery power is Flashes when it is ready to apply low. the sample. TEST RESULT AREA TEMPERATURE SYMBOL Displays glucose results. -
Page 13: Speaking Function
Speaking Function FORA V10 “speaks” aloud step by step instructions to guide you through the process of blood glucose testing. The following table tells you when and what the meter “speaks”. WHEN does the meter speak? WHAT does the meter speak? Thank you for using this product. -
Page 14: Test Strip
Test results might be wrong if the contact bar is not fully inserted into the test slot. NOTE The FORA V10 monitor should only be used with FORA V10 Test Strips. Using other test strips with this meter can produce inaccurate results. -
Page 15: Before Use
BEFORE USE Battery Replacement Your meter comes with two 1.5V AAA alkaline batteries. The meter will alert you when the power is low by displaying two different messages: 1. With battery exhausted symbol pears on the display: the meter is functional and the result remains accurate, but battery should be replaced. - Page 16 To replace the battery, make sure that the meter is turned off. STEP 1 STEP 2 STEP 3 STEP 2 STEP 3 STEP 1 Press the buckle on Remove old batteries Close the battery the battery cover and and replace them with cover.
-
Page 17: Setting The Meter And Deleting The Memory
Setting the Meter and Deleting the Memory Your meter comes with the time, date, memory deletion, voice vol- ume and language preset. If you need to change the time or replace the batteries, you may have to enter the setting mode and reset. Please set the time, date, memory deletion, voice volume and language according to the following steps. - Page 18 STEP 3 Set the Date Press and release the M button until the correct date appears. To move faster, hold the M button down. With the correct date on the display, press the set button and the time will appear on the display with the hour flashing.
- Page 19 NOTE 1. The time, date, memory deletion, voice volume and language can ONLY be changed in the setting mode. Therefore, while performing a blood glucose, these parameters cannot be changed. 2. Your meter displays 7-, 14-, 21-, 28-, 60- and 90-day averages which you can access from the meter memory.
-
Page 20: Before Testing Blood Sugar
Control Test FORA control solution contains a known amount of glucose that reacts with test strips. By comparing your control solution test results with the expected range printed on the test strip vial label, you can ensure that the meter and the test strips are working together as a system and that you are performing the test correctly. -
Page 21: Important Control Solution Test Information
36-86°F (2-30°C). Do not freeze. PLEASE NOTE The control solution range is printed on FORA test strip vial. Only use FORA control solution with FORA test strips. It is used to evaluate the meter and test strip performance. It is not a recommended range for your... -
Page 22: Performing A Control Solution Test
Performing a Control Solution Test STEP 1 Insert Test Strip Fully insert the test strip, with the contact bars end first facing up into test slot. The meter will turn on automatically. “CH” and “ ” will appear first, followed by a flashing “ ”symbol. STEP 2 Press the M Button After the symbol appears on display, press the M button so that “CTL”... - Page 23 STEP 3 Obtain Control Solution Shake the control solution vial well. Remove the cap from the control solution bottle and place it on a flat surface. Squeeze the vial, discard the first drop, and wipe off the dispenser tip to prevent contamination. Squeeze the vial again to produce another drop and place this drop on the top of cap.
- Page 24 STEP 5 Result Appears in 7 Seconds After counting down to 0, the control solution test result will appear. Com- pare the result with the range printed on the test strip vial. The result should fall within this range. Normal 109~165 Out-of-range results If test results fall outside the printed range, check the “Operational...
-
Page 25: Testing Blood Sugar
TESTING YOUR BLOOD SUGAR Be sure to read this section and the test strip package insert in- cluded in the test strip box carefully before testing. Make sure you have all items needed to test: A. Blood glucose meter B. Test strip C.Lancing device D.Sterile lancet E. -
Page 26: Test Procedure
Test Procedure Wash and dry your hands before starting. Step 1 Setting up the Lancing Device Pull off the cap of the lancing device. Insert a lancet into the lancet holder and push down firmly until it is fully secured. Twist the protective disk off the lancet. - Page 27 Pull the cocking control back until it clicks. You will see a color change inside the release button when it is ready. If it does not click, the device may have been cocked when the lancet was inserted. Hold your fingers on the body.
- Page 28 STEP 2 Insert Test Strip Fully insert test strip face up with contact bars end first, into the test slot. The meter will turn on auto- matically and display the following in sequence: “CH” and “ ” → flashing “ ”...
- Page 29 PLEASE NOTE ˙Choose a different spot each time you test. Repeated punctures at the same spot may cause soreness and calluses. ˙Before you decide to begin AST, please consult your health professional. ˙It is recommended that you discard the first drop of blood as it might contain tissue fluid and serum, which may affect the test result.
- Page 30 PLEASE NOTE ˙Do not push your punctured finger (with blood on it) against the test strip or try to apply a smeared blood sample to the test strip. ˙If you do not apply a blood sample to the test strip within 3 minutes, the meter will automatically turn off.
- Page 31 STEP 6 Remove the Lancet Always use caution when removing the lancet. Take the lancet out carefully. Place the disk on a hard surface and push the exposed tip into the protective disk. WARNING! The used lancet and the used test strip may be biohazardous. Please discard them carefully under your healthcare provider’s instructions.
-
Page 32: Expected Test Results
60%. The results provided by the FORA V10 system can help you and your healthcare professional monitor and adjust your treatment plan to gain better control of your diabetes. -
Page 33: Comparing Meter And Laboratory Results
COMPARING METER AND LABORATORY RESULTS The meter provides you with whole blood equivalent results. The result you obtain from your meter may differ somewhat from your laboratory result due to normal variation. Meter results can be affected by factors and conditions that do not affect laboratory results in the same way. -
Page 34: Using The Meter Memory
USING THE METER MEMORY Viewing Results on the Meter Your meter stores 450 most recent blood glucose test results along with their repective dates and times in its memory. It also provides you with 7-, 14-, 21-, 28-, 60- and 90-day averages of your blood glucose test results. You can review these test result averages in memory through the following easy steps. - Page 35 Recall the Stored Test Results · 1. When the meter is off, press and release the M button. The screen shows “ ”. Press the M button again, “01” appears first and then the latest glucose result along with date and time will be shown on the screen.
- Page 36 PLEASE NOTE ˙ The control solution results are NOT stored in the memory (please refer to NOTE on page 23 for more information). The list of past results and the result averages are for blood glucose results only. ˙ When pressing the button to recall the test results, the meter will first display date and time.
-
Page 37: Viewing Results On A Personal Computer
Results in memory can be transmitted to a personal computer. Health Care Software System and an interface cable are required before installation. The software can be downloaded from the home page of Fora Care Inc. An interface cable is required for data transmission, but is not included in the standard kit. To... -
Page 38: Taking Care Of Your Meter And Test Strips
TAKING CARE OF YOUR METER AND TEST STRIPS To protect the monitor and test strips from dirt, dust and other contaminants, please wash and dry your hands thoroughly before use. Cleaning 1. To clean the meter’s exterior, wipe with a cloth moistened with tap water or a mild cleaning agent, then dry the device with a soft and dry cloth. - Page 39 • Store test strip packages in a cool and dry place. Keep away from direct sunlight and heat. • After removing a test strip from the vial, immediately replace the vial cap and close it tightly. • Handle the test strip with clean and dry hands. •...
-
Page 40: Troubleshooting Guide
TROUBLESHOOTING GUIDE The following is a summary of various display messages. These messages help to identify certain problems but do not always appear in all cases when a problem has occurred. Improper use may cause an inaccurate result without producing an error message. -
Page 41: Risk Message
Risk Message Special symbols and messages appear together with your test result. MESSAGE WHAT IT MEANS WHAT TO DO Your result is below measurement limit, You should seek immediate 20 mg/dL(1.1 mmol/L). medical assistance. This indicates hypoglycemia (low blood glucose.) Your result is above measurement limit, You should seek immediate... -
Page 42: Error Message
Error Message MESSAGE WHAT IT MEANS WHAT TO DO Appears when the battery Replace the battery can not provide enough immediately. power for a test. Review the instructions and re-test with a new test Problem with the meter. strip. You need to remove the Re-test with a new test strip after applying blood to strip. -
Page 43: Operational Problem
Operational Problem 1.If the meter does not display a message after inserting a test strip POSSIBLE CAUSE WHAT TO DO Batteries exhausted. Replace the batteries. Batteries incorrectly installed or Check to see if the batteries are absent. correctly installed. Test strip inserted upside down or Insert the test strip correctly with the not completely inserted. - Page 44 3.If the control solution test result is out of range. POSSIBLE CAUSE WHAT TO DO Error in performing the test. Read instructions thoroughly and repeat the test. Control solution vial shaken poorly. Shake the control solution vigor- ously and repeat the test again. Expired or contaminated control Check the expiration and disposing solution.
-
Page 45: Specifications
SPECIFICATIONS Dimension & Weight: 90.7mm(L) x 46.3 mm(W) x 21.5 mm(H), 57.9g Power source: two 1.5V AAA alkaline batteries Battery life: Over 1,000 determinants Display: Large LCD Memory: 450 measurement results with respective dates and times Auto electrode inserting detection Auto sample loading detection Auto reaction time countdown Sleeping mode: Power consumption less than 50uA...
Need help?
Do you have a question about the V10 and is the answer not in the manual?
Questions and answers
What does E U code mean?