Table of Contents
Advertisement
Quick Links
Advertisement
Table of Contents
Troubleshooting

Related Manuals for Jolimark CP-9000K


Summary of Contents for Jolimark CP-9000K
- Page 1 24pin Dot Matrix Printer CP-9000K USER'S MANUAL JOLIMARK...
- Page 2 * Epson is a registered trademark of S.Epson Corporation. * LQ-2550 is a registered trademark of S.Epson Corporation. * IBM is a registered trademark of International Business Machines Corporation. * IBM2931 is a registered trademark of International Business Machines Corporation. * Windows is a registered trademark of Microsoft Corporation.
- Page 3 CP-9000K USER'S MANUAL 24-pin wide-carriage dot matrix printer...
-
Page 4: Table Of Contents
Contents U n p a c k i n g t h e p r i n t e r..1 B a r c o d e p r i n t e n h a n c e m e n t Q u i c k s t a rt u p......... - Page 5 Other........... 8 0 Setting the application software Element printing......... 8 0 About printer driver .
- Page 6 Appendices A. Specifications Printing specifications ....9 5 Parallel interface specifications ....1 0 0 Serial interface specifications .
-
Page 7: Caution For Use
Caution for use Power sourc e • Be sure to insert the power plug only in a wall unit of the voltage designated in the voltage selector switch and on the rating plate on the back of the unit. • Do not place the power cord near heat sources or place heavy objects on it. -
Page 8: Unpacking The Printer
Unpacking the printer Unpacking the printer Check the cartons for the following items: (Driver-CD with User’s Manual, printer driver software) Paper Rack (See page 10) Sound Seal Cover Ribbon Cassette (See page 10) (See page 11) Power Cord Printer (See page 12) -
Page 9: Quick Startup
Quick startup Quick startup To make your first print, follow the procedure below . For more detailed instructions on setting your printer, please refer to the page indicated. To set up the printer 1. Install the paper rack, the sound seal cover, and the ribbon cassette —... -
Page 10: Introduction
1. Introduction 1. Introduction Features Barcode Print available • 13 resident barcode type Industrial 2/5, Interleave 2/5, Codabar, Matrix 2/5, Code 11, Code 39, Code 93, Code 128, EAN-8, EAN-13, UPC-A, UPC-E, Postnet Enlarged character printing Characters can be enlarged (by up to 127 times as large x 127 times as large) using the enlarged character command unique to this printer. -
Page 11: Printer Description
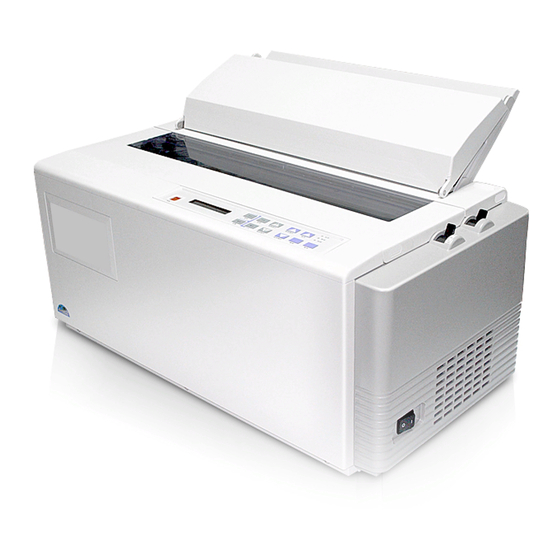
1. Introduction Printer description Paper Guide Ribbon Cassette Platen Paper Bail Paper Select Lever (Friction Lever) Head Adjustment Lever Print head Power Switch Sound Seal Cover Printer Cover Paper Cutter Paper Rack Top Rear Cover Operator Panel Tractor Lock Lever Rear Cover Tractor Cover... - Page 12 1. Introduction Operation guide sheet The operation guide sheet helps you to operate some of the basic options on the front control panel. You can peel the adhesive backed paper and stick it anywhere on your printer for convenience. Precaution for extra-thick paper usage Extra-thick continuous paper, especially 9-part multi-layer paper may get jammed in the printer due to its stiffness and inflexibility.
- Page 13 1. Introduction Physical dimension 24 .4" (620mm) 17.9" (455mm) 19.9" (505mm) Paper Rack in flat position (Continuous paper setting) Sound Seal Cover Paper Rack in upright position (Single sheet setting) 17.1" (435mm) 15.4" Paper Rack in flat position (390mm) (Continuous paper setting) 11.6"...
-
Page 14: Setting Up
2. Setting up 2. Setting up Installing the paper rack 1. Slide both paper guides to the Pivots extreme left and right edges of the Groove paper rack. 2. With the two small pivots on either side of the paper rack downward, fit the pivots in the groove on the rear top cover. -
Page 15: Installing The Ribbon Cassette
2. Setting up Installing the ribbon cassette Turn OFF the printer's power and remove the used ribbon cassette, if necessary, by pulling straight upward. 1. Open the printer cover. 2. Manually move the print head to the extreme right side of the printer for easy installation of the ribbon. -
Page 16: Connecting The Computer
2. Setting up Connecting the computer The printer has a parallel interface connector (Centronics) and a serial interface connector (RS232C). Before you connect an interface cable to your computer, you need to know what type of printer driver is supported by your software applications and what type of connector is needed to attach the printer to the computer. -
Page 17: Loading The Paper
2. Setting up Loading the paper Fanfold continuous paper 1. Move the paper select lever toward the front of the printer to set the fanfold paper setting. 2. Set the print head adjustment lever . In general, position 1 is used for one-part paper. - Page 18 2. Setting up Single sheet paper 1. Move the paper select lever toward the rear of the printer to the single sheet setting. 2. Set the print head adjustment lever . In general, position 1 is used for one-part paper. See page 15. 3.
-
Page 19: Adjusting Print Head Position
2. Setting up Paper alignment Current print line location The current printing line (DDD...) is the third line down from the top of the ribbon guide (line spacing is 1/6 line: 6 LPI). Ribbon Guide Adjusting the print head position The head adjustment is used to obtain the best print quality possible for the specific paper being used. -
Page 20: Control Panel And Operations
3. Control panel and operations 3. Control panel and operations Control panel and indicators Standard Panel TOF SET POWER ON LINE PARK QUALITY M.LF EXIT ENTER M.RLF SETUP TEAR OFF ON LINE RESET Alternate up-side down reverse panel Note: The alternate reverse panel installation instruction is described in Appendix D. Indicators •... -
Page 21: Function Keys
3. Control panel and operations • Indicator lamps Lamp Blinking POWER Power On Power Off — POWER ON LINE (green) ON LINE Online Offline Cover open, or Head overheat (green) protection activating ON LINE P.OUT Out-of-paper Paper-in Home sensor error, RAM error, (umber) or paper error. -
Page 22: Paper Parking 2
3. Control panel and operations • M.LF/M.RLF (Micro line feed/micro reverse line feed) When the M.LF/M.RLF key is pressed, the paper is fed 1/360 inch forward or backward, respectively. This key is used to set the paper position. M.LF M.RLF To set the TOF SET (top-of-form set) function, press the FF key and then simply advance the loaded paper forward or reverse to your desired print position using the M.LF/M.RLF keys. -
Page 23: Other
3. Control panel and operations • TOF SET (ALT+PARK keys) The TOF SET key is valid only when paper is loaded. When the TOF SET TOF SET key is pressed in the offline state, the TOF position is set to the top of the r i b b o n g u i d e , a n d t h e b u z z e r PARK sounds. -
Page 24: Paper Parking
3. Control panel and operations • Paper Select Lever The paper select lever serves to switch between the fanfold continuous paper s e t t i n g a n d t h e s i n g l e s h e e t p a p e r s e t t i n g ( o r C S F s e t t i n g w h e n C S F installed). -
Page 25: Printing Test Pattern
3. Control panel and operations Printing test pattern Before performing the printer's self test, be sure the ribbon cassette and paper are properly installed in the printer. The self test prints a continuous pattern of printable characters (ASCII character pattern) in either draft or letter quality (LQ). While test printing is executed, the ON LINE lamp blinks and the LCD indicates “SELF TEST”. -
Page 26: Demonstration Print-Out
3. Control panel and operations Demonstration print-out To see what this printer can do, you may run this demonstration print-out (Letter or A4 paper size) for checking the printer's performance. Press and hold the RLF and the M.RLF keys while turning on the printer's power. Tearing off a form (Used only with fanfold continuous paper) This function is activated by the TEAR OFF key and feeds fanfold paper so that the... -
Page 27: Power-On Operation Summary
3. Control panel and operations Power-on operation summary Operation (reference page) Self test, draft (P21) Self test,LQ (P21) Hex dump, draft (P62) Hex dump,LQ (P62) Extended setup options (P33) Demo printout (P22) Loading MEMO 1 (P31) Loading MEMO 2 (P31) Loading MEMO 3 (P31) Vertical alignment (P66) EEPROM initialize 1... -
Page 28: Basic Setup Options
4. Basic setup options 4. Basic setup options About basic setup options The setup options serve to define various initial states of the printer that are executed when the power is turned on or when the RESET key is pressed. In addition, this mode serves to redefine the font type, character spacing, and other parameters for the printer's current operating conditions. - Page 29 4. Basic setup options Selection procedure example The following example illustrates the correct procedure to select a letter-portrait paper size from the front panel: 1. Press the ON LINE key to enter the offline state. The ON LINE LED is put out: 2.
-
Page 30: Printing Multipart Paper
4. Basic setup options (1-2) Printing multipart paper The multipart mode increases the print intensity on multipart forms. MULTIPART The followings will give an idea for proper selection: ... Original + 5 copies COPY: NORMAL ... Original + 7 copies COPY: DARK 1 ... -
Page 31: Paper Size
4. Basic setup options (3) Selecting single sheet paper size This function sets a paper size (page length, the right and left margins) of single sheet paper. The "Page Lock" option in the extended options can lock-in the character spacing selected in this option and ignores the related software command. -
Page 32: Selecting Font Style
4. Basic setup options (4) Selecting font style This selection is effective only in the LQ or NLQ print mode. There are 10 resident fonts provided. When the OCR-A or OCR-B font is selected, either 10 cpi or 12 cpi character spacing can be selected. -
Page 33: Selecting Character Spacing
4. Basic setup options (5) Selecting character spacing This function selects one of the fixed spaced characters and proportional spaced characters. The "Pitch Lock" option in the extended setup options can lock-in the character spacing selected in this option and ignores the related software command. When SD (speed draft) or SSD (super speed draft) is set the character spacing automatically changes to 12 cpi or 15 cpi, respectively. -
Page 34: Enlarging/Compressing Print
4. Basic setup options (6) Enlarging/compressing print Enlarges or compresses the text size. Any setting other than 100% will cancel the double height printing mode. The relationships between the paper sizes with their enlargement and compressing ratio are described below. Note: Enlarge ratio of 200% or less is recommended to prevent single sheets from paper skew. -
Page 35: Setting Top Of Form Position
4. Basic setup options (7-8) Setting top of form position The top-of-form (TOF) can be set using this function, anywhere from a minimum of 0 inch to a maximum of 480/60 inches (8 inches = 203mm) by increments of 1/60 inch. Press the Up or Down arrow keys to increase or decrease the TOF setting, respectively. - Page 36 4. Basic setup options (8) Factory Default Setting Option Menu Factory Default Option Menu Factory Default <Basic options> 1 MULTIPART NORMAL 40 TOP MARGIN 0 LINE 2 PAGE FANFOLD 11" 41 BOTTOM MARGIN 0 LINE 3 PAGE SINGLE A4 PORTRAIT 42 LEFT M.
-
Page 37: Extended Setup Options
5. Extended setup options 5. Extended setup options About extended setup options The extended setup options contain various setup options which are used less frequently than the basic setup options. The function in these options are categorized to four functional blocks: •... - Page 38 5. Extended setup options Extended setup options summary Press both the SETUP and RESET keys to enter the extended setup options. Basic setup options #1-#8 Extended setup options #1-#87 PAGE LENGTH FONT SELECT PAGE LENGTH CHARACTER ZOOM IN/OUT MULTIPART (FANFOLD) (SINGLE) PITCH 66 %...
- Page 39 5. Extended setup options Previous page PCL MODE CHR TB2 HP FF CODE TOP MARGIN LEFT MARGIN BOTTOM MARGIN AT TOF 2ND CHARACTER TABLE BOTTOM MARGIN LEFT MARGIN TOP MARGIN VALID PCL MODE + n LINE + n COLUMN + n LINE YES* LINE DRAW * PCL3+ *...
-
Page 40: Print Enhancement
5. Extended setup options (10-13) Print enhancement Emulation The desired emulation mode of the printer can be selected using this function. 10 EMULATION EML: EPSON ... Epson LQ-2550 compatible EML: ... IBM 2391 compatible... -
Page 41: National Font Style 3
5. Extended setup options (14-15) National font style One of the following 16 national fonts can be selected. ASCII HEXADECIMAL 14 NATIONAL FONT 23 24 CNTRY: CNTRY: FRANCE CNTRY: GERMANY CNTRY: U.K. CNTRY: DENMRK CNTRY: SWEDEN CNTRY: ITALY CNTRY: SPAIN CNTRY: JAPAN CNTRY:... -
Page 42: 6 Ibm Alternate Graphic Mode
5. Extended setup options (16-18) IBM Alternate graphic mode (AGM) (Valid in IBM mode) This function enables the IBM emulation to work similar to the Epson emulation in high density graphics. The table below describes the differences in their related control codes. 16 AGM IBM AGM: AGM:... -
Page 43: 0 Slashed Zero
5. Extended setup options (19-22) Line feed spacing This function selects the default line feed spacing. When no line feed spacing is set in the software command, this value is used as a linefeed. 19 LF PITCH 6 LPI 8 LPI 9 LPI 3 LPI 4 LPI... -
Page 44: 5 Lock-In The Character Spacing
5. Extended setup options (23-26) Print quality The letter or draft quality printing or their variations can be selected. This function performs the same way as when the QUALITY key is pressed on the front control panel. This function selects the graphic print speed. See the page 19. 23 QUALITY QLTY: ... -
Page 45: Bar Code Type
5. Extended setup options (27-28) Bar code print enhancement Enable Bar code print and Enlarged character This function enables the printer to accept the control commands of the barcode and enlarged character. 27 BC/L. CHR ... ESC SO and ESC SI can not be used for the bar code data start or stop command. MODE 1 ... -
Page 46: Bar Code Specifications
5. Extended setup options (28) Bar code specifications The table below shows the specifications of thirteen types of bar codes available for the printer. Bar code printing examples are shown on the previous page. Remark Bar code Structure letters (#) Check character Sample data Industrial 2/5... -
Page 47: Enlarged Characters
5. Extended setup options (29-30) Bar code size This function specifies the default bar code size. 29 BC SIZE BC SIZE: BC SIZE: BC SIZE: BC SIZE: The tables below show bar code sizes and attributes. SIZE NARROW BAR 2/120inch 3/120inch 4/120inch 5/120inch WIDE BAR 6/120inch 9/120inch 12/120inch 15/120inch... -
Page 48: Graphic Print Speed 4
5. Extended setup options (31-33) Graphic Print Speed This function selects the print speed of the 120 DPI/240DPI and 180 DPI/360DPI graphics. 31 GR QLTY QLTY: MODE1 QLTY: MODE2 QLTY: MODE3 120/240DPI 180/360DPI SPEED Min.Dot pitch SPEED Min.Dot pitch MODE1 15.7IPS 1/120"... - Page 49 5. Extended setup options (40-42) Paper handling enhancement Set the top margin This function sets the top margin by lines with fixed line spacing of 6 lines per inch in the range between 0 to 15 lines (2.5") from the top of the form. 40 TOP MARGIN T.M.: 0 LINE...
-
Page 50: Fanfold Paper Width 4
5. Extended setup options (43-45) Set the right margin This function sets the right margin by columns with fixed character spacing of 10 characters per inch in the range between 0 to 63 columns (6.3") from the right-most printable location. Right most printable location Right most printable location 43 RIGHT M. -
Page 51: Override Bottom Margin 4
5. Extended setup options (46) Override bottom margin The effect of this function varies depending whether you are using Cut Sheet or Fanfold paper. The operation of this function is also varied depending upon the Emulation setting. 46 OVERRIDE BM OVERRIDE: NO OVERRIDE: YES When using Cut Sheet paper, the bottom... -
Page 52: Label Mode (
5. Extended setup options (47-50) Label mode (valid only in fanfold setting) Label mode is designed to prevent continuous forms labels from being peeled from the backing sheet and becoming jammed in the printer. 47 LABEL MODE ... Set the label protect mode off. LABEL MD: NO ... -
Page 53: Select In Signal (
5. Extended setup options (51-62) Line Feed Speed This function specifies the line feed speed. The 1/2 LF speed feeds paper more stably. It is useful for thick paper, labeled sheets and multipart paper in comtinuous printing. 51 LF SPEED SPEED: NORMAL SPEED: 1/2 Communication enhancement... -
Page 54: Data Length (
5. Extended setup options (63-66) Data length (serial interface) This function selects the appropriate data length. 63 DATA LENGTH LENGTH: 8 BITS LENGTH: 7 BITS Stop bit (serial interface) This function selects the appropriate number of stop bits. 64 STOP BIT STOP BIT: 1 BIT STOP BIT: 2 BITS Communication protocol (serial interface) -
Page 55: Serial Error Check 5
5. Extended setup options (67-70) Serial error check (serial interface) This function selects the printer's response to a serial data transmission error. The serial data transmission error includes a parity error, framing error, and over-run error. If "PRINT" is enabled, the data in error is printed as an asterisk(*). If "IGNORED" is enabled, the data in error is discarded. -
Page 56: Communication Buffer Size 5
5. Extended setup options (71-74) Communication buffer size This function selects the maximum size of the input buffer. When the selection of this function is completed, the printer is initialized. The buffer size affects the signal protocol in serial data communication. In these protocols the printer's busy/ready state changes according to the data remaining values in the input buffer described below. -
Page 57: Lcd Display Language 5
5. Extended setup options (80-82) Miscellaneous Print direction This function selects either pre-directional printing, bi-directional printing, or uni-directional printing. Software commands to control the printing direction will override this selection. Particular characters such as IBM graphic characters are always printed unidirectional. 80 PRINT DIR PRINT: PRE-DIR... -
Page 58: Software Controlled Setup 5
5. Extended setup options (83-87) Software controlled setup This function enables/disables the special software commands that are designed to control most of the extended setup options from host. See "Printer setup command codes" section in Appendix B. 83 SOFTWARE SET SOFTWARE: NO SOFTWARE: YES Lock the RESET key... -
Page 59: Setting The Application Software
6. Setting the application software 6. SETTING THE APPLICATION SOFTWARE About printer driver Printer Driver is a section of your software that automatically translates instructions from the software to your printer. For example, when using some application software if you want to boldface or underline a word, the printer driver automatically translates your specific boldface or underline instruction on your application software to printer control command. -
Page 60: Troubleshooting
7. Troubleshooting 7. Troubleshooting If an error occurs during printing, you will get several warnings. A buzzer sounds, P.OUT lamp blinks, and an error message appears in the display window of the front control panel. Error Messages Error Message Cause and Solution The printer cannot detect the print head position. -
Page 61: Troubleshooting Guide
7. Troubleshooting Troubleshooting guide Problem Cause and Solution Power cord not connected. POWER lamp fails to light Blown fuse in the printer. Print head has overheated. Wait until it has cooled down. Printer stops or slows down on printing Paper detect sensor may be damaged. P.OUT lamp lights Sensor hole is clogged. -
Page 62: Input Hexadecimal Dump Mode
7. Troubleshooting Input Hexadecimal Dump Mode The Input hexadecimal dump capability of the printer enables monitoring of data as it is sent to the printer. Each Escape Sequence, Control Code, and ASCII character sent from the computer to the printer is printed in a two-digit hexadecimal format. Such printing is initiated after 16 bytes of data have been transmitted to the printer. -
Page 63: Maintenance
8. Maintenance 8. Maintenance Cleaning Minimum periodical cleaning will ensure the maximum performance from your printer. Do not spill or splash cleaning liquid inside the printer. Please refer to the "Printer cover removal" on page 64 to remove the covers for cleaning. Before cleaning the printer, be sure to turn off the power and disconnect the power cord. -
Page 64: Lubrication
8. Maintenance (Lubrication) Lubrication In the case of heavy use of the printer, apply a specified lubricating oil only to the front and rear metal carriage bar. When applying the lubricant to the carriage bars, spread the oil by manually moving the print head back and forth along the carriage bar. Consult your dealer to obtain the recommended lubricating oil. - Page 65 8. Maintenance (Printer cover removal) Printer Cover Guide Open the front cover to an upright position, then lift and remove the cover. Pivot Rear Cover O p e n t h e r e a r c o v e r f r o m t h e bottom edge of the cover and pull it away from the printer to remove.
-
Page 66: Vertical Alignment Mode
8. Maintenance (Vertical alignment mode) Vertical alignment mode The vertical alignment mode serves to compensate for the slippage of the vertical printing positions, that occurs due to individual differences and age distortion of the printer. This mode has two features: print start alignment as A-MODE and bidirectional print alignment as B-MODE. - Page 67 8. Maintenance (Vertical alignment mode) 3 13 patterns from 0 to 12 are printed in accordance with the printing conditions. The pattern of the present printing condition is indicated with asterisks (*). PRINTED PATTERNS EXAMPLE Description of Patterns • A pattern describes the type of printing conditions for each mode. •...
- Page 68 8. Maintenance (Vertical alignment mode) A-MODE 1: NO. 6 LCD Description Key Operation Pattern No. (0-12) Up and down arrow keys Mode No. (1-11or 0-11) Left and right arrow keys EXAMPLE (To change the pattern No. 6 to 7 in A-MODE 4.) A-MODE 3 >---->...
-
Page 69: Bar Code And Enlarged Character Function
9. Bar code and enlarged character 9. Bar code and enlarged character The printer can print bar codes and enlarged characters. To activate the bar code and enlarged character function, set #27 BARCODE/ENLARGED CHAR to MODE 1 or MODE 2 in the EXTENDED SETUP MODE. This function is applicable to the EPSON or IBM or HP mode. -
Page 70: Bar Code Command List
9. Bar code and enlarged character Bar Code function (Example) CODABAR Inter Character Gap START STOP Wide Space Character Character Narrow Space Wide Bar Check Character Narrow Bar Bar Code command Function Command Bar code type DC4 DC4 T DC4 DC4 E Element width Bar code height DC4 DC4 H... - Page 71 9. Bar code and enlarged character (2) Element width: DC4 DC4 E Format: ASCII DC4 DC4 E n1 n2 45 n1 n2 Decimal 69 n1 n2 Function: Specifies the n2/120” or n2/180” width of the element n1. (1 ≤ n2 ≤ 127) 120”...
-
Page 72: Check Character 7
9. Bar code and enlarged character (5) HRI font: DC4 DC4 F Format: ASCII Decimal Function: Selects the font of printing the HRI. n = 0: Currently selected font 1: OCR-A 2: OCR-B This setting is not valid for Postnet or Element. (6) Check character: DC4 DC4 C Format: ASCII... -
Page 73: Bar Code Data Sequence 7
9. Bar code and enlarged character (8) End of the bar code data sequence: ESC SO Format: ASCII Decimal Function: Indicates the end of a bar code data sequence. This command is valid only when #27 BARCODE/LABEL MODE is set to MODE 2 in the EXTENDED SETUP MODE. -
Page 74: Barcode Rotational Angle
9. Bar code and enlarged character (12) Start and stop characters: DC4 DC4 N Format: ASCII Decimal Function: Specifies the Codabar start or stop character. n1 selects the start or stop character. n2 specifies a code of the start or stop as shown below. -
Page 75: Initializing The Bar Code Mode
9. Bar code and enlarged character (16) Initializing the bar code mode: DC4 DC4 @ Format: ASCII Decimal Function: Initializes the bar code mode. The following show the default settings for bar code. Bar code type: SETUP Narrow bar width: SETUP Wide bar width: SETUP... -
Page 76: Printing Bar Codes
9. Bar code and enlarged character Printing bar codes Bar codes are printed at normal LQ 10 cpi (158 cps) print speed when the printing density is 120 dpi or at Dark 1 LQ 10 cpi (79 cps) print speed when the printing density is 180 dpi. -
Page 77: Error Processing
9. Bar code and enlarged character Error processing If a character code that is not valid for the selected bar code type is input, the character code is not converted into a bar code symbol but is printed as a character. If the bar code has a start or stop character added to the HRI, the start or stop character is printed. -
Page 78: Upc-E Conversion Rule
9. Bar code and enlarged character UPC-E conversion rule NSC, manufacturer’s codes (M1 M2 M3 M4 M5), and product item codes (X1 X2 X3 X4 X5) are input data. NSC must be 0 or 1. When the manufacturer’s code data is input, the rule is determined and zero checking of the product item codes is performed. - Page 79 9. Bar code and enlarged character • Modulus 11 a. Data characters are weighed from the right to the left, as, example,1, 2, ..., 10, 1, 2 ... 10, 1, 2 and so forth. The sum of the data character values is determined. (The symbol ‘-’ has a character value of 10.) b.
-
Page 80: Element Printing 8
9. Bar code and enlarged character • Modulus 47 a. Data characters are weighed from the right to the left, as, for example, 1, 2, ..., 20, 1, 2 ... 20, 1, 2 and so forth. The sum of the data character values determined.. b. - Page 81 9. Bar code and enlarged character Element printing [Example] The following shows a BASIC program for printing Code 39 bar codes using the element printing function. This example shows how to print “CODE39”. (Replace NB, WB, NS and WS in the data statements in the following example with 0, 1, 2 and 3, respectively.) 100 OPEN "LPT1:"...
-
Page 82: Selecting An Enlarged Character Font
9. Bar code and enlarged character Enlarged character function If #27 BARCODE/ENLARGED CHAR is set to MODE 1 or MODE 2 in the EXTENDED SETUP MODE, enlarged characters can be printed. The enlarged character function is valid for the EPSON or IBM or HP mode. -
Page 83: Executing Backspacing 8
9. Bar code and enlarged character (1) Executing backspacing: BS Format: ASCII Decimal Function: Executes backspacing. When the BS command is executed, the printing position moves to the previous character position on the left. The BS command is valid up to the left margin. -
Page 84: Executing Form Feeding 8
9. Bar code and enlarged character (3) Executing form feeding: FF Format: ASCII Decimal Function: Executes form feeding. This command feeds the page to the next TOF position. If there are still enlarged characters to be printed, they are printed, then form feeding is executed. (4) Executing carriage return: CR Format: ASCII... -
Page 85: Characters 8
9. Bar code and enlarged character (6) Arrangement of enlarged characters: DC4 DC4 a Format: ASCII Decimal Function: Specifies the standard position for adjusting enlarged characters in the vertical direction. n = 00H, 30H: Base line is adjusted to the N’th dot from the top. (N = 20 x cell expansion) 01H, 31H: Descender is adjusted to the N’th dot from the top. -
Page 86: All-Character Set For Enlarged Characters 8
9. Bar code and enlarged character (8) All-character set for enlarged characters: DC4 DC4 d d2...dn Format: ASCII d2...dh d2...dn Decimal Function: Specifies the all-character set for enlarged characters. ≤ ≤ ≤ ≤ Data with a number specified with the parameter “n” is processed as character codes. -
Page 87: Height Expansion For Enlarged Characters 8
9. Bar code and enlarged character (10) Height expansion for enlarged characters: DC4 DC4 h Format: ASCII Decimal Function: Specifies the height expansion of enlarged characters. ≤ ≤ The MSB of the parameter is masked. If n = 0, the expansion specified in the setup mode is selected. Enlarged character cell expansion takes priority over height expansion. -
Page 88: Vmi For Enlarged Characters 8
9. Bar code and enlarged character (12) VMI for enlarged characters: DC4 DC4 j Format: ASCII Decimal Function: Specifies the VMI (vertical motion index) of enlarged characters. ≤ ≤ ≤ ≤ The VMI indicates the distance between two lines, i.e., the length the print head moves after printing one line. -
Page 89: Enlarged Character Cell Offset 8
9. Bar code and enlarged character (14) Enlarged character cell offset: DC4 DC4 o Format: ASCII Decimal Function: Specifies the cell offset for enlarged characters. ≤ ≤ This command specifies the cell offset for the enlarged characters in 1/180”. The cell offset is used to execute a line feed (LF) command. In the enlarged character mode, the line is fed by a pitch of (24 + cell offset)/180”... -
Page 90: Enlarged Character Quality 9
9. Bar code and enlarged character (16) Enlarged character quality: DC4 DC4 q Format: ASCII Decimal Function: Specifies the quality of enlarged characters as shown below. n = 00H, 30H: Standard quality 01H, 31H: High-speed 1 quality 02H, 32H: High-speed 2 quality The MSB of the parameter is masked. -
Page 91: Character Smoothing 9
9. Bar code and enlarged character (18) Setting and canceling enlarged character smoothing: DC4 DC4 s Format: ASCII Decimal Function: Sets and cancels smoothing of enlarged characters. n = 00H, 30H: Cancels smoothing. 01H, 31H: Sets smoothing. The MSB of the parameter is masked. Any sequences other than the above parameters are ignored. -
Page 92: Of Enlarged Characters 9
9. Bar code and enlarged character (20) Setting and canceling underscores for enlarged characters: DC4 DC4 u Format: ASCII Decimal Function: Sets and cancels the underscore function. n = 00H, 30H: Cancels underscoring. 01H, 31H: Specifies the underscoring. The MSB of the parameter is masked. Any sequences other than the above parameters are ignored. -
Page 93: Of Enlarged Characters
9. Bar code and enlarged character If parameter m is different than shown above, this sequence is ignored. The absolute print position is based on the left margin. If the specified position exceeds the right margin, the print position is located at the right margin. -
Page 94: Enlarged Character Print Samples
9. Bar code and enlarged character Enlarged character print samples This page shows examples of a BASIC program for printing enlarged characters and the printed enlarged characters (actual size). 100 OPEN "LPT1:"AS #1 110 DC4$=CHR$(&H14) 120 ' 130 PRINT #1, DC4$;DC4$;"@"; ' Initializing 140 PRINT #1,DC4$;DC4$;"c";CHR$(8);... -
Page 95: Specifications
A. Specifications Appendix A. Specifications Printing specifications • Impact dot matrix and bidirectional logic seeking printing Printing method • 24 pins, movable-type (parallel/staggered orientation.) Print Head Estimated life expectancy: 500 million dots/wire Emulation • Epson LQ-2550 • IBM 2391 • Draft, High quality draft, Speed draft, Super speed draft Resident fonts •... - Page 96 A. Specifications Character Tables Character Tables in the EPSON mode (EPSON mode) • Italic character table • Graphic character table • Graphic character table, extended Character Tables in the IBM mode (IBM mode) • IBM character set 1 table • IBM character set 2 table •...
- Page 97 A. Specifications Evaluation conditions: Throughput Data of 100 lines by 132 columns, all ASCII rolling pattern characters, and 1/6-inch line feed is input from a host and is stored in the 64K-byte communication buffer o f t h e p r i n t e r. Wi t h t h a t c o n d i t i o n , t h e n u m b e r o f printing lines per minute is measured.
-
Page 98: Print Mode
A. Specifications Print mode specifications Note: (+n) indicates the number of space added. Max No. Character Printing Print mode Multipart Spacing Structure Speed mode (inches) Columns (V X H) (cps) Normal 1/90 X 1/120 12 x 12 10 cpi Dark 1 1/90 X 1/120 12 x 12 Dark 2... - Page 99 A. Specifications Note: (+n) indicates the number of space added. Max No. Character Printing Print mode Multipart Spacing Structure Speed mode (V X H) Columns (V X H) (cps) Normal 10 cpi Dark 1 1/180 X 1/360 24 x 36 Dark 2 Normal 12 cpi...
-
Page 100: Parallel Interface Specifications
A. Specifications ❏ Parallel interface specifications • Input connector (36-pin parallel) 1817 1615141312 1110 9 8 7 6 5 4 3 2 1 3635 3433323130 2928 2726252423 22 212019 SIGNAL IN/OUT SIGNAL IN/OUT STROBE DATA 1 DATA 2 DATA 3 DATA 4 DATA 5 DATA 6... -
Page 101: Specifications 1 0
A. Specifications Serial interface specifications • Input connector (25-pin serial) RS-232C Pin assignments SIGNAL IN/OUT SIGNAL IN/OUT CHASSIS GND SIGNAL GND SRTS Notes: 1. NC stands for no connection. 2. CHASSIS GND and GND are connected in the printer. • Handshake protocol One of the following four protocols can be selected: - DTR protocol (Busy/Ready protocol) - X ON/X OFF protocol I... -
Page 102: Other Specifications
A. Specifications Other specifications • 64k byte, 8k byte, 128 byte Buffer size (Changeable buffer size from the setup #71) • 2 levels of fan speed control capability Cooling fan • 120VAC: For USA and Canada Power supply • 220 - 240VAC: For Australia, Asia, Europe and Others •... -
Page 103: Control Code Summary
B. Control code summary (IBM) Appendix B. Control code summary IBM mode ITEM SYMBOL Hexadecimal & Decimal FUNCTION [07] H [7] D Activates the alarm. [08] H [8] D Backspaces one character. [09] H [9] D Moves to next horizontal tab. [0A] H [10] D Linefeeds after printing. - Page 104 B. Control code summary (IBM) ITEM SYMBOL Hexadecimal Decimal FUNCTION [21] ESC 4 [1B,34] H [27,52] D Sets the top-of-form (TOF) at the current print line. [22] ESC 5 n [1B,35,n] H [27,53,n] D Sets/cancels auto linefeed with CR n=0: Carriage return without linefeed. n=1: Carriage return with linefeed.
- Page 105 B. Control code summary (IBM) ITEM SYMBOL Hexadecimal Decimal FUNCTION [38] ESC K n1 n2 [1B,4B,n1,n2,data] H Prints the 8-pin Standard-density graphic mode(60dpi) data [27,75,n1,n2,data] D The total number of dots in the data is set by n1+n2×256. [39] ESC L n1 n2 [1B,4C,n1,n2,data] H Prints the 8-pin Double-density graphic mode(120dpi) data...
- Page 106 B. Control code summary (IBM) ITEM SYMBOL Hexadecimal Decimal FUNCTION [53] ESC [ @ n1 n2 [1B,5B,40,n1,n2,m1,..,m4] H Sets single or double height/width/line-spacing mode. m1...m4 [27,91,64,n1,n2,m1,..,m4] D n1=4, n2=0, and m2=0. m1=00h: no change m1=01h: italic style is set m1=02h: italic style is cancelled m1=04h: outline style is set...
- Page 107 B. Control code summary (IBM) ITEM SYMBOL Hexadecimal Decimal FUNCTION 2. Select a character style, and spacing in the following tables (Hf, Lf is ignored): (n1=6, n2=0, Hf=0, Lf=0, and S=1) Character Spacing and Style Table (Hs: Upper byte, Ls: Lower byte) 00-41 24 cpi, Subscript 84-9B...
- Page 108 B. Control code summary (IBM) ITEM SYMBOL Hexadecimal Decimal FUNCTION [57] ESC [ \ n1 n2 [1B,5B,5C,n1,n2,m1,...m4] H Sets basic line spacing to 1/180", 1/216", or 1/360". m1...m4 [27,91,92,n1,n2,m1,...m4] D n1=4, n2=0, m1=0, and m2=0 The basic line spacing affects the amount of the line feeding at ESC J and ESC 3.
-
Page 109: Epson Mode
B. Control code summary (Epson) EPSON mode ITEM SYMBOL Hexadecimal & Decimal FUNCTION [07] H [7] D Activates the bell. [08] H [8] D Backspace one character. [09] H [9] D Moves to next horizontal tab. [0A] H [10] D Linefeeds after printing. - Page 110 B. Control code summary (Epson) ITEM SYMBOL Hexadecimal Decimal FUNCTION [20] ESC $ n1 n2 [1B,24,n1,n2] H Sets absolute dot position. The dot spacing is 1/60" [27,36,n1,n2] D and its position is n1+n2x256 dots from the left margin. [21] ESC % n [1B,25,n] H [27,37,n] D Sets resident characters or download characters.
- Page 111 B. Control code summary (Epson) ITEM SYMBOL Hexadecimal Decimal FUNCTION d2=8,d3=0 : PC-863 d2=44,d3=0 : PC-858 d2=9,d3=0 : PC-865 d2=24,d3=0 : PC-861 d2=11,d3=0 : PC-857 d2=25,d3=0 : BRASCII d2=17,d3=0 : ISO-8859-1 d2=26,d3=0 : ABICOMP [26] ESC *m n1 n2 [1B,2A,m,n1,n2,data] H Sets various graphic modes.
- Page 112 B. Control code summary (Epson) ITEM SYMBOL Hexadecimal Decimal FUNCTION [41] ESC ? n m [1B,3F,n,m] H Re-assign graphic type for ESC K, ESC L, [27,63,n,m] D ESC Y, and ESC Z commands. n: specifies the former graphic type assigned by "K", "L", "Y", or "Z"...
- Page 113 B. Control code summary (Epson) ITEM SYMBOL Hexadecimal Decimal FUNCTION [57] ESC O [1B,4F] H [27,79] D Cancels skip over perforation. [58] ESC P [1B,50] H [27,80] D Selects pica mode (10cpi). The condensed elite character (20 cpi) also becomes the condensed pica character (17.1 cpi).
- Page 114 B. Control code summary (Epson) ITEM SYMBOL Hexadecimal Decimal FUNCTION [68] ESC a n [1B,61,n] H [27,97,n] D Justification mode. n=0: left justification is set (default) n=1: centering is set n=2: right justification is set n=3: full justification is set When n is other than 0, the printer performs one linefeed after printing.
-
Page 115: Setup Options Control Codes
B. Control code summary (Setup options) Setup options control codes This command is specially designed to assist you in utilizing the printer to its fullest p o t e n t i a l . M o s t o f p r i n t e r ' s s e t u p o p t i o n s c a n b e a c c e s s e d a n d c h a n g e d t h r o u g h t h e following command sequence. - Page 116 B. Control code summary (Setup options) ITEM Mode Code & Hexadecimal n (Hex.) = selection n: 0 = CR only n: 2 = Autofeed CR setting Header 5 n 1 = CR + LF 1B, 7C, 60, 02, 00, 35, n n: 0 = LF only Header 6 n LF setting...
- Page 117 B. Control code summary (Setup options) ITEM Mode Code & Hexadecimal n (Hex.) = selection 00 ≤ ml ≤ 63 Left margin [21] Left/right (Header) Q ml mr 00 ≤ mr ≤ 63 Right margin margin 1B, 7C, 60, 03, 00, 51, ml, mr n: 0 = USA n: 5 = Sweden n: A = Denmark2...
- Page 118 B. Control code summary (Setup options) ITEM Mode Code & Hexadecimal n (Hex.) = selection Header ] x n n: 0 = 1 [33] Bar Code Size 1B, 7C, 60, 03, 00,5D, 78, n 1 = 1.5 2 = 2 3 = 2.5 Header e n n: 0 = Sleep Mode Valid...
- Page 119 B. Control code summary (Setup options) ITEM Mode Code & Hexadecimal n (Hex.) = selection F = ITALY (ISO-15,0I) 10 = FRANC2 FRANCE 2(ISO-25,0F) 11 = GERMN2 GERMAN 2(HP SET,OG) 12 = SPAIN2 (ISO-85,6S) 13 = SPAIN3 (HP-SET,1S) 14 = JAPAN (ISO-14,0K) 15 = PORTU2 PORTUGAL(ISO-84,5S)
-
Page 120: Character Sets
C. Character Sets Appendix C. Character sets Epson, Italic character set (0) (16) (32) (48) (64) (80) (96) (112)(128) (144)(160) (176)(192) (208) (224)(240) Note: This character set is selected with ESC t 0. Refer to Control code summary section. Epson, Graphic character set, extended (0) (16) (32) (48) (64) (80) (96) (112)(128) (144)(160) (176)(192) (208) (224)(240) Note: This character set is selected with ESC 6 and ESC t 1. -
Page 121: Ibm Character Set 1
C. Character Sets International character set (EPSON) Country U.S.A. FRANCE GERMANY U.K. DENMARK SWEDEN ITALY SPAIN JAPAN NORWAY DENMARK 2 SPAIN 2 LATIN AMERICA KOREA TURKEY LEGAL Note: This character set is selected with ESC R n in the epson mode or from the front control panel. Refer to Control code summary or the extended setup options. -
Page 122: Ibm Character Set 2
C. Character Sets IBM character set 2 (0) (16) (32) (48) (64) (80) (96) (112)(128) (144)(160) (176)(192) (208) (224)(240) Note: This character set is selected with ESC 6. Refer to Control code summary section. IBM all character set (16) (32) (48) (64) (80) - Page 123 C. Character Sets Code 00H ~ 7FH (Common) Code Page 437 (U.S.A.) Code Page 850 (Multilingual) Code Page 857 (Turkish) EPSON/IBM mode •The (00)H-(1F)H and (80)H-(9F)H function as control codes only while in IBM character set 1 is selected. •The (03)H-(06)H,(15)H and (80)H-(9F)H are printable only while in IBM character set 2 is selected. •The all of the font table are printable only while in IBM all character set is selected.
- Page 124 C. Character Sets Code Page 860 (Portuguese) Code Page 858 (Multilingual-Euro) Code Page 861 (Icelandic) Code Page 863 (Canadian French) EPSON/IBM mode •The (00)H-(1F)H and (80)H-(9F)H function as control codes only while in IBM character set 1 is selected. •The (03)H-(06)H,(15)H and (80)H-(9F)H are printable only while in IBM character set 2 is selected. •The all of the font table are printable only while in IBM all character set is selected.
- Page 125 C. Character Sets Code Page 865 (Nordic) BRASCII ABICOMP ISO-1 (ISO-8859-1)
-
Page 126: Reverse Control Panel
D. Reverse control panel sheet Appendix D. Reverse control panel sheet Installation The reverse control panel sheet allows you to easily read the function key labels from the back of the printer. In situations where working from the back of the printer is convenient, simply lay the reverse control panel sheet in position over the standard control panel.
Need help?
Do you have a question about the CP-9000K and is the answer not in the manual?
Questions and answers