Table of Contents
Advertisement
Quick Links
Advertisement
Table of Contents

Related Manuals for Jolimark NP311D


Summary of Contents for Jolimark NP311D
- Page 1 JOLIMARK NAIL PRINTER INSTRUCTION MANUAL NP311D AIS CONFIDENTIAL...
-
Page 2: Table Of Contents
Contents Foreword 1.1 Warnings Installation guide 2.1 Unpacking 2.2 Package contents 2.3 Product placement and environment 2.4 Product Movement Product settings 3.1 Product Introduction 3.2 Power On 3.3 Connect to WIFI 3.4 Nail printer APP Introduction 3.5 Installation and replacement of ink cartridge 3.6 Ink cartridge testing and maintenance 3.7 Camera calibration 3.8 Printing position calibration... - Page 3 Customer support 8.1 Customer Support Product safety instructions 9.1 Product Safety Instructions Certificate 10.1 QC Certificate AIS CONFIDENTIAL...
-
Page 4: Warnings
FOREWORD This manual mainly serves as a guide to provide basic operating procedures and precautions for the users when using the product to avoid problems such as product circuit abnormality, electric shock, fire hazard, operator injury and damage caused by improper use of the product. Symbol Description Warning: When this symbol appears in the manual, it implies that such behavior or... -
Page 5: Installation Guide
Installation Guide Thank you for purchasing the Jolimark Nail Printer (the Product), please follow the instructions below to install and use this product. 2.1 Unpacking Open the packaging box Remove the packaging (cushioning) materials Take out the product 2.2 Package contents... -
Page 6: Power On
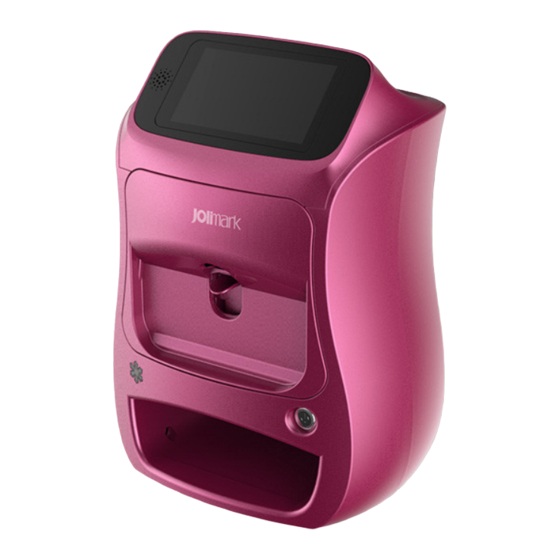
Figure 3.1 Parts of the product 3.2 Power On To use this product, first insert the round plug of the power adapter into the DC power socket of the product and then plug in the other end of the power adapter into the AC wall socket (110V~240V). Press the power switch to turn on the power of the product. -
Page 7: Nail Printer App Introduction
Press the power switch and wait for the Android Touch with your finger and slide down from the top of the tablet to boot. screen to setting screen. Select WLAN option (in red circle). Press the specified WLAN name. Press the specified WLAN name and enter the WIFI connection is completed. - Page 8 You can also create your own nail plan. Click the button in the upper right corner of the page to enter the “production plan” page, fill in the name of the plan, select the picture of the ten fingers in the gallery, and then select the style of the plan to generate a unique plan.
- Page 9 3.4.3 Print nail art pattern In the first step, the Base Gel and the Color Gel are applied in turn, and both gels need to be illuminated to dry. After drying, apply Frame Gel to the edge of the nail, no need to illuminated;...
- Page 10 Graphic requirements: printing glue (transparent / sequin / cream) does not require lighting iii. In the third step, after opening the App to select the printing scheme / picture, a printing task will be automatically generated in "Task Management". Select the finger to be printed and click the "Print"...
- Page 11 [Important] When you press “Print” button to print the nail, the display screen will be locked in printing procedure, you cannot do any other process before the printing job is finished. Step 4. After printing the pattern, please peel off the anti-spill adhesive on the edge of the nail, and then light it for 2 ~ 3 minutes;...
-
Page 12: Installation And Replacement Of Ink Cartridge
Installation and replacement of ink cartridge 3.5.1 First time installation i. Please remove the front cover when starting the product for the first time. At this time, the cartridge holder will move to the front and the indicator light will be solid yellow. - Page 13 Figure 3.5.3 Install the ink tank Note When installing the ink cartridge, do not touch the yellow probe on the ink cartridge and the surface of the wafer. Figure 3.5.4 Do not touch the ink cartridge probe point and ink cartridge chip v.
- Page 14 i. Open the Nail printer APP-> System Management-> Replace Ink Cartridge and click to start replacement. ii. Open the front cover and remove the ink tank. iii. To install the ink cartridge, follow the steps 2 to 5 in section 3.5.1 to complete the replacement process.
- Page 15 holder Enter the Nail printer App, select System Printing is complete, and the printout is Management-> Print Test, and click "Start shown below. Printing" Figure 3.6.1 Ink cartridge print test 3.6.2 Ink Cartridge Maintenance AIS CONFIDENTIAL...
-
Page 16: Camera Calibration
If white lines or ink does not appear on the inkjet, refer to this section to clean the ink cartridges. i. Please refer to section 3.5.2 to remove the ink cartridge ii. Please prepare paper towels and fold them into squares iii. - Page 17 iv. Calibration method: The upper edge of the nail holder is aligned with the upper edge of the screen, and the center of the nail holder is aligned with the calibration separator. v. After finishing the movement, press Save to complete the camera calibration Open the front cover and prepare the Insert the nail holder into the finger holder: nail-holder...
- Page 18 1.甲片固定座上緣 對齊螢幕上緣 2.校準豎線對齊 甲片固定座中心 攝像頭顯示移動選項 After calibration is complete, press Save to complete the camera calibration Figure 3.7 Camera calibration 3.8 Print Position Correction (Before performing this correction, please complete the camera calibration in section 3.7) When the nail print is found to be too different from the position specified by the nail app, you can refer to this chapter to correct the print position.
- Page 19 Prepare blank paper and stick to Open the front cover and put the nail holder into nail holder the nail machine vii. Use your fingers to move the displayed test draft image, adjust its size and make the size of the displayed test draft image equal to the printed test draft image.
- Page 20 Do not move the test draft in the screen and Open the Nail printer App, select press the print icon on the right System Management-> Print Position Calibration 1.請勿移動測試稿位置 2.按下此圖示 After printing is completed (do not The correct position adjustment is as follows. move the nail holder), adjust the After finishing, press Save to complete the displayed test draft to be as large...
-
Page 21: Gel Description
Gel description 4.1 Gel type Gel name Label description UB Base Base UB Color Color layer UB Frame Spill glue UB Print-1 UBP1 UB Print-2 UBP2 UB Print-3 UBP3 Anti-Spill UB Reinforce Adhesive UB Seal Reinforce 4.2 Gel description Function description Drying time AIS CONFIDENTIAL... -
Page 22: Gluing Process
Reinforcing bond strength Nail Base (UB Base) 30-60second between layers Nail Color Layer (UB Background color as painted 60second Color) pattern Apply around nails to prevent Nail Spill Glue (UB skin contact when using nail No needed Frame) polish Nail Printing Apply on top of color glue before Adhesive (UB Print1) printing to make the printed... -
Page 23: Specifications
美甲色膠 (UB Color) 美甲底膠 (UB Base) Figure 4.3 Gluing process Specification 5.1 Product specification Table 5.1 Product Specifications Product name Nail Art Printer Model name NP311D Power Rated voltage 24Vdc specifications Rated current 2.5A Wireless Wi-Fi Wi-Fi IEEE 802.11 b/g/n... -
Page 24: Ink Cartridge Specification
Acoustic Sound pressure ≤67dB emission Operating Operating 5℃ ~ 35℃ environment temperature Operating relative 20% to 80% (non-condensing) humidity Storage Storage -25℃ ~ 60℃ environment temperature Storage relative 20% ~ 93% (non-condensing) humidity Ink cartridge specifications Dye: Ink Sealed:5℃~35℃ Storage environment Unsealed:Please keep it inside the machine Proper way to place the ink cartridge... -
Page 25: Indicator Instructions And Firmware Upgrade
Unsealed: one year AC power adapter The primary function of the power adapter is to convert the AC power (AC) from the wall outlet to the specific voltage DC power (DC) required by the product. Input voltage / current 100Vac – 240Vac / 50Hz –60Hz Rated voltage / current 24Vdc / 2.5A Use a power adapter that complies with the local country's certified power adapter or optional accessories for... -
Page 26: Firmware Upgrade
-Refer to Chapter 3.6.1 and Chapter 3.6.2 for ink cartridge maintenance -Put your finger on the finger holder and don't press down. Put it lightly on the finger holder and let the finger holder spring up to position it. Customer Support Website www.kamoppos.com E-mail kamopos@jolimark.com AIS CONFIDENTIAL... - Page 27 Table.8-1 Customer Support Information Product safety instructions 9.1 Product Safety Instructions Please read all the operation manuals. This product can only be operated with the ink cartridge and accessories from original manufacturer. Do not use any unauthorized accessories or supplies. Children should not use this product.
- Page 28 FCC Compliance Statement This equipment has been tested and found to comply with the limits for a Class B digital device, pursuant to Part 15 of the FCC Rules. These limits are designed to provide reasonable protection against harmful interference in a residential installation. This equipment generates, uses, and can radiate radio frequency energy and, if not installed and used in accordance with the instructions, may cause harmful interference to radio communications.
- Page 29 EU Declaration of Conformity Languages Statement This equipment is in compliance with the essential requirements and other relevant English provisions of Directive 2014/53/EU, 2014/35/EU. Cet équipement est conforme aux exigences essentielles et autres dispositions de la Français directive 2014/53/EU, 2014/35/EU. Toto zaøízení...
- Page 30 forordninger i direktiv 2014/53/EU, 2014/35/EU. Tämä laite täyttää direktiivien 2014/53/EU, 2014/35/EU. oleelliset vaatimukset ja muut suomen kieli asiaankuuluvat määräykset. This equipment complies with EU radiation exposure limits set forth for an uncontrolled environment. This equipment should be installed and operated with minimum distance 20cm between the radiator &...
- Page 31 Penalties may be applicable for incorrect disposal of this waste, in accordance with you national legislation. Certificate 10.1 QC Certificate Shenzhen Jolimark-Kamo Mobile Payment Co., LTD. Email : kamopos@jolimark.com Address : B706 , 708 , 7th Floor , Jiuzhou Electric Building, Nanshan Technology South 12th Road, Shenzhen...
Need help?
Do you have a question about the NP311D and is the answer not in the manual?
Questions and answers