Table of Contents
Advertisement
Quick Links
Advertisement
Table of Contents

Subscribe to Our Youtube Channel
Related Manuals for Craftex CT170


Summary of Contents for Craftex CT170
- Page 1 CT170 1”x30” BELT & 5” DISC SANDER User Manual...
-
Page 2: Table Of Contents
TABLE OF CONTENTS General Safety Instructions for Machines ............... 3 Specific Safety Instructions..................4 CT170 Features ...................... 5 Physical Features ....................6 Proper Grounding ....................7 Un-Packing ......................8 Sanding Belt Table....................8 Dust Chute......................8 Sanding Disc Table....................9 Belt Tracking ...................... -
Page 3: General Safety Instructions For Machines
GENERAL SAFETY INSTRUCTIONS FOR MACHINES Extreme caution should be used when operating all power tools. Know your power tool, be familiar with its operation, read through the owner’s manual and practice safe usage procedures at all times. ALWAYS read and understand the NEVER leave a tool unattended while it user manual before operating the is in operation. -
Page 4: Specific Safety Instructions
CT170 – 1”x30” BELT & 5” DISC SANDER SPECIFIC SAFETY INSTRUCTIONS MAKE SURE the sander is connected ALWAYS wear a dust mask and safety to the matched and specific power glasses while operating the sander. The source instructed in the manual. -
Page 5: Ct170 Features
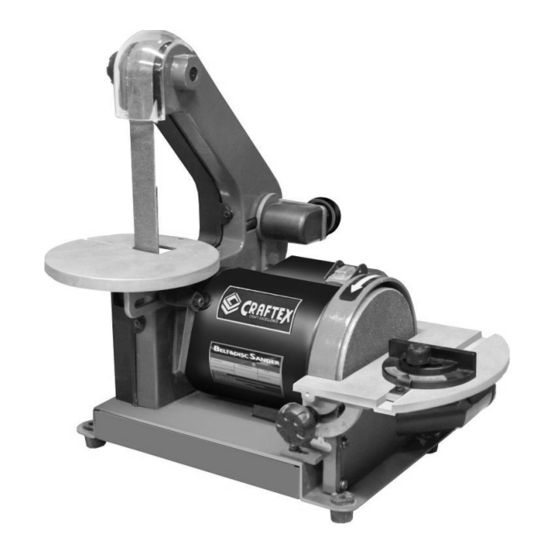
MODEL CT170 – 1”x30” BELT & 5” DISC SANDER As part of the growing line of Craftex woodworking equipment, we are proud to offer the CT170, a 1”x30” Belt and 5” Disc Sander. The Craftex name guarantees Craft Excellence. By following the instructions and procedures laid out in this user manual, you will receive years of excellent service and satisfaction. -
Page 6: Physical Features
CT170 – 1”x30” BELT & 5” DISC SANDER PHYSICAL FEATURES... -
Page 7: Proper Grounding
It is strongly recommended not to use resistance for electric current to reduce the extension cords with your CT170. Always risk of electric shock. try to position your machine close to the power source so that you do not need to Make sure the cord is plugged into a use extension cords. -
Page 8: Unpacking
Some of the parts come preassembled with the machine because of shipping purposes. SANDING BELT TABLE The CT170 is equipped with a tilting table secured with a lock lever. To install the table: Figure-3 Sanding belt dust port with side... -
Page 9: Sanding Disc Table
Figure-4 Installing sanding disc dust chute SANDING DISC TABLE CT170 is provided with a work table for disc sanding operation. To install the sanding disc table: Figure-6 Belt Tracking adjustment knob Make sure the switch is in the OFF position and the cord is disconnected from the power sources. -
Page 10: Upper Guard
MOUNTING The CT170 is provided with 4 pre-drilled holes on its base to allow mounting on a workbench. To mount the sander on a workbench: Remove the rubber feet in the holes and place the machine on the workbench and... -
Page 11: Test Run
TEST RUN Once you have assembled the machine it is Loosen the two hex screws located under then time to do a test run and see that the the table, securing the platen to the sander machine powers up and runs properly. frame. -
Page 12: Sanding Belt Replacement
Remove the upper guard and the side cover by removing the lock knob and loosening the two screws securing the upper guard and the side cover. See figure- Figure-11 Squaring table to the belt Figure-13 Removing the side cover The middle roller features spring at the back and can be pushed towards the table. -
Page 13: Sanding Disc Replacement
Take the belt off the rollers with another MITER GAUGE hand and replace it with a new one. CT170 is provided with a miter gauge and Once the belt is position on the wheels, can be used on the disc table. -
Page 16: Warranty
This warranty shall not apply to consumable products such as blades, bits, belts, cutters, chisels, punches etceteras. Craftex shall in no event be liable for injuries, accidental or otherwise, death to persons or damage to property or for incidental contingent, special or consequential damages arising from the use of our products.
Need help?
Do you have a question about the CT170 and is the answer not in the manual?
Questions and answers