Ness D8x User Manual
Navigator alarm control panels v7 touch screen keypad operation and user programming manual
Hide thumbs
Also See for D8x:
- Installation & programming manual (88 pages) ,
- User manual (32 pages) ,
- User manual (22 pages)

Related Manuals for Ness D8x


Summary of Contents for Ness D8x
- Page 1 Touch screen Keypad User’s ManUal D8x/D16x navigator alarm Control Panels V7 Operation and User Programming Manual rev 2.1...
- Page 2 improvement.
-
Page 3: Table Of Contents
contents introduction ............4 navigator system overview . -
Page 4: Introduction
Zone descriptions are displayed in plain english and you can even edit zone navigator Touch screen Keypad is compatible with ness D8x and D16x control panels Version 7 and later. -
Page 5: Navigator System Overview
Your navigator system your ness alarm system ness navigator Touch screen Keypad is the face of your ness D8x or D16x navigator alarm system. navigator’s self-explanatory operation guides provide you with plain english displays and intuitive touch screen operation. The interactive display screens make it easy to view all your zones with your own text descriptions, get help and prompts for arming, disarming, operating outputs, emergency alarms and more. -
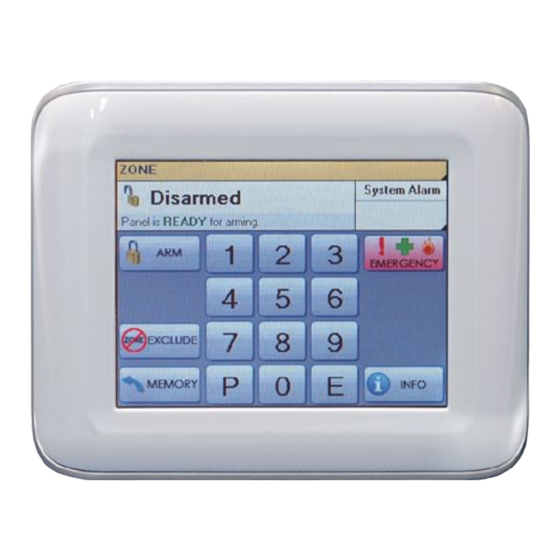
Page 6: Navigator Touch Screen Keypad Overview
overview The Disarmed screen in the normal disarmed mode, the navigator screen displays information about the state of your system and gives you instant access to commonly used functions. Touch to arm the system. Page 14. Touch to arm home Mode. Page 16. Touch to exclude zones. -
Page 7: Information Screen
8. ness Corporation contact details. your installer’s contact details are stored here. never lose a business card again! -
Page 8: Care & Cleaning
care & cleaning Caring for your navigator Do not use a pen, screwdriver or other sharp implement to press the touch screen. Permanent damage may result and will invalidate any warranties. Please press lightly, the touch screen does not need heavy force to operate. Pressing too hard may damage the lCD screen and the housing. -
Page 9: Applying The Protective Film
screen Protection applying the Protective Film navigator Touch screen Keypad is supplied a self-adhesive screen protector to help protect the sensitive touch surface from marks and scratches which may ap- pear under normal use. We highly recommend that you apply the protective film to keep the touch surface looking brand new for years to come. -
Page 10: Zone Status Display
Unsealed zones The Zone list display will show show a red indicator. 8 or 16 zones depending on whether your navigator Control Panel is a D8x or D16x. Zone names can be customised in program mode. Page 28. -
Page 11: Clock Display
clock Display The date and time are normally displayed when the system is armed or disarmed. The date and time can be set in User Program Mode, see page 30. if there is a system alarm, this area will display the alarm. see next page. -
Page 12: System Alarm Displays
system alarm Display if there is a system alarm, the clock area will display the alarm. Touch to display details. to display system alarm details. Touch the system alarm area. Full description of the system alarm and what action to take. Outstanding system alarms shown here. -
Page 13: System Alarm Displays
system alarm Display radio Key low battery alarm. radio Tamper alarm indicates that a device such as a radio reed switch or the r12 radio Pir may have been opened. Check the device. radio supervision, if enabled by your installer, alerts you if a radio device has not transmitted a signal for a set interval. -
Page 14: Arming The System
to arm The control panel must be armed in order to detect intruders. Before arming, make sure all zones are “sealed” by ensuring there is no movement in rooms covered by motion detectors and that doors or windows protected by reed switches are closed. -
Page 15: Disarming The System
to Disarm When you enter the protected premises through a delay zone, the keypad responds with regular beeps as a reminder to disarm. if the panel is not disarmed by the end of the entry delay time, an alarm will occur. Using the optional radio keys, you may disarm your system from inside your premises or from just... -
Page 16: Home Mode
to arm Home mode home mode allows you to arm selected zones while others are Touch ignored. Typically, perimeter zones (doors and windows) can be monitored while you are at home. or touch A valid user code. your installer must program which zones will be active in home mode. -
Page 17: Duress Alarm
Keypad Duress alarm The DUress alarm can be used to trigger the keypad Duress alarm, add a to send a silent alarm to the central special digit before your user code when station that you are being forced to disarming. disarm the panel against your will. -
Page 18: Emergency Alarms
emergency alarms Panic aLarm to trigger emergency alarms. The Panic alarm may have been programmed to be either audible Touch to activate the sirens, or silent to send a PaniC report by dialler if your system is monitored by a Central station. -
Page 19: Excluding Zones
excluding Zones if there is a problem with a to exclude zones. detection device and the zone cannot be sealed when arming Touch the panel, then that zone can be manually excluded so that it does Then touch the zone name/s to toggle the not generate alarms. -
Page 20: Event Memory
event memory The panel stores a comprehensive to view the event memory. event memory, including arming, Disarming, low Battery, Mains Fail Touch and alarm events. The memory is constantly upgraded and the last 80 events with time & date are always available for viewing. -
Page 21: Day Mode Setup
Day mode - set up select which zones will be Temporary Day your navigator control panel has a Zones. you probably will only need to do this Temporary Day Zone feature which once or occasionally. allows easy and flexible Day Zone selection and operation. -
Page 22: Day Mode Operation
Day mode - operation Day Mode can be enabled when the panel is in This enables/disables both the normal disarmed mode. Temporary and Permanent Day Zones. to enable Day mode. When Day Mode is enabled, any unsealed day zone will sound the Touch programmed output for 2 seconds. -
Page 23: Auto Time Automation
DisarM aUTOMaTiCally at navigator security system. pre-programmed times of day or day of ARMED the week. your D8x/D16x navigator panel ARMED HOME features sophisticated automation increase site security. no need to rely on features making full use of the... -
Page 24: Auxiliary Outputs, Manual Operation
aUX outputs - manual operation Manual Operation Of the aux to operate the aUX outputs. Outputs (Optional function - must be enabled by your installer.) Touch as well as automatic operation auxiliary Control is available in all modes, by auto Time, the four auxiliary including when the system is armed. -
Page 25: Programming
Programming how to enter program mode ........26 set Brightness, set Volume . -
Page 26: How To Enter Program Mode
Programming - How to enter Program mode enter program mode when the panel is in the in User Program Mode you can normal disarmed mode. program User Codes, Timers, real Time Clock, Follow Me Telephone number. to enter User Program mode. User coDes Touch Your Master code. -
Page 27: Set Brightness, Set Volume
Programming - navigator configuration The navigator Configuration screen in User Program Mode. allows you to: Touch set brigHtness adjust the brightness of the navigator’s lCD screen back- lighting to suit the room. set voLUme adjust the beep volume of the navigator touch screen. -
Page 28: Edit Zone Names, Edit Aux Output Names
The example opposite shows how to edit Zone names. Follow the same procedure to edit aux Output names. Touch a zone name. if you have a navigator D8x panel this display will show 8 zones. next/Previous zone Backspace Move cursor left/right... -
Page 29: Zone Name Library
Programming - navigator configuration eDiting Zone names Using the Zone name library. Touch a zone name to display the zone name editor. next/Previous zone Backspace Move cursor left/right Opens zone name library To return to the zone list Touch select to open the zone name library. -
Page 30: Setting The Real Time Clock
Programming the real time clock This option allows you to program: in User Program Mode. Day OF MOnTh (01-31) Touch MOnTh (01-12) year (10-63) hOUr (00-23) 24hr time format MinUTe (00-59) The Day Of Week does not need to be programmed. it is automatically calculated from the date. -
Page 31: User Codes Options Table
Programming User codes User coDe Programming rULes • User Code 1 is also the Master Code which is used to enter User Program • Up to 56 Keypad Codes can be used mode. at up to 4 wired navigator keypads for controlling all panel functions including •... -
Page 32: User Codes Programming
Programming User codes in User Program Mode. refer to the User Code options table on page 31 then enter the option number of the user code you want to program. Touch 3 digit option number The option number and the current user code is displayed. -
Page 33: Radio Keys Programming
Codes. refer to the User Code options table on page 31 then enter the option number of the user This allows up to 55 ness radio code you want to program. Keys to be used for arming and disarming of the panel. -
Page 34: Timer Programming, Entry/Exit Delays
Programming timers in User Program Mode. This option allows you to program: enTry Delay TiMe 1 (01-99 sec) Touch entry Delay Time 1 sets the time allowed to enter the premises through a delay zone. enTry Delay TiMe 2 (01-990 sec) if enabled by your installer, this timer is used to give extra long entry delay on selected zones. -
Page 35: Follow Me Telephone Number Programming
Programming - Follow me telephone number in User Program Mode. This option allows you to program: FOllOW Me TelePhOne Touch nUMBer if your panel is set up for audible Voice monitoring, you can program the Follow Me Telephone number to temporarily replace the two installer-programmed phone numbers. -
Page 36: Monitoring Operation
(by user number) identify the users who arm ness navigator control and disarm the system. panels have a digital dialler which can send Central station monitoring is highly rec-... -
Page 37: Remote Operation By Telephone
/Disarm anD oPerate seqUence oF oPeration. aUX oUtPUts bY PHone 1. Phone the panel telephone number and listen for the required number of rings and then hang up. ness navigator control pan- els allow a user to call in to the 2. -
Page 38: Troubleshooting
troubleshooting sYmPtom PossibLe caUse remeDY When arming, a zone light is One or more detection device Find the cause of movement or close on or the keypad gives a long (a Pir or reed switch) may be the door or window. beep. -
Page 39: Installation Record
DATE PURCHASED: DATE INSTALLED: INSTALLATION COMPANY: TELEPHONE: navigator D8x panel MONITORING COMPANY: navigator D16x panel TELEPHONE: ZONE ASSIGNMENT TIMERS Installer programming options ENTRY DELAY TIME 1 Seconds ENTRY DELAY TIME 2 Seconds EXIT DELAY TIME Seconds SIREN TIME Minutes PIR, Reed...
Need help?
Do you have a question about the D8x and is the answer not in the manual?
Questions and answers