Table of Contents
Advertisement
Quick Links
Advertisement
Table of Contents

Related Manuals for BK Medical Type 8553


Summary of Contents for BK Medical Type 8553
- Page 1 Convex Array Transducer User Guide Type 8553 English BB0101-H August 2006...
- Page 2 If you receive an email message from us asking for your feedback, we hope you will be willing to answer some questions about your experience buying and using our products. Your opinions are important to us. You are of course always welcome to contact us via your BK Medical representative or by contacting us directly.
-
Page 3: Table Of Contents
Convex Array Transducer Type 8553 Introduction Scanning Plane General Information Caring for the Transducer Cleaning and Disinfection Starting Scanning Connecting a Transducer Changing Frequency Using a Transducer Cover Using the Transducer Control Button Changing Orientation Puncture Facilities UA0940 UA1217 Performing Puncture and Biopsy... -
Page 5: Convex Array Transducer Type
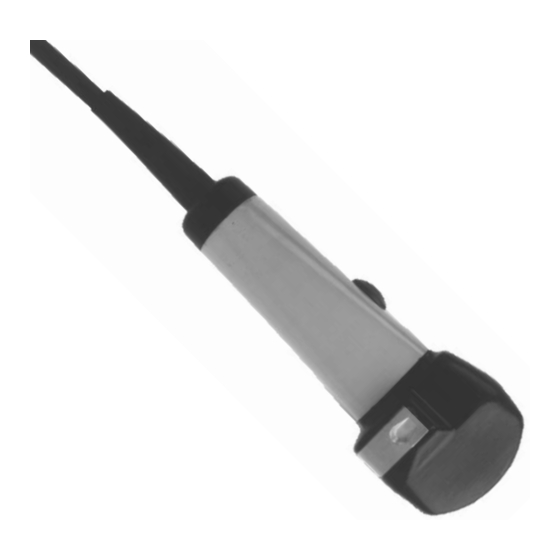
8553 • Introduction Introduction This is the user guide for Convex Array Transducer Type 8553 and must be used together with Transducer Care, Cleaning & Safety which contains important safety information. 8553 is an abdominal transducer suitable for transcutaneous scanning of the bladder and kidney, and for intercostal examinations. -
Page 6: Caring For The Transducer
8553 • Cleaning and Disinfection WARNING! If at any time the scanner malfunctions, or the image is severely distorted or degraded, or you suspect in any way that the scanner is not functioning correctly: • Remove all transducers from contact with the patient. •... -
Page 7: Connecting A Transducer
8553 • Starting Scanning Connecting a Transducer WARNING Keep all plugs and sockets absolutely dry at all times. Unscrew the connector plug cover on the transducer (if attached). On the connector plug, make sure that the red arrow is aligned with the red dot on the transducer socket. Pull back the outer locking mechanism and insert the plug in the socket. -
Page 8: Puncture Facilities
8553 • Puncture Facilities Puncture Facilities Puncture and biopsy is possible with Type 8553. The puncture attachments are illustrated in the following pages with a brief description of their uses and operating instructions. WARNING: It is essential for the patient’s safety that only the correct puncture attachment is used with Type 8553. -
Page 9: Ua1217
8553 • Puncture Facilities All parts of the puncture attachment can be autoclaved or disinfected by total immersion in a suitable solution. Fig. 4. Puncture attachment UA0940 mounted on the 8553 UA1217 Fig. 5. Puncture attachment UA1217 The puncture attachment (see Fig. 5.) is recommended for use with catheters and large diameter needles from 1.2 mm and up to 3.6 mm. -
Page 10: Performing Puncture And Biopsy
8553 • Performing Puncture and Biopsy Performing Puncture and Biopsy WARNING! It is essential for the patient’s safety that only the correct puncture attachments, as described in this guide, are used. Never use unauthorized combinations of transducers and puncture attachments or other manufacturers puncture attachments. WARNING! The puncture line on the scan image is an indication of the expected needle path. -
Page 11: Cleaning After Puncture And Biopsy
8553 • Disposal Cleaning after Puncture and Biopsy If biological materials are allowed to dry on the transducer or puncture attachments, disin- fection and sterilization processes may not be effective. Therefore, you must clean puncture attachments and transducers immediately after use. Use a suitable brush to make sure that biological material and gel are removed from all nee- dle guides and other channels and grooves.
Need help?
Do you have a question about the Type 8553 and is the answer not in the manual?
Questions and answers