
Related Manuals for BK Medical Type 2050


Summary of Contents for BK Medical Type 2050
- Page 1 Anorectal Transducer User Guide Type 2050 and Type 2052 English BB1804-B December 2009...
- Page 2 If you receive an email message from us asking for your feedback, we hope you will be willing to answer some questions about your experience buying and using our products. Your opinions are important to us. You are of course always welcome to contact us via your BK Medical representative or by contacting us directly.
-
Page 3: Table Of Contents
Contents General Information ..........5 About the Transducer . -
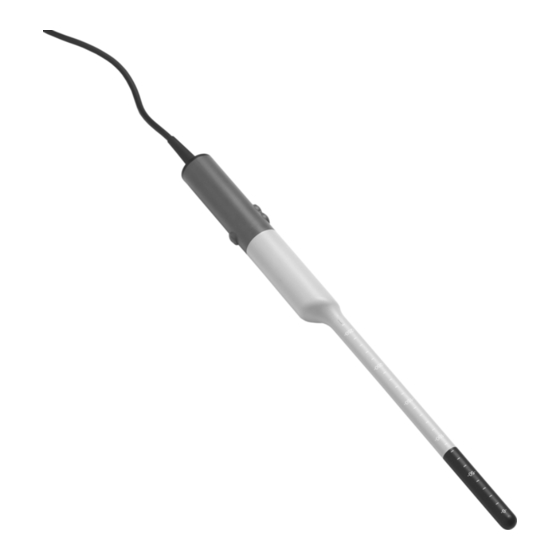
Page 5: General Information
General Information Figure 1. Anorectal transducers types 2050 and 2052. This is the user guide for Anorectal Transducers Types 2050 and 2052. It contains a description of the transducers, a list of the intended applications, and information about operating these particular transducers. You must use this guide together with other documents that contain important information, including vital safety information. -
Page 6: About The Transducer
About the Transducer Applications The transducer is suitable for the following types of examinations. Colorectal Scanning • endoanal scanning • endorectal scanning Pelvic Floor Scanning • endoanal scanning • endovaginal scanning of the pelvic floor FDA WARNING for the United States of America The transducer should not be used for fetal examinations. -
Page 7: Scanning Plane
Scanning Plane 360° Figure 3. Scanning plane for the anorectal transducer. The extreme positions of the crystal assembly are shown. Scanning Frequencies Each crystal has 3 scanning frequencies. On the scanner, the scanning frequency is displayed on the screen. Control Buttons The transducer has 3 control buttons on the handle. -
Page 8: Safety Information
The transducer may be damaged during use or processing, so it must be checked before use. Check the transducer more thoroughly once a month. See Care, Cleaning & Safety. Contact your BK Medical service representative if you detect any signs of damage or of oil leaking from the transducer. -
Page 9: Using A Transducer Cover
Using a Transducer Cover Endoanal or Transvaginal Scanning You must use a transducer cover. See the Product Data sheet for a list of available transducer covers, including sterile covers. Apply scanning gel or other water-soluble agent inside and outside the cover to create good acoustic contact. -
Page 10: Selecting The Crystal And Scanning Frequency
Insert the plug in the socket. To disconnect the transducer, you must pull back the outer locking NOTE: mechanism on the plug before you remove the plug from the socket. Selecting the Crystal and Scanning Frequency To select the other crystal or change the scanning frequency, please refer to your scanner user guide. - Page 11 Changing the 2052 Crystal Position on the Pro Focus You can use the buttons on the transducer handle to move Forward Backward the crystal. You can also use the on-screen control to change the crystal position. To move the crystal in the 2052 transducer: •...
-
Page 12: Scanning
• Make sure the image is frozen, and press the transducer control button to move the insertion depth to zero. If the insertion depth is not set, or is zero, the displayed value next to Anat. Pos. is Scanning Image Orientation The 12 o’clock position on the displayed image is identified by the two control buttons on the transducer handle pointing to the anterior 12 o’clock position. -
Page 13: Endorectal Scanning
You must use a water standoff system to scan the rectum from the anorectal junction and beyond. BK Medical recommends using a rectosigmoidoscope when attempting to scan proximally in the rectum (approximately 10cm or more from the anal verge). A water standoff system with the following components is available: •... - Page 14 To prepare the water standoff system: Place the two O-rings in the outer grooves as shown in this picture. The water outlet is just above the inner groove. Do NOT block this Place the O-rings in these two grooves Luer Lock valve (water inlet) Use a little water to moisten the silicone O-rings inside the water standoff collar.
- Page 15 wire clip 2-3 silicone rubber bands in each of the two grooves Secure the water standoff condom in place with 2 or more silicone rubber bands in each groove (silicone rubber bands are supplied with water standoff condoms UA0037). Fill the syringe with degassed water. Use the 2-way stopcock and plastic extension tube to attach the syringe to the Luer lock valve on the water standoff collar.
-
Page 16: Using A Rectosigmoidoscope And Scanning
The transducer is designed to pass through Rectosigmoidoscope UA0672, Rectosigmoidoscope UA0673 or single-use Rectosigmoidoscope UA0681. Caution: If you use a rectosigmoidoscope that you do not purchase from BK Medical, it must be fully cylindrical and have an inner diameter of at least 21 mm. - Page 17 Using a rectosigmoidoscope Insert the obturator fully into the rectosigmoidoscope and apply gel to the outside tip. Introduce the rectosigmoidoscope as far as the beginning of the rectal ampulla (4–5 cm). WARNING Do not use excessive force during insertion. Do not make excessive lateral movements during or after insertion.
- Page 18 Inserting the transducer and water standoff system Make sure that the entire outer surface of the water standoff condom is thoroughly lubricated with a glycerine-based lubricant. Insert the transducer just until the tip of the transducer is at the far end of the rectosigmoidoscope.
-
Page 19: 3D Scanning
Scanning To start scanning, press the button on the underside of the Start/Stop/Capture transducer handle. Scan the exposed area. (For a 3D scan, see “3D Scanning” on page 19.) If you have not scanned the entire object of interest in the first pass, pull the transducer together with the rectosigmoidoscope back another 4–6 cm, and scan again. -
Page 20: Service And Repair
Service and Repair WARNING Service and repair of BK Medical electromedical equipment must be carried out only by the manufacturer or its authorized representatives. BK Medical reserves the right to disclaim all responsibility, including but not limited to responsibility for the operating safety, reliability and performance of equipment serviced or repaired by other parties.
Need help?
Do you have a question about the Type 2050 and is the answer not in the manual?
Questions and answers