Table of Contents
Advertisement
Quick Links
Advertisement
Table of Contents

Subscribe to Our Youtube Channel
Related Manuals for BK Medical 20R3


Summary of Contents for BK Medical 20R3
- Page 1 User Guide 20R3 Transducer 16-01278-EN-07 For Professional Users Only May 2019...
- Page 2 BK Medical Customer Satisfaction Input from our customers helps us improve our products and services. Your opinions are important to us. You are always welcome to contact us via your BK Medical representative or by contacting us directly. 20R3 = Ref. Type 9052 ©...
-
Page 3: Table Of Contents
Contents Introduction ............5 Intended use . -
Page 5: Introduction
Introduction This is the user guide for the 20R3 transducer, and it must be used together with the Care and Cleaning user guide which contains important safety information. Caution Rx-c1 United States Federal law restricts this device to sale by or on the order of a physician. -
Page 6: Crystals
Figure 3. Imaging plane for the anorectal transducer. The extreme positions of the crystal assembly are shown. Imaging Frequencies Each crystal has 3 imaging frequencies. On the system, the imaging frequency is displayed on the screen. May 2019 20R3 User Guide (16-01278-EN-07) -
Page 7: Control Buttons
Do not try to repair the system yourself. • Contact your BK service representative or hospital technician. • WARNING AO-w1 To avoid tissue damage, always keep the exposure level (the acoustic output level and the exposure time) as low as possible. 20R3 User Guide (16-01278-EN-07) General Information... -
Page 8: Service And Repair
Cleaning. It should also be checked thoroughly once a month following the same procedure. Reprocessing To ensure the best results when using BK Medical equipment, it is important to maintain a strict cleaning routine. Complete details and procedures can be found in Care and Cleaning that accompanies this user guide. -
Page 9: Connecting The Transducer
Apply sterile gel to the tip of the transducer or fill the cover with 1 to 2 ml of sterile water. This improves screen imaging by preventing image artifacts caused by air bubbles. 20R3 User Guide (16-01278-EN-07) Starting Imaging... -
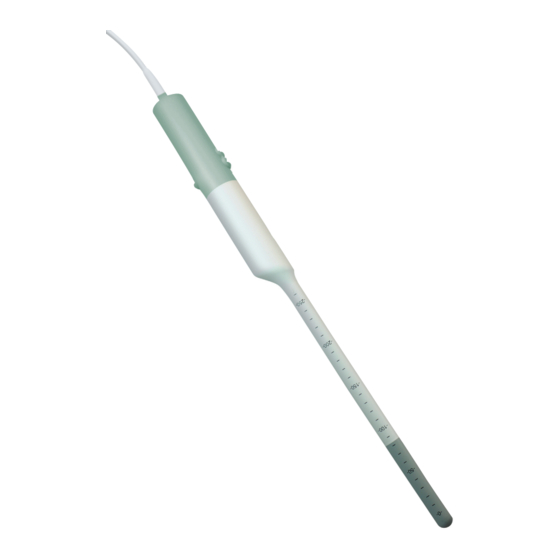
Page 10: Selecting The Crystal And Imaging Frequency
To select the other crystal or change the imaging frequency, please refer to your system user guide. Anatomical Position (Insertion Depth) and Crystal Position When imaging with 20R3, you can calculate where the imaging plane is in the patient by setting anatomical position (insertion depth) and crystal position. To set the insertion depth: Find the actual insertion depth by reading the scale on the transducer. -
Page 11: Image Orientation
You must use a water standoff system to image the rectum from the anorectal junction and beyond. BK Medical offers reusable water standoff systems and single-use water standoff systems. When using a water standoff system, you should always follow policies established by your office, hospital or institution when you are performing endorectal imaging. -
Page 12: Preparing The Patient
The water standoff collar, O-ring, rectosigmoidoscope and obturator can be autoclaved. For best results, separate the O-ring from the water standoff collar before NOTE: autoclaving. O-rings that are no longer watertight should be replaced. May 2019 20R3 User Guide (16-01278-EN-07) - Page 13 2-3 silicone rubber bands in each of the two grooves Secure the water standoff cover in place with 2 or more silicone rubber bands in each groove (silicone rubber bands are supplied with water standoff covers UA0037). 20R3 User Guide (16-01278-EN-07) Endorectal Imaging...
- Page 14 10 Remove enough water from the water standoff cover to allow the system to pass through the BK Medical rectosigmoidoscope. 11 Lubricate the entire outer surface of the water standoff cover with a glycerine- based lubricant.
-
Page 15: Preparing The Ua0048 Single-Use Water Standoff System
Apply water to moisten the transducer. Figure 7. Moistening the transducer with water. Pull the inner cover (A in Fig. 5) over the transducer. (See Fig. 8.) Check the inner cover for damage (tears). 20R3 User Guide (16-01278-EN-07) Endorectal Imaging... - Page 16 1-2 mm. Follow the steps shown in Fig. 10. The tape must be tight so that when you put water in the standoff, it doesn’t run out under the tape. May 2019 20R3 User Guide (16-01278-EN-07)
- Page 17 Using a standard syringe, fill the water standoff system slowly with degassed water (max 200 ml). Make sure that the stopcock on the water tube is positioned correctly to allow NOTE: water to pass through the tube. (See Fig. 13.) 20R3 User Guide (16-01278-EN-07) Endorectal Imaging...
-
Page 18: Performing A Rectoscopy Using A Reusable Water Standoff System
To perform an endorectal examination: Prepare the water standoff system before you start. (See “Preparing the Patient” on page 12.) Always perform a digital palpation before you insert a rectosigmoidoscope or endo transducer into the rectum. May 2019 20R3 User Guide (16-01278-EN-07) - Page 19 Use the light source and visually inspect the rectum. If necessary, empty the rectum. Using visual guidance, advance the rectosigmoidoscope to the level of interest – so that it just covers the area you want to image. 20R3 User Guide (16-01278-EN-07) Endorectal Imaging...
- Page 20 Click the wire clip over the rectosigmoidoscope to hold it in place with the water standoff collar. Do not reposition the transducer relative to the patient while you are doing this. click the wire clip over the wire clip rectosigmoidoscope rectosigmoidoscope May 2019 20R3 User Guide (16-01278-EN-07)
- Page 21 When you have completed the examination, empty the water from the water standoff standoff cover, using a syringe. system Withdraw the transducer and remove the outer cover by pulling it inside out up over the transducer tip. 20R3 User Guide (16-01278-EN-07) Endorectal Imaging...
- Page 22 Conduct the thorough cleaning process as soon as possible after use in order to prevent bioburden drying on the surface. Dried bioburden can lead to inefficient cleaning, disinfection and sterilization, causing a risk of cross-contamination. May 2019 20R3 User Guide (16-01278-EN-07)
-
Page 23: 3D Imaging
WARNING D-w1 For disposal of contaminated items such as transducer covers or needle guides or other disposable items, follow disposal control policies established for your office, department or hospital. 20R3 User Guide (16-01278-EN-07) 3D Imaging... - Page 24 May 2019 20R3 User Guide (16-01278-EN-07)
Need help?
Do you have a question about the 20R3 and is the answer not in the manual?
Questions and answers