Crestron TPMC-8X-GA Operation Manual
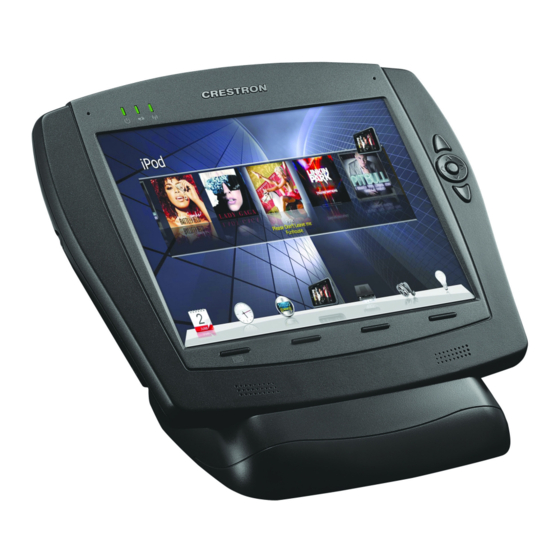
Isys 8.4” wifi touch screen
Hide thumbs
Also See for TPMC-8X-GA:
- Operation manual (68 pages) ,
- Operation manual (60 pages) ,
- Operation manual (66 pages)
Table of Contents
Advertisement
Quick Links
Download this manual
See also:
Operating Manual
Advertisement
Table of Contents

Related Manuals for Crestron TPMC-8X-GA


Summary of Contents for Crestron TPMC-8X-GA
- Page 1 Crestron TPMC-8X-GA ® Isys 8.4” WiFi Touch Screen Operations Guide...
- Page 2 This document was prepared and written by the Technical Documentation department at: Regulatory Compliance As of the date of manufacture, the TPMC-8X-GA has been tested and found to comply with specifications for CE marking and standards per EMC and Radiocommunications Compliance Labelling.
-
Page 3: Table Of Contents
Problem Solving ........................52 Troubleshooting......................52 Reference Documents....................53 Further Inquiries ......................54 Future Updates ......................54 Appendix: TPMC-8X-GA Security Pack ................55 Return and Warranty Policies ....................59 Merchandise Returns / Repair Service ..............59 Crestron Limited Warranty..................59 ®... -
Page 5: Isys 8.4" Wifi Touch Screen: Tpmc-8X-Ga
1. Support for H.264 video and Rava SIP Intercom are future features that will be enabled through a future firmware release. 2. Refer to “Specifications” which starts on page 5 for full wireless range details. ® 8.4” WiFi Touch Screen: TPMC-8X-GA • 1 Operations Guide – DOC. 7078D Isys... - Page 6 2. External battery pack allows ~3.5 hours continuous, 20+ hours under normal use. 3. Requires TPMC-8X-DSW (material # 6504859). Owners of older TPMC-8X-DSW must contact Crestron Customer Support to acquire the TPMC-8X-DSW Bezel Conversion Kit (material #6505136). ® 2 • Isys 8.4” WiFi Touch Screen: TPMC-8X-GA Operations Guide – DOC. 7078D...
- Page 7 Streaming video capability makes it possible to view security cameras and other video sources right on the touch screen display. Native support for H.264 MJPEG formats allows the TPMC-8X-GA to display live video images from Web cameras and servers such as the Crestron CEN-NVS200 Network Video Streamer (sold separately).
- Page 8 Keyboard/Mouse Options On-screen keyboard and mouse capabilities enable complete control of the TPMC-8X-GA’s embedded Web browser and other applications. It can also be used to control external network devices like the Crestron ADMS Intermedia Delivery System™ (sold separately) as well as computers running TouchPoint™ Virtual Mouse &...
-
Page 9: Specifications
® Crestron TPMC-8X-GA Isys 8.4” WiFi Touch Screen Specifications Specifications for the TPMC-8X-GA are listed in the following table. TPMC-8X-GA Specifications SPECIFICATION DETAILS Touch Screen Display Display Type TFT active matrix color LCD Size 8.4 inch (213 mm) diagonal Aspect Ratio... - Page 10 10% to 90% RH (non-condensing) Heat Dissipation 143 BTU/Hr Enclosure Plastic front and metal back, stylus storage slot (stylus included), integral docking station port (Continued on following page) ® 6 • Isys 8.4” WiFi Touch Screen: TPMC-8X-GA Operations Guide – DOC. 7078D...
- Page 11 Crestron Authorized Independent Programmers (CAIPs) only. New users may be required to register to obtain access to certain areas of the site (including the FTP site). ® 8.4” WiFi Touch Screen: TPMC-8X-GA • 7 Operations Guide – DOC. 7078D Isys...
-
Page 12: Physical Description
Crestron TPMC-8X-GA Physical Description This section provides information on the connections, controls and indicators available on your TPMC-8X-GA. TPMC-8X-GA Physical View (Shown on Optional TPMC-8X-DS Desktop Docking Station/Charger) ® 8 • Isys 8.4” WiFi Touch Screen: TPMC-8X-GA Operations Guide – DOC. 7078D... - Page 13 ® Crestron TPMC-8X-GA Isys 8.4” WiFi Touch Screen TPMC-8X-GA Overall Dimensions (Shown with Optional TPMC-8X-BTPE External Battery Pack Attached) 1.67 in 1.13 in (43 mm) (29 mm) Light Sensor Microphone 9.69 in (246 mm) 8.21 in (209 mm) ® 8.4” WiFi Touch Screen: TPMC-8X-GA • 9 Operations Guide –...
- Page 14 Battery Switch (1) Recessed slide switch inside battery compartment, shuts off battery for long term storage; refer to “Internal Battery Switch” on page (Continued on following page) ® 10 • Isys 8.4” WiFi Touch Screen: TPMC-8X-GA Operations Guide – DOC. 7078D...
- Page 15 3. Only generic USB devices (i.e., simple keyboard, mouse and external storage) should be used with the TPMC-8X-GA. Any complex USB devices (e.g. a storage device with a built-in fingerprint scanner) will not have the proper support on the touch screen.
-
Page 16: Setup
Setup Identity Code The IP ID is set within the TPMC-8X-GA’s table using Crestron Toolbox™. For information on setting an IP table, refer to the Crestron Toolbox help file. The IP IDs of multiple TPMC-8X-GA devices in the same system must be unique. -
Page 17: Configuring The Touch Screen
NOTE: The only connection required to configure the touch screen is power (supplied from the internal battery, external battery or the included power pack). The TPMC-8X-GA is configured from the setup menu. NOTE: If no project has been loaded or if an invalid project has been loaded, the touch screen displays the startup splash screen. - Page 18 “Preparing to Load Project” message. Maintain touch until after the countdown, when the message will change to “Loading Setup Screen”. ® 14 • Isys 8.4” WiFi Touch Screen: TPMC-8X-GA Operations Guide – DOC. 7078D...
- Page 19 A mapped network drive permits easy access to embedded application files (Word, Excel, PowerPoint, etc.) and provides a ® 8.4” WiFi Touch Screen: TPMC-8X-GA • 15 Operations Guide – DOC. 7078D Isys...
- Page 20 5. Touch OK to enable the new network connection and return to the “Network Connections” window. Once all changes to network connections have been completed, touch OK to return to the “Security Setup” window. ® 16 • Isys 8.4” WiFi Touch Screen: TPMC-8X-GA Operations Guide – DOC. 7078D...
-
Page 21: Touch Screen
The Certificates button can be used to install or uninstall certificates used for server and/or user authentication when making a secure connection (for example, to a secured wireless access point). In order to use certificates, the TPMC-8X-GA Security Pack must be installed (refer to “Appendix: TPMC-8X-GA Security Pack”... - Page 22 In the Load New Firmware section, touch Browse and select the firmware file (i.e., the .csz file) to be loaded from a network drive, USB device or flash drive. Touch Load to load the new firmware. ® 18 • Isys 8.4” WiFi Touch Screen: TPMC-8X-GA Operations Guide – DOC. 7078D...
- Page 23 The Test Recording button allows testing of the built-in microphone. Touching Play Test plays a short internal audio file. Changes to audio settings are made in real time. “Audio Setup” Window ® 8.4” WiFi Touch Screen: TPMC-8X-GA • 19 Operations Guide – DOC. 7078D Isys...
- Page 24 Touch Close after all changes have been made. The touch screen must be rebooted for changes to take effect. Refer to “Save & Reboot and Shut Down Details” on page 37 for more information. ® 20 • Isys 8.4” WiFi Touch Screen: TPMC-8X-GA Operations Guide – DOC. 7078D...
- Page 25 NOTE: Save & Reboot on the setup menu must be selected for Embedded Apps changes to take effect. NOTE: While browsing the Internet with the TPMC-8X-GA, clicking on a link may cause a message box titled "Restrictions" to appear that contains the text "This operation has been cancelled due to restrictions in effect on this computer.
- Page 26 Screen Brightness can be varied from 0 to 100. To increase brightness, touch Up. To decrease brightness, touch Down. Lower brightness settings extend battery life. Touch Close to return to the setup menu. Screen Brightness Screen ® 22 • Isys 8.4” WiFi Touch Screen: TPMC-8X-GA Operations Guide – DOC. 7078D...
- Page 27 By default, hard key number 4 will release the touch screen from the (optional) TPMC-8X-DSW docking station. Buttons are programmed using VT Pro-e. Touch Close to return to the setup menu. Hard Buttons Screen ® 8.4” WiFi Touch Screen: TPMC-8X-GA • 23 Operations Guide – DOC. 7078D Isys...
- Page 28 On-Screen Keyboard - Numeric Touch the key to change to a symbol keyboard, as shown in the illustration that follows. On-Screen Keyboard - Symbols ® 24 • Isys 8.4” WiFi Touch Screen: TPMC-8X-GA Operations Guide – DOC. 7078D...
- Page 29 Reset CTP Port resets the default value of the CTP port to 41795, for terminal connection using Crestron Toolbox. To configure the appearance of popup messages and passcode messages, touch Configure Messages. The “Message Configurations Properties” window will open. ® 8.4” WiFi Touch Screen: TPMC-8X-GA • 25 Operations Guide – DOC. 7078D Isys...
- Page 30 Touch Close to close the popup window. NOTE: The default value for Screen Position is Lower Left. ® 26 • Isys 8.4” WiFi Touch Screen: TPMC-8X-GA Operations Guide – DOC. 7078D...
- Page 31 NOTE: The default values for Color are white for Upper Left, blue for Lower-Right and black for Text. The default value for Timeout is 0 seconds. ® 8.4” WiFi Touch Screen: TPMC-8X-GA • 27 Operations Guide – DOC. 7078D Isys...
- Page 32 “Ethernet Setup” Window NOTE: The “ASIX AX88772 USB 2.0 to Fast Ethernet Adapter” line in the “Ethernet Setup” window is seen only when the TPMC-8X-GA is mounted on the optional (TPMC-8X-DS or TPMC-8X-DSW) Docking Station/Charger. ®...
- Page 33 4628, for information on how Windows switches between wired Ethernet communications and Wi-Fi. NOTE: The TPMC-8X-GA Security Pack allows the user to provide a username and password for authentication in infrastructures utilizing a RADIUS (Remote Authentication Dial In User Service) server. For details, refer to “Appendix: TPMC-8X-GA Security Pack”...
- Page 34 Use Window to configure my wireless network settings checkbox is checked. If using the TPMC-8X-GA Security Pack, make sure this is not checked. NOTE: The link at the bottom of the window, which says “Learn about setting up a wireless network configuration”...
- Page 35 To configure your wireless network manually, complete the following procedure: 1. From the Wireless Networks tab, touch Add… to open the “Wireless network properties” window. “Wireless network properties” Window 2. Enter the Network name (SSID). ® 8.4” WiFi Touch Screen: TPMC-8X-GA • 31 Operations Guide – DOC. 7078D Isys...
- Page 36 The procedure for configuring IP settings for both wired and wireless networks is the same. The TPMC-8X-GA is configured for DHCP by default. To establish static processing or to switch between DHCP and static IP, use the General tab of the “Wireless Network Connection Properties”...
- Page 37 Edit, remove or enter a control system’s IP address in the IP table to enable communication between the touch screen and a control system. The touch screen can communicate with multiple control systems. ® 8.4” WiFi Touch Screen: TPMC-8X-GA • 33 Operations Guide – DOC. 7078D Isys...
- Page 38 The hostname may be used when transferring a program over Ethernet using Crestron Toolbox. This window permits editing of the hostname and workgroup. “Network ID” Window NOTE: The hostname is required for Ethernet communication. ® 34 • Isys 8.4” WiFi Touch Screen: TPMC-8X-GA Operations Guide – DOC. 7078D...
- Page 39 Use the Up and Down buttons to set the Power Down from 0 through 120 minutes, where 0 disables the timeout. The power button (on the left side of the TPMC-8X-GA) can also be used to manually put the touch screen into power down mode. Press and release the power button to enter power down mode.
- Page 40 The WiFi Status section of the setup menu contains a bar graph showing the strength of the Wi-Fi signal as well as an indicator to show when the TPMC-8X-GA is communicating with a wireless access point (AP). SSID, BSSID, IP and MAC addresses are also shown.
- Page 41 Touch Exit to leave the setup menu and return to the project. If no project has been loaded, the touch screen will display an error message and return to the setup menu. ® 8.4” WiFi Touch Screen: TPMC-8X-GA • 37 Operations Guide – DOC. 7078D Isys...
-
Page 42: Hardware Hookup
When making connections to the TPMC-8X-GA, consider the following: • Use the included Crestron power supply for these devices. • The power supply cable cannot be extended. Hardware Connections for the TPMC-8X-GA (Left, Right and Bottom Views) Headphones MMC Compatible Card Slot (Inside Battery Compartment) USB: 12V 3.5A:... -
Page 43: Programming Software
Programming with SIMPL Windows NOTE: While SIMPL Windows can be used to program the TPMC-8X-GA, it is recommended to use SystemBuilder for configuring a system. SIMPL Windows is Crestron’s premier software for programming Crestron control systems. - Page 44 IP ID as shown in the following illustration. C2ENET-2 Device, Slot 8 2. If additional TPMC-8X-GA devices are to be added, repeat step 1 for each device. Each TPMC-8X-GA is assigned a different IP ID number as it is added.
-
Page 45: Programming With Visiontools Pro-E
There are no special programming requirements to use the functions of the TPMC-8X-GA in a room-control system. Multi-Mode Objects Multi-mode objects offer high-... - Page 46 16-bit image may cause the loss of some subtle shading. To compensate for this, use the dithering to simulate the original shading. Check your ® 42 • Isys 8.4” WiFi Touch Screen: TPMC-8X-GA Operations Guide – DOC. 7078D...
- Page 47 To compile and use multibyte characters it is essential that the operating system understand the language. Some versions of Windows are available in many international languages and add-on software is available for other versions. ® 8.4” WiFi Touch Screen: TPMC-8X-GA • 43 Operations Guide – DOC. 7078D Isys...
-
Page 48: Embedded Applications
® Isys 8.4” WiFi Touch Screen Crestron TPMC-8X-GA Embedded Applications A number of third-party or in-house applications are embedded in a VT Pro-e TPMC-8X-GA project. (Refer to illustration on the following page.) • Adobe Reader • Microsoft Excel Viewer •... -
Page 49: Defaults For Embedded Windows Applications
The following diagram is an example of a basic SIMPL program that enables you to open/close an embedded application. The example program is discussed following the diagram. ® 8.4” WiFi Touch Screen: TPMC-8X-GA • 45 Operations Guide – DOC. 7078D Isys... - Page 50 One-Shot to reset the state of the Toggle symbol. Now the toggle is properly synchronized if the user closes the application from the touch screen itself. ® 46 • Isys 8.4” WiFi Touch Screen: TPMC-8X-GA Operations Guide – DOC. 7078D...
-
Page 51: Uploading And Upgrading
However, before attempting to upload or upgrade it is necessary to establish communication. Establishing Communication Use Crestron Toolbox for communicating with the TPMC-8X-GA; refer to the Crestron Toolbox help file for details. There is a single method of communication: TCP/IP communication. -
Page 52: Program Checks
Be sure to use the Crestron Toolbox to create the TPMC-8X-GA IP table. 1. Select Functions | IP Table Setup. 2. Add, modify or delete entries in the IP table. The TPMC-8X-GA can have only one IP table entry. 3. A defined IP table can be saved to a file or sent to the device. -
Page 53: Operation
(TPMC-8X-DS) when it is connected to AC power or by connecting the TPMC-8X-GA to the optional Wall Mount Docking Station/Charger (TPMC-8X-DSW). The TPMC-8X-GA has four power modes: On, Standby, Power Down and Off. Refer to the following table for details. TPMC-8X-GA Power Modes... -
Page 54: Charging The Internal Battery
Security Infrastructure Since the TPMC-8X-GA does not use a traditional hard drive but rather an image that gets restored every time the touch screen is rebooted, any virus infection is cleared immediately after a reboot. - Page 55 The TPMC-8X-GA has ActiveX disabled and has no Java Virtual Machine installed. These applets cannot run on the TPMC-8X-GA. NOTE: While browsing the Internet with the TPMC-8X-GA, clicking on a link may cause a message box titled "Restrictions" to appear that contains the text "This operation has been cancelled due to restrictions in effect on this computer.
-
Page 56: Problem Solving
28 to the TPMC-8X-GA. define IP addresses. If the TPMC-8X-GA is set up to use DHCP (not recommended), you can use the WAP window box to verity the IP address provided. If the number is... -
Page 57: Reference Documents
The latest version of all documents mentioned within the guide can be obtained from the Crestron Web site (www.crestron.com/manuals). List of Related Reference Documents DOCUMENT TITLE 2-Series Control Systems Reference Guide ® 8.4” WiFi Touch Screen: TPMC-8X-GA • 53 Operations Guide – DOC. 7078D Isys... -
Page 58: Further Inquiries
Future Updates As Crestron improves functions, adds new features and extends the capabilities of the TPMC-8X-GA, additional information may be made available as manual updates. These updates are solely electronic and serve as intermediary supplements prior to the release of a complete technical documentation revision. -
Page 59: Appendix: Tpmc-8X-Ga Security Pack
In order to gain access in this infrastructure, a username and password must be entered for verification by the server. To facilitate this, the TPMC-8X-GA Security Pack adds the Atheros Client configuration utility. The Security Pack is available as a special firmware build (TPMC-8X-GA_SP_1.4.zip or later) for the TPMC-8X-GA. - Page 60 “Profile Management” Window (General) Enter a name for the profile in Profile Name and the name of your wireless network in SSID1. Then, touch the Security tab. ® 56 • Isys 8.4” WiFi Touch Screen: TPMC-8X-GA Operations Guide – DOC. 7078D...
- Page 61 WPA/WPA2 EAP Type or 802.1x EAP Type, will become enabled. Use the drop down box to make your selection, then touch Configure…. “Configure PEAP” Window ® 8.4” WiFi Touch Screen: TPMC-8X-GA • 57 Operations Guide – DOC. 7078D Isys...
- Page 62 With the Profile Management tab selected, the window will display the new entry. Select the entry within the window and touch Activate. To complete the process, close this window using the “X” in the upper right corner. ® 58 • Isys 8.4” WiFi Touch Screen: TPMC-8X-GA Operations Guide – DOC. 7078D...
-
Page 63: Return And Warranty Policies
Crestron dealers and Crestron Authorized Independent Programmers (CAIPs) under a limited non-exclusive, non-transferable license pursuant to a separate end-user license agreement. The terms of this end user license agreement can be found on the Crestron Web site at www.crestron.com/legal/software_license_agreement. ® 8.4” WiFi Touch Screen: TPMC-8X-GA • 59 Operations Guide – DOC. 7078D Isys... -
Page 64: Microsoft Windows Xp Embedded End User License Agreement
“Limited Use of Particular Services” paragraph above, you may use the SOFTWARE on the DEVICE to interact with other computers or electronic devices. ® 60 • Isys 8.4” WiFi Touch Screen: TPMC-8X-GA Operations Guide – DOC. 7078D... - Page 65 WMFSDK to develop such an application, visit http://msdn.Microsoft.com/workshop/imedia/windowsmedia/sdk/ wmsdk.asp, accept a separate license for the WMFSDK, download the appropriate WMFSDK, and install it on your system. ® 8.4” WiFi Touch Screen: TPMC-8X-GA • 61 Operations Guide – DOC. 7078D Isys...
- Page 66 Crestron Electronics, Inc. Operations Guide – DOC. 7078D 15 Volvo Drive Rockleigh, NJ 07647 (2028795) Tel: 888.CRESTRON 12.11 Fax: 201.767.7576 Specifications subject to www.crestron.com change without notice.
Need help?
Do you have a question about the TPMC-8X-GA and is the answer not in the manual?
Questions and answers