Table of Contents
Advertisement
Advertisement
Table of Contents

Related Manuals for GRE PSR-295


Summary of Contents for GRE PSR-295
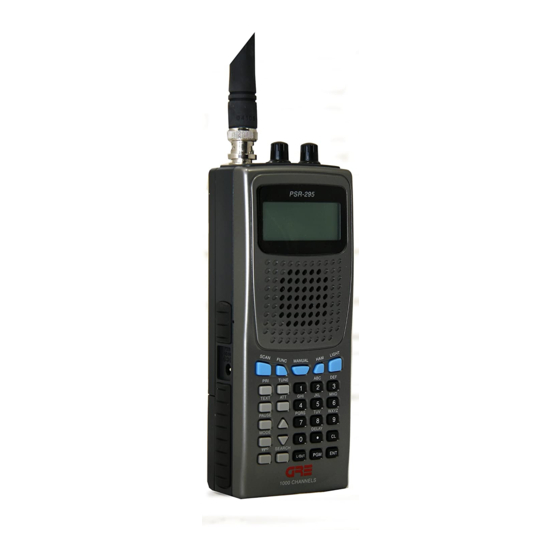
- Page 1 PSR-295 Portable Scanner OWNER’S MANUAL Page 1 2004/07/06, 15:37...
-
Page 2: Table Of Contents
Contents FEATURES ................3 PREPARATION ................. 5 Power Sources ..............5 Connecting the Supplied Antenna ........8 Connecting an Earphone/Headphones ......8 Connecting an Extension Speaker ........9 Using the Belt Clip ............. 9 ABOUT YOUR SCANNER ............10 About the Keypad ............10 Understanting Banks ............ -
Page 3: Features
FEATURE Your PSR-295 Portable Scanner also lets you scan trans- missions, and is preprogrammed with service search banks for convenience. This scanner gives you direct access to over 61,000 fre- quencies including those used by police and fire depart- ments, ambulance services, government agencies, air, and amateur radio services. - Page 4 Attenuate — lets you program your scanner to reduce the scanner’s sensitivity to strong local signals, to reduce interference or noise caused by these signals. Text Input — lets you input a text label for each channel, or other memory location so you can easily identify the transmission.
-
Page 5: Preparation
PREPARATION Power Sources You can power your scanner from any of three sources: • internal non-rechargeable batteries or rechargeable batteries (not supplied — see “Using Batteries”) • standard AC power (with an optional AC adapter — see “Using AC Power” on Page 7) •... -
Page 6: Charging Rechargeable Batteries
CAUTIONS: • The battery holder fits only one way. Do not force it. • Use only fresh batteries of the required size and rec- ommended type. • Always remove old or weak batteries. Batteries can leak chemicals that destroy electronic circuits. •... -
Page 7: Using Ac Power
To charge batteries with a DC adapter from a DC power source, you must use a 9V, 300mA DC adapter with 4.75mm outer/1.7mm inner plug. It takes about 16 hours to recharge fully discharged 1600mAh Ni-MH rechargeable batteries. You can oper- ate the scanner while recharging the rechargeable bat- teries, but charging takes longer. -
Page 8: Connecting The Supplied Antenna
CAUTION: Always connect the DC adapter to the scan- ner before you connect it to the power source. When you finish, disconnect the adapter from the power source before you disconnect it from the scanner. To power the scanner using a DC adapter, set the adapter’s voltage switch to 9V. -
Page 9: Connecting An Extension Speaker
• Set the volume to the lowest setting before you begin listening. After you begin listening, adjust the volume to a comfortable level. • Do not listen at extremely high volume levels. Extended high-volume listening can lead to permanent hearing loss. -
Page 10: About Your Scanner
ABOUT YOUR SCANNER Once you understand a few simple terms used in this manual and familiarize yourself with your scanner’s fea- tures, you can put the scanner to work for you. You sim- ply determine the type of communications you want to receive, then set the scanner to scan them. - Page 11 LIGHT — turns on/off the display’s backlight. PRI (priority) — sets and turns the priority function on or off. TEXT — lets you input text. PAUSE — stops/restarts search/tune. MODE — changes the receive mode (AM, FM, CTCSS, DCS) KEY mark — locks/unlocks the keypad to prevent acci- dental entries when this key press and hold about three seconds.
-
Page 12: Understanting Banks
UNDERSTANDING BANKS Channel Storage Banks A bank is a storage area for a group of channels. Chan- nels are storage areas for frequencies. Whereas a chan- nel can only contain one frequency, a bank can hold nu- merous channels. To make it easier to identify and select the channels you want to listen to, your scanner divides the channels into 10 banks (0 to 9) of 100 (00 to 99) channels each, a total of 1,000 channels. - Page 13 CTCSS allows multiple users to share a single radio fre- quency without hearing each other’s transmissions. In your PSR-295 scanner, the CTCSS feature can be used to block the reception of transmissions on shared chan- nel to only those that use the CTCSS tone that you have specified.
-
Page 14: Operation
OPERATION Turning on the Scanner and Setting Squelch 1. To turn on the scanner, turn VOLUME clockwise. Wel- come To Scanning Receiver appears. After about 3 sec- onds, you might hear a hissing sound. Then adjust VOLUME to a comfortable listening level. 2. -
Page 15: Programming Channels For Ctcss And Dcs Operation
• Press FUNC, then press /\ or \/. The bank number moves in the direction of the arrow pressed. • Press FUNC. Then hold down /\ or \/. The bank num- ber moves continuously in the assigned direction. • Press /\. The channel number moves upward one by one. - Page 16 There are two ways you can program your scanner to operate with CTCSS and DCS. If you know the CTCSS and DCS code that is used on a particular frequency, you can manually enter the code when you are program- ming the scanner, or any time afterwards.
-
Page 17: Storing Text Tags
CTCSS Code Table: (kHz) 67.0 94.8 131.8 171.3 203.5 69.3 97.4 136.5 173.8 206.5 71.9 100.0 141.3 177.3 210.7 74.4 103.5 146.2 179.9 218.1 77.0 107.2 151.4 183.5 225.7 79.7 110.9 156.7 186.2 229.1 82.5 114.8 159.8 189.9 233.6 85.4 118.8 162.2 192.8 241.8 88.5 123.0 165.5 196.6 250.3... -
Page 18: Assigning A Text Tag To A Channel
Assigning a Text Tag to a Channel 1. Press MANUAL, enter the channel number where you want to enter the text, then press MANUAL again. MAN and the bank and channel number appear at the up- per left corner of the display (for example: MAN Ch000). -
Page 19: Finding And Storing Active Frequencies
M N O 6 then FUNC m n o P Q R S 7 then FUNC p q r s T U V 8 then FUNC t u v w x y z 9 then FUNC w x y z . -
Page 20: Searching A Preprogrammed Frequency Range
Searching a Preprogrammed Frequency Range The scanner contains these preprogrammed search ranges, stored in the search bank. Bank Band Marine Marine Channels CB (Citizens Band) Channels PMR (Personal Mobile Radio) Channels Air Band All Receivable Frequencies Limit Limit Search (User changeable) Follow these steps to select preprogrammed search bands and search them for active frequencies: 1. - Page 21 Channel Freq. (MHz) Channel Freq. (MHz) 156.0500 156.2500 156.3000 156.3500 156.4000 156.4500 156.5000 156.5500 156.6000 156.6500 156.7000 156.7500 156.8000 156.8500 156.9000 156.9500 157.0000 157.0500 161.6000 157.1000 157.1500 157.2000 157.2500 161.8000 161.8500 157.3000 157.3500 161.9000 161.9500 157.4000 156.1750 162.0000 156.2250 156.2750 160.8250 156.3250 156.375...
- Page 22 Search Range: CB (Citizen Band) Receive mode: FM (Default) Channel Freq. (MHz) Channel Freq. (MHz) 26.9650 26.9750 26.9850 27.0050 27.0150 27.0250 27.0350 27.0550 27.0650 27.0750 27.0850 27.1050 27.1150 27.1250 27.1350 27.1550 27.1650 27.1750 27.1850 27.2050 27.2150 27.2250 27.2550 27.2350 27.2450 27.2650 27.2750 27.2850...
- Page 23 Search Range: All (All Receivable Band) Receive mode: FM (Default) Group Display Search Range (MHz) 25-68 25.000-67.995 68-88 68.000-88.000 118-137 118.000-136.99166 137-174 137.000-174.000 216-225 216.000-225.000 225-400 225.0125-400.000 400-512 400.0125-512.000 806-900 806.000-900.000 900-960 900.0125-960.000 1240-1300 1240.000-1300.000 Note: If you turn on the sub-bank, the scanner displays search range about 2 seconds, and start the search at that sub-bank.
-
Page 24: Manually Tuning A Frequency
6. If you want to input text label into limit search bank, press TEXT. Cursor blinks third line. Enter the text la- bel using the keypad, then press ENTER. (See Text Input Chart on Page 18.) 7. Rotate SQUELCH clockwise and leave it set to a point just after the hissing sound stops. -
Page 25: Listening To The Ham Band
Note: If you press PAUSE while tuning, the scanner stops tuning and *** PAUSED *** appears. Press PAUSE again, and the scanner resumes tuning. Listening to the Ham Band You can search for transmissions in the scanner’s preprogrammed ham band. The ham band is divided into six sub-bank. -
Page 26: Copying A Frequency Into A Vacant Channel In A Specified Bank
2. Press the desired bank and the channel number where you want to store the frequency. The display indicates the bank and channel number. After 1 second, the fre- quency to be copied flashes. 3. Press ENTER. All the conditions such as receive mode and delay condition are copied onto the channel. -
Page 27: Scanning The Channels
Copying a Frequency into the Priority Channel You can copy a frequency into the priority channel (see “Priority” on Page 31) when the scanner stops on the frequency during Search, Scan, Manual, Tune, or HAM mode. Press FUNC then PRI when the frequency is on the dis- play. -
Page 28: Deleting Frequencies From Channels
Deleting Frequencies from Channels 1. Press MANUAL. 2. Use the number keys to enter the channel with the frequency you want to delete. 3. Press MANUAL again. 4. Press PGM to enter the program mode. MAN changes to PGM. 5. Press FUNC. 6. -
Page 29: Using The Delay Function
Using the Delay Function Many conversations might have a pause of several sec- onds between a query and a reply. To avoid missing a reply, you can program a 2-second delay into any of your scanner’s channels. Then, when the scanner stops on the channel, D appears and the scanner continues to monitor the channel for 2 seconds after the transmission stops before it resumes scanning or searching. - Page 30 Notes: • The scanner does not store locked out frequencies during a search. • You can lock out as many as 50 frequencies in each bank. If you try to lock out more, L/O Memory Full! appears. • If you lock out all frequencies in one search bank and only this search bank is activated, All ranges Locked out! appears and the scanner does not search.
-
Page 31: Priority
Note: You cannot clear all locked out frequencies (an- other banks locked out frequencies) if all frequencies in the selected bank are locked out. Priority In addition to the 1,000 programmable memory chan- nels, the scanner has one priority channel. With the priority feature, you can scan through pro- grammed channels and still not miss an important or in- teresting transmission on a specific channel. -
Page 32: Using The Attenuator
To change the receive mode, repeatedly press MODE. The receive mode changes as follows: AM — configures the channel for AM mode. FM — configures the channel for FM mode. CT — configures the channel for CTCSS mode. DC — configures the channel for DCS mode. Note: You can change the receive mode during search- ing and tuning. -
Page 33: Turning The Key Tone On And Off
Turning the Key Tone On and Off Each time you press any of the scanner’s keys, the scan- ner sounds a tone. To turn the scanner’s key tone off or 1. If the scanner is on, turn VOLUME OFF/MAX counter- clockwise until it click to turn the scanner off. -
Page 34: Changing The Display Contrast
4. Press ENTER to set the display contrast. Cloning the Programmed Data You can transfer the programmed data to and from an- other PSR-295 scanner using an optional connecting cable with 3.5mm phone plugs on both ends (not sup- plied). -
Page 35: Resetting The Scanner
IMPORTANT: If you have problems with the scanner, first try to reset it to retain all memory. If that does not work, you can initialize the scanner; however, initializing clears all information stored in the scanner’s memory. Resetting the Scanner 1. - Page 36 51.000 62.835 63.090 73.795 119.80833 122.88333 123.53333 125.950 127.500 129.025 132.09166 134.76666 135.16666 140.250 153.600 154.100 165.750 285.6875 285.7375 316.5375 316.575 327.250 327.2875 340.225 340.9875 347.1375 348.6375 348.675 353.275 396.2875 451.000 451.150 457.725 470.0125 482.300 488.450 494.5875 812.700 829.440 835.490 835.580 847.870 To find the birdies in your scanner, begin by disconnect-...
-
Page 37: Care
CARE Keep the scanner dry; if it gets wet, wipe it dry immedi- ately. Use and store the scanner only in normal tempera- ture environments. Handle the scanner carefully; do not drop it. Keep the scanner away from dust and dirt, and wipe it with a damp cloth occasionally to keep it looking new. - Page 38 Sensitivity (20dB S/N): 25-88 MHz .............. 0.3 µV 118-174 MHz ............0.3 µV 216-225 MHz ............0.5 µV 225.0125-400 MHz ..........0.7 µV 400.0125-512 MHz ..........0.5 µV 806-960 MHz ............0.7 µV 1240-1300 MHz ............0.7 µV 25-88 MHz ..............1 µV 118-174 MHz .............
- Page 39 Squelch Sensitivity: Threshold (AM/FM) ..........0.5 µV Tight (AM) .............. 20 dB Tight (FM) .............. 25 dB Antenna Impedance ......... 50 Ohms Audio Output Power (10% THD) ....... 170 mW Built-in Speaker ....36 mm, 8-ohm Dynamic Type Power Requirements: Batteries ........
- Page 40 GE-04D-1390 07G04 Page 40 2004/07/06, 15:37...
Need help?
Do you have a question about the PSR-295 and is the answer not in the manual?
Questions and answers
All my channels are locked how do I disable the lock on my PSR 295