Table of Contents
Advertisement
Advertisement
Table of Contents

Related Manuals for GRE PSR-255


Summary of Contents for GRE PSR-255
- Page 1 PSR-255 50-CHANNEL SCANNER OWNER'S MANUAL...
- Page 2 FEATURES Your new PSR-255 50-Channel Portable Scanner gives you direct access to over 26,000 exciting frequencies, including police and fire departments, ambulance services, and ama- teur radio services. You can select up to 50 channels to scan, and you can change your selection at any time.
-
Page 3: Table Of Contents
Your PSR-255 scanner can receive all of these frequencies: h 26-54 MHz h 68-88 MHz h 137-174 MHz h 380-512 MHz For a list of the frequency ranges in the ten preprogrammed search bands, see "Search Bands". We recommend you record your scanner's serial number here. -
Page 4: Preparation
PREPARATION POWER SOURCES You can power your scanner from any of four sources: h Internal batteries (not supplied) with the provided battery holder h A rechargeable scanner battery pack (not supplied) h Standard AC power (using an optional AC adapter) h Vehicle battery power (using an optional DC cigarette- lighter adapter) You can power your scanner from six AA batteries. - Page 5 2. Slide the battery holder out of the battery compartment. 3. If you are installing individual batteries, insert six AA bat- teries in the battery holder as indicated by the polarity symbols (+ and –) marked on the battery holder. 4.
- Page 6 Cautions: h You must use a DC adapter that supplies 9 volts and de- livers at least 200 milliamps. Its center tip must be set to negative, and its plug must correctly fit the scanner's PWR/ CHG jack. The recommended adapter meets these speci- fications.
-
Page 7: Connecting The Antenna
CONNECTING THE ANTENNA Follow these steps to attach the supplied flexible antenna to your scanner. 1 Align the slots around the scanner's connector with the tabs on the ANT jack. 2. Press the antenna down over the jack and turn the antenna's base clockwise until it locks into place. -
Page 8: Connecting An Extension Speaker
h Do not listen at extremely high volume levels. Ex- tended high-volume listening can lead to perma- nent hearing loss. h Once you set the volume, do not increase it. Over time, your ears adapt to the volume level, so a vol- ume level that does not cause discomfort might still damage your hearing. -
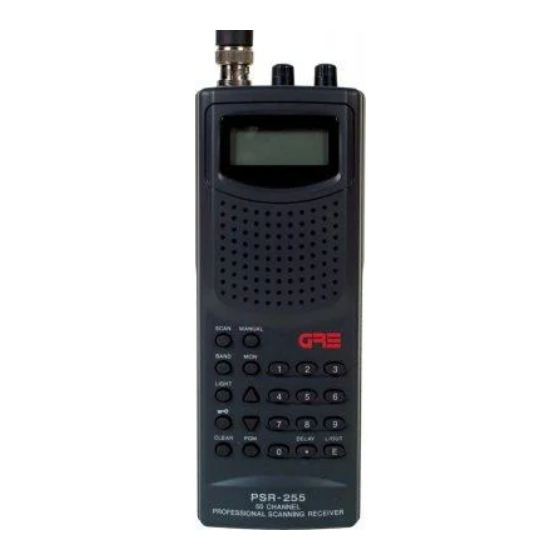
Page 9: Your Scanner
YOUR SCANNER A LOOK AT THE KEYPAD Your scanner's keys might seem confusing at first but this information should help you understand each key's function. SCAN - scans through the programmed channels. MANUAL - stops scanning to let you directly enter a channel number. -
Page 10: A Look At The Display
A LOOK AT THE DISPLAY The display has indicators that show the scanner's current operation. MAN - appears when you manually select a channel. SCAN - appears when you scan channels. MON - appears when you listen to the monitor memory. BATT - appears when battery power is low. -
Page 11: Understanding Bands/Monitor Memory
UNDERSTANDING BANDS/MONITOR MEMORY Search Bands Your scanner can tune over 26,000 different frequencies. Many of these frequencies are grouped within permanent memory locations called search bands. Band Displayed Search Range Description 26-40 MHz VHF Lo 40-54 MHz VHF-Lo 68-78 MHz VHF-Lo 78-88 MHz VHF-Hi... -
Page 12: Operation
OPERATION TURNING ON THE SCANNER/SETTING VOLUME AND SQUELCH Note: Make sure the scanner's antenna is connected before you turn it on. 1. Turn SQUELCH fully counterclockwise. 2. Turn VOLUME clockwise until it clicks and you hear a hissing sound. 3. Turn SQUELCH clockwise until the hissing sound stops. Notes: h If the scanner picks up unwanted, partial, or very weak transmissions, turn SQUELCH clockwise to decrease the... - Page 13 3. Use the number keys and DLY/. to enter the frequency (including the decimal point) you want to store into that channel. 4. Press E to store the frequency. Notes: h If you entered an invalid frequency in Step 3, Error ap- pears, the channel number flashes, and the scanner beeps three times after you press E.
- Page 14 Notes: h To reverse the search direction at any time, hold down \/ or /\ for about 1 second. h To search the band upward or downward in small incre- ments (in steps or 5 of 12.5 kHz, depending on the band), repeatedly press and release \/ or /\.
-
Page 15: Moving A Frequency From The Monitor Memory To A Channel
MOVING A FREQUENCY FROM THE MONITOR MEMORY TO A CHANNEL 1. Press MANUAL, enter the channel number where you want to store the frequency, then press PGM. PGM, the frequency number or 000.0000, and the selected chan- nel number appear. 2. -
Page 16: Listening To The Monitor Memory
LISTENING TO THE MONITOR MEMORY To listen to the frequency stored in the monitor memory, press MANUAL then MON. MAN, MON and the frequency stored in the monitor memory appear. CLEARING A CHANNEL 1. Press MANUAL. 2. Use the number keys to enter the channel number con- taining the frequency you want to delete, then press PGM. -
Page 17: Special Features
SPECIAL FEATURES DELAY Many agencies use a two-way radio system that might have a pause of several seconds between a query and a reply. To avoid missing a reply, you can program a 2-seocnd delay into any of your scanner's channels. Then, when the scan- ner stops on the channel, DELAY appears and the scanner continues to monitor the channel for 2 seconds after the trans- mission stops before it resumes scanning. -
Page 18: Turning The Key Tone On And Off
TURNING THE KEY TONE ON AND OFF Each time you press any of the scanner's keys (except (key symbol) and LIGHT), the scanner sounds a tone. Follow these steps to turn the scanner's key tone off or back 1. If the scanner is on, turn VOLUME counterclockwise until it clicks to turn it off. -
Page 19: General Guide To Scanning
GENERAL GUIDE TO SCANNING BIRDIE FREQUNCIES Every scanner has birdie frequencies. Birdies are signals created inside the scanner's receiver. These operating fre- quencies might interfere with broadcasts on the same fre- quencies. If you program one of these frequencies, you hear only noise on that frequency. -
Page 20: Troubleshooting
TROUBLESHOOTING If your scanner is not working as it should, these sugges- tions might help you eliminate the problem. If the scanner still does not operate properly, take it to your local store for assistance. l t u . l l y l l s ' r i e t... -
Page 21: Resetting/Initializing The Scanner
RESETITNG/INITIALIZING THE SCANNER If the scanner's display locks up or does not work properly after you connect a power source, you might need to reset or initialize it. Important: If you have problems, first try to reset the scan- ner. If that does not work, you can initialize the scanner, how- ever, initializing clears all frequencies you stored in the scanner's memory and initialilzes the scanner to its default settings. -
Page 22: Care And Maintenance
CARE AND MAINTENANCE The following suggestions will help you care for your scan- ner so you can enjoy it for years. Keep the scanner dry. If it gets wet, wipe it dry immediately. Use only fresh batteries of the required size and type. Al- ways remove old and weak batteries. -
Page 23: Specifications
SPECIFICATIONS Frequency Coverage 26-54 MHz 68-88 MHz 137-174 MHz 380-512 MHz Channels of Operation 50 Channels and 1 Monitor Memory Sensitivity (20dB S/N): 0.7 µV 26-54 MHz 0.7 µV 68-88 MHz 0.7 µV 137-174 MHz 0.7 µV 380-512 MHz Selectivity: +/-10kHz -6 dB +/-18kHz... - Page 24 GE-00D-3618...
Need help?
Do you have a question about the PSR-255 and is the answer not in the manual?
Questions and answers
Hi I just recently bought a PSR-282 200-Channel VHF/Air/UHF Handheld Scanner sos to see weather I'd like this as a hobby & progress further, worked OK for a while.. But turned on and none of the keys function,the lcd desplay operating with bank 1 flashing & seem ready to tune as have to operate squelch knob in normal way & this works Ok, Tried reset/initializing did reset but still no keys functioning,... (+new batterys) wondering if any one can help Thanks