
Related Manuals for GRE PSR-200U


Summary of Contents for GRE PSR-200U
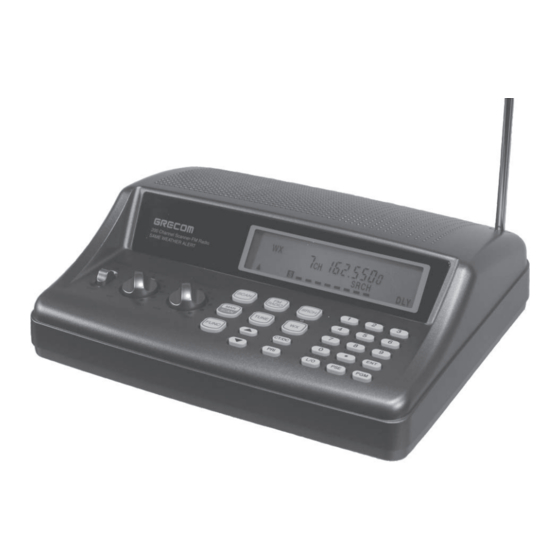
- Page 1 PSR-200U 200-Channel plus 20 FM Channel VHF/Air/UHF Desktop Scanner Please read this user's guide before installing, setting up and using your new product. Owner’s Manual PSR200U-OM.indd 2010/02/22 16:24:41...
-
Page 2: Table Of Contents
CONTENTS Features .........................4 Preparation ........................8 Power Sources .......................8 Using AC Power ......................8 Using Vehicle Battery Power ..................8 Connecting the Supplied Antenna ................9 Connecting an Outdoor Antenna ..................9 Connecting an Earphone/Headphones.................9 Listening Safely ......................10 Connecting an Extension Speaker ................10 About Your Scanner .....................11 About the Keypad ......................11 A Look at the Display ....................13 Understanding Channel Storage Banks ..............16... - Page 3 Cloning the Programmed Data ..................34 Initializing the Scanner ....................34 Birdie Frequencies .......................35 Frequency Conversion ....................35 FAQs ..........................36 Care ..........................36 In Case of Fault ......................36 Specifications .......................37 What's Included PSR-200U Scanner • Telescoping Antenna • AC Adaptor • User's Guide • PSR200U-OM.indd...
-
Page 4: Features
FEATURES Your new PSR-200U 200 Channel plus 20 FM channels VHF/Air/UHF Desktop Scanner lets you scan conventional transmissions, and is preprogrammed with search banks for convenience. You press a FM RADIO key, you can quickly listen to the local broadcast stations. - Page 5 External Antenna Connector — lets you connect an external antenna (not supplied) with a BNC connector to the scanner for improved reception of distant/weaker signals. Your PSR-200U scanner can receive these bands: Frequency Range Types of Transmissions 29–54 MHz 10-Meter Ham Band, VHF Lo, 6-Meter Ham Band 87.3–107.9 MHz...
- Page 6 THE FCC WANT YOU TO KNOW This equipment has been tested and found to comply with the limits for a scanning receiver, pursuant to Part 15 of the FCC Rules. These limits are designed to provide reasonable protection against harmful interference in a residential installation.
-
Page 7: Scanning Legally
SCANNING LEGALLY Your scanner covers frequencies used by many different groups including police and fire departments, ambulance services, government agencies, private companies, amateur radio, military operations, pager services, and wireline (telephone and telegraph) service providers. It is legal to listen to almost every transmission you should never intentionally listen to. -
Page 8: Preparation
PREPARATION POWER SOURCES USING AC POWER You can power the scanner using a supplied AC adaptor. Cautions: ! You must use a supplied AC adaptor. • Always connect the AC adaptor to the scanner before you connect it to AC power. When you finish, disconnect the adaptor from AC power before you disconnect it from the scanner. -
Page 9: Connecting The Supplied Antenna
CONNECTING THE SUPPLIED ANTENNA You must install an antenna before you can operate the scanner. The supplied telescoping antenna helps your scanner receive strong local signals. To install the antenna, thread it clockwise into the hole on top of the scanner. -
Page 10: Listening Safely
Listening Safely To protect your hearing, follow these guidelines when you use an earphone or headphones. • Set the volume to the lowest setting before you begin listening. After you begin listening, adjust the volume to a comfortable level. • Do not listen at extremely high volume levels. Extended high-volume listening can lead to permanent hearing loss. -
Page 11: About Your Scanner
ABOUT YOUR SCANNER Once you understand a few simple terms used in this manual and familiarize yourself with your scanner’s features, you can put the scanner to work for you. You simply determine the type of communications you want to receive, then set the scanner to scan them. - Page 12 WX (Blue)/ — Lets you search the scanner’s preprogrammed 7 weather channels; directly accesses skywarn channel. FUNC — Lets you use various functions by pressing this key in combination with other keys. 5 / 6 — Searches up or down for active frequencies or selects the direction when scanning channels.
-
Page 13: A Look At The Display
A LOOK AT THE DISPLAY The display has indicators that show the scanner’s current operating status. This quick look at the display will help you understand how your scanner operates. BANK 1 2 3 4 5 6 7 8 9 10 FD/PD AIR HAM FM Radio... - Page 14 S — Appears with 8-digit bar that shows receiving signal strength. PGM — Appears when you program frequencies into the scanner’s channels. DLY — Appears when you program a 2-second delay. ALL CH L-out — Appears when you lock out the all marine channels. -b- —...
- Page 15 WEAthEr — Appears about 2 seconds when you select weather band. Lo VHF — Appears when you turn on the low VHF sub-bank while fire/police bank searching. Hi VHF — Appears when you turn on the high VHF sub-bank while fire/ police bank searching.
-
Page 16: Understanding Channel Storage Banks
Understanding Channel-Storage Banks A bank is a storage area for a group of channels. Channels are storage areas for frequencies. Whereas a channel can only contain one frequency, a bank can hold numerous channels. To make it easier to identify and select the channels you want to listen to, your scanner divides the channels into 10 banks (1 to 10) of 20 channels each, a total of 200 channels. - Page 17 Marine Channel Frequency (MHz) Chhannel Frequency (MHz) 156.0500 156.1750 156.2500 156.2250 156.3000 160.8250 156.3500 156.2750 156.4000 156.3250 156.4500 156.3750 156.5000 156.4250 156.5500 156.4750 156.6000 156.5250 156.6500 156.5750 156.7000 156.6250 156.7500 156.6750 156.8000 156.7250 156.8500 156.8750 156.9000 156.9250 156.9500 156.9750 157.0000 157.0250 161.6000 157.0750...
- Page 18 Fire/Police Group Frequency Range (MHz) Step (kHz) 33.420-33.980 37.020-37.420 39.020-39.980 42.020-42.940 44.620-45.860 45.880 45.900-46.060 46.080-46.500 153.770-154.130 154.145-154.445 154.650-154.950 155.010-155.370 155.415-155.700 155.730-156.210 158.730-159.210 166.250 170.150 453.0375-453.9625 12.5 458.0375-458.9625 12.5 460.0125-460.6375 12.5 465.0125-465.6375 12.5 Group Frequency Range (MHz) Step (kHz) 108.000-118.000 8.33 118.00833-136.99166 8.33 Amateur Radio...
-
Page 19: Operation
OPERATION UNDERSTANDING 3 MODES Your PSR-200U has three kinds of modes, and changes the mode by pressing an orange key. • Scan/Manual mode • FM Radio mode • Service Search mode If you press SCAN (Orange) key, your PSR-200U scanner enters SCAN/ MANUAL mode. -
Page 20: Storing Known Frequencies Into Channels
STORING KNOWN FREQUENCIES INTO CHANNELS Follow these steps to store frequencies into channels. 1. Press SCAN (Orange). Note: If you want to program FM broadcast into channel, press FM RADIO. 2. Press PGM, then PGM appears. Enter the channel number (1–200; If you enter FM RADIO mode, 1-20) where you want to store a frequency, then press PGM again. -
Page 21: Using Tune
Notes: • You can use the scanner’s delay feature while searching the banks, see “Delay” on Page 30. • The scanner does not search locked-out frequencies while searching ranges. See “Locking out Channels or Frequencies”. The scanner contains these preprogrammed search ranges, stored in the search bank. -
Page 22: Copying A Frequency Into A Vacant Channel In A Specified Bank
2. If desired, you can change the start frequency. To change the start frequency, enter frequency with numeral keys, then press ENT. 3. Press PSE/CLEAR to start tune. -t- appears on the display. 4. To change the tuning direction, press 5 or 6. The scanner displays 5 or 6 and start tune. -
Page 23: Scanning The Stored Channels
Note: If the scanner displays -dUPL-, the entered frequency is already stored in another channel. See above Note on previous page. SCANNING THE STORED CHANNELS To set the scanner to continuously scan through all channels with stored frequencies as follows: 1. -
Page 24: Monitoring A Stored Channel
If no transmission is found, the scanner continues scanning to scan through all selected banks. MONITORING A STORED CHANNEL You can continuously monitor a specific channel without scanning. This is useful if you hear an emergency transmission on a channel and do not want to miss any details —... -
Page 25: Monitoring Stored Fm Radio Channel
3. Press PSE to start tune. To change the tune direction, press 6 or 5. To program tuned broadcast into FM Radio Channel 1. Press FM RADIO if your scanner does not stay the FM RADIO mode. 2. Press FUNC. 3. -
Page 26: Listening To The Weather Band
LISTENING TO THE WEATHER BAND Your scanner incorporates weather alert as one of its features and is an extremely sensitive high quality receiver on the weather frequencies. However, the included telescopic antenna is optimized for general purpose scanning. If you use this scanner as your only means for receiving weather alerts, please check to be sure you are receiving a clear signal on the telescopic antenna or switch to an external antenna that gives you clear reception of a local NOAA weather broadcast. -
Page 27: Same Standby Mode
SAME Standby Mode The National Weather Service precedes each weather alert with a digitally encoded SAME (Specific Area Message Encoding) signal, then a 1050 Hz tone. The SAME signal includes a FIPS (Federal Information Processing Standard) area code, and an event code that corresponds with the type of alert being sent. -
Page 28: Skywarn
Skywarn Many areas of the country have amateur radio repeaters that have been designated as “Skywarn” repeaters. During times of severe weather, these repeaters are used to relay reports of severe weather directly to meteorologists at a local National Weather Service (NWS) forecast office. Using the Skywarn feature in your scanner, you can easily jump to Skywarn repeater frequencies and monitor these reports, in many cases hearing about severe weather in your area instantly as it occurs. -
Page 29: Special Features
SPECIAL FEATURES USING CTCSS AND DCS CTCSS and DCS allow you to program frequencies into your scanner that are used by more than one group in your area and listen only to the group that is of interest to you by specifying the group’s specific CTCSS or DCS code. -
Page 30: Programming Ctcss/Dcs Code Into Channel Memory
3. Press CD/DC again. Ct-Srch appears and CTCSS flashes. Press ENT to store CTCSS code search setting into this channel. 4. Press CT/DC 3 times. dC-Srch appears and DCS flashes. Press ENT to store DCS code search setting into this channel. 5. -
Page 31: Locking Out Channels Or Frequencies
• If the scanner is searching, or tuning, press DELAY/•. DLY appears and the scanner automatically adds a 2-second delay to every transmission it stops on in that band. To turn off the 2-second delay in a channel or for all frequency, press DELAY/•... -
Page 32: Locking Out Frequencies
Locking Out Frequencies To lock out a frequency during a search/tune, press L/O/L/O RVW when the scanner stops on that frequency. The scanner locks out the frequency then continues searching. Note: You can lock out as many as 100 frequencies during a search/tune and 50 frequencies during a FM radio mode. -
Page 33: Turning The Key Tone On And Off
To program a weather channel as the priority channel: 1. Press WX. 2. Select the weather channel you want to program as the priority channel. 3. Press FUNC then PRI. P ChAnnEL is displayed momentarily. After P ChAnnEL appears, PCH flashes and 000.0000 or the previously-stored frequency appears. -
Page 34: Cloning The Programmed Data
Cloning the Programmed Data You can transfer the programmed data to and from a PSR-200U scanner using an optional connecting cable with 3.5mm stereo phone plugs on both ends (not supplied). 1. Turn on both scanner. 2. Connect the connecting cable to each scanner’s PC/IF jack. CLOnE and UP to SEnd appears. -
Page 35: Birdie Frequencies
Birdie Frequencies Every scanner has birdie frequencies. Birdies are signals created inside the scanner’s receiver. These operating frequencies might interfere with transmissions on the same frequencies. If you program one of these frequencies, you hear only noise on that frequency. If the interference is not severe, you might be able to turn SQUELCH clockwise to cut out the birdie. -
Page 36: Faqs
FAQs (Frequently Asked Questions) The scanner is not working at all. What’s wrong? • The AC or DC adaptor might not be connected. Be sure the adaptor’s barrel plug is fully inserted into the DC 9V jack. The center tip of the adaptor’s barrel plug must be set to positive. -
Page 37: Specifications
SPECIFICATIONS Frequency Coverage (MHz): 29–54 ( in 5 kHz steps/FM) 87.3–107.9 (in 100 kHz steps/WFM) 108–136.99166 (in 8.33 kHz steps/AM) 137–143.9875 (in 12.5 kHz steps/FM) 144–148 (in 5 kHz steps/FM) 148.0125–150.7875 (in 12.5 kHz steps/FM) 150.8–161.995 (in 5 kHz steps/FM) 162–174 (in 12.5 kHz steps/FM) 380–512 (in 12.5 kHz steps/FM) Channels of Operation... - Page 38 Squelch Sensitivity: Threshold (AM/FM) ............Less than 0.5 mV Threshold (WFM) ...............Less than 1.0 mV Tight (FM) ................(S + N)/N 25 dB Tight (AM) ................(S + N)/N 20 dB Tight (WFM) ...............(S + N)/N 60 dB Antenna Impedance ................50 Ohms Audio Output Power (10% THD) ..........0.7 W Nominal Built-In Speaker ............
- Page 39 NOTE PSR200U-OM.indd 2010/02/22 16:24:44...
-
Page 40: Limited Warranty
12 months from the date of sale to the end user. GRE America will correct defects. There will be no charge for labor for a period of 12 months from the date of original sale, except as provided below. Overtime premiums and/or expedited handling and shipping costs must be paid by the owner.
Need help?
Do you have a question about the PSR-200U and is the answer not in the manual?
Questions and answers