Polycom IP 7000 User Manual
Phone for 8x8 virtual office
Hide thumbs
Also See for IP 7000:
- User manual (130 pages) ,
- Setup manual (38 pages) ,
- Integration manual (32 pages)

Subscribe to Our Youtube Channel
Related Manuals for Polycom IP 7000


Summary of Contents for Polycom IP 7000
- Page 1 User Guide for the ® ® Polycom SoundStation IP 7000 Phone for 8x8 Virtual Office SIP 3.2.3 March, 2011 1725-15645-001 Rev. C...
- Page 2 As between the parties, Polycom, Inc., retains title to and ownership of all proprietary rights with respect to the software contained within its products. The software is protected by United States copyright laws and international treaty provision.
-
Page 3: About This Guide
About This Guide ® ® Thank you for choosing the Polycom SoundStation IP 7000 conference phone. This phone provides multi-person audio conferencing capabilities for medium to large conference rooms within a Session Initiation Protocol (SIP) internet telephony system. This guide provides everything you need to quickly use your new phone. -
Page 4: Table Of Contents
Contents About This Guide........iii 1 Getting Started with Your Phone . - Page 5 Managing Contacts ..........2–17 Viewing Your Local Contact Directory .
- Page 6 Using Conference Bridges ........3–13 To call into a conference bridge: .
-
Page 7: Getting Started With Your Phone
Getting Started with Your Phone This chapter provides basic installation instructions and information for obtaining the best performance from your SoundStation IP 7000 conference phone. The phone is a next-generation phone with a modern industrial design, and the latest advancements in Polycom voice technology. -
Page 8: Parts List
Parts List The following items are included in your basic SoundStation IP 7000 package: • SoundStation IP 7000 Conference Phone • 25-foot Network Cable • Quick Start Guide • AC Power Kit with: — Power Adapter — Regional Power Cord •... -
Page 9: Connecting Network And Power Sources
Connecting Network and Power Sources There are two ways to connect your phone to the network and a power source. Your system administrator can tell you which of the following methods best suits your teleconferencing needs: • Power over Ethernet (PoE) •... -
Page 10: Connecting Optional Extension Microphones
Before you use your phone, you or your system administrator will have to register it. For detailed information on how to register your phone after you install it, see Quick Tip 44011: Register Standalone SoundPoint IP, SoundStation IP, and Polycom VVX 1500 Phones, available at http://www.polycom.com/usa/en/support/ voice/soundpoint_ip/VoIP_Technical_Bulletins_pub.html... -
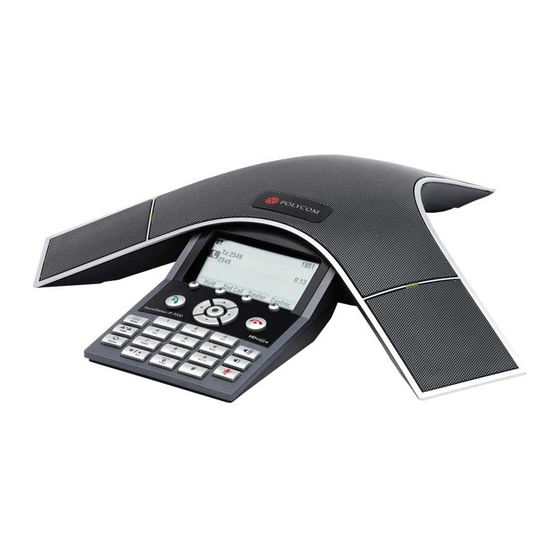
Page 11: Features Of The Phone
Features of the Phone The following figure shows the primary hardware features of your phone console. Feature Description Speaker Allows for ringer and hands-free audio output. Microphones Provide 360 coverage by three internal microphones. LED Indicators Indicate phone and call status through three bi-color LEDs. - Page 12 The following figure shows the primary key buttons, controls, and indicators on your phone console: 1 - 6...
- Page 13 Item Description LCD graphic display Shows the time and date, menus, and soft keys, as well as information about calls, messages, and features. The information display line (the line that displays the directory number) also displays icons and text, such as: •...
-
Page 14: Understanding Line And Call Icons
Understanding Line and Call Icons Icon Line or Call State Description Active call using A call is in progress using Polycom HD Voice. ® The active call icons merge into one icon on Polycom HD Voice™ the phone screen. The following figure shows... - Page 15 Icon Line or Call State Description Dialing The phone is dialing a number. Do Not Disturb You have enabled the Do Not Disturb feature on your phone. Your phone will not ring. See Using Do Not Disturb on page 3-19. Forwarding You have enabled the forwarding feature on your phone.
-
Page 16: Navigating Menus And Entering Data
Navigating Menus and Entering Data To navigate menus and enter data, follow these tips: Note After 20 seconds of inactivity, the menu system automatically exits to the idle screen unless an edit session is in progress. If you want to... Then do this... - Page 17 If you want to... Then do this... Enter text in a specific Press the Encoding soft key. language When in text entry mode, the language the text will display in appears at the top of the screen. Enter special characters •...
-
Page 18: Customizing Your Phone
Customizing Your Phone You can customize your SoundStation IP 7000 conference phone by adjusting certain settings, including language, volume, time and date, display contrast, backlight intensity, and ring type. You can also add contacts to the phone’s local Contact Directory. -
Page 19: Configuring Basic Settings
Configuring Basic Settings To configure basic phone settings, press , and then select Settings > Basic to view the basic phone settings you can customize. This section includes the following topics: Updating Preferences • • Updating the Display Contrast • Updating the Backlight Intensity •... -
Page 20: Updating The Time And Date Display
Press to return to the idle screen. Updating the Time and Date Display The time and date appear on the idle screen of your phone. If the phone cannot obtain a time and date, the display will flash. If this happens, or if the time or date is incorrect, see your system administrator. - Page 21 — To change the time format, scroll to Clock Time, and then press the Select soft key. The Clock Date screen or the Clock Time screen displays. Scroll to the date or time format you want, and then press the Select soft key.
- Page 22 To enable or disable the time and date display: Press , and then select Settings > Basic > Preferences > Time and Date. The Time and Date screen displays. Do one of the following: — To disable the time and date display, scroll to Disable. —...
-
Page 23: Updating The Display Contrast
Updating the Display Contrast You can set how light or dark the screen appears. To adjust the contrast on the phone screen: Press , and then select Settings > Basic > Contrast. The Contrast screen displays. Press the Up or Down soft keys to increase or decrease the display contrast. - Page 24 • A voice message received If you do not press any keys on the phone, after 20 seconds of the backlight turning on, the backlight dims (or changes) to medium in the following cases: • A call is in progress •...
- Page 25 If you selected a new intensity, press the Save soft key. If you did not select a new intensity, press the Back soft key. Select Backlight Idle Intensity. The Backlight Idle Intensity screen displays. Scroll to the intensity you want, and then press the Select soft key. The default Backlight Idle Intensity is Low.
-
Page 26: Updating The Ring Tone
Updating the Ring Tone You can select from many different ring tones to distinguish your phone from your neighbor’s. You can also set distinctive ring tones for contacts in your local directory so you can identify callers when your phone rings. Selecting a Ring Tone You can choose a unique ring tone for your phone to identify it when it rings. - Page 27 To set a distinctive ring tone for a local contact: Press , and then select Features > Contact Directory. The Directory screen displays. Scroll to the contact for whom you want to assign a distinctive ring tone. Press the Edit soft key. The Edit Contact screen displays.
-
Page 28: Updating Audio Quality And Capabilities
Updating Audio Quality and Capabilities You can adjust the audio quality of your phone, and enable auxiliary audio components, such as wireless (lapel) microphones, speakers, recording devices, and computers that you connect to the Multi-Interface Module. Updating the Sound Quality of Your Phone You can adjust the sound quality of your phone by changing the treble or bass control. -
Page 29: Enabling Auxiliary Audio Components
Phone Cable or the Computer Calling Cable to the 2.5mm audio connector on your conference phone. For information on connecting auxiliary audio components to the conference phone or Multi-Interface Module, see the Setup Guide for the Polycom SoundStation IP 7000 Phone, available at www.polycom.com/voicedocumentation. - Page 30 To enable or disable wireless (lapel) microphones: Press , and then select Settings > Basic > Audio > Auxiliary Audio > Aux Audio In. The Aux Audio In screen displays. Do one of the following: — To enable a wireless (lapel) microphone, scroll to Wireless Mic, and then press Select.
-
Page 31: Adjusting The Speaker And Ringer Volume
— To disable speakers, and to prevent recording devices and computers from recording phone calls, scroll to Off, and then press Select. Press to return to the idle screen. Adjusting the Speaker and Ringer Volume To adjust the speaker volume: >>... -
Page 32: Viewing Call Lists
Viewing Call Lists You can access any call list from the Call Lists menu, or you can quickly access missed calls from the idle screen. To view a call list: >> Do one of the following: — Press , and then select Features > Call Lists > Missed Calls, Received Calls, or Placed Calls. - Page 33 — To clear the records in a call list, select Clear, and then scroll to either Missed Calls, Received Calls or Placed Calls. Then, press Select. The following figure shows the message that displays when you clear a Missed Calls list. To manually clear all calls in all call lists, you can restart the phone by pressing Note , then selecting Settings >...
-
Page 34: Managing Contacts
Managing Contacts You can store a large number of contacts in your phone’s local Contact Directory. Contact your system administrator for the exact number. You can dial and search for contacts in this directory. You may be able to add, edit, and delete contacts. -
Page 35: Accessing Your Corporate Directory
Accessing Your Corporate Directory When you access Corporate Directory, a search screen displays so you can search for a specific contact. You can perform a quick search or an advanced search. Note Each time you access Corporate Directory, the search screen displays, unless you enable your phone to remember the last search you performed or the last person you selected. -
Page 36: Adding Contacts To Your Local Contact Directory
person you selected, will display. If you don’t enable your phone to save search results, each time you access Corporate Directory, a blank search screen will display. To enable your phone to save Corporate Directory search results: Press , and then select Settings > Basic > Preferences > Corporate Directory >... - Page 37 To add a contact to your phone’s database, press the Add soft key. The Add To Directory screen displays. Enter the contact information. To move between fields, use the Next and Prev soft keys. Enter the following information: Note Your phone may not display all the following fields. For more information, see your system administrator.
- Page 38 the following figure, the labels Sales and Marketing have been assigned to contacts in the local Contact Directory. — (Optional.) Set the Ring Type. For information on setting the ring type, see Updating the Ring Tone on page 2-9. — (Optional.) Assign a Divert Contact. The Divert Contact identifies the third party to which you want this contact’s calls sent.
-
Page 39: Adding Contacts From Call Lists
Adding Contacts from Call Lists You can save call information from a call list to your local Contact Directory. To add a contact to the local Contact Directory from a call list: Press the Dir soft key, and then select Call Lists > Missed Calls, Received Calls, or Placed Calls. -
Page 40: Searching For Contacts
Press the View soft key. The Contact screen displays. To save the contact to the local Contact Directory, press the Save soft key. “Saved” displays on the screen. Only the first name, last name, and phone number are saved. If the contact already exists in your local Contact Directory, “Contact already exists”... -
Page 41: Searching For Contacts In Your Corporate Directory
To search for a contact in the local Contact Directory: Press the Dir soft key, and then select Contact Directory. The Directory screen displays. Press the Search soft key. Then, enter the first few characters of the contact’s first or last name, and then press the Search soft key again. The Directory Search screen displays a list of successful matches. - Page 42 To search for a contact in the Corporate Directory: Press the Dir soft key, and then select Corporate Directory. The Corporate Directory search screen displays. Note If you have enabled your phone to save the results of your last search (or remember the last contact you selected), your previous search results (or the contact), will display instead of a blank search screen.
-
Page 43: Updating Contacts In Your Local Contact Directory
Updating Contacts in Your Local Contact Directory You can update contact information for contacts in your local Contact Directory. You cannot update information for contacts in your Corporate Directory. To update a contact in your local Contact Directory: Press the Dir soft key, and then select Contact Directory. The Directory screen displays. -
Page 44: Deleting Contacts From Your Local Contact Directory
Deleting Contacts from Your Local Contact Directory You can delete contacts from your local Contact Directory, but not from your Corporate Directory. To delete a contact from the local Contact Directory: Press the Dir soft key, and then select Contact Directory. The Directory screen displays. - Page 45 To place a call to a contact in the local Contact Directory: Press the Dir soft key, and then select Contact Directory. The Directory screen displays. Scroll to the contact you want to call. Or, search for the contact (see Searching for Contacts in Your Local Contact Directory on page 2-23).
-
Page 46: Managing Incoming Calls
Managing Incoming Calls You can manage incoming calls from the contacts in your Contact Directory by doing the following: • Setting up a distinctive ring tone for a contact. • Rejecting calls from a particular contact by sending the call to your voice mail system. -
Page 47: Diverting Calls
Press the Edit soft key. The Edit Contact screen displays. Scroll down to the Auto Reject field, and then change the Auto Reject setting to Enabled. Use the Right or Left scroll key to select Enabled. Press the Save soft key. Press to return to the idle screen. - Page 48 Press the Edit soft key. The Edit Contact screen displays. Scroll to the Divert Contact field, and then enter the number of the party to whom you want to divert the call. You can enter a maximum of 32 characters. Scroll to the Auto Divert field, and then change the Auto Divert setting to Enabled.
-
Page 49: Using The Features Of Your Phone
Using the Features of Your Phone Your SoundStation IP 7000 conference phone is designed to be used like a regular conference phone on a public switched telephone network (PSTN). You can place calls, transfer a call to someone else, conduct a multi-party conference call, or perform other basic and more advanced functions. -
Page 50: Placing Calls
Placing Calls You can place a call off-hook (with a dial tone), or on-hook (without a dial tone). If you place a call off-hook, you have the option of dialing a contact using a URL or IP address, if this feature is enabled for your phone. You can also place calls (on-hook and off-hook) using speed dial numbers (see Placing Calls Using Speed Dials... -
Page 51: Placing Calls Using Speed Dials
To place a call on-hook (to dial a phone number): >> Enter the phone number of the party you want to call, and then press the Dial soft key. Instead of entering a phone number from memory, you can access call lists, Note directories, and speed dial lists to display and dial the number for you. -
Page 52: Answering Calls
— If you do not know the contact’s speed dial index number, scroll to the contact, and then press the Dial soft key. The call is placed. Answering Calls To answer a call: >> Press or the Answer soft key. The three LEDs flash green when the phone rings. -
Page 53: Muting The Microphone
Muting the Microphone To mute the microphone: >> During a call, press The LEDs glow red, and the mute icon displays on the phone screen. The other person (or people) cannot hear you. You can still hear all other people while Mute is enabled. -
Page 54: Holding And Resuming Calls
Scroll to the number you want to redial, and then press or the Dial soft key. Holding and Resuming Calls You can place up to eight calls on hold on your phone. (For information on placing conference calls on hold, see Holding and Resuming Conferences on page 3-12.) -
Page 55: Hosting Local Conference Calls
Hosting Local Conference Calls You can create a conference with up to two other parties using the phone’s local conference feature. To quickly set up a conference, you can use the Join soft key to create a conference between an active call and a call on hold. After you set up a conference, you can hold the conference call, split the conference call into individual calls on hold, or end the conference call (and your connection to the conference call participants). - Page 56 Note If configured for single key-press conferences, you do not have to press the Confrnc soft key again. The Active:Conference screen displays. Setting Up a Conference with an Active Call and a Call on Hold If you are currently in an active call, and you have another call on hold, you can create a conference call between the active call, the call on hold, and yourself, by pressing the Join soft key.
-
Page 57: Managing Conferences
Managing Conferences To manage a conference, you must currently be in an active conference call. From the Active:Conference screen, you can press the Manage soft key to manage the individual participants in the conference, or end the conference call. The following figure shows the Manage soft key that displays when you are in an active conference. -
Page 58: Muting Conference Call Participants
Conference Call Participants on page 3-11.) • Info—Provides additional information about the selected participant. • Far Mute—Mutes the selected participant. The muted participant can hear all participants, but no participant can hear the muted participant. Muting Conference Call Participants To mute a conference call participant: >>... -
Page 59: Removing Conference Call Participants
The following figure shows James Smith on hold. The “on hold” icon displays next to his name, and the Resume soft key appears. The held participant cannot hear any participants and no participant can hear the held participant. To return the participant to the conference, scroll to the participant, and then press the Resume soft key. -
Page 60: Holding And Resuming Conferences
Press the Info soft key. The Participant Info screen displays. Press the Back soft key to return to the Manage Conference screen. Holding and Resuming Conferences When you place a conference call on hold, you place all other conference participants on hold. To place an individual participant on hold, see Placing Conference Call Participants on Hold... -
Page 61: Splitting Conferences
• To end the conference call and split the conference into two separate calls on hold, press the Split soft key. Splitting Conferences When a conference has been established, a Split soft key is available. When you split a conference, you end the conference and put all parties on hold. To split a conference: >>... -
Page 62: Conference Menu Options
External: Call direct DID to Conference Bridge (only if a DID is assigned to Conference Bridge). Call in Auto Attendant and select Menu Option that is assigned to Conference Bridge.* (e.g. Option 4 > Conference Bridge) Conference Menu Options Enter a Conference - (Option 1): Enter your extension then press # . -
Page 63: Performing A Consultative Transfer
— Performing a Blind Transfer on page 3-15. • Attended transfer—The parties are automatically connected to each other after you exit a conference. — Set up a conference call and then end your participation. For more information, see Setting Up Conferences on page Ending Conferences... -
Page 64: Forwarding Calls
Forwarding Calls Polycom IP 7000 phone offers two methods of call forwarding: • Online Call Forwarding • Phone-based Call Forwarding 8x8 recommends using online call forwarding instead of phone-based call Note forwarding so that your call forwarding instructions are stored online instead of on your phone. - Page 65 To forward calls to another extension: Press , and then select Features > Forward. The Forwarding Type Select screen displays. Scroll to the forwarding type you want, and then press the Select soft key. The options are: — Always—To forward all incoming calls. —...
-
Page 66: Forwarding Calls Dynamically
To disable call forwarding: Press , and then select Features > Forward. The Forwarding Type Select screen displays, showing the forwarding type that is enabled. Scroll to the forwarding type you want to change, and then press the Select soft key. A screen displays showing the details of the forwarding type you want to disable. -
Page 67: Using Do Not Disturb
Using Do Not Disturb To prevent your phone from ringing, activate the Do Not Disturb feature. Calls you receive while Do Not Disturb is enabled will display in your Missed Calls Call List (see Using Call Lists on page 2-14). If you have chosen to forward your calls to another number, calls will be sent to that number if Do Not Disturb is enabled. -
Page 68: Using The Corporate Directory
Using the Corporate Directory To use the Corporate Directory to make a call: Press and select Applications, then select Apps Home, then Corporate Directory Listing. Browse up and down the directory list and select the person you wish to call (speed dial). For long directories, you can search for a user in the directory and then select their name to speed dial them. - Page 69 To update a speed dial entry in your contact directory: Press the Dir soft key, and then select Contact Directory. The Directory screen displays. Scroll to the user’s entry, and then press the Edit soft key. The Edit Contact screen displays. Scroll to the Speed Dial Index field, and then update the speed dial index number.
-
Page 70: Using Voice Mail
Using Voice Mail Voice mail is an optional feature that your system administrator sets up. Your Note system may not support it. For more information, contact your system administrator. Screen options may vary with your application. Voice mail may be accessible with a single key press. -
Page 71: Call Recording
Call Recording Call Recording On/Off (Virtual Office Pro users only) Call Recording On/Off is available to Virtual Office Pro users when the Call Recording feature on your Virtual Office online dashboard settings is set to Record Calls On Demand. • To turn on Call Recording during a call, press *0 •... -
Page 72: Troubleshooting Your Phone
Troubleshooting Your Phone This chapter contains general troubleshooting information to help you solve any problems you might encounter when you use the SoundStation IP 7000 conference phone. The tables in this chapter list possible trouble symptoms, the likely causes of these problems, and recommended corrective actions to take. -
Page 73: Power And Startup
Power and Startup Symptom Problem Corrective Action The display shows “Network Link The network cable is not properly Verify that the network cable is properly is Down.” connected. connected: • Check the cable termination at the switch or hub (furthest end of the cable from the phone). -
Page 74: Controls
Controls Symptom Problem Corrective Action The dial pad does not work. The dial pad on the phone does Try the following: not respond. • Check for a response from other feature keys or from the dial pad. • Place a call to the phone from a known working telephone. -
Page 75: Access To Screens And Systems
Access to Screens and Systems Symptom Problem Corrective Action There is no response when you The phone is not in an active Try the following: press a feature key. state. • Press the keys more slowly. • Call the phone to confirm that inbound call display and ringing is normal. -
Page 76: Displays
Symptom Problem Corrective Action There is no audible ring tone. Ringer volume is low, or the Verify ringer volume and Ring Type: Ring Type is set to Silent Ring. • To adjust the ringer volume, press either of the volume keys when the phone is in the idle state. -
Page 77: Audio
Audio Symptom Problem Corrective Action The speaker has no audible Speaker volume is low. Adjust the speaker volume. During a call, sound. press the volume keys to adjust the volume. Testing Phone Hardware Your system administrator may ask you to access a diagnostics menu on your phone to test your phone hardware.
Need help?
Do you have a question about the IP 7000 and is the answer not in the manual?
Questions and answers