Table of Contents
Advertisement
Advertisement
Table of Contents

Subscribe to Our Youtube Channel
Related Manuals for WayFinder V7000


Summary of Contents for WayFinder V7000
- Page 1 OPERATION MANUAL DIGITALVEHICLECOMPASS...
- Page 2 Making Ordinary Products Extraordinary...
- Page 3 Features sophisticated compasses available for use in • Uses patented magnetic sensor technol- a vehicle. The Wayfinder V7000 is a valuable ogy, same as the built-in compasses in tool for your vehicle, utilizing technology to GM, Ford, and Chrysler vehicles.
- Page 4 FEATURES • Weather forecast predicts sun, cloud, or memory to stay on desired course. rain based on barometric pressure . • Programmable backlight auto shut-off • “Auto-Integrate” circuitry, automatically feature. turns the unit on (when engine is turned • Photo sensor feature turns the backlight on and unit is used with 12-volt adapter) on or off depending on the amount of or off when no magnetic field changes...
- Page 5 CONVENTIONS USED IN THIS MANUAL 1. The LCD icons are written in all capital Indicates a warning or important letters with quotes around them. information 2. Buttons used in procedures are presented Indicates optional equipment avail- as button icons. able at additional cost. 3.
-
Page 6: Table Of Contents
CONTENTS Barometer mode ....25 Display and Buttons ....5 Weather forecast display . -
Page 7: Display And Buttons
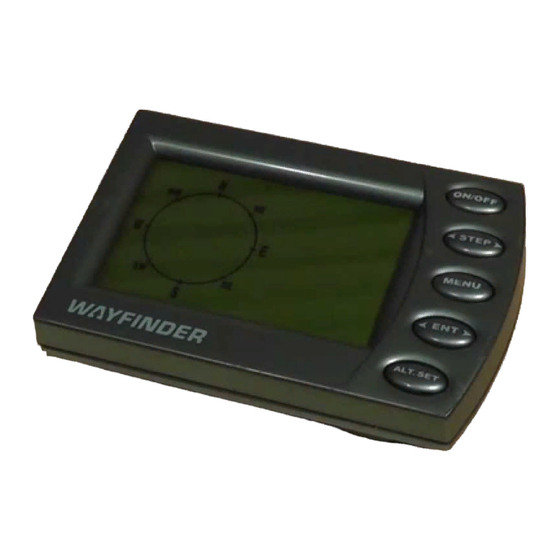
DISPLAY AND BUTTONS Temperature and Numeric Heading Battery Photo Sensor Bearing Point Readout Readout Compartment Declination Icon Compass Rose Altitude, Barometer Buttons Temperature 12-Volt Power and Weather Forecast Readout Sensor Jack AdapterJack BACK FRONT... - Page 8 DISPLAY AND BUTTONS The Wayfinder V7000 displays direction of Buttons travel in three different formats: (1) cardinal ON/OFF button points, (2) numeric digits (325°, 330°, etc.), Press or any other button to turn and (3) compass rose. The eight cardinal...
- Page 9 DISPLAY AND BUTTONS MENU button ALT.SET button Press to advance through programming Press as a quick reset for altitude. It menu options “ ” (calibration), “ ” resets the altitude from the currently displayed CALIb dECL (declination), “ ” (backlight), “ ”...
-
Page 10: Installation
The Wayfinder V7000 has an auto shut-off fea- your hand and the battery will come out. ture. When no magnetic field change has been... -
Page 11: Step 2: Installing The 12-Volt Adapter
Wayfinder V7000 at all times to allow the unit to The Wayfinder V7000 switches on keep memory settings. automatically when it senses the engine is on. -
Page 12: Step 3: Installing The External
It is best to adhere the temperature sensor sensor on a surface that is least conductive The Wayfinder V7000 has a built-in internal to heat -- such as on a rubber or plastic temperature sensor designed to measure... - Page 13 HEADER INSTALLATION To install the external temperature If the temperature sensor is not plugged sensor: in and is toggled to “outside temperature” display, the message 1. Insert the connector end of the tether “ ” will scroll in PLUG IN TEMP CABLE into the jack marked “TEMP,”...
- Page 14 HEADER INSTALLATION bracket teeth. Release once desired angle Windshield Mounting: is achieved and check that the teeth have 1. Install the suction cups into the mounting locked securely into place. bracket by sliding them into their holes (if not pre-installed). 5.
- Page 15 HEADER INSTALLATION...
-
Page 16: Step 4: Mounting The Unit
Make sure the windshield surface • The accuracy of the Wayfinder V7000 is clean. Once installed, the face of the will be diminished by a strong magnetic compass must be pointing toward the field, such as that found in proximity to rear of the vehicle. - Page 17 INSTALLATION Do not leave the Wayfinder V7000 in a parked vehicle that is likely to be exposed to extremely hot or cold 20° maximum up tilt Horizontal temperatures. Plane 20° maximum down tilt Dashboard Adjustment of this bracket does not require the use of a screwdriver.
-
Page 18: Programming And Operation
2 flashes continuously. Calibration Guidelines 1. The Wayfinder V7000 needs to be 3. If you intend to operate your Wayfinder calibrated (1) when used for the first V7000 with the temperature tether time in a vehicle, (2) when moved to a... - Page 19 PROGRAMMING AND OPERATION 4. If you drive with your headlights and “ ” displays. turn ONCE PrESS Ent to End stereo on, turn these on prior to Turn vehicle in one complete circle in either calibration. direction. Circle size does not matter. Take at least 20 seconds to complete the circle.
-
Page 20: Declination Mode
The Wayfinder V7000 corrects for declination electronically. Correcting for If you do not know your exact latitude and longitude in the USA, go to the web page... - Page 21 PROGRAMMING AND OPERATION To enter a declination angle The 10s position on line 2 starts flashing. Press to toggle through the program- 4. Press ming options until “ ” and “ ” display dECL Display changes from “ ” to “ ”...
- Page 22 PROGRAMMING AND OPERATION Continue to press until the correct To select between true or magnetic north: number displays. Note: The proper declination angle must first be stored as indicated in the previous sec- 7. Press tion. To select the 1s digit, which stops flashing. 1.
-
Page 23: Backlight Mode
PROGRAMMING AND OPERATION Backlight Mode the backlight uses significantly more power The Wayfinder V7000 has a programmable than the unit itself, it is recommended that backlight auto shut-off feature when operat- the backlight be turned off when not needed. ing on battery power. The default auto shut-... -
Page 24: Photo Sensor Feature
PROGRAMMING AND OPERATION 2 and “ ” in line 3. Photo sensor feature The Wayfinder V7000 comes equipped with 2. Press a photo sensor that turns the backlight on To advance through the values of 10, 30, 60, or off depending on the amount of ambient 180 and 00 seconds respectively. -
Page 25: Bearing Mode
PROGRAMMING AND OPERATION Bearing Mode Long method of entering a bearing point Press to toggle through the program- Quick method of entering a bearing point ming options until “ ” and “ ” display bEAr Press until “ ” or the last entered b_ _ _ °... - Page 26 PROGRAMMING AND OPERATION 3. Press To view a stored bearing To store selected digit in 100s position Press in normal display mode to toggle and 10s digit flashes. Press until between the various display options until the correct digit displays then press bearing point value appears.
-
Page 27: Barometer Mode
PROGRAMMING AND OPERATION Barometer mode whether the pressure has increased or The Wayfinder V7000 contains a pressure decreased over the last hour. The unit stores sensor capable of detecting pressure changes pressure data continuously, even when off. caused by weather conditions, altitude To select between“... -
Page 28: Weather Forecast Display
PROGRAMMING AND OPERATION Weather Forecast Display Barometer weather forecast The Wayfinder V7000 provides 3 weather readings are affected by altitude and forecasts (Sun, Cloud, or Rain) based on a cabin pressure changes. Please refer to 24-hour change in in barometric pressure. -
Page 29: Ice Alert Feature
The V7000 displays temperature readings select and exit to normal display mode. between 1°F and 158°F (-17°C to 70°C). If Do not leave the Wayfinder in a parked the temperature falls below 1°F (-17°C), the vehicle that is likely to be exposed to display will flash “... -
Page 30: Altitude Mode
PROGRAMMING AND OPERATION Altitude mode Press in normal display mode to toggle Press to toggle through the program- between the various display options until the ming options until “ ” and “ ” display “ indicator is on. The altitude on screen. -
Page 31: Alt.set Mode
PROGRAMMING AND OPERATION HEADER 3. Press to advance the first flashing Alt.set mode digit. Please refer to the Frequently Asked Questions section for altimeter reading. 4. Press to select value. To reset altitude back to the value set in The second digit from the left starts flashing. altitude mode, press to toggle line 3 When all 5 digits have been assigned values,... -
Page 32: Optional Accessories
HEADER OPTIONAL ACCESSORIES A 15-foot (4.5m) hard-wire kit is avail- A 30-foot (9m) temperature sensor tether able for an additional charge by calling is available for an additional charge by our customer service department at calling our customer service department (888) 422-6672 from within the U.S.A., at (888) 422-6672 from within the U.S.A., (707) 566-2260, or by e-mail at... -
Page 33: Declination Angle Map
DECLINATION ANGLE MAP HEADER Figure A Declination angles for the United States... -
Page 34: General Specifications
HEADER GENERAL SPECIFICATIONS • Battery life: • Altimeter resolution/accuracy: 3,600 hours without backlight, 140 hours 5 ft / ± 75 ft at constant air pressure with constant backlight usage. (1m / ±23 m) • Operating temperature range (°F/°C): • Barometer function (mb/inHg): 14°F to 140°F / -10°C to 60°C 300 to 1,100mb / 8.90 to 32.40 inHg •... -
Page 35: Frequently Asked Questions
Where can the Wayfinder V7000 be used? in the earth’s field from your vehicle’s magnetic The Wayfinder V7000 can be used in any type field. The Wayfinder V7000’s microprocessor of vehicle, including cars, trucks, vans, SUVs, electronically subtracts out your vehicle’s mag-... - Page 36 HEADER FREQUENTLY ASKED QUESTIONS What does it mean when the degree symbol been calibrated, the Wayfinder V7000 will be on line 2 is flashing slowly? accurate. If the degree symbol flashes contin- This indicates magnetic distortion. Many uously or immediately after calibration, the...
- Page 37 The Wayfinder V7000 predicts the weather based on changes in pressure. In addition Why would my altimeter reading change to changes in weather and cabin pressure, from one day to another when my vehicle is pressure also varies depending on altitude.
- Page 38 HEADER FREQUENTLY ASKED QUESTIONS 200 feet (60m). Use the Alt.set feature as set your ventilation system to recirculate often as possible and no less than once a inside air instead of bringing in outside air if day to recalibrate altitude and reset baromet- the fan is on.
-
Page 39: Service And Replacement
SERVICE AND REPLACEMENT HEADER Customer Service • By phone: (888) 422-6672 (toll-free within Please e-mail customer service department the U.S.A. only) or at (707) 566-2260 at customerservice@pnicorp.com or call us between 8:00 a.m. and 5:00 p.m. (PST). between the hours of 8:00 a.m. and 5:00 •... - Page 40 SERVICE AND REPLACEMENT purchase is provided, or if it is past the outside of your package and send your warranty period. proof-of-purchase and description of the Once you have acquired a RMA number, problem to the following address: pack the unit securely to prevent damage PNI Corporation in transit.
-
Page 41: Warranty
LIMITED WARRANTY; LIMITATION OF LIABILITY HEADER result of improper usage, neglect of care, altera- The service and replacement section that follows is valid for products purchased and used tion, accident or unauthorized repair. in the U.S.A. and Canada only. For products If the product is found by PNI to be defective purchased outside the U.S.A. - Page 42 LIMITED WARRANTY; LIMITATION OF LIABILITY HEADER the period of time remaining on the original speculative damages (including, but not limited two (2) years warranty. to, consequential, incidental and special dam- ages) relating to the use of or inability to use THE FOREGOING WARRANTY IS GIVEN this product, whether arising out of contract, IN LIEU OF AND PNI DISCLAIMS ALL...
- Page 44 PNI Corporation www.pnicorp.com 11381 R02 1000242 VJ2-01...
Need help?
Do you have a question about the V7000 and is the answer not in the manual?
Questions and answers