Table of Contents
Advertisement
Advertisement
Table of Contents

Related Manuals for WayFinder z250


Summary of Contents for WayFinder z250
- Page 1 OPERATION MANUAL DIGITALVEHICLECOMPASS...
- Page 2 Making Ordinary Products Extraordinary...
- Page 3 You have acquired one of the most • Programmable automatic compass shut- sophisticated compasses available for use in off. a vehicle, RV or boat. The Wayfinder Z250 • Programmable automatic backlight shut- utilizes patented magnetic sensor technology off. that was developed for the United States •...
-
Page 4: Table Of Contents
Features ......17 Resetting the Wayfinder ....7 Steps to use the Timer . -
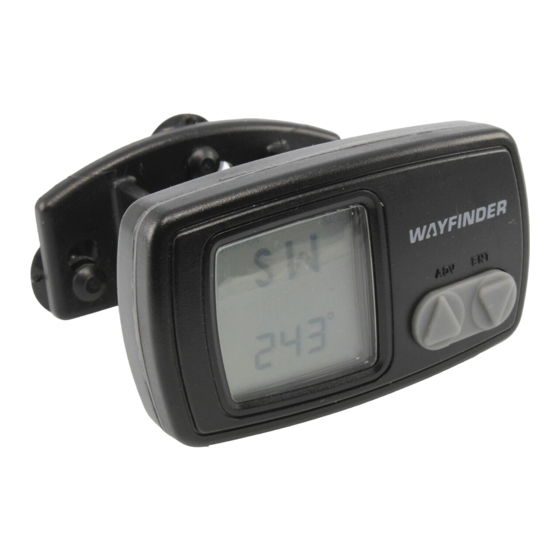
Page 5: Modes, Buttons And Display
Cardinal Points Readout Buttons Heading is displayed in one of 8 cardinal points (N, NE, E, SE, S, SW, W, NW). ADV Button (Advance) Press ADV to turn the Wayfinder on or to change from Basic mode to Timer mode. - Page 6 The Timer is a standard counter that records structures causes inaccurate readings in any a maximum of 99 hours, 59 minutes, and magnetic compass, but the Wayfinder detects 59 seconds. The Wayfinder can be used this interference and alerts you.
- Page 7 MODES, BUTTONS AND DISPLAY MODES, BUTTONS AND DISPLA Y “DISTORTION” Cardinal Point Numeric Heading BASIC Mode Icon Icon Readout Readout DISTORTION BASIC ADV button ENT button...
-
Page 8: Resetting The Wayfinder
ADV button to exit reset tion, the automatic shut-off values, and timer mode. settings. Resetting the Wayfinder should only 4. If “rESET” flashes for 30 seconds and be done when you want to completely erase neither button is pressed, the Wayfinder the memory. -
Page 9: Installing The Wayfinder
20° from the horizontal plane. If tilted more than ±20°, the heading information after calibration • The accuracy of the Wayfinder will be may not be accurate. The selected angle diminished by a strong magnetic field, from the horizontal plane must stay... -
Page 10: Windshield Mounting
It is recommended that Adjusting the Bracket the unit be mounted 5 or more inches The Wayfinder has an adjustable bracket away from stereo speakers. which rotates 180°. To adjust the bracket, press the two buttons on the back of the Windshield Mounting: compass. - Page 11 When reinstalling the compass, make sure the angle of the Wayfinder in the bracket is the same as it was before iremoval in order to avoid recalibrating the unit.
-
Page 12: Features
HEADER BASIC MODE The Wayfinder must be in Basic mode to use value is selected. any of the features described in this section. Calibration Features Calibration allows the unit to separate the earth’s magnetic field from the magnetic The Basic mode provides the current com-... - Page 13 BASIC MODE HEADER When to Calibrate : flash. This indicates you are now in Calibration. The Wayfinder must be calibrated when: 3. Press ENT, backlight will 1. It is being used for the first time. momentarily flash. Then the message 2.
- Page 14 2 minutes. displayed in the upper right corner. Compass Automatic Shut-Off 2. Press and hold ADV and “CAL” The Wayfinder has a programmable compass flashes. shut-off feature. The default value for the 3. Press ADV and the default value “C 05”...
-
Page 15: Compass Time-Out
90 or OFF. Stop at your desired selection Backlight Automatic Shut-Off for the compass time-out. The Wayfinder has a programmable time-out 6. Press the ENT button once to set your for the backlight. The default shut-off value selected time-out and “C” and the select is 10 seconds, meaning that after 10 seconds time-out value should flash. -
Page 16: Backlight Time-Out
HEADER BASIC MODE Steps to select the backlight shut-off : Stop at your desired selection for the backlight time-out. 1. Press the ADV button until the“BASIC” icon is displayed in the upper right 6. Press the ENT button once to set your corner. -
Page 17: Timer Mode
1. Press the ADV button until “00:00:00” maximum of 99 hours, 59 minutes and 59 is shown in the center of the compass seconds, “99:59:59”. The Wayfinder can be display. used as a compass while still using the timer. 2. Press the ENT button to start the timer. -
Page 18: Steps To Change The Battery
The Wayfinder uses one Lithium coin cell times. The timer will continue to run even battery (3 volt), #2032. These can be found though the Wayfinder is in a different mode at most major retailers who carry batteries. or has timed-out. The timer will continue to Removal requires the use of a small Phillips run until it is paused or reset. - Page 19 HEADER CHANGING THE BATTERY and the battery. Do not disturb the through the PCB and hold the battery in rubber seal that is resting on the case place. Make sure these are intact and the front. battery is situated inside these pins. 4.
- Page 20 9. The display should function properly at this point. If it does not, remove the battery, wait several seconds, and reinsert the battery. 10. Since the battery has been removed, it is Back Cover necessary to re-calibrate the Wayfinder. PCB Board Lithium Battery Front Cover...
-
Page 21: Frequently Asked Questions
HEADER FREQUENTLY ASKED QUESTIONS How does the Wayfinder work? being less expensive. These advantages have The Wayfinder uses a patented magnetic sensor made magneto-inductive sensor technology the technology that was developed by PNI Corpo- choice for many high-profile compass applica- ration for the U.S. - Page 22 HEADER FREQUENTLY ASKED QUESTIONS When do I need to calibrate the Wayfinder? tion. Many things generate external magnetic The Wayfinder needs to be calibrated when fields causing compass inaccuracy, including used for the first time in a vehicle, when used metal and electronics.
- Page 23 HEADER SERVICE & REPLACEMENT Customer Service tion (RMA) number by contacting PNI Please e-mail customer service department Corporation. at customerservice@pnicorp.com or call us • By phone: (888) 422-6672 (toll-free between the hours of 8:00 a.m. and 5:00 p.m. within the U.S.A. only) or at (707) (PST) Monday through Friday, with your 566-2260 questions.
- Page 24 HEADER SERVICE & REPLACEMENT place of purchase. proof of purchase and description of the problem to the following address: Once you have acquired an RMA number, pack the unit securely to prevent damage PNI Corporation in transit. If possible, use the original 5464 Skylane Blvd., Suite A packing material and box.
- Page 25 HEADER LIMITED WARRANTY; LIMITATION OF LIABILITY PNI Corporation manufactures its products your exclusive remedy for breach of warranty from parts and components that are new shall be that PNI, at its option, will replace or or equivalent to new in performance and repair the product and return the replacement warrants to the original user that this product or repaired product to you at no charge,...
- Page 26 HEADER LIMITED WARRANTY; LIMITATION OF LIABILITY WARRANTIES OR REPRESENTATIONS, out of contract, negligence, tort, or under EXPRESSED OR IMPLIED, IN FACT OR IN any warranty theory, or for infringement of LAW, WITH RESPECT TO THIS PRODUCT, any other party’s intellectual property rights, INCLUDING, BUT NOT LIMITED TO, irrespective of whether PNI had advance (1) THE IMPLIED WARRANTIES OF...
- Page 28 PNI Corporation www.pnicorp.com 11188 R02 1000063...
Need help?
Do you have a question about the z250 and is the answer not in the manual?
Questions and answers
What is error 13?