Table of Contents
Advertisement
Quick Links
Advertisement
Table of Contents

Subscribe to Our Youtube Channel
Related Manuals for WayFinder V2000


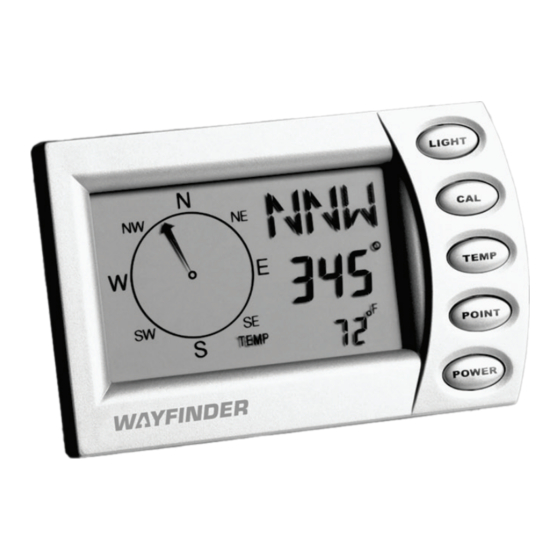
Summary of Contents for WayFinder V2000
-
Page 2: Getting Started
QUICK REFERENCE GUIDE Hold button and follow on-screen directions. You simply turn your vehi- Getting started: cle in one complete circle, taking 20 to 1. Install battery, observing dia- 60 seconds to complete (page 5). grammed polarity (page 1). 2. Plug 12-volt adapter into “POWER” Using your compass: jack and your vehicle lighter socket •... -
Page 3: Easy Installation
CONGRATULATIONS! EASY INSTALLATION Now you have a new navigational part- Note: Remove the protective overlay ner when you drive — one of the most film from the LCD screen. modern and accurate compasses avail- Step 1: Install the battery. able for use in all types of vehicles. To Slide open the battery cover on the get the most from your compass, please rear of the unit and insert the battery... - Page 4 Note: Do not leave the Wayfinder for exterior temperatures (required for V2000 in a parked vehicle that is ICE alert feature). If used inside, place likely to be exposed to extremely hot the sensor in a natural airflow, out of or cold temperatures.
- Page 5 Step 4: Mount on windshield. To adjust the angle, grasp the spring- Slide the compass into the mounting loaded pivot and pull to the right, bracket until it clicks securely into freeing the locking teeth (see diagram place (it only fits one way). Slide the below).
-
Page 6: Controls At A Glance
Power button: Press to switch the Wayfinder V2000 on or off. “Distortion” icon: Indicates that mag- netic interference is compromising com- Temperature 12-Volt Power pass accuracy, or that the battery has been... -
Page 7: Calibrating The Compass
For boats, calibration is best performed in a calm harbor or marina. 4. Press “DONE” displays briefly in lower Calibration steps: right corner. The V2000 is now 1. Hold calibrated. The message “PRESS AGAIN TO START OR PRESS LIGHT TO... -
Page 8: Using The Thermometer
00° displays in the “PLUG IN THE SENSOR” will lower right corner.) appear on the screen.) The Wayfinder V2000 displays temperatures between To enter a bearing point: 1°F and 158°F (-17°C to 70°C), or 1. - Page 9 ICE alert 2. Press When the exterior sensor is properly The values 00, 10, 30, 60, and 180 installed, the Wayfinder V2000 can seconds appear in sequence. alert you to dangerous road con- 3. Hold ditions. Any time the temperature To select the desired interval until drops to 35ºF (2ºC), it automatically...
-
Page 10: Optional Accessories
Each is available for an additional ler automobiles, Polaris jet skis, Bay- charge by calling our customer ser- liner boats, and Timex watches. vice department at (888) 422-6672 Where can the Wayfinder 2000 be from anywhere in the U.S.A., (707) used? 566-2260, e-mail You’ll find it a valuable help to navi-... - Page 11 by a vehicle’s steel body or electron- How can I improve the calibration ics. Without calibration, the built-in process? microprocessor interprets the detected Remember to match conditions to magnetic fields as coming entirely your actual use before calibrating. For from the earth, which can produce example, calibrate with both the tem- inaccurate compass readings.
-
Page 12: Service And Replacement
SERVICE AND REPLACEMENT • By fax at (707) 566-2261. • You may also contact us by Customer Service e-mail at the following address For customer service questions, our customerservice@pnicorp.com. customer service department can contacted e-mail 2. Provide a proof of purchase, such customerservice@pnicorp.com, as a mechanical reproduction or call us between 8:00 a.m. -
Page 13: Specifications
United Parcel Service (UPS), SPECIFICATIONS FedEx Parcel Service, or First Power Class Mail to avoid loss in transit. 1 x Lithium CR123 battery 4. Write the issued RMA number on 12V DC adapter the outside of your package and Battery Life send your proof-of-purchase and 3,600 hours without backlight, 140 description of the problem to:... - Page 14 In order to validate your warranty, you must provide LIMITED WARRANTY; LIMITATION OF LIABILITY proof of purchase acceptable to PNI, together with PNI Corporation (“PNI”) manufactures its products, the product shipped for warranty repair/replacement. which include accessories, from parts and compo- Products returned to PNI must be pre-authorized nents that are new or equivalent to new in perfor- by PNI with an RMA (return material authorization)
- Page 15 Your Opinion Matters! Please take a few minutes to register and let us know about yourself. It will help us serve you better in the future, and all information will remain confidential. To register, log on to: www.pniservice.com...
Need help?
Do you have a question about the V2000 and is the answer not in the manual?
Questions and answers