Table of Contents
Advertisement
Advertisement
Table of Contents

Related Manuals for Grecom EZ Scan-SD PSR-700


Summary of Contents for Grecom EZ Scan-SD PSR-700
- Page 1 GRECOM PSR-700 EZ Scan-SD Owner’s Manual...
-
Page 2: Important Notice
GRECOM PSR-700 EZ Scan-SD Handheld Scanning Receiver OWNERʼS MANUAL - Please read before using this equipment. IMPORTANT: This manual uses the following symbols to emphasize Warnings, Notes and Usage Hints A WARNING symbol is used to indicate possible risk of personal... -
Page 3: Table Of Contents
Table of Contents Introduction! ......................Features! ......................The FCC Wants You To Know! ................ Scanning Legally! .................... Installing the EZ Scan-SD PC Application! ............Getting Familiar With Your EZ Scan-SD! ............EZ Scan-SD Front View! ................Understanding the Keypad! ................POWER/Backlight ! ................... - Page 4 Browse the Library! ................Pick objects from the Library! ............Import objects to Scanlists! .............. Basic Step by Step Programming Instructions! ........Browsing the Library! ................. Picking Objects from the Library! ............. Importing Objects to Scanlists! ............Conventional Frequencies and Trunking Talkgroups! ......
-
Page 6: Introduction
Introduction Welcome to scanning with the EZ Scan-SD! The EZ Scan-SD is an exciting new way to enjoy the hobby of scanning police, fire, EMS, amateur, government and other two-way analog radio communications. The EZ Scan-SD provides a simple and easy to understand user interface in a powerful and feature-rich state of the art analog scanning receiver. -
Page 7: The Fcc Wants You To Know
storm conditions as they occur, and become aware of dangerous conditions before the media or emergency management officials are able to announce them to the general public. SAME and All Hazards Weather Alerting - The EZ Scan-SD features a Dedicated SAME Weather Alert Receiver mode, alerting you to severe weather and other hazards in the specific area(s) that you select, or, the EZ Scan-SD can check your local NOAA weather frequency periodically, even while scanning, and... -
Page 8: Scanning Legally
Rules. These limits are designed to provide reasonable protection against harmful interference in a residential installation. This equipment generates, uses and can radiate radio frequency energy and, if not installed and used in accordance with the instructions, may cause harmful interference to radio communications. - Page 9 According to the Electronic Communications Privacy Act (ECPA), you are subject to fines and possible imprisonment for intentionally listening to, using, or divulging the contents of such a transmission unless you have the consent of a party to the communication (unless such activity is otherwise illegal). This scanner has been designed to prevent illegal reception of protected transmissions.
-
Page 10: Installing The Ez Scan-Sd Pc Application
Installing the EZ Scan-SD PC Application EZ Scan-SD comes with an easy to use computer application that you can use to modify your EZ Scan-SD’s programming or to add your own custom programming. To begin the installation process, insert the CD into your computer’s CD-ROM drive. - Page 11 Welcome Screen: This screen is the initial welcome screen for the installer. This is an informational screen only. Click on the “Next” button to begin the installation. Click the “Cancel” button to abort the install. License Agreement: In keeping with the agreement with RadioReference.com LLC, license text is displayed regarding the use of the frequency database library files that are included in the...
- Page 12 Custom Setup: If the user selects a custom install, this screen will appear. This screen allows the user to limit what components will be installed. Once the components have been selected, click on the “Next” button to continue to the next step.
- Page 13 Completing the install: This screen is the final check for the user before the installation actually begins. Click “Next” to perform the actual installation. Installing EZ Scan-SD: This screen is shown while the selected files are being copied to the computer. When this process completes, click the “Next”...
-
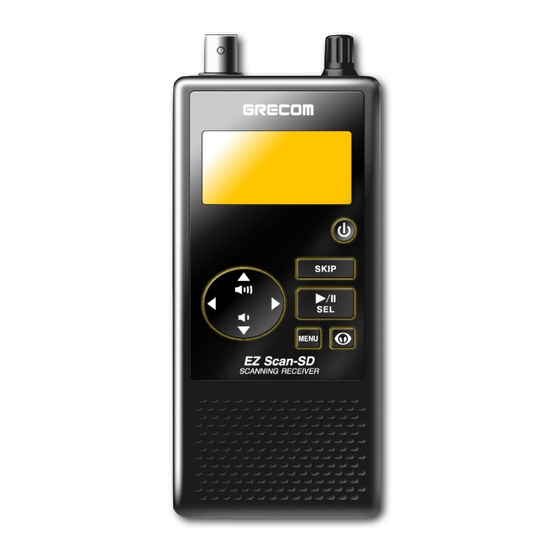
Page 14: Getting Familiar With Your Ez Scan-Sd
Getting Familiar With Your EZ Scan-SD The following illustrations are provided to help you get familiar with your EZ Scan-SD controls and display. EZ Scan-SD Front View Headset Connector BNC Antenna Squelch Connector Control PC/IF DC Power Keypad Jack Main Power Speaker Figure 1 - EZ Scan-SD front view... -
Page 15: Understanding The Keypad
Understanding the Keypad Your EZ Scan-SD features an simplified backlit keypad with 9 keys that are used to operate the unit. Figure 2 highlights the various keys and their basic functions. Figure 2 - Keypad layout POWER/Backlight The POWER key is located to the top right of the keypad. Press and hold for one second to turn the EZ Scan-SD on and off. -
Page 16: Down Arrow Key
DOWN Arrow Key The DOWN Arrow key is used to decrease the volume when the EZ Scan-SD is scanning or monitoring objects. When browsing objects, the key scrolls down through objects in a Scanlist. When using menus or the Library, the scrolls down through the available items. -
Page 17: Wx Key
editing text, pressing the SKIP key clears all text to the right of the cursor. WX Key When pressed, the WX key provides instant access to NOAA Weather Radio broadcasts, and is used to access Dedicated SAME Weather Alert Receiver mode, which allows the EZ Scan- SD to remain silent while monitoring for severe weather conditions in the area you specify by entering NOAA SAME codes. -
Page 18: Battery Type Selection
Lift here to open Figure 3 - Main Power cover WARNING:! The Main Power Off switch will not protect your EZ Scan-SD from damage that may occur due to battery leakage when the EZ Scan-SD is stored for long periods of time. Always remove the batteries from the EZ Scan-SD when placing it into long-term storage. -
Page 19: Squelch
result in battery leakage or other damage to your scanner if the scanner is connected to an external power source. ! Squelch The EZ Scan-SD is equipped with a top mounted squelch control. The squelch control acts as a gate for the transmissions that EZ Scan-SD receives. -
Page 20: Display Icons
-Main Menu- Scan ▶ Browse objects Scanlists Search Browse library Figure 4 - EZ Scan-SD Main Menu A “Scanning” display shows a scrolling list of enabled Scanlists while the EZ Scan-SD is scanning. Figure 5 provides an example of the EZ Scan-SDʼs Scanning display. ▶... -
Page 21: Psd Indicators
" The scanner is currently receiving trunking control channel data. " When present, the attenuator is set for Global mode. " When present, the attenuator is active. ▶" EZ Scan-SD is in Scan mode (scanning) EZ Scan-SD is in Pause mode (monitoring a single object) "... -
Page 22: How The Ez Scan-Sd Works
How the EZ Scan-SD Works Your EZ Scan-SD is designed with an easy-to-use simplified MENU keypad that provides navigation keys, a key, SKIP ▶/II/SEL key and a key. The EZ Scan-SDʼs uncluttered keypad gives you instant access to the functions that you need most while using your scanner. - Page 23 of the database. We ask that you respect this copyright by adhering to the following guidelines: The Library data is intended for your personal use only in conjunction with programming and using your EZ Scan-SD. As such RadioReference.com LLC grants the customer a non- exclusive single license to only be used with the EZ Scan-SD radio and its associated PC software. The Library shall not be copied or transferred to any 3rd party in any electronic or...
-
Page 24: Getting Started
Getting Started Unpacking the EZ Scan-SD Unpack your EZ Scan-SD carefully. Save all documentation and packing materials in case it is necessary to return your scanner for repair. WARNING:! Always protect the EZ Scan-SD from exposure to extreme heat or cold temperatures. WARNING:! The EZ Scan-SD is not waterproof. -
Page 25: Attaching The Antenna
WARNING:! Always remove old or weak batteries. Batteries can leak chemicals that destroy electronic circuits. Always turn off the scanner when not in use to prevent deep discharge and possible battery leakage. Do not mix old and new batteries, different types of batteries (alkaline, or rechargeable), rechargeable batteries of different capacities or rechargeable batteries with different charge states. -
Page 26: Low Battery Warning
indicates that the EZ Scan-SD is connected to external power and the internal battery charger circuit is active. WARNING:! The external DC power input is designed to accept external power from the USB data cable and from USB power adapters. Turn the EZ Scan-SD off prior to connecting or disconnecting external power. -
Page 27: Connecting An Optional External Antenna
Connecting an Optional External Antenna The BNC antenna connector on the EZ Scan-SD makes it easy to use the scanner with a variety of antennas, such as an external mobile antenna or outdoor base station antenna. Always use 50-ohm coaxial cable, such as RG-58 or RG-8 low- loss dielectric coaxial cable. -
Page 28: Connecting An Earphone Or Headphones
Connecting an Earphone or Headphones For private listening, you can plug an 1/8-inch (3.5 mm) mini-plug earphone or headphones (not supplied) in the HEADPHONE jack on top of the EZ Scan-SD. This automatically disconnects the internal speaker. Connecting an External Speaker In a noisy area, an amplified speaker (not supplied) might provide more comfortable listening. - Page 29 PWR jack. To prevent corruption of SD Card data, always power the EZ Scan-SD off using the front panel button before connecting or disconnecting external power sources. NOTE: ! Some external USB power supplies may generate RF noise that can interfere with the EZ Scan-SDʼs reception.
-
Page 30: Using Vehicle Battery Power
Using Vehicle Battery Power You can power the scanner using an optional car USB power adaptor and the supplied USB power/data cable. To power the scanner using a car USB power adaptor, connect the USB plug end of the supplied USB power/data cable to the car USB power adapter, and connect the scanner data plug end of the supplied USB power/data cable to the scannerʼs PC/IF - PWR jack. -
Page 31: Import Objects To Scanlists
Import objects to Scanlists Finally, when you have picked the objects you want to import, you complete the operation by selecting one or more Scanlists where you would like the selected objects to be imported. The EZ Scan-SD will add your objects to the Scanlists you have selected. -
Page 32: Picking Objects From The Library
NOTE: ! When selecting objects below the Systems level from either States or Cities/Counties, keep in mind that one or more Sites must be also be selected along with any individual talkgroup objects that you pick from a System. When in doubt about which Site should be selected, you can select all sites, or even the entire System, and the EZ Scan-SD will automatically find and use the best available site. -
Page 33: Importing Objects To Scanlists
Keep in mind that picking an entire grouping for importing may result in a very large number of objects being imported to the EZ Scan-SDʼs Scanlists. The EZ Scan-SDʼs capacity for objects is limited only by the size of the SD Card memory, meaning that a massive number of objects can potentially be imported and saved in Scanlists. -
Page 34: Conventional Frequencies And Trunking Talkgroups
key. The EZ Scan-SD will display a list of Scanlists. Use the and ▶/II/SEL keys to place checkmarks next to each Scanlist that you wish to import the selected objects into. After you have marked each desired destination Scanlist, press the key to begin importing your picked objects into the selected Scanlists. - Page 35 “Talkgroups” on the top line of the display while you are browsing the library. When browsing the EZ Scan-SDʼs library, everything you find below the “Systems” level under States or Counties/ Cities will be trunked radio systems and associated sites and talkgroups.
-
Page 36: Setting Up Scanlists
• Access the Library from the Main Menu • Scroll to Indiana and press the key • Scroll down to Systems and press the key. At this level you will see the one system in Indiana with statewide coverage, the Indiana Project Hoosier SAFE-T state public safety ▶/II/SEL radio system. -
Page 37: Enabling/Disabling Scanlists
you will also want to give your Scanlists names that describe the objects that you have stored in them. Enabling/Disabling Scanlists MENU To enable and disable Scanlists for scanning, press the key until you reach the Main Menu, which is indicated at the top of the LCD display. -
Page 38: Monitoring While Browsing
Monitoring While Browsing You can monitor objects while browsing objects and Scanlists. Follow the steps for Browsing Scanlists and Objects above. Press the ▶/II/SEL key to monitor a selected object. Press the ▶/II/SEL key again to scan all objects in enabled Scanlists. Scanning MENU To scan all active objects in enabled Scanlists, press the... -
Page 39: More Ez Scan-Sd Features
scanning again, but will continue to receive further transmissions on the object. More EZ Scan-SD Features EZ Scan-SD PC Application Your EZ Scan-SD includes a powerful EZ Scan-SD PC Application You should use the EZ Scan-SD PC Application for the following operations: •... -
Page 40: Sd Card Contents
To remove the SD Card from the EZ Scan-SD, turn the radio off using the button on the front of the radio. WARNING:! To prevent corrupted data on the SD Card, always turn !EZ Scan-SD off using the front panel power key before opening the battery compartment cover. -
Page 41: Sd Card Error Messages
• Any SD Card with greater than 2GB of capacity should be formatted using the FAT32 file system with a cluster size of 32kB. For reference, here is the directory structure for the EZ Scan- SDʼs SD Card. You may wish to make a copy of the CDAT folder on your computer as a backup. -
Page 42: Ez Scan-Sdʼs Main Menu
Unable to read valid low-level file system information (partition tables, etc.) from installed SD Card at power-up: No file system on SD Card SD Card has a cluster size other than 32kB – 32kB is required by EZ Scan- Bad file system: 32k clusters required Unrecoverable error reading the SD Card. -
Page 43: V-Scanner Ii Storage System
Browse Library Accesses the Library, where you can browse and pick objects to import into Scanlists. Update from Library Applies current Library data from the SD Card to all of the programmed objects. Restore Skipped Restores all skipped objects so they will be scanned again in Scan mode. -
Page 44: Editing Objects
Editing Objects From time to time you may find it necessary to edit the objects that you have imported from the library into your Scanlists. This can be accomplished using the EZ Scan-SD itself, or you can use the EZ Scan-SD PC Application. To edit objects using the EZ Scan-SD, follow the instructions above for Browsing Scanlists and Objects to select the object MENU... - Page 45 Allows you to change the Scanlists that the selected object is a ▶/II/SEL member of. Use the key to change Scanlist membership by adding or removing checkmarks to Scanlists. Locked Out When checked, the selected object is Locked Out and will not be scanned.
- Page 46 Light Defines backlight behavior for the selected object. Use the or keys to select the desired light behavior. Options are Leave (use default backlight settings), On (turn the backlight on) or Flash (flash the backlight according to the Flash Pattern setting). Flash Pattern, On Time, Off Time Flash Pattern defines the pattern that is used for this object when the Light mode is set to Flash.
- Page 47 The flash pattern is set for each block by specifying the number or letter associated with the desired flash pattern. Using this technique it is possible to define simple or complex flash patterns that you can use to identify an active object at a glance from across the room.
-
Page 48: Weather Modes
Selecting Delete Object removes the object from the EZ Scan- SDʼs working memory configuration. The Library data is never altered in any way, so if necessary, the object can be imported to the EZ Scan-SDʼs Scanlists again. To delete the current object, use the and keys to scroll to Delete Object, then press the ... -
Page 49: Dedicated Same Weather Alert Receiver
weather channel number in the display (e.g., “WX7” is Channel MENU key. Scroll to Priority, and use the and 7). Press the keys to select the same NOAA weather radio channel number that you previously identified as having the best signal for your MENU area. -
Page 50: Skywarn
The first digit, 0, indicates that the geographical area consists of the entire county. The SAME specification can use the first digit to define a sub-area within a county, but this is generally not used. The second two digits, 48, indicate the state is Texas. The last three digits, 113, indicate that the County is Dallas. -
Page 51: Searching
in Weather Monitor mode. When activated from Weather Monitor mode, all other Scanlists are temporarily disabled, and only objects mapped to the Skywarn Scanlist will be monitored. Searching Your EZ Scan-SD features several search modes to help you find more objects to listen to. As you use the EZ Scan-SDʼs search modes to find new objects, you can write them down as they are received, then use the companion EZ Scan-SD PC Application to add them to your Scanlists later. - Page 52 Attenuator When checked, attenuation is enabled when using Spectrum Sweeper. Attenuation limits the effective range of Spectrum Sweeper and may help reduce interference from strong local transmitters. Use the ▶/II/SEL or keys to toggle Attenuator status. Zeromatic Enables or disables the EZ Scan-SDʼs Zeromatic circuit. Zeromatic helps the EZ Scan-SD tune to exact frequencies when searching.
-
Page 53: Service Search
25-54 MHz" " VHF Low Band 108-137 MHz" " VHF Aircraft Band 137-174 MHz" " VHF High Band 216-300 MHz" " 220 MHz Commercial/Amateur Band 300-406 MHz" " UHF Military Air Band 406-470 MHz" " UHF Band 470-512 MHz" " UHF-T Band 764-797 MHz"... - Page 54 Aircraft - Searches civilian and military air frequencies. Groups are as follows: 108-118 MHz Navigation 118-137 MHz Civilian Voice 138-150 MHz Military Voice (excludes 2m Amateur) 225-400 MHz Military Voice Railroad - searches the Association of American Railroads (AAR) VHF railroad frequencies used in the US and Canada Amateur - Searches amateur radio frequencies.
-
Page 55: Limit Search
and may help reduce interference from strong local transmitters. ▶/II/SEL or keys to toggle Attenuator status. Use the Zeromatic Enables or disables the EZ Scan-SDʼs Zeromatic circuit. Zeromatic helps the EZ Scan-SD tune to exact frequencies when searching. Use the or keys to toggle Zeromatic enabled/ disabled status. -
Page 56: Storing Found Ctcss Or Dcs Codes
Navigates to the EZ Scan-SDʼs Main Menu Search Menu Navigates to the Search Menu Cancel Changes Exits the Limit Search Menu without saving any changes Save Changes Saves your changes and exits the Limit Search Menu Attenuator When checked, attenuation is enabled when using Limit Search. Attenuation limits the effective range of Limit Search and may help reduce interference from strong local transmitters. -
Page 57: Updating Your Programmed Data To Latest Data From Library
channels in cases where the squelch code is not included in the RadioReference database, or is not known by you. When importing objects from the Library, CTCSS and DCS code information from the RadioReference database is automatically imported with the conventional channel information. When the code is unknown, the radio will be programmed to automatically search for and identify the CTCSS or DCS code if one is present on the conventional channel. - Page 58 • Updates made to the RadioReference database to incorporate changes CTCSS programming for a conventional channel by a radio system operator You should use the EZ Scan PC application to download the latest Library data and move it to your radioʼs SD card on a routine basis to ensure that you have the latest RadioReference data in your Library.
-
Page 59: Troubleshooting
Troubleshooting Should you experience difficulty with the EZ Scan-SD, please refer to the following troubleshooting guide for assistance. If you are unable to restore the EZ Scan-SD to normal operation after following these steps, contact your dealer or GRE America for assistance. -
Page 60: Birdie Frequencies
The scanner does not recognize the SD Card • The SD Card is not properly formatted. Use the EZ Scan-SD PC Application to reformat the card. If using Windows to format the card, the card format must be FAT with 32kB clusters. •... -
Page 61: Care
removed, the noise is most likely coming from an external source. Moving the scanner may reduce or solve the issue. Care Your scanner is not waterproof. Do not expose it to rain, moisture, or extreme high humidity. If the scanner gets wet, wipe it dry immediately. -
Page 62: Appendix A - The Ez Scan-Sd Settings Menu
Appendix A - The EZ Scan-SD Settings Menu The EZ Scan-SDʼs factory default settings should be adequate for most users. You can use the Settings menu to customize these settings to suit your individual needs. To access the Settings menu, press the MENU key until the Main Menu appears, then scroll to the Settings menu item and press the ... - Page 63 G Atten On Activates the Global Attenuation. Key Beeps Enables or disables Key Beep sounds. Beep Volume Controls the volume of Key Beep sounds. Alert Volume Controls the volume of object alert sounds. Contrast Sets the contrast of the LCD display. LiteMode Sets the backlight mode to On, Stealth, Normal, Key, or Ignore.
- Page 64 TG Disp Sets the display format for talkgroup IDs. EZ Scan-SD User Manual! Page 63...
-
Page 65: Specifications
Specifications FREQUENCY RANGE! Freq.Step ! Mode (Default) 25.0000 − 26.9600 MHz! 10 kHz ! 26.9650 − 27.4050 MHz! 10 kHz! 27.4100 − 29.5050 MHz! 5 kHz! 29.5100 − 29.7000 MHz! 5 kHz! 29.7100 − 49.8300 MHz ! 10 kHz! 49.8350 − 54.0000 MHz! 5 kHz! 108.000 −... - Page 66 RECEIVING MODES AM, FM, FM-MOT (Motorola), LTR (EF Johnson), EDACS wide/narrow (GE/Ericsson/HARRIS), CTCSS and DCS RECEIVING SYSTEM Triple conversion PLL super heterodyne SERVICE BAND SEARCH! Marine FRS/GRMS/MURS Public safety Aircraft Amateur (Ham) Railroad WX FREQUENCIES 162.400, 162.425, 162.450, 162.475, 162.500, 162.525, 162.550 MHz DISPLAY Full dot matrix bitmap LCD(96x48 dots) SENSITIVITY (FM 12 dB SINAD UNLESS OTHERWISE NOTED)
- Page 67 SCAN AND SEARCH DELAY TIME 2 seconds ! AUDIO MAX. POWER RF INPUT: 100 µ V AT 154.1 MHZ (DEV:3KHZ AT1KHZ) 8 Ohms Resistor Load at speaker terminal (BTL): 280 m Watts INTERMEDIATE FREQUENCY 380.8 MHz 21.4 MHz 455 kHz CURRENT DRAIN (BACK LIGHT OFF/WITH OUT CHARGING) 8 Ohm internal speaker at 154.1 MHz, 5V Ext Power, Squelched: 120mA!
-
Page 68: Limited Warranty
Limited Warranty Limited Warranty General GRE America, Inc. warranty all parts of each new product to be of sound design, good material and workmanship, and will repair or exchange any parts proven to be defective under normal use at no charge for a period of 12 months from the date of sale to the end user. - Page 69 RadioReference.com Your Complete Reference Source www.radioreference.com RADIOREFERENCE.COM IS THE WORLD’S LARGEST RADIO COMMUNI CATIONS WEBSITE, WITH A COMPLETE FREQUENCY AND TRUNKED RADIO SYSTEM DATABASE. COME SEE WHAT FREE SERVICES WE HAVE TO OFFER TO THE COMMUNITY: The RadioReference Database Includes a complete frequency database, trunked radio system information, FCC license assignments, 10 Code lists, agency maps, les, downloads, and detailed information for most...
Need help?
Do you have a question about the EZ Scan-SD PSR-700 and is the answer not in the manual?
Questions and answers