
Related Manuals for Grecom PSR-310


Summary of Contents for Grecom PSR-310
- Page 1 PSR-310 Advanced Handheld Scanning Receiver with Object Oriented User Interface Owner's Manual Please read this User's Guide before installing, setting up and using your new product.
-
Page 2: Table Of Contents
Object abbreviations used in this document ..........10 The FCC Wants You To Know ..............11 Scanning Legally ..................12 Getting Familiar With Your PSR-310 ............13 PSR-310 Front View ................... 13 PSR-310 Rear View ..................14 PSR-310 Included Accessories ..............15 Understanding the Display Icons .............. - Page 3 Audible Alarms and the ALERT LED ............56 Dedicated search modes ................58 Using Weather Modes ................64 Cloning Your Radio to Another PSR-310 or PSR-410 Scanner ....70 Standard Text Entry Method and QuickText ..........70 Entering and Editing Alphanumeric Information ........70 Using QuickText ..................
- Page 4 PSR-310 ADVANCED TRUNKING SCANNER WITH OBJECT ORIENTED USER INTERFACE Owner’s Manual Please take the time to read this manual comopletely before using your new scanner. Motorola, Smartnet, Smartzone, Omnilink, ASTRO and Privacy Plus are registered trademarks of Motorola Inc. EDACS and Pro Voice are registered trademarks of Harris Corporation.
-
Page 5: Introduction
Introduction Welcome to an exciting new world of radio scanning! Recognizing that contemporary scanning receivers are too hard to program and use, GRE's engineers conducted extensive research to determine the functional require- ments for an entirely new scanning receiver user interface. We call this new... -
Page 6: Features
LTR Home Repeater AutoMove - Takes the guesswork out of programming LTR trunking systems when the home repeater order is not known. Enter the LTR system frequencies in any order, and the PSR-310 will automatically move the frequencies to the proper home repeater slots as transmissions... - Page 7 Scannable Objects are active. Can be used in conjunction with, or separately from, the ALERT LED described above. High Speed PC Interface - uses GRE's 100-016 USB cable in full duplex mode at 6 times the speed of previous scanner models for PC transfer and 8 times the speed of previous models for radio to radio cloning.
-
Page 8: What Is Object Oriented Scanning
What is Object Oriented Scanning? To put it simply, Object Oriented Scanning describes a new user interface design for scanning receivers (the Object Oriented User Interface, or OOUI). In Object Oriented Scanning, we introduce the concept of the Scannable Object. A Scannable Object is defined as “something that can be scanned”. The Scannable Object concept is very important in the OOUI design. -
Page 9: A Few Things To Remember About Object Oriented Scanning
A Few Things To Remember about Object Oriented Scanning Object oriented scanning is completely different from any prior scanning receiver technology. Accordingly, some users may find it difficult to visualize and understand how Object Oriented Scanning works. This may be espe- cially true for users who have become very familiar with more recent scan- ning receiver technologies. -
Page 10: About This Manual
About this manual Object abbreviations used in this document We described how your new GRE scanner utilizes an Object Oriented User Interface in the Introduction and Overview sections of this manual. You learned that the key components of this new user interface are the Scan- nable Objects, which are, of course, “things that can be scanned”. -
Page 11: The Fcc Wants You To Know
tor specific VHF marine channels, they should be programmed as CONV objects. If you want to monitor your favorite amateur radio channel, it should be stored as a CONV object. If your police or fire department uses a chan- nel, or channels that are not trunked, but part of a “plain old radio system”, they should be stored as CONV objects. -
Page 12: Scanning Legally
This device complies with Part 15 of the FCC Rules. Operation is subject to the following two conditions: 1. This device may not cause harmful interference. 2. This device must accept any interference received, including interference that may cause undesired operation. Scanning Legally Your scanner covers frequencies used by many different groups including police and fire departments, ambulance services, government agencies, pri-... -
Page 13: Getting Familiar With Your Psr-310
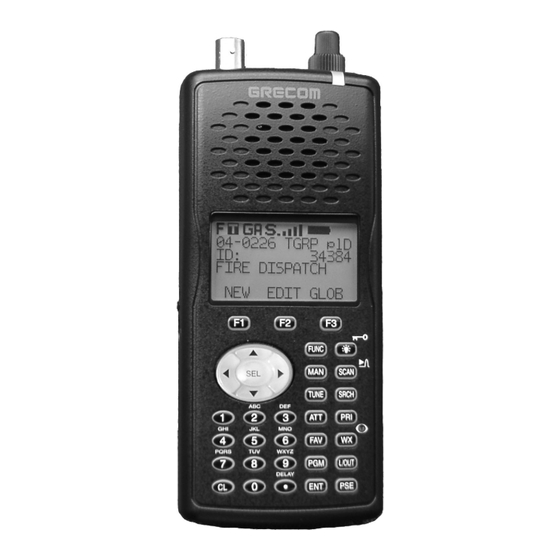
PSR-310 Front View Headset Connector Volume Control BNC Antenna Squelch Control Connector Alert LED PC/IF Jack LCD Display External DC Power Jack FUNC and Softkeys Backlight Keys Five Way Push- button Pad Operations Keys Numeric Keypad Figure 1 - PSR-310 front view... -
Page 14: Psr-310 Rear View
PSR-310 Rear View Headset Connector Volume Control BNC Antenna Squelch Control Connector PC/IF Jack Belt Clip External DC Power Jack Battery Compartment Figure 2 - PSR-310 rear view... -
Page 15: Psr-310 Included Accessories
PSR-310 Included Accessories AC/DC Adaptor Antenna Non-Rechargeable Rechargeable Battery Holder Battery Holder Figure 3 - PSR-310 Included Accessories... -
Page 16: Understanding The Display Icons
Understanding the Display Icons Your PSR-310 features a high contrast, white backlit Liquid Crystal Display (LCD) to provide important information about the status of the radio while you are programming and using it. The LCD includes a row of icons at the top that provides information about the status of the scanner while it is oper- ating. -
Page 17: Understanding The Keypad
Understanding the Keypad Your PSR-310 features an easy-to understand backlit keypad with 34 keys that are used to control and program the radio. Figure 5 highlights the vari- ous keys and their basic functions. Figure 5 - Keypad layout Softkeys F1, F2, F3 - activate function shown in the LCD display immediately above the softkey. - Page 18 Operation Keys FUNC - activates alternate key functions. FUNC key operation is very intui- tive - typically it “amplifies” the keypress that follows it. LIGHT - activates backlight, FUNC LIGHT locks keypad. MAN - Places scanner in Manual Mode for monitoring single objects. SCAN - Places scanner in Scan Mode for scanning enabled objects, FUNC SCAN launches Spectrum Sweeper.
-
Page 19: Getting Started
Getting Started First Time Startup We believe that your new PSR-310 is so easy to use that scannists with minimal experience in the hobby should be able to get up and running in a matter of just a few minutes. If you already know the difference between a... -
Page 20: Attach The Antenna
NOTE: Two battery holders are included with your PSR-310. The black bat- tery holder should be used with non-rechargeable alkaline batteries. The yellow battery holder should be used with rechargeable Ni-MH or Ni-Cd batteries. The radio will charge the batteries when the yellow holder is used in conjunction with the supplied AC adapter or other external 9 VDC power supply rated at 400 mA. -
Page 21: Set The Battery Type, If Necessary
Please note the position of the squelch control for future reference. Once the squelch setting is complete, you may press PGM to exit TUNE mode. Set the battery type, if necessary By default, your new scanner is configured to use standard alkaline batter- ies. -
Page 22: Listening Safely
NOTE: An animated battery icon provides an indication that the battery char- ger circuit is active. If you set Alkaline in battery type selection , and you use rechargeable battery holder with rechargeable battery, the battery charger circuit is active and animated battery icon does not appear. Listening Safely To protect your hearing, follow these guidelines when you use headphones. -
Page 23: Connecting An Earphone/Headphones
You can use the belt clip attached to the back of the scanner for hands- free carrying when you are on the go. The PSR-310 ships with the belt clip already installed. To remove the belt clip, use your finger to disengage the retaining catch at the top of the belt clip from the back of radio, and slide the belt clip upwards. -
Page 24: Using Vehicle Battery Power
To power the scanner using an AC adaptor, connect the plug into the scan- ner's PWR DC 9V jack. Then connect the AC adaptor to a standard AC out- let. WARNING: To prevent electric shock, do not use the AC adaptor's polarized plug with an extension cord, receptacle, or other outlet unless you can fully insert the blades to prevent blade exposure. -
Page 25: Creating Your First New Objects
Creating Your First New Objects When the scanner is first turned on after it is unpacked, you are working with a clean slate. You will notice that your scanner tells you this: The scanner is in program mode and is ready for you to enter the first Ob- jects into the memory. - Page 26 to match the frequency of the transmitter you want to scan or monitor, and the MODE should be set to Auto, or, if desired, AM, FM or NFM. Note that the scanner will automatically select the default mode based on the frequen- cy you enter when MODE is set for AUto.
- Page 27 If you press the 6 key on the bottom of the 5-way pushbutton pad, you can scroll down and see all of the parameters that can be specified for a CONV object. Go ahead and take a peek - then scroll back to the very top of the display so you can begin entering information for your first CONV object.
-
Page 28: Talkgroup Object (Tgrp)
Press the ENT key or DONE softkey to store the new tag information for your CONV object. Now you are ready to store your first CONV object. There are other param- eters that you can change, and we invite you to scroll through the CONV menu to see the other settings that are available. - Page 29 depending on the type of trunked radio system you plan to monitor. If you are a reasonably experienced user you probably already know what the essential parameters are for the system you wish to monitor. For example, each TSYS must correctly specify the type of system being monitored, the control channel or LCN frequencies used by the system, and so on.
- Page 30 We are entering a new Motorola Type II 800 MHz system, so we can leave the Type: field as-is. It's a good idea (in fact, a REALLY good idea, for rea- sons you will see as you proceed) to give your TSYS a unique name. Press the down arrow key once to scroll to the Tag: field, then press the SEL key and enter a name for the system using the methods previously described for naming your CONV object.
- Page 31 Notice that the system name has changed to reflect the name you chose when you were entering the parameters for the trunking system. As you en- ter this TGRP and other TGRP objects for this system, you will just specify the system name here.
- Page 32 7 1 P 6 3 O 5 3 L 4 3 I 2 3 C 3 2 E <space> 3 1 D 4 3 I 7 4 S 7 1 P 2 1 A 8 1 T 2 3 C 4 2 H Press ENT or DONE to store the name, then press SAVE to store the TGRP as a new object.
-
Page 33: Using Dupe To Speed Up Object Entry
• Wildcard Talkgroup: will monitor all talkgroup call radio traffic on the desired trunked radio system (press Dflt in the ID: field of the TGRP object to use Wildcard) • Talkgroup with TGID: will only monitor talkgroup call radio traffic on the specified TGID (enter the desired talkgroup in the ID: field of the TGRP object to scan a specified ID) •... - Page 34 ated so you can select just one to monitor. To activate Scan Mode, just press the SCAN key on the keypad. Unless you have explicitly changed Scan List membership, all of the objects you have entered so far should be mapped to Scan List 01, and your scanner should begin scanning these objects immediately when you press the SCAN key.
- Page 35 When the scanner is stopped on a TGRP while scanning, or paused in Man- ual Mode, the display will appear as follows: When the scanner is stopped on a conventional channel while scanning, or while paused in Manual Mode, the display will appear as follows:...
-
Page 36: Browsing Objects
The 5-way pushbutton pad makes it easy for you to browse the stored ob- jects in your PSR-310 when in Manual or Program modes. Press MAN or PGM, then use the 3456 keys on the 5-way pushbutton pad to move around in the scanner's memory as follows: navigates “up”... -
Page 37: More About Wildcard Scanning
Using the Object ID to directly access an object You can use this address to quickly access your stored objects when in the Manual Mode and PGM modes. Press MAN or PGM, then key the Object ID using the numeric keypad, then press ENT to go to that object. In the above example, press MAN or PGM, then key 0348 ENT to jump directly to that object. -
Page 38: Displaying Memory Usage
Search Object Types A very powerful feature of your PSR-310 is the ability to define different types of frequency searches and process them while scanning. Frequency search- es are just another type of Scannable Object in the hierarchy of the radio's memory organization, so they can be manipulated and scanned in the same manner as conventional channels and trunking talkgroups. - Page 39 Press the PSE key to hold on the active frequency. To resume, press the PSE key again. HINT: It can take some time for the PSR-310 to process all of the frequencies in a LMIT search. You can experiment with different size frequency ranges to find a LMIT search setup that does not interfere excessively with scanning of other object types.
- Page 40 SWPR objects just like any other Scannable Object when in Scan Mode. If you create a SWPR object, assign it to a Scan List and press the SCAN key, the radio will check for activity on all the enabled Scannable Objects - TGRP objects, CONV objects, LMIT objects and SWPR objects.
- Page 41 In Public Safety, the sub bands are defined as follows: 0: 33.420-46.5 MHz VHF Low Band 1: 151.820-170.150 MHz VHF High Band 2: 453.0375-467.7125 MHz UHF Band 3: 764.003125-766.996875 MHz 700 MHz Band 769.003125-775.996875 MHz 794.003125-796.996875 MHz 4: 806.0125-868.9875 MHz 800 MHz Band Sub bands can be selected and deselected by using the 34 keys to scroll through the sub bands, and pressing the SEL key to toggle the selected sub...
- Page 42 Essential Service Search parameters The only critical parameter needed for a Service Search to function is the service type. When you set up a Service Search, you will want to specify the type of service that you wish to search. To create a new SRVC object, press PGM to place your scanner into Pro- gram Mode, then press the NEW softkey, then press the SRCH softkey to view the available Search types, then press the SRVC softkey.
-
Page 43: Grouping Objects With Scan Lists
When finished, press the Save softkey to store your SRVC search as a new object. Once your SRVC object is saved, you can use it while scanning, or launch the SRVC search by itself by pressing the SRCH softkey after navigating to the SRVC object in Manual Mode. - Page 44 Although Scan Lists may seem similar to the “banks” that are used in older bank/channel scanner designs, you will find that they are much more power- ful and flexible than “banks”. The number of objects that can be grouped in a Scan List is limited only by the scanner's memory, and single objects can be members of multiple Scan Lists without creating duplicate versions of those objects and manually placing them in each Scan List where you want...
- Page 45 another Scan List. Racing fans may wish to group objects for different cars, drivers, teams and tracks into separate Scan Lists. By Favorites The Favorites (FAV) Scan List is a powerful tool that can be used to quickly narrow (or expand) your scanning profile. In addition to the normal Scan List map, each Scannable Object menu in- cludes a FAV (yes/no) item.
- Page 46 Save softkey to save the modified object. Objects can be members of as many Scan Lists as you see fit, without limitation to the number of Scan Lists an object is mapped to, and without limitation to the number of objects that are mapped to a given Scan List.
-
Page 47: Other Advanced Startup Topics
CURR softkeys to see the object's menu. Finding Stored Objects Easily The PSR-310's browse feature makes it easy to scroll to the Scan Lists and Scannable Objects you have created, using the 3456 keys on the 5-way pushbutton pad while the scanner is in PGM or Manual Mode. Here are some more methods you can use to find stored objects quickly. - Page 48 • In TGRP objects, the ID field and the Tag field • In CONV objects, the Frequency field and the Tag field • In TSYS, LMIT, SRVC and SWPR objects, the Tag field To use FIND, press the PGM key, then press the EDIT softkey. Press the FIND softkey.
-
Page 49: Object Lockout
Scan List. Locking out an object locks it out “radio-wide” until it is enabled by toggling the lockout setting. Four types of lockout functions are available in the PSR-310, temporary lock- out, permanent lockout, search lockout and talkgroup lockout. - Page 50 Temporary lockout is a very useful feature. For example, when a major inci- dent occurs while you are scanning, you may wish to focus your scanning on that major incident, and exclude unrelated talkgroups so that radio traffic associated with the major incident is not interrupted. You could press the PSE or MAN keys to listen to a single object, if commu- nications for the major incident are only being conducted on single channel or talkgroup.
- Page 51 Applying search lockout to an undesired frequency adds that frequency to the Search Lockout List, a list of frequencies that the scanner ignores when performing searches or during Spectrum Sweeper operations. You can edit or clear the Search Lockout List by following these steps: Press PGM Press the GLOB softkey Scroll down to the SRCH L/Outs: item and press SEL...
-
Page 52: Setting The Default Scan List
Applying wildcard lockout to an undesired talkgroup creates a new TGRP object in the same Scan List as the wildcard TGRP , then applies permanent lockout to the new TGRP object, so that will be ignored in the future by the scanner when scanning the wildcard talkgroup. -
Page 53: Using Multi-Site Mode On Networked Systems
Your PSR-310 includes a Multi-site feature that can enhance the operation of the scanner when monitoring Multi-site systems. Multi-site can be enabled by editing the trunking system (TSYS) parameters for a Motorola system. -
Page 54: Ltr Home Repeater Automove
Scroll down to the TSYS item and press the SEL key to edit the TSYS pa- rameters. Scroll to Multi-Site . Use the 34 keys to select Off , Stat or Roam . When set to Off , the scanner will find the first usable control chan- nel in the control channel list and use it until it is no longer usable. -
Page 55: Priority Scan
When AutoMove HRs is turned on, you may enter the LTR system frequen- cies in any order, and the PSR-310 will automatically move the frequencies to the proper home repeater slots as transmissions are received on the sys- tem. Priority Scan Your PSR-310 scanner features Priority Scan operation for CONV and TGRP objects. -
Page 56: Hit Counters
Hit Counters Your PSR-310 includes a unique Hit Counter feature that keeps track of how many transmissions are received for each object type. The Hit Counter for an object is incremented each time a transmission is received on an object, making it possible for you to determine the objects that are the least and most active. - Page 57 NOTE: Slight variations to LED colors are a normal part of the manufactur- ing process. You may notice these variations when using the White LED color setting ( LED COLOR: 0 ), or when comparing one PSR-310 to an- other. You can compensate for these slight variations by fine-tuning the Red/ Green/Blue (RGB) LED settings for each color.
-
Page 58: Dedicated Search Modes
• You have included a Spectrum Sweeper object in your scan configura- tion so that you can find nearby strong transmitters while you are scan- ning. You can use an Audible Alarm to alert you when the radio receives a Spectrum Sweeper hit, and turn on the backlight so that you can read the display and operate the keypad to save or lock out the new frequency. - Page 59 Operation of the dedicated Spectrum Sweeper mode is almost identical to that of the object mode, with one exception. When running the Spectrum Sweeper as a Scannable Object, you must use the object menu to enable or disable the Spectrum Sweeper sub-bands when operating in Scan Mode. When dedicated Spectrum Sweeper mode is used, you may press the nu- meric key on the keypad that corresponds with the sub-band you wish to en- able or disable.
- Page 60 By default, TUNE mode is paused when first activated. Press PSE to begin searching from the current frequency. Press the 5 or 6 keys on the 5-way pushbutton pad to change the search direction. Press the FrL/O softkey to add a found frequency to the lockout list. Press the MODE softkey to change the receive mode (AM, FM, NFM) from the default for the current frequency range (au).
- Page 61 “VC: lsTGID” readings should be expected. You may wish to use the PSR-310's Tune LED feature to obtain a visual in- dication of signal strength using the tri-color LED. To activate the Tune LED, press PGM, then the GLOB softkey. Press the 6 key until Tune LED: Off appears in the display.
- Page 62 To enter LMIT mode, press the SRCH key on the keypad repeatedly until the display indicates LMIT search as follows: Use the Lmts softkey to set the lower and upper frequency limits for your limit search. NOTE: When a signal is being received, the Lmts softkey (F1) changes to FrL/O .
- Page 63 0: 33.42-46.5 MHz VHF Low Band 1: 151.82-170.15 MHz VHF High Band 2: 453.0375-467.7125 MHz UHF Band 3: 764.003125-766.996875 MHz 700 MHz Band 769.003125-775.998675 MHz 794.003125-796.996875 MHz 4: 806.0125-868.9875 MHz 800 MHz Band Aircraft - Searches civilian and military air frequencies. Groups are as fol- lows: 0: 108-118 MHz Navigation...
-
Page 64: Using Weather Modes
Press the STOR softkey to create a new CONV object using the found fre- quency. Using Weather Modes Your PSR-310 also functions as a powerful weather alert receiver. There are three modes of weather alert operation available to you. NOTE: Your scanner incorporates weather alert as one of its features and is an extremely sensitive high quality receiver on the weather frequencies. - Page 65 Weather Priority Mode Weather Priority mode samples the specified weather frequency periodically while scanning to see if the All Hazards 1050 Hz Warning Alert Tone (WAT) is present. If the WAT is present, the scanner will sound an alarm and tune to the specified weather frequency to monitor the nature of the alert.
- Page 66 *48*** (To enter the code, 048000: This scanner does not input the * in this entering. Use 0 instead of *.) This tells the radio to alert on any SAME message with a location code that matches 48 for the state of Texas. Your scanner also allows you to specify the event code.
- Page 67 SAME Entry 2: Code: 048113 Event: RWT Entry: ON Lockout: ON The above combination of entries for 048113 will receive all SAME messag- es for 048113, except the Required Weekly Test (RWT) message, since the second entry is ON, with lockout ON, and with RWT in the event field. SAME Entry 1: Code: 048113 Event: ***...
- Page 68 Use the 5 or 6 keys on the 5-way pushbutton pad to scroll to the desired SAME code entry. Press the SEL key on the 5-way pushbutton pad to edit the selected SAME entry. The scanner display will appear as follows: With the Entry: field selected, press 4 on the 5-way pushbutton pad to turn the entry on.
- Page 69 62 N 81 T 93 Y Scroll to the Alarm: field. Note that you can specify different alarm sounds for this SAME entry. We recommend that you use the default setting here for general purpose weather alerting. Scroll to the Lockout: field. Note that Lockout is currently set to off. Lockout is a special purpose parameter that can be used to lock out indi- vidual event or area codes.
-
Page 70: Cloning Your Radio To Another Psr-310 Or Psr-410 Scanner
Cloning Your Radio to Another PSR-310 or PSR-410 Scanner Your PSR-310 features a high speed data interface that can be used to trans- fer the data from your scanner to another PSR-310 or PSR-410 scanner from GRE. To clone your radio to another unit, use a standard stereo patch cord termi- nated with 1/8”... - Page 71 Use the CL key as a backspace key to erase char- acters before the cursor, and press FUNC CL to clear the entire field. The PSR-310 character set and corresponding entry codes are provided be- low for reference. Pressing FUNC to toggle the shift lock status will produce lower case characters for letters, and a second set of punctuation marks for special characters.
-
Page 72: Using Quicktext
Using QuickText QuickText allows you to store up to 10 commonly used text items for instant recall while editing alphanumeric fields. For example, as you search for, store and name new CONV or TGRP objects, you may find that you type the same words over and over, such as POLICE, FIRE, SHERIFF, STATE, CITY, COUNTY, etc. -
Page 73: Power-On Configuration Key Sequences
Power-On Configuration Key Sequences Your PSR-310 features power-on keypress sequences that are used as shortcuts to configuration items, like attenuator settings, backlight settings and memory information. Power-on key sequences are also used to place your scanner into firmware upgrade mode for CPU firmware upgrades. -
Page 74: Care
Care Keep the scanner dry and away from water; do not wash the scanner with a wet cloth or pour fluid into the scanner. Use and store the scanner only in normal temperature environments. Handle the scanner carefully; do not drop it. -
Page 75: In Case Of Fault
S c a n n e r w i l l n o t AC or DC power supply Check connection to AC or power on not properly connected DC power source Dead batteries Replace or recharge batter- T h e k e y p a d d o e s The scanner may need Follow steps below to initial- not work... -
Page 76: Initializing The Scanner To Factory Defaults
System Tests: Select a Test... Exits if no key is pressed 3. Press 2. The scanner displays Init GLOB data To factory state ENTER if APPROVE CLEAR to EXIT 4. Press ENT. The scanner displays GLOB EEPROM area Initialized to defaults. - Page 77 System Tests: Select a Test... Exits if no key is pressed 3. Press 1. The scanner displays Factory Init Erase Memory ENTER if APPROVE CLEAR to EXIT 4. Press ENT. The scanner displays Initializing the File System Please Wait..Then, File System Initialized to Defaults.
-
Page 78: Detailed Menu Reference
Your PSR-310 scanner uses GRE's exclusive Object Oriented User Interface, which features a powerful menu system that is used to configure the various Scannable Objects that your scanner is capable of receiving. The PSR-310 design also includes a Global Settings (GLOB) menu that provides unprec- edented control over the radio wide settings used throughout your scanner. - Page 79 HINT: You can restore all GLOB settings to their defaults without affecting your programmed objects. Power cycle the radio, then press 0, then 2 dur- ing the welcome message display. Press ENT to confirm the GLOB param- eter reset. GLOB Parameter Options Description Sets LCD contrast.
- Page 80 NiMH, Alkaline or Ni- Loads low battery profile for each Battery different battery type. Controls critical battery audible Lo Batt Alert 0-60 seconds alert. 0=off. Displays current battery voltage, DAC value and charge time re- Battery Info maining if battery is charging. The attenuator reduces the amount of signal at the receiver input.
- Page 81 Press SEL to clear the Favorites Clear FAV Scan List. Press SEL to see the current mem- ory usage. Use 5 and 6 keys to Memory Info scroll. EXPERT BELOW Activates Signal Strength driven Tune LED On or Off LED when in TUNE mode. Sets intensity of red, green and blue LEDs.
-
Page 82: Conv Menu Reference
Sets wait for reply delay for all Search Delay 1-100 x 100 mS search modes Controls the operation of the L/OUT key. When No, pressing L/OUT per- forms a Temporary Lockout of the selected object. When Yes, press- ing L/OUT performs a Permanent TLO=FUNC L/O Yes or No Lockout of the selected object. - Page 83 The alphanumeric display name for the CONV channel. Use the stand- ard text entry method or QTXT to Alpha-numeric text name the object. Sets subaudible squelch mode. Use Search to automatically analyze signals to determine squelch mode and code. Use None to ignore sub- audible squelch.
-
Page 84: Tgrp Menu Reference
Sets the Audible Alarm for the CONV object. When an Audible Alarm is selected, the selected alarm will play at the beginning of each transmission on the CONV ob- None, Chirp, Hi-Lo, ject, or anytime the scanner stops Alert, Ring, 2-Chirp, for activity on the CONV object Alarm Fast Hi-Lo, DTMF#... - Page 85 access the various different parameters. The active parameter is always the middle parameter and is indicated by a flashing “ : ”. The entire TGRP menu is shown below: TGRP Parameter Options Description Sets membership in Scan Lists. Use 3 4 keys to scroll through Scan Lists.
-
Page 86: Tsys Menu Reference
Normally the ALERT LED is active only while the object is receiving a transmission. When Latch is on, the ALERT LED will remain lit after the transmission is complete, unless overridden by a subsequent object Latch LED On or Off that is also using the ALERT LED. - Page 87 rameter and is indicated by a flashing “ : ”. The entire TSYS menu is shown below: TSYS Parameter Options Description Sets the trunking system type. Choose MOT800/900 if the system is a Motorola 800 or 900 MHz ana- log trunked radio system that uses the 3600 baud control channel.
- Page 88 Sets the amount of time the scan- ner dwells on a Motorola, or EDACS system control channel for activity on programmed talkgroups. Use 0 for automatic mode, which uses control channel information to de- termine when all current talkgroup information has been broadcast by Dwell 0-200 x 100 mS the system.
-
Page 89: Lmit Menu Reference
For Motorola systems only - sets custom channel tables. Use 34,to select option, press SEL on Cus- D e f a u l t , S p l i n t e r, tom to enter custom table informa- T Tables Custom tion TypeII, E1P1, E1P2,... - Page 90 Controls whether the ALERT LED flashes or remains on solid when LED Mode Solid or Flash the ALERT LED is used. Sets LED color to 0-7 as defined in the GLOB menu. By default, 0=LED Off, 1=Red, 2=Yellow, 3=Green, 4=Cyan, 5=Blue, 6=Magenta, LED Color 7=White.
-
Page 91: Srvc Menu Reference
Sets the amount of time (in 100 mil- lisecond intervals) for the wait for re- ply delay if Delay is On, e.g., 20=2 Delay Time 1-200 seconds. When on, enhances the scanner’s ability to lock on to the actual center frequency of a search hit instead of Zeromatic On or Off... - Page 92 Public Safety (Pub Safety) - Search- es commonly used public safety frequencies. Groups are as follows: 0: 33.42-46.5 MHz 1: 151.82-170.15 MHz 2: 453.0375-467.7125 MHz 3: 764.003125-766.996875 MHz 769.003125-775.998675 MHz 794.003125-796.996875 MHz 4: 806.0125-868.9875 MHz Aircraft - Searches civilian and mili- tary air frequencies.
- Page 93 Toggle search channels when Ma- 56 to scroll, 34 to rine, CB, FRS/GM/MURS search Channels toggle on/off are used. The alphanumeric display name for the SRVC search. Use the standard text entry method or QTXT to name Alpha-numeric text the object. Permanent lockout for the SRVC object.
-
Page 94: Swpr Menu Reference
When on, applies 20 dB of attenua- tion to all hits received on the SRVC search. Useful in areas where inter- ference from nearby strong signals Atten On or Off is present. Controls whether a Delay is used to wait for reply traffic after a transmis- Delay On or Off sion on the SRVC search. - Page 95 Use 3 4 to select All Bands or Public Safety. All Bands covers the entire frequency range of the scanner. Public Safety covers fre- A l l B a n d s o r P u b quency ranges commonly used for Type Safety public safety communications.
- Page 96 Controls whether the ALERT LED flashes or remains on solid when LED Mode Solid or Flash the ALERT LED is used. Sets LED color to 0-7 as defined in the GLOB menu. By default, 0=LED Off, 1=Red, 2=Yellow, 3 = G r e e n , 4 = C y a n , 5 = B l u e , LED Color 6=Magenta, 7=White.
- Page 97 SWPR works by quickly sweeping the RF spectrum in 1 MHz incre- ments to find nearby strong sig- nals. If the 1 MHz sweep indicates that activity is present in the 1 MHz range, SWPR sweeps that range to Special On or Off find the source.
-
Page 98: Appendix A - Frequency, Step And Mode Specifications
Appendix A - Frequency, Step and Mode Specifications Frequency Range Step Size Default Mode 25.0000 - 26.9600 MHz 10 kHz 26.9650 - 27.4050 MHz 10 kHz 27.4100 - 29.5050 MHz 5 kHz 29.5100 - 29.7000 MHz 5 kHz 29.7100 - 49.8300 MHz 10 kHz 49.8350 - 54.0000 MHz 5 kHz... -
Page 99: Appendix B - General Specifications
Appendix B - General Specifications Item Specification Working Memory 1800 programmed objects using flexible “Scan- nable Object” system. Program and scan conventional channels, trunking talkgroups, limit searches, service searches, and Spectrum Sweeper configurations as “Scannable Objects” that are created, edited, grouped and scanned using common user interface conventions. - Page 100 Preprogrammed Service Marine, Aircraft, CB, FRS/GMRS/MURS, Public Searches Safety, Amateur Radio, Railroad Weather frequencies 162.400, 162.425, 162.450, 162.475, 162.500, 162.525, 162.550 MHz Scanning Rate Approximately 55 channels per second Search Rate Approximately 90 steps per second Display LCD with white LED backlight, 4 lines of 16 char- acters each Zeromatic Automatically zeroes receiver on correct frequen-...
- Page 101 Weight Approximately 8.5 ounces, 240 grams (not in- cluding batteries and antenna) Included accessories GRE compact helical antenna, alkaline battery holder, Ni-Cd/Ni-MH battery holder, belt clip, AC to DC external power adapter, Owner’s Manual Memory backup No backup battery required, utilizes non-volatile...
-
Page 102: Appendix C - Finding More Information
In many cases a simple Web search using Google or other popular Internet search tools will help you find web sites and discussion forums where you can read more about the PSR-310, ask questions, and share your experi- ences with other PSR-310 users. -
Page 103: Limited Warranty
12 months from the date of sale to the end user. GRE America will correct defects. There will be no charge for labor for a period of 12 months from the date of original sale, except as provided below. Overtime premiums and/or expedited han- dling and shipping costs must be paid by the owner. - Page 104 Printed in China 08G10 GR-10D-1580...
Need help?
Do you have a question about the PSR-310 and is the answer not in the manual?
Questions and answers