
Related Manuals for Grecom PSR-410


Summary of Contents for Grecom PSR-410
- Page 1 PSR-410 Advanced Base/Mobile Scanning Receiver with Object Oriented User Interface Owner's Manual Please read this User's Guide before installing, setting up and using your new product.
-
Page 2: Table Of Contents
About this manual ................10 Object abbreviations used in this document ........10 The FCC Wants You To Know ............12 Scanning Legally ................12 Getting Familiar With Your PSR-410 ..........14 PSR-410 Front View ................14 PSR-410 Rear View .................15 PSR-410 Included Accessories ............16 Understanding the Display Icons ...........17 Understanding the Keypad .............18... - Page 3 Audible Alarms and the ALERT LED ..........62 Dedicated search modes ..............64 Using Weather Modes ..............70 Cloning Your Radio to Another PSR-410 or PSR-310 Scanner ..77 Standard Text Entry Method and QuickText ........78 Entering and Editing Alphanumeric Information ......78 Using QuickText ................79 Power-On Configuration Key Sequences ........80...
- Page 4 PSR-410 ADVANCED TRUNKING SCANNER WITH OBJECT ORIENTED USER INTERFACE Owner's Manual Please take the time to read this manual completely before using your new scanner. Motorola, Smartnet, Smartzone, Omnilink, ASTRO and Privacy Plus are registered trademarks of Motorola Inc. EDACS and Pro Voice are registered trademarks of Harris Corporation.
-
Page 5: Intruduction
Introduction Welcome to an exciting new world of radio scanning! Recognizing that contemporary scanning receivers are too hard to program and use, GRE's engineers conducted extensive research to determine the functional requirements for an entirely new scanning receiver user interface. We call... -
Page 6: Features
Features Upgradeable CPU Firmware - keep your radio current with enhancements as they become available with free upgrades from www.greamerica.com! Intuitive "Object Oriented" User Interface Design is designed for ease of use, yet powerful enough to satisfy the most sophisticated experts. Common data entry, browsing and control methods are used for non- trunked conventional channels, trunking talkgroups, search configurations and Spectrum Sweeper setups. - Page 7 LTR Home Repeater AutoMove - Takes the guesswork out of programming LTR trunking systems when the home repeater order is not known. Enter the LTR system frequencies in any order, and the PSR-410 will automatically move the frequencies to the proper home repeater slots as transmissions are received on the system.
-
Page 8: What Is Object Oriented Scanning
What is Object Oriented Scanning? To put it simply, Object Oriented Scanning describes a new user interface design for scanning receivers (the Object Oriented User Interface, or OOUI). In Object Oriented Scanning, we introduce the concept of the Scannable Object. A Scannable Object is defined as “something that can be scanned”. The Scannable Object concept is very important in the OOUI design. -
Page 9: A Few Things To Remember About Object Oriented Scanning
A Few Things To Remember about Object Oriented Scanning Object oriented scanning is completely different from any prior scanning receiver technology. Accordingly, some users may find it difficult to visualize and understand how Object Oriented Scanning works. This may be especially true for users who have become very familiar with more recent scanning receiver technologies. -
Page 10: About This Manual
About this manual Object abbreviations used in this document We described how your new GRE scanner utilizes an Object Oriented User Interface in the Introduction and Overview sections of this manual. You learned that the key components of this new user interface are the Scannable Objects, which are, of course, “things that can be scanned”. - Page 11 object” that can be used over and over again when adding talkgroups for a specified trunked radio system. CONV CONV is used to represent a Conventional Channel Object. A Conventional Channel Object is a regular, non-trunked frequency used for radio communications.
-
Page 12: The Fcc Wants You To Know
The FCC Wants You To Know This equipment has been tested and found to comply with the limits for a scanning receiver, pursuant to Part 15 of the FCC Rules. These limits are designed to provide reasonable protection against harmful interference in a residential installation. - Page 13 According to the Electronic Communications Privacy Act (ECPA), you are subject to fines and possible imprisonment for intentionally listening to, using, or divulging the contents of such a transmission unless you have the consent of a party to the communication (unless such activity is otherwise illegal).
-
Page 14: Getting Familiar With Your Psr-410
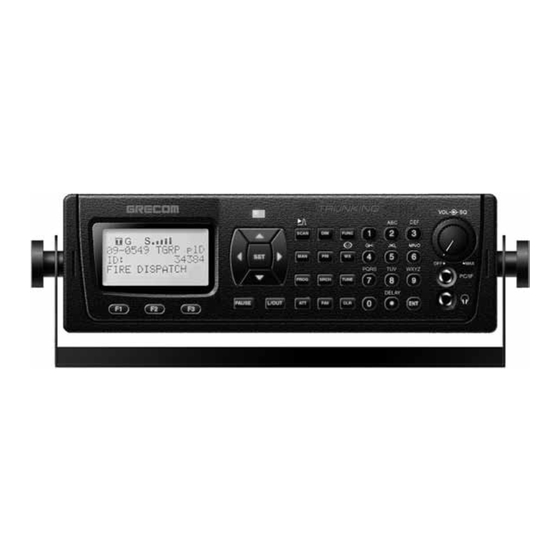
The following illustrations are provided to help you get familiar with your PSR-410's controls and accessories. PSR-410 Front View Volume Control Alert LED LCD Display Squelch Control DIN Keyslot DIN Keyslot PC/IF Jack Five Way Softkeys Headphone Jack Pushbutton Pad Ooperations Key Numeric Keypad Figure 1 - PSR-410 front view... -
Page 15: Psr-410 Rear View
PSR-410 Rear View BNC Antenna Connector External Speaker Connector External DC Power Jack Figure 2 - PSR-410 rear view... -
Page 16: Psr-410 Included Accessories
AC Adaptor Antenna USB Cable Note: USB cable is an optional acces- sory and not included in this model. USB PC/Interface cable (Model No.: 100-016) is available on our website (www.greamerica.com) Figure 3 - PSR-410 Included Accessories (Compact Disc not shown) -
Page 17: Understanding The Display Icons
Understanding the Display Icons Your PSR-410 features a high contrast, white backlit LCD Display to provide important information about the status of the radio while you are programming and using it. The LCD includes a row of icons at the top that provides information about the status of the scanner while it is operating. -
Page 18: Understanding The Keypad
Understanding the Keypad Your PSR-410 features an easy-to understand backlit keypad with 34 keys that are used to control and program the radio. Figure 5 highlights the various keys and their basic functions. Figure 5 - Keypad layout Softkeys F1, F2, F3 - activate function shown in the LCD display immediately above the softkey. - Page 19 TUNE - Allows direct tuning of any valid frequency, FUNC TUNE loads the current or most recently scanned frequency into TUNE SRCH - Dedicated Search mode for service and frequency searches ATT - Toggles Attenuator on and off, FUNC ATT toggles Global Attenuator mode PRI - Toggles the Priority setting for selected or active object, FUNC PRI toggles Priority Mode on or off for the scanner...
-
Page 20: Getting Started
Getting Started First Time Startup We believe that your new PSR-410 is so easy to use that scannists with minimal experience in the hobby should be able to get up and running in a matter of just a few minutes. If you already know the difference... -
Page 21: Attach The Supplied Antenna To The Radio
Attach the three self-adhesive rubber feet to the bottom of the mounting bracket in the spaces provided. The rubber feet help prevent sliding on smooth surfaces, and will help prevent scratching of your desk or tabletop. Do not use the rubber feet if you plan to attach the mounting bracket to a fixed surface with screws. -
Page 22: Mobile Operation
Your PSR-410 is also designed to fit into a DIN-E compatible sleeve, which makes it easy to mount the radio in an existing radio or CD player dashboard opening. - Page 23 At the marked locations, drill holes that are slightly smaller than the screws. Use caution not to damage wiring or components that are located behind the mounting surface. Using the provided screws and lock washers, attach the mounting bracket to your vehicle. Attach the two self-adhesive rubber washers to the inside of the mounting bracket sides, over the holes that are used when attaching the bracket to the scanner’s side holes.
-
Page 24: Connecting An Earphone Or Headphones
To power your scanner from a 12V power source in your vehicle, such as cigarette-lighter socket, you need a 12V, at least 600mA DC with 7.75mm outer/1.7mm inner plug cigarette-lighter adaptor (not supplied). Insert the adaptor’s barrel plug into the scanner’s DC 13.8V jack. Plug the adaptor’s other end into your vehicle’s cigarette lighter or power socket. -
Page 25: Connecting An Optional External Antenna
Listening Safely To protect your hearing, follow these guidelines when you use headphones. Do not connect headphones to the external speaker jack located on the rear panel of the radio. Set the volume to zero before putting on headphones. With the headphones on, adjust the volume to a comfortable level. -
Page 26: Turn The Radio On
Warning: Outdoor antennas must be properly grounded to prevent static buildup and lightning damage. Article 810 of the National Electrical Code. ANSI/NFPA 70, provides information about proper grounding of the antenna mast, connection of coaxial cable to a lightning arrestor, size of grounding conductors, location of the lightning arrestor and connection of grounding conductors to grounding electrodes. -
Page 27: Creating Your First New Objects
Creating Your First New Objects When the scanner is first turned on after it is unpacked, you are working with a clean slate. You will notice that your scanner tells you this: The scanner is in program mode and is ready for you to enter the first Objects into the memory. - Page 28 Essential Conventional Channel parameters CONV objects are the simplest objects supported by the radio. By this we mean that there really isn't that much for you to do if you want to create one. There are only a few essential parameters in the CONV object fields that must be set correctly for a CONV object to work.
- Page 29 Save Exit Dflt The Save softkey will save your new CONV object to the file system when pressed (but don't press it yet!). The Exit softkey aborts the creation of the new CONV object, and the Dflt softkey restores the selected CONV menu parameter to its default setting.
- Page 30 By default, your new CONV object will be tagged “Channel”. If you'd like to change this, just scroll the screen down one click until the flashing cursor highlights the Tag: field, then press SEL to edit the tag. You can move the cursor around using the 34 keys on the 5-way pushbutton pad, use the CLR key to clear the old text, or press FUNC CLR to erase the entire field.
-
Page 31: Talkgroup Object (Tgrp)
Talkgroup Object (TGRP) A Trunking Talkgroup Object (TGRP) is a record that stores the parameters for a trunked talkgroup on a trunked radio system. When you create a TGRP object, you are creating an object that will allow you to scan and monitor a talkgroup on a particular trunked radio system. - Page 32 Assuming that you have already entered one or more CONV objects (which we recommend you do prior to attempting the entry of the slightly more complicated TGRP object), you should press the PROG key to place your scanner into Program Mode, then press the NEW softkey, then press the TGRP softkey.
- Page 33 6 1 M 9 3 Y • <space> 7 4 S 9 3 Y 7 4 S 8 1 T 3 2 E 6 1 M If necessary, use the decimal/period key or the CLR key to delete any unnecessary characters, and press the SAVE softkey to save your TSYS name.
- Page 34 Notice that the system name has changed to reflect the name you chose when you were entering the parameters for the trunking system. As you enter this TGRP and other TGRP objects for this system, you will just specify the system name here. So, the TSYS parameters for a system need only be entered once.
- Page 35 7 1 P 6 3 O 5 3 L 4 3 I 2 3 C 3 2 E • <space> 3 1 D 4 3 I 7 4 S 7 1 P 2 1 A 8 1 T 2 3 C 4 2 H Press ENT or DONE to store the name, then press SAVE to store the TGRP as a new object.
-
Page 36: Using Dupe To Speed Up Object Entry
Also with regard to trunked radio systems, it is important to note that a talkgroup object may be configured in one of four different ways to monitor traffic on a trunked radio system. They are as follows: • Wildcard Talkgroup: will monitor all talkgroup call radio traffic on the desired trunked radio system (press Dflt in the ID: field of the TGRP object to use Wildcard) •... -
Page 37: Basic Scanning Operation
NOTE: Use caution with DUPE. As soon as you press DUPE , a duplicate of the selected object is created and saved in memory. Be certain to delete any DUPEd objects that you create accidentally. Basic Scanning Operation Now that you have entered a few CONV or TGRP objects you can experiment with Scan and Manual operation. - Page 38 To pause the scanner on an active object so that the scanner does not resume scanning, press the PAUSE key while the scanner is stopped on that object, and press PAUSE or SCAN to resume scanning. Alternatively, you may press MAN to monitor an active object. Although PAUSE and MAN both stop the scanner on the active object, there are some small differences in how they operate.
-
Page 39: Browsing Objects
Browsing Objects The 5-way pushbutton pad makes it easy for you to browse the stored objects in your PSR-410 when in Manual or Program modes. Press MAN or PROG, then use the 3456 keys on the 5-way pushbutton pad to move around in the scanner's memory as follows: 5: navigates “up”... -
Page 40: About Object Numbering
About Object Numbering Your PSR-410 is different from other types of scanners in how it stores your Scannable Objects in memory. Instead of fixed channels and banks, objects are stored in the first available block of free memory and assigned an Object ID. -
Page 41: Displaying Memory Usage
56 keys to scroll the display. Search Object Types A very powerful feature of your PSR-410 is the ability to define different types of frequency searches and process them while scanning. Frequency searches are just another type of Scannable Object in the hierarchy of the radio's memory organization, so they can be manipulated and scanned in the same manner as conventional channels and trunking talkgroups. - Page 42 Limit Search Object (LMIT) A Limit Search Object (LMIT) is a search object that stores the parameters necessary for the radio to search each frequency within a lower and an upper limit for activity. A LMIT object can be used for standalone searching - the radio just searches and stops when activity is detected on a frequency, or for searching that is performed while the radio is scanning.
- Page 43 Press the PAUSE key to hold on the active frequency. To resume, press the PAUSE key again. HINT: It can take some time for the PSR-410 to process all of the frequencies in a LMIT search. You can experiment with different size frequency ranges to find a LMIT search setup that does not interfere excessively with scanning of other object types.
- Page 44 Essential Spectrum Sweeper parameters Like every other object type, there are certain parameters in a SWPR record that are essential in order for the SWPR object to function correctly. By default, a newly created SWPR object is ready to go without any changes. In its default configuration, the SWPR object will sweep through all of the important land mobile radio bands and look for strong signal activity from nearby transmitters.
- Page 45 In Public Safety, the sub bands are defined as follows: 0: 33.420-46.5 MHz VHF Low Band 1: 151.820-170.150 MHz VHF High Band 2: 453.0375-467.7125 MHz UHF Band 3: 764.003125-766.996875 MHz 700 MHz Band 769.003125-775.998675 MHz 794.003125-796.996875 MHz 4: 806.0125-868.9875 MHz 800 MHz Band Sub bands can be selected and deselected by using the 34 keys to scroll through the sub bands, and pressing the SEL key to toggle the selected...
- Page 46 Service Search Object (SRVC) A Service Search Object (SRVC) is similar to a LMIT search but is optimized for a specific radio service, and can search for activity associated with a type of service across multiple frequency bands. Essential Service Search parameters The only critical parameter needed for a Service Search to function is the service type.
- Page 47 CB - Searches the Citizens Band radio frequencies Marine - Searches the VHF-FM marine radio band FRS/GMRS/MURS/DOT/STAR (F/G/MURS) - Searches the FRS, GMRS, MURS, DOT and STAR radio frequencies Railroad - searches the Association of American Railroads (AAR) VHF railroad frequencies used in the US and Canada When finished, press the Save softkey to store your SRVC search as a new object.
-
Page 48: Grouping Objects With Scan Lists
These are just a few of the many ways you can incorporate different types of search objects in your Scan List configurations. And, just a few of the many ways that each of the individual search types can be configured to your preferences and needs. - Page 49 home Scan List, so you disable that Scan List and enable the Scan List that contains the channels and talkgroups that are in use in your family's town. By trunking system It is possible to assign any combination of object types to any Scan List. However, you may wish to assign TGRP objects associated with specific trunked radio systems to specific Scan Lists, so you can easily enable or disable monitoring of each system by enabling or disabling the associated...
- Page 50 It is also possible to clear the FAV Scan List completely by pressing PROG, then the GLOB softkey, then scrolling to down to the Clear FAV menu item. Press the SEL key to set FAV=NO for all objects, press the YES softkey to confirm the action, then press the Save softkey to save your changes.
- Page 51 5: navigates “up” through the objects assigned to the current Scan List 6: navigates “down” through the objects assigned to the current Scan List 4: navigates “up” through the active Scan Lists in the radio 3: navigates “down” through the active Scan Lists in the radio Scroll down in the object's parameters menu to the Scan Lists: field.
-
Page 52: Finding Stored Objects Easily
CURR softkeys to see the object's menu. Finding Stored Objects Easily The PSR-410's browse feature makes it easy to scroll to the Scan Lists and Scannable Objects you have created, using the 3456 keys on the 5-way pushbutton pad while the scanner is in Program or Manual Mode. Here are some more methods you can use to find stored objects quickly. - Page 53 To use FIND, press the PROG key, then press the EDIT softkey. Press the FIND softkey. To find objects that are locked out, press the L/Out softkey. The scanner finds the first locked out object. Press the L/OUT key to toggle lockout status.
-
Page 54: Object Lockout
Scan List. Locking out an object locks it out “radio-wide” until it is enabled by toggling the lockout setting. Four types of lockout functions are available in the PSR-410, temporary lockout, permanent lockout, search lockout and talkgroup lockout. - Page 55 Temporary lockout is a very useful feature. For example, when a major incident occurs while you are scanning, you may wish to focus your scanning on that major incident, and exclude unrelated talkgroups so that radio traffic associated with the major incident is not interrupted. You could press the PAUSE or MAN keys to listen to a single object, if communications for the major incident are only being conducted on single channel or talkgroup.
- Page 56 Search Lockout Search lockout works with certain search objects, including LMIT searches, some SRVC searches, and SWPR objects. Frequency lockout is used to lock out undesired frequencies that are found during searches. To apply search lockout during a search, press the FrL/O softkey while the scanner is stopped on the undesired frequency: Applying search lockout to an undesired frequency adds that frequency to the Search Lockout List, a list of frequencies that the scanner ignores when...
-
Page 57: Setting The Default Scan List
Applying wildcard lockout to an undesired talkgroup creates a new TGRP object in the same Scan List as the wildcard TGRP , then applies permanent lockout to the new TGRP object, so that will be ignored in the future by the scanner when scanning the wildcard talkgroup. -
Page 58: Deleting Objects
Deleting Objects Objects that you no longer need to use can easily be deleted from the PSR- 410's memory, making room for new objects. To delete an object, press PROG, then use the 3456 keys to navigate to the object you wish to delete. Press FUNC CLR to delete the object. The scanner will ask you to confirm the delete command before removing the object from the scanner's memory. - Page 59 Your PSR-410 includes a Multi-site feature that can enhance the operation of the scanner when monitoring Multi-site systems. Multi-site can be enabled by editing the trunking system (TSYS) parameters for a Motorola system.
-
Page 60: Ltr Home Repeater Automove
TSYS, then press the Save softkey to save your changes. When AutoMove HRs is turned on, you may enter the LTR system frequencies in any order, and the PSR-410 will automatically move the frequencies to the proper home repeater slots as transmissions are received on the system. - Page 61 TGRPs are checked, and during the reply delay time after non-priority TGRP calls. Additionally, your PSR-410 decodes the subaudible priority data that is present on analog Motorola talkgroup calls (3600 baud control channel systems only), and will switch to a priority talkgroup when the data for that...
-
Page 62: Hit Counters
Hit Counters Your PSR-410 includes a unique Hit Counter feature that keeps track of how many transmissions are received for each object type. The Hit Counter for an object is incremented each time a transmission is received on an object, making it possible for you to determine the objects that are the least and most active. - Page 63 0 ), or when comparing one COLOR: PSR-410 to another. You can compensate for these slight variations by fine-tuning the Red/Green/Blue (RGB) LED settings for each color. See the COLOR settings in the GLOB menu in Detailed Menu Reference section at the end of this manual.
-
Page 64: Dedicated Search Modes
• Yo u h a v e i n c l u d e d a S p e c t r u m S w e e p e r o b j e c t i n y o u r s c a n configuration so that you can find nearby strong transmitters while you are scanning. - Page 65 NOTE: When a signal is being received, the Band softkey (F1) changes to FrL/O . You can access the Band softkey by pressing FUNC F1 when the F1 key function is FrL/O . Operation of the dedicated Spectrum Sweeper mode is almost identical to that of the object mode, with one exception.
- Page 66 Using dedicated TUNE mode Your scanner's dedicated TUNE mode provides you with the ability to quickly enter any frequency and monitor that frequency for transmissions, or search up or down from that frequency for activity. To enter TUNE mode, press the TUNE key on the keypad. The scanner displays the TUNE screen.
- Page 67 “ VC: lsTGID ” readings should be expected. You may wish to use the PSR-410's Tune LED feature to obtain a visual indication of signal strength using the tri-color LED. To activate the Tune LED, press PROG, then the GLOB softkey.
- Page 68 Using dedicated Limit and Service search modes The SRCH key provides immediate access to the dedicated search modes of your PSR-410. Pressing the SRCH key cycles through each search mode in this order: Limit, Railroad, Public Safety, Aircraft, Ham, CB, Marine, and FRS/GMRS/MURS/DOT.
- Page 69 Press the STOR softkey to create a new CONV object using the found frequency. Using dedicated SRVC mode Your scanner's dedicated SRVC search modes provide you with the ability to instantly access each of the scanner's service search ranges without creating a new SRVC object.
-
Page 70: Using Weather Modes
Press the STOR softkey to create a new CONV object using the found frequency. Using Weather Modes Your PSR-410 also functions as a powerful weather alert receiver. There are three modes of weather alert operation available to you. NOTE: Your scanner incorporates weather alert as one of its features and is an extremely sensitive high quality receiver on the weather frequencies. - Page 71 Weather Radio Mode Weather radio mode allows you to receive weather broadcasts from your local weather service anytime of the day. To use weather radio mode, simply press the WX button on the keypad. The scanner will quickly scan and lock on to the first active weather radio frequency it receives.
- Page 72 SAME Standby Mode SAME Standby Mode monitors the specified weather frequency silently, waiting to receive a Specific Area Message Encoding (SAME) alert that corresponds with a SAME location code that you have previously entered. If there is a match between a sent SAME location code and one that you have previously stored, the scanner will sound an alarm, display the alert type, and monitor the nature of the alert.
- Page 73 http://www.weather.gov/os/eas_codes.shtml Each SAME location/event code storage location can be configured for Entry ON/OFF and Lockout ON/OFF. When a SAME location/event code storage location is set for Entry: ON , the radio will process the SAME location/event code that is stored there.
- Page 74 The above combination of entries for 048113 will receive all SAME messages for 048113, except the Required Weekly Test (RWT) message, since the second entry is ON, with lockout ON, and with RWT in the event field. SAME Entry 1: Code: 048113 Event: *** Entry: ON...
- Page 75 Use the 5 or 6 keys on the 5-way pushbutton pad to scroll to the desired SAME code entry. Press the SEL key on the 5-way pushbutton pad to edit the selected SAME entry. The scanner display will appear as follows: With the Entry: field selected, press 4 on the 5-way pushbutton pad to turn the entry on.
- Page 76 31 D 21 A 53 L 53 L 21 A 74 S • <space> 23 C 63 O 82 U 62 N 81 T 93 Y Scroll to the Alarm: field. Note that you can specify different alarm sounds for this SAME entry. We recommend that you use the default setting here for general purpose weather alerting.
-
Page 77: Cloning Your Radio To Another Psr-410 Or Psr-310 Scanner
Cloning Your Radio to Another PSR-410 or PSR- 310 Scanner Your PSR-410 features a high speed data interface that can be used to transfer the data from your scanner to another PSR-410 or PSR-310 scanner from GRE. -
Page 78: Standard Text Entry Method And Quicktext
Standard Text Entry Method and QuickText Your PSR-410 features a high-contrast, backlit alphanumeric display that provides constant feedback about what the radio is doing while scanning and monitoring your “Scannable Objects”. To get the most out of your scanner and this display, you will want to name your objects as you program them into the radio. -
Page 79: Using Quicktext
Use the CLR key as a backspace key to erase characters before the cursor, and press FUNC CLR to clear the entire field. The PSR-410 character set and corresponding entry codes are provided below for reference. Pressing FUNC to toggle the shift lock status will produce lower case characters for letters, and a second set of punctuation marks for special characters. -
Page 80: Power-On Configuration Key Sequences
QTXT, then press the SAVE softkey again to save the changes you made to the GLOB menu. Power-On Configuration Key Sequences Your PSR-410 features power-on keypress sequences that are used as shortcuts to configuration items, like attenuator settings, backlight settings... -
Page 81: Birdie Frequencies
and memory information. Power-on key sequences are also used to place your scanner into firmware upgrade mode for CPU firmware upgrades. The following table lists the power-on key sequences available in the PSR- 410. Unless otherwise specified, each sequence is invoked by pressing and releasing each key in sequence, one at a time. -
Page 82: Troubleshooting
Troubleshooting If you have problems with your scanner, please refer to the following chart for some suggestions that might help you eliminate the problem. If the scanner is still not operating correctly after trying these tips, contact the dealer where you purchased your scanner for assistance. Problem Possible Cause Remedy... -
Page 83: Initializing Global Parameters To Factory Defaults
Initializing Global Parameters to Factory Defaults If your scanner does not appear to be functioning properly, you can reset the global radio parameters to their factory state without losing any of your programmed data. Any custom changes you have made to the radio's global parameters will be lost. -
Page 84: Erase Memory
NOTE: This procedure clears all information you stored in the scanner's working memory, AND resets the global parameters to factory defaults. Initialize the scanner only when you are sure the scanner is not working properly. 1. Turn off the scanner, then turn it on again. The scanner briefly displays the Welcome/Owner screen. -
Page 85: Care
Care Keep the scanner dry and away from water; do not wash the scanner with a wet cloth or pour fluid into the scanner. Use and store the scanner only in normal temperature environments. Handle the scanner carefully; do not drop it. -
Page 86: Detailed Menu Reference
Scannable Objects that your scanner is capable of receiving. The PSR-410 design also includes a Global Settings (GLOB) menu that provides unprecedented control over the radio wide settings used throughout your scanner. - Page 87 The GLOB menu allows you to “tweak” these settings to your liking. The default settings will work fine for most users, but most users will want to use the GLOB menu to personalize the radio to suit their individual tastes. The active parameter is always the middle parameter and is indicated by a flashing “...
- Page 88 The attenuator reduces the amount of signal at the receiver input. This helps reduce interference from strong nearby transmitters. Global attenuator mode applies attenuation radio-wide, regardless of individual object set- tings. In Normal attenuator mode, the attenuator follows the individual object Atten Mode Global or Normal attenuator setting.
- Page 89 Sets intensity of red, green and blue LEDs. Press SEL to edit colors. Use 34 keys to scroll to R, G or B LED settings. Use numeric keys to activate Red/Green/Blue preset intensity levels for each LED, or Color 0-7 (RGB) value use 56 keys to fine scroll intensity.
-
Page 90: Conv Menu Reference
Controls the operation of the L/OUT key. When No, pressing L/OUT per- forms a Temporary Lockout of the se- lected object. When Yes, pressing L/ OUT performs a Permanent Lockout of TLO=FUNC L/O Yes or No the selected object. I f s e t t o Ye s , d u p e c h e c k i n g w i l l check both the stored frequency and any encoded squelch settings when DupeChecksSQ... - Page 91 Any supported f r e q u e n c y i n The frequency that the CONV object Freq will use. The alphanumeric display name for the CONV channel. Use the standard Alpha-numeric text entry method or QTXT to name the text object.
- Page 92 “Off” setting is ignored by the Backlight On, Off or Flash PSR-410. Sets the Audible Alarm for the CONV object. When an Audible Alarm is se- lected, the selected alarm will play at...
-
Page 93: Tgrp Menu Reference
TGRP Menu Reference The TGRP menu is used when creating new Trunking Talkgroup objects, or editing existing Trunking Talkgroup objects. All menus are shown in the scanner's display as a three line window that can be scrolled up or down to access the various different parameters. - Page 94 Controls whether the ALERT LED flashes or remains on solid when the LED Mode Solid or Flash ALERT LED is used. Sets LED color to 0-7 as defined in the GLOB menu. By default, 0=LED Off, 1=Red, 2=Yellow, 3=Green, 4=Cyan, LED Color 5=Blue, 6=Magenta, 7=White.
-
Page 95: Tsys Menu Reference
Increments each time a transmission is received on the SWPR object. Glob- al “Hit Counts” must be set to ON. Hit Count Numeric value Press the Dflt softkey to reset to 0. TSYS Menu Reference The TSYS menu is used when creating new Trunking System objects, or editing existing Trunking System objects. - Page 96 EXPERT BELOW When on, applies 20 dB of attenuation to all transmissions on this TSYS. Use- ful in areas where interference from Atten On or Off nearby strong signals is present. Use Yes when the system is known to use Narrow FM modulation. Most 900 MHz analog trunked radio systems uti- Narrow FM Yes or No...
-
Page 97: Lmit Menu Reference
Available when Multi-Site is set to ROAM. Sets the control channel de- code % threshold for a site to be con- sidered good when looking for a new Threshold Hi 1-99 site. Available when Multi-Site is set to ROAM. Sets the control channel de- code % threshold for a site to be con- sidered out of range, which will begin Threshold Lo... - Page 98 LMIT Parameter Options Description Sets membership in Scan Lists. Use 3 4 keys to scroll through Scan Lists. Use SEL key to toggle Scan List membership. A “ * ” next to the On or Off for Scan Scan List number indicates that the Scan Lists Lists 1-22 object is mapped to that Scan List.
- Page 99 Sets the Audible Alarm for the LMIT None, Chirp, Hi- object. When an Audible Alarm is L o , A l e r t , R i n g , selected, the selected alarm will play 2-Chirp, Fast Hi- anytime the scanner stops for activity Alarm Lo, DTMF# on the LMIT object while scanning.
-
Page 100: Srvc Menu Reference
SRVC Menu Reference The SRVC menu is used when creating new Service Search objects, or editing existing Service Search objects. All menus are shown in the scanner's display as a three line window that can be scrolled up or down to access the various different parameters. - Page 101 Public Safety (Pub Safety) - Searches commonly used public safety frequencies. Groups are as follows: 0: 33.42-46.5 MHz 1: 151.82-170.15 MHz 2: 453.0375-467.7125 MHz 3: 764.0000-766.996875 MHz 769.0000-775.998675 MHz 794.0000-796.996875 MHz 4: 851.0125-868.996875 MHz Aircraft - Searches civilian and military air frequencies.
- Page 102 The alphanumeric display name for the SRVC search. Use the standard A l p h a - n u m e r i c text entry method or QTXT to name text the object. Permanent lockout for the SRVC ob- ject.
-
Page 103: Swpr Menu Reference
When on, applies 20 dB of attenua- tion to all hits received on the SRVC search. Useful in areas where interfer- ence from nearby strong signals is Atten On or Off present. Controls whether a Delay is used to wait for reply traffic after a transmis- Delay On or Off sion on the SRVC search. - Page 104 Use 34 to select All Bands or Public Safety. All Bands covers the entire fre- quency range of the scanner. Public Safe- All Bands or Pub ty covers frequency ranges commonly Type Safety used for public safety communications. Sub bands are available when using SWPR in All Bands or Public Safety mode.
- Page 105 The alphanumeric display name for the SWPR object. Use the standard A l p h a - n u m e r i c text entry method or QTXT to name text the object. Permanent lockout for the SWPR search. Also accessed by pressing FUNC L/OUT while the scanner is L/Out On or Off...
- Page 106 Controls whether a Delay is used to wait for reply traffic after a transmis- Delay On or Off sion on the SWPR search. Sets the amount of time (in 100 mil- lisecond intervals) for the wait for reply delay if Delay is On, e.g., 20=2 Delay Time 1-200 seconds.
-
Page 107: Appendix A - Frequency, Step And Mode Specifications
Appendix A - Frequency, Step and Mode Specifications Frequency Range Step Size Default Mode 25.0000 - 26.9600 MHz 10 kHz 26.9650 - 27.4050 MHz 10 kHz 27.4100 - 29.5050 MHz 5 kHz 29.5100 - 29.7000 MHz 5 kHz 29.7100 - 49.8300 MHz 10 kHz 49.8350 - 54.0000 MHz 5 kHz... -
Page 108: Appendix B - General Specifications
Appendix B - General Specifications Item Specification Working Memory 1800 programmed objects using flexible "Scannable Object" system. Program and scan conventional channels, trunking talkgroups, limit searches, service searches, and Spectrum Sweeper configurations as "Scannable Objects" that are created, edited, grouped and scanned using common user interface conventions. - Page 109 Preprogrammed Marine, Aircraft, CB, FRS/GMRS/MURS, Public Service Searches Safety, Amateur Radio, Railroad Weather frequencies 162.400, 162.425, 162.450, 162.475, 162.500, 162.525, 162.550 MHz Scanning Rate Approximately 55 channels per second Search Rate Approximately 90 steps per second Display L C D w i t h w h i t e L E D b a c k l i g h t , 4 l i n e s o f 1 6 characters each Zeromatic Automatically zeroes receiver on correct frequency...
-
Page 110: Appendix C - Finding More Information
In many cases a simple Web search using Google or other popular Internet search tools will help you find web sites and discussion forums where you can read more about the PSR-410, ask questions, and share your experiences with other PSR-410 users. -
Page 111: Limited Warranty
Limited Warranty General GRE America, Inc. warranty all parts of each new product to be of sound design, good material and workmanship, and will repair or exchange any parts proven to be defective under normal use at no charge for a period of 12 months from the date of sale to the end user. -
Page 112: Warranty Returns
WARRANTY HAS EXPIRED MAY BE SERVICED AT A FIXED RATE + PARTS FOR FACTORY REPAIRS. RETURN SHIPPING FOR UNITS UNDER WARRANTY WILL BE PAID BY GRE AMERICA. SHIPPING FOR UNITS OUT OF WARRANTY WILL BE PAID BY THE SENDER IN BOTH DIRECTIONS. AN RMA# OUTSIDE THE BOX NEXT TO THE SHIPPING ADDRESS MUST BE ACCOMPANIED WITH ALL UNITS BEING RETURN BACK TO GRE AMERICA.
Need help?
Do you have a question about the PSR-410 and is the answer not in the manual?
Questions and answers