Avermedia AVerVision CP300 User Manual
Digital
Hide thumbs
Also See for AVerVision CP300:
- Quick manual (2 pages) ,
- Quick manual (4 pages) ,
- Quick reference manual (1 page)
Table of Contents
Advertisement
Quick Links
Advertisement
Table of Contents

Subscribe to Our Youtube Channel
Related Manuals for Avermedia AVerVision CP300


Summary of Contents for Avermedia AVerVision CP300
- Page 1 AVerMedia AVerVision CP300 ® User Manual AVerMedia ® Digital Document Camera...
- Page 2 P/N 300AP0A7-CPF M a d e i n Ta i w a n...
- Page 3 C O P Y R I G H T © 2008 by AVerMedia Information, Inc. All rights reserved. No part of this publication may be reproduced, transmitted, transcribed, stored in a retrieval system, or translated into any language in any form by any means without the written permission of AVerMedia INFORMATION, Inc.
-
Page 5: Table Of Contents
Connecting an IBM Compatible PC or Macintosh Computer ..........8 Installing the Optional Light Box ......... 9 Connecting to a Microscope ........9 Setting Up AVerVision CP300......10 Camera Head ............10 LED & Laser Positioning Guide ........ 10 Flexible Gooseneck and Arm........11 Infrared Sensor............11... -
Page 7: Introduction
3D Anti-glare Sheet objects onto a TV, LCD or DLP projector making presentations a snap. AVerVision CP300 is an ideal presentation tool for business, academic, medical and the scientific Remote Control (batteries included) community. -
Page 8: Optional Accessories
34mm Microscopic Adapter 28mm Microscopic Adapter Light Box... -
Page 9: Avervision Cp300 Parts
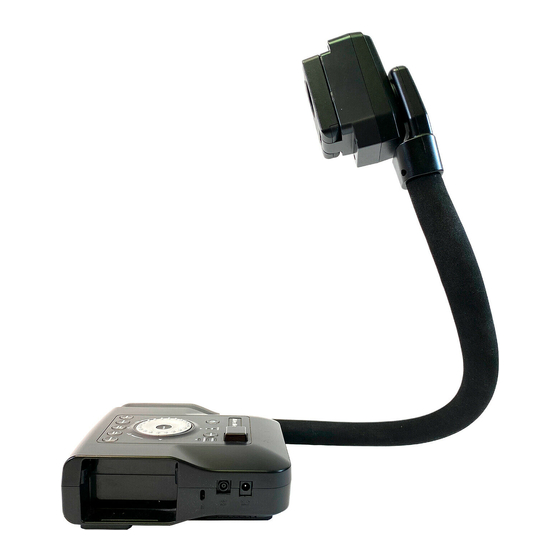
The illustrations below identify the parts of AVerVision CP300 (1) Camera head (2) LED light with Laser Positioning Guide (3) Camera lens (4) LED & Laser Positioning Guide switch (5) IR sensor (6) Control panel (7) Right panel (8) Gooseneck... -
Page 10: Technical Specifications
Image Sensor 1/2” Progressive Scan CMOS Pixel Count 3.2 mega pixels Frame Rate 24 fps (max.) White Balance Auto / Manual Exposure Auto / Manual Image mode Text / Graphics / High Frame Effect Color / B/W / Negative WXGA 60Hz (1280 x 720); XGA 60 Hz; SVGA 60 Analog RGB output Hz;... -
Page 11: Making The Connections
The ports on the rear, left and right panel of CP300 enable you to connect the unit to a computer, graphics display monitor or LCD/DLP projector, TV or other device. Illustrated below are the ports that are located at the rear, left and right panel of CP300 with their corresponding labels. -
Page 12: Connecting The Power Adapter
Port Description (9) USB Use CP300 as a USB Camera or transfer the captured images from CP300 memory to PC. (10) TV-RGB switch Switch to output display video either from Video and S-VIDEO, or RGB and DVI-I output port. Connect the power adapter to a standard 100V~240V AC power source. Wall outlet Power adapter Power cord... -
Page 13: Connecting A Vga, Mac Display Monitor Or Lcd/Dlp Projector
Locate the RGB (VGA) input port of the display device and connect it to RGB OUTPUT port of CP300. If you are not sure, please refer to the user manual of the device. Make sure the TV/RGB switch is set to RGB. RGB (VGA) cable LCD/DLP projector (not supplied) -
Page 14: Macintosh Computer
Locate the USB port of the computer or laptop and connect it to USB port of CP300. This enables you to use CP300 as a USB Camera and to transfer the captured images from the memory and to computer. Also see “Transfer Image from AVerVision CP300 to PC”. Computer USB cable... -
Page 15: Installing The Optional Light Box
Connecting an optional light box enables you to view x-rays, transparencies and negative slides. Light Box (optional) TURN ON PLUG IT HERE Connecting the CP300 to a microscope enables you to examine microscopic objects on a big screen without straining your eyes. Microscopic Adapter Microscope... -
Page 16: Setting Up Avervision Cp300
This section provides useful tips on how to adjust the CP300 to meet your needs. The camera head can be turned 90 ° to the left and right. The latch must be pressed to open and unfold the LED light. Make sure to unfold the LED light fully. -
Page 17: Flexible Gooseneck And Arm
The flexible gooseneck and arm design allows you to position the camera head from any angle. 90° Aim the remote control at the infrared sensor to operate the unit. The anti-glare sheet is a special coated film that helps eliminate any glare that maybe encountered while displaying very shiny objects or glossy surfaces such as magazines and pictures. -
Page 18: Using The Infrared Remote Control
Use the CP300 Remote Control to enhance your presentation by having the ability to switch between three (3) presentation modes and access various features. To use the remote control, first insert the batteries (2 “AAA” size batteries are provided) into the battery compartment at the back of the remote. - Page 19 Name Function (3) Shuttle Wheel make a selection or adjustment on the OSD main-menu and sub-menu (See Menu Functions for more details). (4) ENTER Make a selection in Playback mode and OSD menu. (5) AF Adjust the focus automatically. (Auto Focus) (6) Source Switch between Camera, Playback and PC mode.
- Page 20 Name Function (12) PRESENTER change the frame color from red, green and blue, and RESIZE to change the size of the frame. To resize or move the frame around the presentation screen, press the shuttle wheel ▲,▼,◄, & ►. AVerVisor covers part of the presentation screen. The upper part of the presentation screen is slightly exposed when it is being called each time.
-
Page 21: Touch Button Control Panel
The touch button control panel located on the top side of the CP300 provides quick access to commonly used functions. (10 ) (11) Function Description (1) POWER Turn the unit on/off. Indicate the setting of the TV to RGB dip switch to (2) Output LED which the video signal is being sent out. - Page 22 Function Description (8) Source Switch between Camera, Playback and PC mode. - Camera mode displays the video signal from the built-in camera. - Playback mode displays the captured image SLIDE SHOW from the built-in memory in 16-thumbnail images. START Use ▲,▼,◄, & ► buttons to make a selection INTERVAL and ENTER to display the selected image in full screen.
-
Page 24: Menu Functions
The MENU functions of CP300 enhance fine-tuning your screen display, set the timer, select OSD language and more. Press the MENU button to call up and exit from the main menu or sub-menu display. Then use ▲or▼ buttons to select the items in the menu list. Use ►/ENTER button to enter sub-menu and ◄/ ENTER to return to main menu. - Page 25 OSD Menu Description AVerVisor covers part of the presentation screen. The MENU EFFECT upper part of the presentation screen is slightly REVERSE/MIRROR AVERBOX PRESENTER exposed when it is being called each time. To expose SPLIT SCREEN AVERVISOR OFF SHADE part of the covered area, press the shuttle wheel COLOR TIMER ▲,▼,◄, &...
- Page 26 OSD Menu Description In Continuous mode, use ►or◄ buttons to increase INTERVAL or decrease the capture time interval between frames and then press ENTER to save the setting and exit. 5 SECS The time interval can be set from 5 to 600 sec. SETTINGS MENU EFFECT...
- Page 27 OSD Menu Description automatically adjust the exposure to compensate for NIGHT VIEW the adverse condition, but the captured image will appear to be in slow motion. AUTO SETTINGS > IMAGE > EXPOSURE > WHITE BALANCE IMAGE EXPOSURE Press ► and use ▲or▼ buttons to select between AUTO WHITE BALANCE BRIGHTNESS...
-
Page 28: Rs-232C Diagram Connection
OSD Menu Description • Img Download - transfer the captured images from USB CONNECTION USB CAMERA the built-in memory to computer hard disk. IMG DOWNLOAD SETTINGS > SAVE SAVE PROFILE 1 Use ▲or▼ buttons to select which user setting profile PROFILE 2 PROFILE 3 number to save your preferred setting. -
Page 29: Rs-232C Transmission Spec
:1 bit Star bit :8 bit Data bit :1 bit Stop bit Parity bit :None X parameter :None Baud rate(Communication speed) :9600bps Start Code(1 Byte) : 0xFF Type Code(1 Byte) : 0x70 DataLength Code(1 Byte) : 0x01 Data Code(1 Byte) : See the Command Table for reference. -
Page 30: Transferring The Captured Image To Pc
This enables you to transfer the captured image from the built-in memory to PC. The instruction below MUST be read and followed BEFORE connecting the USB cable. 1. MUST set the USB CONNECTION as IMG DOWNLOAD before connecting the USB cable. To set the USB CONNECTION as IMG DOWNLOAD, press MENU >... -
Page 31: Limited Warranty
You as the original purchaser. Except for the foregoing, the Product is provided “AS IS.” In no event does AVerMedia warrant that You will be able to operate the Product without problems or interruptions, or that the Product is suitable for your purposes. -
Page 32: Limitation Of Liability
Limitations of Warranty AVerMedia makes no warranties to any third party. You are responsible for all claims, damages, settlements, expenses, and attorneys’ fees with respect to claims made against You as a result of Your use or misuse of the Product. This warranty applies only if the Product is installed, operated, maintained, and used in accordance with AVerMedia specifications.
Need help?
Do you have a question about the AVerVision CP300 and is the answer not in the manual?
Questions and answers