Table of Contents
Advertisement
Quick Links
Advertisement
Table of Contents

Related Manuals for Avermedia AVerVision CP150


Summary of Contents for Avermedia AVerVision CP150
- Page 1 AVerMedia AVerVision CP150 ® User Manual AVerMedia ® Digital Document Camera...
- Page 2 P/N 300AP0A7-CPE M a d e i n Ta i w a n...
- Page 3 F C C N O T I C E ( C l a s s A) This device complies with Part 15 of the FCC Rules. Operation is subject to the following two conditions: (1) this device may not cause harmful interference, and (2) this device must accept any interference received, including interference that may cause undesired operation.
- Page 4 The information contained in this documentation is subject to change without notice. In no event will AVerMedia be liable for direct, indirect, special, incidental, or consequential damages arising out of the use or inability to use this product or documentation, even if advised of the possibility of such damages.
-
Page 5: Table Of Contents
Connecting an IBM Compatible PC or Macintosh Computer ..........7 Installing the Optional Light Box ......... 8 Connecting to a Microscope ........9 Setting Up AVerVision CP150......9 Camera Head ............. 9 LED Light..............9 Flexible Gooseneck and Arm........10 Infrared Sensor............10 Anti-glare Sheet............ -
Page 7: Introduction
3D Anti-glare Sheet objects onto a TV, LCD or DLP projector making presentations a snap. AVerVision CP150 is an ideal presentation tool for business, academic, medical and the scientific Driver CD community. ®... -
Page 8: Optional Accessories
34mm Microscopic Adapter 28mm Microscopic Adapter Light Box... -
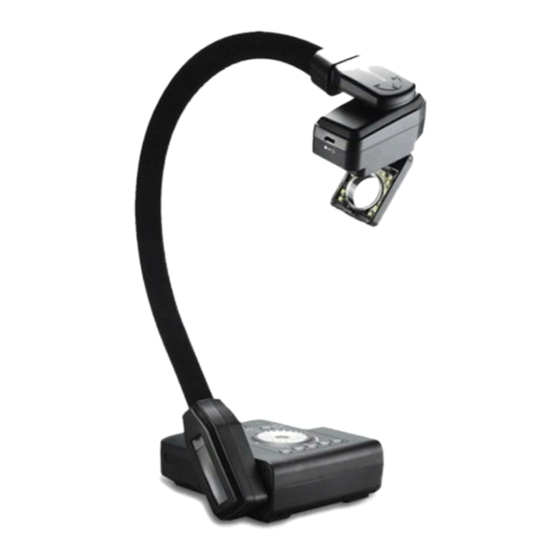
Page 9: Avervision Cp150 Parts
The illustrations below identify the parts of AVerVision CP150 (1) Camera head (2) LED light module (3) Camera lens (4) LED switch (5) IR sensor (6) Control panel (7) Right panel (8) Gooseneck (9) Rear panel (10) Left panel (11) Light box power port... -
Page 10: Technical Specifications
Image Sensor 1/2" CMOS color image sensor Pixel Count 3.2 mega pixels Frame Rate 24 fps (max.) White Balance Auto / Manual Exposure Auto / Manual Image mode Text / Graphics / High Frame Effect Color / B/W / Negative Analog RGB output XGA 60 Hz;... -
Page 11: Making The Connections
The ports on the rear, left and right panel of CP150 enable you to connect the unit to a computer, graphics display monitor or LCD/DLP projector, TV or other device. Illustrated below are the ports that are located at the rear, left and right panel of CP150 with their corresponding labels. -
Page 12: Connecting The Power Adapter
Connect the power adapter to a standard 100V~240V AC power source. Wall outlet Power adapter Power cord Locate the VIDEO, S-VIDEO or SCART RGB input port of the TV or Video equipment (i.e., VCR) to record your presentation on a videotape and connect it to S-VIDEO or VIDEO OUTPUT port of CP150. -
Page 13: Lcd/Dlp Projector
Locate the RGB (VGA) input port of the display device and connect it to RGB OUTPUT port of CP150. If you are not sure, please refer to the user manual of the device. Make sure the TV/RGB switch is set to RGB. RGB (VGA) cable LCD/DLP projector (not supplied) -
Page 14: Installing The Optional Light Box
Locate the USB port of the computer or laptop and connect it to USB port of CP150. This enables you to use CP150 as a USB Camera and to transfer the captured images from the memory and to computer. Also see “Transfer Image from AVerVision CP150 to PC”. Computer USB cable... -
Page 15: Connecting To A Microscope
Microscopic Connecting the CP150 to a microscope enables Adapter you to examine microscopic objects on a big screen without straining your eyes. Microscope This section provides useful tips on how to adjust the CP150 to meet your needs. The camera head can be turned 90 ° to the left and right. The latch must be pressed to open and unfold the LED light. -
Page 16: Flexible Gooseneck And Arm
The flexible gooseneck and arm design allows you to position the camera head from any angle. 90° Aim the remote control at the infrared sensor to operate the unit. The anti-glare sheet is a special coated film that helps eliminate any glare that maybe encountered while displaying very shiny objects or glossy surfaces such as magazines and pictures. -
Page 17: Using The Infrared Remote Control
Use the CP150 Remote Control to enhance your presentation by having the ability to switch between three (3) presentation modes and access various features. To use the remote control, first insert the batteries (2 “AAA” size batteries are provided) into the battery compartment at the back of the remote. - Page 18 Name Function (4) Source Switch between Camera, Playback and PC mode. - Camera mode displays the video signal from the built-in camera. - Playback mode displays the captured image from the built-in memory in 16-thumbnail images. Use ▲,▼,◄, & ► buttons to make a selection and ENTER to display the selected image in full screen.
-
Page 19: Touch Button Control Panel
Name Function (13) PRESENTER AVerVisor covers part of the presentation screen. The upper part of the presentation screen is slightly exposed when it is being called each time. To expose part of the covered area, press the shuttle wheel ▲,▼,◄, & ►. Select SHADE to change the darkness of the shaded area between 50% or 100%. - Page 20 Select INTERVAL to set the display time interval between frames in second. - PC mode displays the video signal from the RGB INPUT port of AVerVision CP150. Automatically adjust and set the white balance and (9) AUTO IMAGE exposure setting.
-
Page 22: Menu Functions
The MENU functions of CP150 enhance fine-tuning your screen display, set the timer, select OSD language and more. Press the MENU button to call up and exit from the main menu or sub-menu display. Then use ▲or▼ buttons to select the items in the menu list. Use ►/ENTER button to enter sub-menu and ◄/ ENTER to return to main menu. - Page 23 OSD Menu Description part of the covered area, press the shuttle wheel MENU EFFECT ▲,▼,◄, & ►. Select SHADE to change the darkness REVERSE/MIRROR PRESENTER AVERBOX of the shaded area between 50% or 100%. AVERVISOR OFF TIMER CAPTURE SHADE COLOR SETTINGS RESIZE RECALL...
- Page 24 OSD Menu Description • High Frame - increases the frame rate capture and MODE TEXT can visually tracks the motion and react quickly. GRAPHICS Sufficient lighting is required when using this HIGH FRAME mode. SETTINGS > IMAGE > EXPOSURE IMAGE EXPOSURE AUTO Press ►...
- Page 25 OSD Menu Description SETTINGS > IMAGE > CONTRAST IMAGE EXPOSURE Use ►or◄ buttons to emphasize or reduce the WHITE BALANCE BRIGHTNESS difference between light and dark conditions. The CONTRAST RESOLUTION contrast level can be adjustable up to 255. SETTINGS > IMAGE > RESOLUTION IMAGE EXPOSURE Press ►/ENTER and use ▲or▼...
-
Page 26: Transferring The Captured Images To Pc
3. Upon connecting the USB cable, the system automatically detects the new removable disk. You may now transfer the captured image from AVerVision CP150 built-in memory to PC hard disk. This section provides many useful tips on how to solve common problems while using the CP150. -
Page 27: Limited Warranty
You as the original purchaser. Except for the foregoing, the Product is provided “AS IS.” In no event does AVerMedia warrant that You will be able to operate the Product without problems or interruptions, or that the Product is suitable for your purposes. -
Page 28: Limitation Of Liability
AVERMEDIA’S TOTAL, AGGREGATE LIABILITY FOR DAMAGES OF ANY NATURE, REGARDLESS OF FORM OF ACTION, SHALL IN NO EVENT EXCEED THE AMOUNT PAID BY YOU TO AVERMEDIA FOR THE SPECIFIC PRODUCT UPON WHICH LIABILITY IS BASED. Governing Law and Your Rights This warranty gives You specific legal rights;...
Need help?
Do you have a question about the AVerVision CP150 and is the answer not in the manual?
Questions and answers