GE Profile PT925 Technical Service Manual
Ge pro?le wall oven
Hide thumbs
Also See for Profile PT925:
- Owner's manual (72 pages) ,
- Installation instructions manual (29 pages) ,
- Installation instructions manual (28 pages)

Related Manuals for GE Profile PT925


Summary of Contents for GE Profile PT925
-
Page 1: Wall Oven
GE Consumer & Industrial Technical Service Guide September 2008 GE Profile Wall Oven PT925 31-9176 GE Appliances General Electric Company Louisville, Kentucky 40225... - Page 2 If grounding wires, screws, straps, clips, nuts, or washers used to complete a path to ground are removed for service, they must be returned to their original position and properly fastened. GE Consumer & Industrial Technical Service Guide Copyright © 2008 All rights reserved.
-
Page 3: Table Of Contents
Table of Contents Bake Element ..................................36 Broil Element ..................................35 Component Locator Views ............................25 Control Features ................................6 Control Voltage .................................. 48 Convection Bake Element ............................. 37 Convection Fan Blade ..............................36 Convection Fan Motor ..............................37 Convection Fan Troubleshooting ..........................53 Cooling Fan .................................. -
Page 4: Introduction
Introduction The new 30-in. wall ovens have superior style and performance. These ovens feature electronic controls that utilize the precision of modern digital technology. Additional features include: • Glass Touch LCD Controls - Combine a smooth, easy-to-clean glass design with large, easy-to-read graphics to facilitate easier usage •... -
Page 5: Nomenclature
Nomenclature Model Number P T 9 2 5 B R B B GE Cooking Product Product Color P = Profile SS = Stainless Steel BB = Black WW = White Configuration Model Year Designator T = 30-in. Wall Oven Glass Color... -
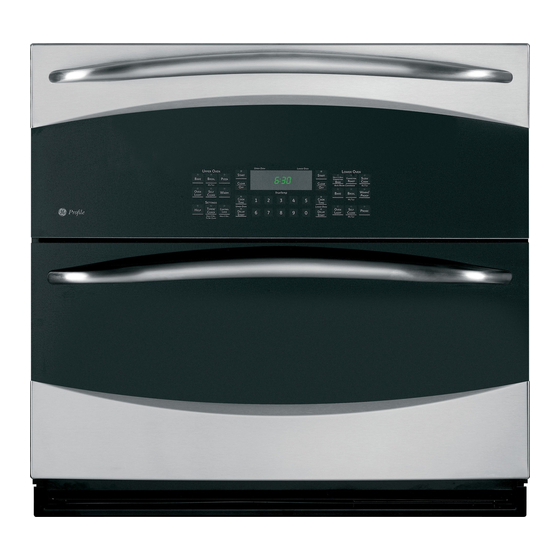
Page 6: Control Features
Control Features Features and appearance may vary. BAKE Pad COOK TIME Pad Touch to select the bake function. Touch this pad and then touch the number pads to set the amount of time you want BROIL HI/LO Pad your food to cook. The oven will shut off Touch to select the broil function. - Page 7 Using the Upper and Lower Ovens How to Set the Upper Oven for Baking Touch the BAKE pad. Touch the number pads to set the desired temperature. Touch the START pad. Check if food is done at minimum time of the recipe. Cook longer if necessary.
- Page 8 How to Set an Immediate Start and Automatic Stop The oven will turn on immediately and cook for a selected length of time. At the end of the cooking time, the oven will turn off automatically. Touch the BAKE pad. Touch the number pads to set the desired oven temperature.
- Page 9 How to Set a Delayed Start and Automatic Stop The oven will turn on at the time of day you set, cook for a specific length of time, and then turn off automatically. Make sure the clock shows the correct time of day. Touch the BAKE pad.
- Page 10 Using the Probe on the Lower Convection Oven How to Set the Lower Oven for Baking/Roasting When Using the Probe Insert the probe fully into the food. Plug the probe into the outlet in the oven. Make sure it’s pushed all the way in.
- Page 11 Using the Clock, Kitchen Timer, and Control Lock To Set the Clock The clock must be set to the correct time of day for the automatic oven timing functions to work properly. The time of day cannot be changed during a timed baking or self-cleaning cycle. Touch the CLOCK pad.
- Page 12 Control Lock Your control will allow you to lock out the touch pads so they cannot be activated when touched. To lock/unlock the controls: Touch and hold the 9 and 0 pads for 3 seconds. The oven display will show “Oven controls locked” for several seconds, then “Locked.”...
-
Page 13: Using The Convection Oven
Using the Convection Oven Convection Fan Operation In a convection oven, a fan circulates hot air over, under, and around the food. This circulating hot air is evenly distributed throughout the oven. As a result, foods are evenly cooked and browned ― often in less time than with convection heat. - Page 14 How to Set the Lower Oven for Convection Baking or Roasting Touch the CONVECTION BAKE pad and then the 2 pad for multi- rack convection baking. This mode is used for cooking food items on more than one rack (i.e., 2, 3, or more racks) at the same time in convection bake.
-
Page 15: Using The Timed Features For Convection Cooking
Note: The maximum internal temperature that you can set is 200°F. 7. Touch the START pad. The display will flash "PROBE", and the oven control will signal if the probe is inserted into the outlet and you have not set a probe temperature and pressed the START pad. - Page 16 5. Touch the START pad. The oven will turn on, and the display will show the cooking time countdown and the changing temperature starting at 100°F. (The temperature display will start to change once the oven temperature reaches 100°F.) When the oven reaches the temperature you set, 3 beeps will sound.
- Page 17 7. Touch the START pad. Note: • An attention tone will sound if you are using timed baking or roasting and do not touch the START pad. • If you would like to check the times you have set, touch the DELAY START pad to check the start time you have set, or touch the COOK TIME pad to check the length of cooking time you have set.
- Page 18 How to Set the Upper Oven For Pizza Adjust rack position for type of pizza tray being used. Touch the PIZZA pad. Touch the number pads to select 1 for fresh or 2 for frozen pizza. Touch the number pads to set the baking temperature. Touch the START pad.
- Page 19 Using the Self-Cleaning Upper and Lower Ovens How to Set the Upper/Lower Oven for Cleaning The oven doors must be closed and all controls set correctly for the cycle to work properly. Touch the SELF CLEAN HI/LO pad once for a 5-hour clean time or twice for a 3-hour clean time.
- Page 20 4. Using the number pads, enter the time of day you want the clean cycle to start. 5. Touch the START pad. The upper and lower oven doors lock automatically. The display will show the start time. It will not be possible to open the oven doors until the temperature drops below the lock temperature and LOCKED goes off in the control display.
- Page 21 Fahrenheit or Celsius Temperature Selection Your oven control is set to use the Fahrenheit temperature selections, but you may change this to use the Celsius selections. Touch the upper oven BROIL HI/LO and BAKE pads at the same time until the display shows "SF". Touch the COOK TIME and BROIL HI/LO pads at the same time.
- Page 22 12-Hour, 24-Hour or Clock Blackout Your control is set to use a 12-hour clock. If you would prefer to have a 24-hour military time clock or black out the clock display, follow the steps below. Touch the upper oven BROIL HI/LO and BAKE pads at the same time until the display shows "SF".
- Page 23 Using the Sabbath Feature (lower oven only) (Designed for use on the Jewish Sabbath and Holidays) The Sabbath feature can be used for baking only. It cannot be used for convection, broiling, self-cleaning, or delay start cooking. How to Set for Regular Baking Make sure the clock shows the correct time of day and both ovens are off.
- Page 24 6. Touch the lower oven START pad. 7. Touch the lower oven BAKE pad. No signal will be given. 8. Using the number pads, enter the desired temperature. No signal or temperature will be given. 9. Touch the lower oven START pad. 10.
-
Page 25: Bake Element
Component Locator Views Single Double Wall Oven (Profile shown) Door Lock Broil Element Light Oven Temperature Sensor Ribbon Cable Meat Probe Outlet Convection Fan Bake Element Upper Oven Door Control System (Door shown with inner door assembly removed) Display/Logic Board Slider Assembly (Continued next page) –... - Page 26 Control Compartment Back of Oven (Main Rear Panel Shown Removed) Broil Element Lock Out Relay Lower Oven Relay Board Thermal Cut Out Upper Oven Relay Board Thermal Cut Out Convection Element Convection Fan Sail Switch Bake Element Cooling Fan (Continued next page) –...
-
Page 27: Oven Component Access Chart
Oven Component Access Chart WARNING: • The wall oven is heavy and requires two people to remove it from the installation. Care should be taken when removing and installing. • Sharp edges may be exposed when servicing. Use caution to avoid injury. Wear Kevlar gloves or equivalent protection. -
Page 28: Oven Components
Oven Components Door Assemblies Pull down Upper to access Oven The upper door contains many of the electronics Lower and controls for the oven. Oven Snap engages Caution: The doors are heavy. Use the correct lifting with door frame procedure. Do not lift the doors by the handles. To remove the lower door: Open the door fully. - Page 29 7. On both sides of the door, press down on the To remove the lower outer door assembly: release buttons on each hinge. Remove the lower door. (See Door Assemblies Door Place the inner door assembly, gasket side up, Frame on a protective surface.
- Page 30 To replace the lower inner door assembly: To remove the upper outer door assembly: Remove the outer door assembly. (See Remove the upper door. (See Door Door Assemblies Assemblies Place the inner door assembly, gasket side up, 2. Remove the four T15 Torx screws (2 on each on a protective surface.
- Page 31 To replace the upper inner door assembly: Assembly Notes Remove the upper door assembly. (See When assembling, make sure the hinges are parallel Door to each other and perpendicular to the door liner. If Assemblies not, the hinge may bind on the receiving channel of 2.
-
Page 32: Electronic Oven Control
Door Shown with Inner Door Assembly Removed Oven Removal The replacement of certain components require oven removal. (See Oven Component Access Chart WARNING: The oven is heavy and requires two people to remove it from the installation. To remove the oven: Outer Door Assembly Remove the 2 Phillips-head screws (1 on each side) that hold the oven in place. -
Page 33: Side Access Panels
9. To access the slider board assembly, remove the Side Access Panels 3/8 -in. nut securing the insulating cover. There are two side panels on each side of the oven. To remove the side access panels: Remove the oven. (See Oven Removal On each side of the oven, remove the four 1/4- in. -
Page 34: Rear Access Panels
Rear Access Panels Top Access Panels There are two rear access panels: the main rear To remove the top access panels: access panel and the secondary rear access panel. Remove the oven. (See Oven Removal To remove many of the oven components, it is Remove the four 1/4-in. -
Page 35: Oven Temperature Sensor
5. Remove the thirteen 1/4-in. hex-head screws 4. Carefully pull the sensor and sensor wiring from the top of the heat shield. harness from the oven liner. Note: When reinstalling the sensor, use a small flat- bladed screwdriver to push and guide the sensor wire harness into the oven liner. - Page 36 4. Remove the three 1/4-in. hex-head screws 3. Remove the two 1/4-in hex-head screws that that attach the broiler element to the oven hold the bake element to the back of the oven. cavity. 5. Carefully pull out the sensor approximately 2 inches from the broiler element bracket.
-
Page 37: Convection Bake Element
Convection Bake Element Convection Fan Motor The inner convection element is rated at 655 watts The convection fan motor is located on the back and the outer convection element is rated at 645 wall of the oven cavity. watts. The convection fan will turn on (after a short delay). The convection bake element is located on the back The fan may cycle on and off, and change direction, wall of the oven. -
Page 38: Lock Assembly
Relay Boards Lock Assembly The relay boards can be accessed by removing the The motorized door lock assembly is located above main rear access panel. The top relay board controls the oven and comes as a complete assembly. the lower oven, and the bottom relay board controls the top oven. -
Page 39: Thermal Cut Outs
Strip Circuit Thermal Cut Outs When either of the 2 thermal cut outs are open, L2 is UNLOCKED cut off from the oven. The thermal cut outs are rated at: • Upper oven TCO = 177°C/350°F • Lower oven TCO = 150°C/302°F J17-Pin9 To remove the lock assembly: Upper Oven Thermal Cut Out... -
Page 40: Lock Out Relay
Micro Switch Lock Out Relay The L2 DLB lockout relay opens the L2 side of the line to the upper oven heating elements if the upper oven door is opened. Sail To remove the lock out relay: Airflow from the Cooling Fan Pulls Remove the main rear access panel. -
Page 41: Cooling Fan
Cooling Fan Ribbon Cable Assembly The cooling fan is located in a recess in the back of To remove the ribbon cable assembly: the oven. It is necessary to remove the oven from Open or remove the lower door. the installation to access the cooling fan. Release the ribbon cable assembly from the The fan will begin to operate when the oven is in door. -
Page 42: Door Hinge Receivers
3. Pull the outlet and wiring down from the oven Door Hinge Receivers wall. To remove the door hinge receivers: Note: When replacing the meat probe outlet, cut the probe wires and splice the new probe using Remove the side access panels. (See Side Access approved heat-resistant connectors. -
Page 43: Oven Light Bulbs
3. Disconnect the light assembly wire harness. 2. Using gloves or a dry cloth, remove the bulb by pulling straight out. Socket Receptacle Disconnect 3. Open the oven door and remove the two 1/4-in. hex-head screws that attach the light housing to Bulb the oven liner. -
Page 44: Smoke Eliminators
Note: To access the lower oven smoke eliminator, Smoke Eliminators the two ovens must be separated. To separate the upper and lower ovens, it is necessary to remove To remove the upper oven smoke eliminator: all 4 side access panels and remove the 2 metal Remove both rear access panels. -
Page 45: Electronic Oven Control
Electronic Oven Control Oven Circuits Relay* Relay* UPPER OVEN UPPER OVEN BAKE & SELF CLEAN BROIL BAKE INNER BROIL INNER BROIL ON/OFF SPEED HIGH OUTER BROIL COOLING FAN ON/OFF SPEED HIGH COOLING FAN LOWER OVEN LOWER OVEN BROIL SELF CLEAN BAKE INNER BROIL INNER BROIL... - Page 46 Relay Boards Note: There is one relay board for each oven. Lower Oven Relay Board CONVX Broil Bake Lower Oven: Oven Light, CONVX Fan, Lock Lower Oven and Upper Oven: Thermal Limit Motor Switches Lower Oven Door Lock, Sail Switch Lower Oven and Upper Oven: Door Switches Communication Cable, Lower Oven Clean Upper Oven Relay Board...
- Page 47 Electronic Oven Control Wire Harness to Interface Board Wire Harness to Interface Board Electronic Oven Control (Shown attached to Glass Touch Interface) Wire Harness to Interface Board Wire Harness to Interface Board – 47 –...
-
Page 48: Control Voltage
Diagnostics and Service Information Control Voltage WARNING: Components are electrically HOT on control when voltage is connected to oven. To prevent electrical shock, use extreme caution when diagnosing oven with outer covers removed and power on. Note: Mode and temperature selection is necessary for operation of relay contacts. This model incorporates Double Line Break, meaning there is no voltage on the elements when the control is in standby. - Page 49 Wires on J7 (below small relays) Brown to White 0 ohms when oven light is on Blue to J11 (Lwr oven relay board only) 120V when convection fan turns CCW Black jumper to J11 120V when convection fan is on Red to J11 (Lwr oven relay board only) 120V when convection fan turns CW Violet with white to J11...
-
Page 50: Service Mode
Service Mode The oven control has a service mode that can be utilized by the service technician in order to test critical components and to access error codes. This service mode will help the service technician to quickly identify failed or improperly operating oven components. To enter the service mode: To exit the service mode: 1. -
Page 51: Using The Ribbon Cable For Troubleshooting
Using the Ribbon Cable for Troubleshooting The ribbon cable allows the technician to inspect several key signals without removing the wall oven from the cabinet. To access the ribbon cable, remove the ribbon cable from the upper oven door as described in a previous section. - Page 52 Problem Possible Causes What To Do If the cavity lights are always on, check the plunger switch Plunger switch related to the bad cavity. • Test the functions in Service Mode. Relay (upper cavity • If the cooling fan, sail switch, and lights work properly, only) check the relay and associated wiring.
-
Page 53: Oven Sensor Ohmmeter Test
Convection Fan Troubleshooting Problem Possible Causes What To Do Fan motor buzzes Open capacitor Harness, terminals, or bad capacitor. Open winding as indicated by ohm check red to black and Replace motor. blue to black (approx. 60 ohms each) Check voltage CCW to N when fan is CCW - should read 120VAC •... -
Page 54: General Troubleshooting
General Troubleshooting Problem Possible Causes What To Do Oven light does Light bulb is loose Replace the bulb. not work A fuse in the home may be blown or the circuit Replace the fuse or reset the circuit breaker. breaker is tripped Oven will not work Oven controls See the Using the Upper and Lower Ovens section. - Page 55 Problem Possible Causes What To Do This is the sound of the metal heating and "Crackling" or cooling during both the This is normal. "popping" sound cooking and cleaning functions Excessive smoking Touch the CLEAR/OFF pad. Open the windows to rid the during a clean Excessive soil room of smoke.
- Page 56 Problem Possible Causes What To Do Reset the clock. If the oven was in use, you must reset it Power outage, Power outage or surge by touching the CLEAR/OFF pad, setting the clock, and clock flashes resetting any cooking function. When using the ovens, it is normal to see steam coming out of...
-
Page 57: Error Codes
Error Codes Access the ERC failure codes by pressing the UPPER START pad and the CLOCK pad for 3 seconds. To clear the fault codes, press the UPPER COOK TIME pad and the UPPER DELAY START pad for 3 seconds. The oven may stop operating but not immediately give and F code on the display. -
Page 58: Schematics And Wiring Diagrams
Schematics and Wiring Diagrams WARNING: Disconnect electrical power before servicing. Caution: Label all wires prior to disconnection. Wiring errors can cause improper and dangerous operation. Verify operation after servicing. (Continued Next Page) – 58 –... - Page 59 Wiring Diagram, High Voltage Circuits O+BK R+BU BU+W Y+BK PR+W BK+W BK+W PR+W BU+W W+BK BR+W PR+W BU+W PR+W BU+W PR+W BU+W BU+W GY+W PR+W PR+W PR+W PR+W BR+W GY+W BU+W CABLE RIBBON BOARD INTERFACE CONNECTOR PLUG (Continued Next Page) –...
- Page 60 Wiring Diagram, Low Voltage Circuits (Continued Next Page) – 60 –...
- Page 61 Wiring Diagram, Low Voltage Wiring Harness – 61 –...
-
Page 62: Warranty
This warranty is extended to the original purchaser and any succeeding owner for products purchased for home use within the USA. If the product is located in an area where service by a GE Authorized Servicer is not available, you may be responsible for a trip charge or you may be required to bring the product to an Authorized GE Service location for service.
Need help?
Do you have a question about the Profile PT925 and is the answer not in the manual?
Questions and answers