Table of Contents
Advertisement
Quick Links
Table of Contents
1.1 A Thank-you Note Before You Get Started...........................................................4
1.2 The Features Of This Manual...............................................................................5
1.3 Preliminary Tools..................................................................................................6
1.4 What s In The Box?..............................................................................................7
1.5 Accessory.............................................................................................................8
2.1 Features of XC Cube..........................................................................................12
2.2 Starting Installing................................................................................................13
2.3 Disassemble the power modulus........................................................................15
2.4. Disassemble the Driver bays.............................................................................16
2.5 Install the HDD driver bay...................................................................................17
2.6 Install Serial ATA hard disk.................................................................................18
2.7 Slim Optical Drive Installation.............................................................................19
2.8 Memory Installation............................................................................................21
2.9 Install the Hard Disk cable to the motherboard..................................................22
2.10 Install the Optical driver cable to the motherboard...........................................22
2.11 Install CPU on Socket 479................................................................................23
2.12 Install CPU Cooler and CPU Fan Connector....................................................23
2.13. Driver bays Installation....................................................................................24
2.14 Install the Hard Disk cable and power cord......................................................25
2.15 Install the Optical driver cable and power cord.................................................25
2.16 Install the power modulus.................................................................................26
2.17 Install the front panel........................................................................................26
2.18 Install AGP/PCI/PCI-Express additional cards.................................................27
2.19 Connect Keyboard and Mouse.........................................................................28
2.20 Connect Monitor and tighten screws................................................................28
1
Advertisement
Table of Contents

Related Manuals for AOpen XC Cube Mini


Summary of Contents for AOpen XC Cube Mini
-
Page 1: Table Of Contents
Table of Contents I. GettingStart 1.1 A Thank-you Note Before You Get Started............4 1.2 The Features Of This Manual................5 1.3 Preliminary Tools....................6 1.4 What s In The Box?....................7 1.5 Accessory......................8 II. Start To Assemble 2.1 Features of XC Cube..................12 2.2 Starting Installing....................13 2.3 Disassemble the power modulus................15 2.4. - Page 2 firms. We regret not informing about any changes in usage standards and other related information. AOpen Company reserves the right of altering or modifying the content of this manual. In case of any mistakes or incorrect descriptions, which include those on the products, AOpen makes no guarantee or commitments.
-
Page 3: Gettingstart
I. Getting Start... -
Page 4: A Thank-You Note Before You Get Started
1.1 A Thank-you Note Before You Get Started First of all, we would like to express our gratitude for purchasing our AOpen specially-designed XC Cube. Once again, this bare-system is designed uniquely to meet all your personal needs with our great industry-designing ability and our everlasting perseverance to the quality of all our products. -
Page 5: The Features Of This Manual
1.2 The Features Of This Manual In this manual, you'll be able to learn how to: ►Set up a personal computer on your own. ►Correctly and safely put everything together and learn something about hardware. ►Learn some practical techniques that make doing the job easier. In addition, this manual DOES NOT offer you: ►Any sorts of back doors, such as overclocking. -
Page 6: Preliminary Tools
1.3 Preliminary Tools "A workman must first sharpen his tools if he is to do his work well". Right before you start the assembly, there are some tools that can't be spared. Firstly, the most frequently-used tool is cross screwdriver by which most interior components are fixed. -
Page 7: What In The Box?
1.4 What s In The Box? Open the XC Cube box, you will find components as follow: ► XC Cube chassis / Drives Cage ► Motherboard (Pre-installed on XC Cube chassis.) ► AC to DC Adaptor (Optional) ► CPU cooler ►... -
Page 8: Accessory
1.5 Accessory Besides above-mentioned main component, you may see the attached accessory as below: Fixed screw: The accessory package includes three kinds of the fixed screw for use. The second kind of the screw is T h e f i r s t k i n d o f t h e The third kind of the screw longer and the screw head is flat. - Page 9 XC Cube Mini, we design the same color for the slim ODD front panel and the same color label of the XC Cube Mini. You can install it to the slim ODD to get the identical color tones and appearance.
- Page 10 Note...
-
Page 11: Start To Assemble
II. Start To Assemble... -
Page 12: Features Of Xc Cube
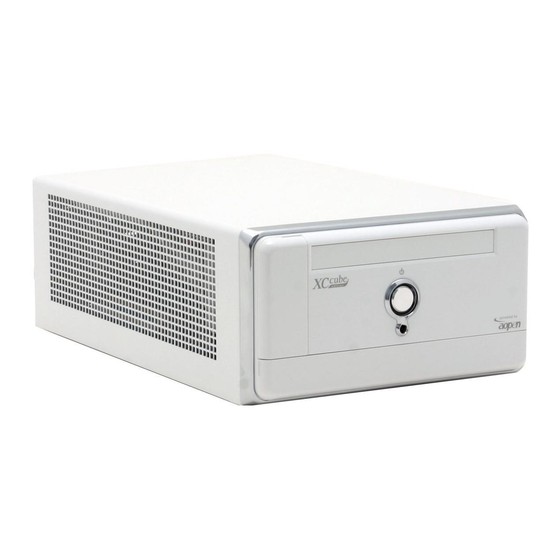
2.1 Features of XC Cube AOpen XC Cube Mini, designed as a Mini-PC, provides you as many advantages as it can. You may find that it is elegant among other traditional PC design that obviously highlighted your individual style and taste with different color panel provided. In addition to it s unique appearance, AOpen XC Cube Mini is easy to move around in your house, suitable for decoration even in your living room. -
Page 13: Starting Installing
2.2 Starting Installing Unscrew all screws on the chassis. Use your thumb to push the chassis backward to you. Lift the chassis up. Here you may see the internal of the chassis. - Page 14 If you don t want to install the slim ODD, you don t need to open the front panel of the XC Cube Mini. When you start to take the Front Panel apart, please pay attention to the rib that is located at top of the both side panel.
-
Page 15: Disassemble The Power Modulus
2.3 Disassemble the power modulus The first turn the screw off from the center of the power modulus in the case. Pull away the fixed clamp beside the modulus gently, then raise it about 30 degree. Finally take it out from the top of the case. There are many connectors link with the motherboard in the power modulus of the XC Cube Mini. -
Page 16: Disassemble The Driver Bays
2.4. Disassemble the Driver bays Turn the front panel of the XC Cube Mini face to myself. The first, turn the screw off in the driver bays, then push the driver bays backward, until the front driver bays away the fixed slot of the front panel. -
Page 17: Install The Hdd Driver Bay
Take the screw no.2 from the XC Cube package to screw to the four screw hole. Please pay attention, don t break the rubber cushion. This is the special design from the AOpen, when you use the XC Cube Mini, you will always work quietly. -
Page 18: Install Serial Ata Hard Disk
2.6 Install Serial ATA hard disk As Serial ATA hard disk comes with different power connector and Serial ATA cable, please use our bundled SATA power connector and Serial ATA cable to connect the hard disk. Serial ATA cable SATA power connector If you happen to have Serial ATA hard disk, this motherboard comes with Serial ATA connectors onboard as well. -
Page 19: Slim Optical Drive Installation
If you don t want to install the Slim Optical Drive, you can pass this step as below. XC Cube Mini package include GBAS Slim Optical Drive faceplate, if you need to exchange it, you can follow the below steps. - Page 20 ODD must be face to the front panel of the XC Cube Mini. Use the XC Cube Mini enclosed screw no.1, let slim ODD lock to the top of the driver bays.
-
Page 21: Memory Installation
2.8 Memory Installation For easy to recognize, the memory slot of the motherboard use blue color design, please install the memory into the slot. Pull the fixed shaft of the memory slot both side out. Install the memory along with the slot, pay attention to the memory and memory slot, they both have avoid wrong installation setting. -
Page 22: Install The Hard Disk Cable To The Motherboard
2.9 Install the Hard Disk cable to the motherboard For the XC Cube Mini special design, before you install the driver bays, you can connect the HDD driver bay cable and IDE hander of the Motherboard. You can refer to the Easy Installation Guide to understand the position. -
Page 23: Install Cpu On Socket 479
2.11 Install CPU on Socket 479 Remove plastic membrane from CPU socket and make sure the drop-shaped indicator on socket screw aims at open direction (the default is open). Plastic membrane Drop-shaped indicator Socket screw Match socket Pin 1 and golden arrow, and gently put CPU onto CPU socket. Then lock socket screw clockwise to finish CPU installation. -
Page 24: Driver Bays Installation
Let the front driver bays downward about 30 degree, pull the both side fixed clamp away, to combine with the fixed beam of the XC Cube Mini both side case. Push the driver bays to the front case, until combine with the fixed seat of the front... -
Page 25: Install The Hard Disk Cable And Power Cord
2.14 Install the Hard Disk cable and power cord As shown in the right picture, it s a vertical view of the XC Cube Mini, the cable connector of the HDD place to the left side of the case, connect with the cable and power cord. -
Page 26: Install The Power Modulus
If you want to install the slim ODD, please follow the below steps. There are four ribs inside the front panel of the XC Cube Mini. After loose the ribs, push the front panel outside to the inside, then slide the front ODD off. It should aline the hole of the front case. -
Page 27: Install Agp/Pci/Pci-Express Additional Cards
The first, take out the fixed screw, then turn to the left side and pull the above faceplate up. Pull the additional cards faceplate of the rear XC Cube Mini up, then set up the additional cards. Please pay attention; the AGP/PCI/PCI-Express additional cards have different slot specifications. -
Page 28: Connect Keyboard And Mouse
2.19 Connect Keyboard and Mouse 2.20 Connect Monitor and tighten screws 2.21 Connect Microphone (Speaker or Earphone) and Network cable... - Page 29 Finally, take the hander of the power transformer connect to the room socket, then the direct current output to the plug, link to the direct current input hander of the rear XC Cube Mini. Then finish all of the installation, prepare to open the power.
- Page 30 Note...
- Page 31 III. Turn On The Power...
-
Page 32: Turn On The Power
3.1 Turn on the power Ok, all cables have been properly connected. Are you getting confident of assembling a computer by yourself? The final stage is to turn on the power to check what you have done so far. Now take a short break and have a drink. Then turn on the computer to see how things are going 3.2 Set BIOS (Basic Input / Output System) Not long after activating the power, you ll see the following screen. - Page 33 After pressing <Delete>, you'll see the following BIOS setup. Now, you can move the cursor by using direction keys on the keyboard. Move the cursor to the option item "Load Setup defaults" and press <Enter>...
- Page 34 Then, the following dialogue screen will pop up to confirm the default BIOS values. Please press <Y> to confirm and then press <Enter> Finally, move the cursor to Save & Exit Setup and press <Enter> to save the parameters and exit BIOS setup.
- Page 35 At the same time, type <Y> in the dialogue box and press <Enter> to exit. Now everything is perfectly finished!!
-
Page 36: Postscripts
We sincerely hope every customer who wants to assemble a computer on his or her own has a wonderful beginning! To learn more about AOpen XC Cube, visit us at http://xc.aopen.com.tw... -
Page 37: Appendix
Appendix Install OS into Serial ATA Hard Disk for UX661 Series UX661 is equipped with powerful SiS 964 chip with Serial ATA function. Please notice that when installing OS into Serial ATA hard disk, there will be some limitations due to the limitation of SiS 964 chip. -
Page 38: Raid Driver Installation Guide For Ux661 Series
RAID Driver Installation Guide for UX661 Series By the strength of SiS 964 chip, UX661 provides RAID 0 and 1 functions. User could build RAID in Windows 2000 or Windows XP. For enabling RAID function, it’s needed to install driver from Floppy drive. Please connect Floppy drive to motherboard before starting to install OS. - Page 39 Select the driver for your OS (Windows 2000 or Windows XP) and press <Enter> to install the driver. For more information of RAID installation, please refer to the file "964_180umh030. pdf" in the Utility CD.
-
Page 40: Introduction To Jumper Settings And Other Connectors
Introduction to Jumper Settings and Other Connectors JP14 Clear CMOS You can clear CMOS to restore system default setting. To clear the CMOS, follow the procedure below. 1. Turn off the system and unplug the AC power. 2. Remove ATX power cable from connector PWR2. 3.
Need help?
Do you have a question about the XC Cube Mini and is the answer not in the manual?
Questions and answers