Table of Contents
Advertisement
Quick Links
Copyright
All rights are reserved. No part of this publication may be reproduced, transmitted, transcribed,
stored in a retrieval system or translated into any language or computer language, in any form or by
any means, electronic, mechanical, magnetic, optical, chemical, manual or otherwise, without the
prior written permission of the company. Brands and product names are trademarks or registered
trademarks of their respective companies.
The vendor makes no representations or warranties with respect to the contents herein and especially
disclaim any implied warranties of merchantability or fitness for any purpose. Further the vendor
reserves the right to revise this publication and to make changes to the contents herein without
obligation to notify any party beforehand. Duplication of this publication, in part or in whole, is not
allowed without first obtaining the vendor's approval in writing.
Disclaimer
We make no warranty of any kind with regard to the content of this user's manual. The content is
subject to change without notice and we will not be responsible for any mistakes found in this user's
manual. All the brand and product names are trademarks of their respective companies.
FCC Compliance Statement
This equipment has been tested and found to comply with the limits of a Class B digital device,
pursuant to Part 15 of the FCC Rules. These limits are designed to provide reasonable protection
against harmful interference in a residential installation. This equipment generates, uses and can
radiate radio frequency energy and, if not installed and used in accordance with the instructions, may
cause harmful interference to radio communications. Operation of this equipment in a residential
area is likely to cause harmful interference in which case the user will be required to correct the
interference at his own expense. However, there is no guarantee that interference will not occur in a
particular installation.
Ver:EG100
PM800 Pro (V2.0)
Advertisement
Table of Contents

Related Manuals for Albatron PM800 Pro (V2.0)


Summary of Contents for Albatron PM800 Pro (V2.0)
-
Page 1: Fcc Compliance Statement
PM800 Pro (V2.0) Copyright All rights are reserved. No part of this publication may be reproduced, transmitted, transcribed, stored in a retrieval system or translated into any language or computer language, in any form or by any means, electronic, mechanical, magnetic, optical, chemical, manual or otherwise, without the prior written permission of the company. -
Page 2: Package Contents
You have to know !!! The images and pictures in this manual are for reference only and may vary slightly from actual product installation depending on specific hardware models, third party components and software versions. Unplug your computer when installing components and configuring switches and pins. - Page 3 PM800 Pro(V2.0) PM800 & VT8237 ® Supports Socket 478 Intel Pentium ® ® (Willamette/ Northwood/ Prescott) Processor User Manual Enabling Hyper-Threading for your computer system requires ALL of the following components CPU: An Intel Pentium 4 Processor with HT Technology ®...
-
Page 4: Table Of Contents
Contents CHAPTER 1. GETTING STARTED ............2 ......................2 NTRODUCTION ......................3 PECIFICATION Hardware Installation ................... 7 CPU Processor Installation ................... 7 Memory Installation ..................... 8 Back Panel Configuration..................9 Front Panel Indicator: SW/LED、PWRLED、SPEAKER ....... 11 Headers & Jumpers..................... 13 Audio Connectors ....................14 Slots ........................ -
Page 5: Chapter 1. Getting Started
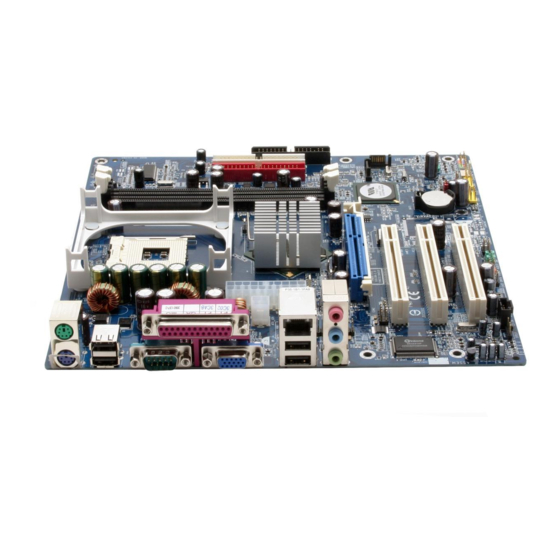
PM800 Pro(V2.0) Chapter 1. Getting Started Introduction Congratulations on choosing the PM800 Pro(v2.0) mainboard !These are based on the VIA® PM800 Northbridge chipset and the VIA® VT8237 Southbridge chipset. It supports Intel® Pentium® 4 (Willamette/ Northwood/ Prescott) Processors with a FSB (Front Side Bus) frequency of 400/ 533/ 800 MHz. -
Page 6: Specification
PM800 Pro(V2.0) Specification CPU: ® Supports Socket 478 Pentium 4 processor Supports Hyper-Threading Technology Speed: 400/ 533/ 800 MHz Front Side Bus frequencies 33 MHz, 32 bit PCI interface (PCI 2.2 compliant) 66 MHz AGP 3.0 compliant interface that supports 8X/ 4X data transfer modes (only supports 0.8V/ 1.5V) Chipset: Northbridge Chipset –... -
Page 7: Flash Memory
PM800 Pro(V2.0) BUS Slots: AGP slot (8X/ 4X, 1.5V or 0.8v) x 1 PCI bus slot x 3 CNR bus slot x 1 (Optional) Flash Memory: Supports flash memory functionality Supports ESCD functionality Hardware Monitor Function: Monitors CPUFAN/ CHASFAN Speeds Monitors system Voltage Infrared: Supports IrDA Version 1.0 SIR Protocol with a maximum baud rate of up to 115.2 Kbps... - Page 8 PM800 Pro(V2.0) Onboard Video Graphic Acceleration: Supports 2D Acceleration Supports 3D Acceleration Supports Video Acceleration ® Micorsoft DirectX compatible OpenGL dreiver available I/O facilities: One multi-mode Parallel Port capable of supporting the following specifications: Standard & Bi-direction Parallel Port Enhanced Parallel Port (EPP) Extended Capabilities Port (ECP) Supports one serial ports, 16550 UART Supports one VGA port...
-
Page 9: Watch Dog Timer
PM800 Pro(V2.0) Watch Dog Timer: This mainboard contains a special feature called the “Watch Dog Timer” which is used to detect when the system is unable to handle over-clocking configurations during the POST stage. Once a problem is detected the system will reset the configurations and reboot the system after five seconds. -
Page 10: Hardware Installation
PM800 Pro(V2.0) Rear (back) side connectors. JPANEL1: Front Panel headers. JCMOS1: Clear CMOS header. JAUDIOIN1: Front side audio out header. (Optional) JCDIN1: CD-In connector. JCI1: Chassis open header. JSPDIF1: Digital Audio connector. JSATA1~2: Serial ATA connectors. (Optional) CNR1: Communication Network Riser AGP1: Accelerated Graphics Port slot. -
Page 11: Memory Installation
PM800 Pro(V2.0) 4. Smear thermal grease on top of the CPU. Lower the CPU fan onto the CPU and use the clasps on the fan to attach it to the socket. Finally, extend the power cable from the fan and insert it onto the CPUFAN adapter. -
Page 12: Back Panel Configuration
PM800 Pro(V2.0) 3. Lower the RAM module into the DIMM Slot and press firmly using both thumbs until the module snaps into place. 4. Repeat steps 1-3 for the remaining RAM modules. * The pictures above are for reference only and may vary slightly for your mainboard. Back Panel Configuration JUSBLAN1 JKBMS1... -
Page 13: Audio Port Connectors
PM800 Pro(V2.0) Assignment Assignment Assignment Assignment +5 V (fused) USBP0+/P1+ USBP0-/P1- Ground Serial and Parallel Interface Ports The mainboard comes equipped with one serial port , one VGA port and one parallel port on the back panel. These interface ports will be explained below. Print Port Parallel Interface Port: PRT The parallel port on your system has a 25-pin, DB25 connector and is used to interface with parallel... -
Page 14: Front Panel Indicator: Sw/Led、Pwrled、Speaker
PM800 Pro(V2.0) Mic In is used to connect to a microphone. If the Super 5.1 driver is installed the Mic In becomes the Subwoofer/ Center out. This mainboard supports Super 5.1 Channel Audio effects which turns your standard Speaker Out, Lin In, Mic In audio connectors into a 6 channel audio system. - Page 15 PM800 Pro(V2.0) PWR-LED (2-pin Power LED Header) The mainboard provides two power LED connector.If there is a 2-pin power LED cable on the front panel of a computer case. You can attach it to the 2-pin power LED connector. The LED will illuminate while the computer is powered on.
-
Page 16: Headers & Jumpers
PM800 Pro(V2.0) SATA1/ SATA2 The SATA connectors support transfer rate to 150 MB/s and SATA RAID 0 or 1 mode. The connectors only can connect one serial ATA hard disk device each. Assignment Assignment Ground Ground JSATA1~2 Ground Headers & Jumpers Front USB Headers: USB3 USB4 You can connect the USB Bracket to the USB3/ USB4 header. -
Page 17: Audio Connectors
PM800 Pro(V2.0) Audio Connectors This mainb oard provides three connectors as part of its audio Subsystem. CD-ROM Audio-In Header: JCDIN1 This header is used to connect to a CD-ROM / DVD audio cable. Assignment Left channel input Ground JCDIN1 Ground Right channel input Front Panel Audio Header: JAUDIO1 JAUDIO1... -
Page 18: Power Supply Attachments
PM800 Pro(V2.0) ower Supply Attachments ATX Power Connector: ATX_PWR & ATX_12V his mainboard has two ATX power connections; a 20-pin connector and a 4-pin connector. You can connect power supply to the ATX_PWR conne ctor only or connect to both of the ATX_PWR and ATX_12V connectors. -
Page 19: Appendix I: Super 5.1 Channel Setup
PM800 Pro(V2.0) Appendix I: Super 5.1 Channel Setup This appendix describes the ins tallation procedures for 5.1 Channel Setup. Note that if your operating system is Windows 98/ ME/ 2000, go directly to step 3. 1. Beginning with the “Start” button, select Setting Control Panel Sounds, Speech, and Audio Devices... - Page 20 PM800 Pro(V2.0) 4. On the “Front Speaker” screen, select “Options Properties”, then che ck “Rear Speaker” item and click OK. Also on the “Front Speaker” screen, select “Options Advanced Controls”. . Next, click the “Advanced” button of the Front Speaker, then check the “...
Need help?
Do you have a question about the PM800 Pro (V2.0) and is the answer not in the manual?
Questions and answers