Janome Sewing Machine Instruction Book
Hide thumbs
Also See for Sewing Machine:
- Instruction book (138 pages) ,
- Getting started manual (112 pages) ,
- Instruction manual (92 pages)
Table of Contents
Advertisement
Advertisement
Table of Contents

Related Manuals for Janome Sewing Machine


Summary of Contents for Janome Sewing Machine
- Page 1 INSTRUCTION BOOK...
-
Page 2: Important Safety Instructions
Use only attachments recommended by the manufacturer as contained in this ownerʼs manual. 3. Never operate this sewing machine if it has a damaged cord or plug, if it is not working properly, if it has been dropped or damaged, or dropped into water. - Page 3 5. The maximum permissible power for the sewing lamp bulb is 5 watts. 6. When using your sewing machine for the first time, place a piece of waste fabric under the presser foot and run the machine without thread for a few minutes. Wipe away any oil which...
-
Page 4: Table Of Contents
KNOW YOUR MACHINE UTILITY STITCHES Names of Parts ..............2 Buttonholes ..............34 Attaching the quick referencce board ........ 2 Variety of buttonholes ..........34 Standard Accessories ............3 Sensor buttonholes ............ 34 Double layer buttonhole ..........37 GETTING READY TO SEW Corded buttonhole ............. -
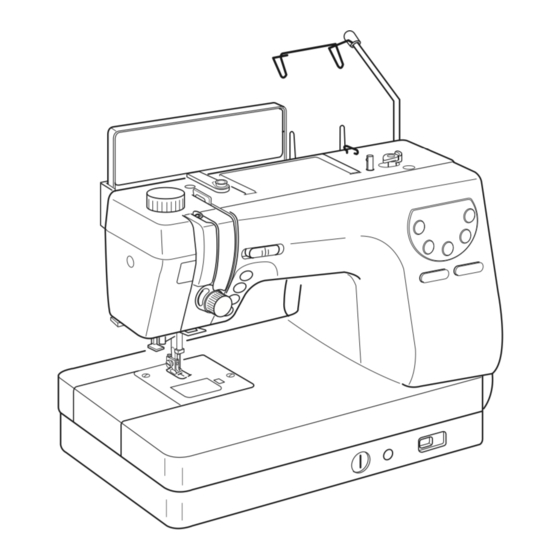
Page 5: Know Your Machine Names Of Parts
KNOW YOUR MACHINE Name of Parts 1. Foot Pressure Dial 2. Thread Take-up Lever 3. Thread Guide 4. Quick Reference Board 5. Speed Control Lever 6. Retractable Thread Guide 7. Bobbin Winder Spindle 8. Bobbin Winder Stopper 9. LED Window 10. -
Page 6: Standard Accessories
Standard Accessories 1. Zigzag Foot A (comes attached to the machine) 2. Overedge Foot C 3. Rolled Hem Foot D 4. Zipper Foot E 5. Satin Stitch Foot F 6. Blind Hem Foot G 7. Cording Foot H 8. Overcasting Foot M 9. -
Page 7: Getting Ready To Sew Connecting The Power Supply
GETTING READY TO SEW Connecting the Power Supply Turn off the power switch. Insert the foot control plug into the machine socket. Insert the machine plug into the machine socket. Insert the power supply plug into the wall outlet. Turn on the power switch. 1 Power Switch 2 Foot Control Plug 3 Machine Socket... -
Page 8: Function Buttons
Function Buttons 1 Thread cutter button Press this button after finishing sewing and the machine will trim the threads. The LED signal blinks while cutting the threads. 5 Thread Cutter Signal NOTES: The auto thread cutter does not work if the presser foot is raised. - Page 9 Function Buttons 6 Stitch width adjusting button: Press this button to alter the stitch width. 7 Stitch length adjusting button: Press this button to alter the stitch length. 8 Pattern selection buttons Press one of these buttons until a pattern number of the desired 1 Bobbin winding button: pattern is displayed in the LED Press this button to wind the bobbin.
-
Page 10: Raising And Lowering The Presser Foot
Raising and Lowering the Presser Foot The presser foot lifter raises and lowers the presser foot. You can raise the presser foot about 6 mm (1/4") higher than the normal up position by exerting more pressure when lifting the presser foot lifter. This allows for easy removal of the presser foot and helps you to place thick fabrics under it. -
Page 11: Variety Of Presser Feet And Their Uses
Variety of Presser Feet and Their Uses Zigzag foot A: This is the most versatile foot. It can be used for various stitches including straight stitches and zigzag stitches. It is designed to achieve firm and neat seam results. Overedge foot C: This foot is exclusively for overedging. -
Page 12: Changing The Presser Foot
Changing the Presser Foot CAUTION: Turn OFF the power switch before changing the foot. Always use the proper foot for the selected pattern. Wrong foot can cause the needle to break. To snap off: Raise the needle and presser foot. Press the red button on the back of the foot holder and the foot will drop. -
Page 13: Attaching The Even Feed Foot
Attaching the even feed foot Remove the foot holder. Attach the even feed foot to the presser bar with the lever over the needle clamp screw and secure it with the thumb screw. 1 Thumb screw 2 Lever 3 Presser Bar Attaching the darning foot P Loosen the thumbscrew and remove the foot holder. -
Page 14: Winding The Bobbin
Winding the Bobbin Removing the bobbin Slide the hook cover plate release button to the right, and remove the hook cover plate. Lift out the bobbin from the bobbin holder. 1 Hook Cover Plate Release Button 2 Hook Cover Plate 3 Bobbin NOTES: Avoid using a bobbin when it begins to empty since it... -
Page 15: Winding The Bobbin
Winding the bobbin z Pass the thread through the guide on the thread guide post from behind. 1 Thread Guide Post x Pass the thread under the bobbin winding tension disk. 2 Bobbin Winding Tension Disk c Thread through the hole in the bobbin from the inside to the outside. -
Page 16: Inserting The Bobbin
Inserting the bobbin z Place the bobbin in the bobbin holder with the thread running off counterclockwise. 1 Thread 2 Bobbin Holder x Guide the thread into notch (A) on the front of the bobbin holder. c Draw the thread to the left, sliding it between the tension spring blades. -
Page 17: Threading The Machine
Threading the Machine Raise the presser foot lifter. Press the up/down needle button twice to raise the needle to its highest position. z Pass the thread through the guide on the thread guide bar from behind. 1 Thread Guide Bar x Pass the thread through the right thread guide. - Page 18 Threading the Machine (continued) b Draw the thread down and around the tension dial from the right to the left. While holdin the thread beside the left thread guide, pull the thread up to insert it between the tension disks and under the loop of the check spring.
-
Page 19: Automatic Needle Threader
Automatic Needle Threader Raise the needle to its highest position by pressing the up/down needle button twice. Turn the power switch off. Lower the presser foot. z Depress the needle threader knob as far as it will go. The hook comes out through the needle eye from behind. -
Page 20: Drawing Up The Bobbin Thread
Drawing Up the Bobbin Thread z Raise the Presser Foot Lifter. Hold the needle thread with your finger and press the up/down needle button twice to pick up the bobbin thread. 1 Needle Thread 2 Needle Up/Down Button x Draw up the needle thread to bring up a loop of the bobbin thread. -
Page 21: Changing Needles
Changing Needles Raise the needle by pressing the up/down needle button and lower the presser foot. Turn off the power switch. z Loosen the needle clamp screw by turning it counterclockwise. Remove the needle from the clamp. 1 Needle Clamp Screw x Insert a new needle into the needle clamp with the flat side of the needle to the rear. -
Page 22: Balancing Thread Tension
Balancing Thread Tension Correct tension: The ideal straight stitch has threads locked between two layers of fabric. For an ideal zigzag stitch, the bobbin thread does not show on the right side of the fabric, and the needle thread shows slightly on the wrong side of the fabric. -
Page 23: Adjusting The Foot Pressure
Adjusting the Foot Pressure The foot pressure dial should be set at “3” for regular sewing. Reduce the pressure for appliqué, sewing on fine synthetics and elastic fabrics. Set the dial at “1” when sewing extra fine fabrics. 1 Foot Pressure Dial 2 Setting mark NOTE: Do not reduce the foot pressure lower than “0”. -
Page 24: Basic Stitches Straight Stitch
BASIC STITCHES Straight Stitch Machine Setting Pattern: 01 or 02 Thread tension:2-6 Presser foot: Zigzag foot A Foot pressure: 3 To sew Raise the presser foot and position the fabric next to a seam guide line on the needle plate. Lower the needle to the point where you wish to start. -
Page 25: Changing Sewing Direction
Changing sewing direction: Stop the machine a few stitches before the end of a seam. Press the up/down needle button a few times until the needle falls on the end of the seam. Raise the presser foot. Pivot the fabric around the needle to change the sewing direction as desired. -
Page 26: Adjusting The Needle Drop Position
Adjusting the needle drop position The needle drop position can be altered by pressing the stitch width adjusting button. Press the right side of the button (+ sign) to move the needle bar to the right. Press the left side of the button (- sign) to move the needle bar to the left. -
Page 27: Variety Of The Straight Stitches
Variety of the straight stitches 02 Straight stitch with left needle position Use this stitch to seam the edge of fabrics. 03 Lock-a-Matic stitch Use this stitch to secure the beginning and the end of a seam with backstitching. When you reach the end of the seam, press the reverse button once. -
Page 28: Basting
Basting Machine Setting Pattern: 06 Thread tension:1-3 Presser foot: Darning foot P Foot pressure: 1 Feed dog: Dropped The basting stitch is used to hold fabric layers together during fitting. Lower the feed dog and set the foot pressure dial at “1”. Draw the both needle and bobbin threads to the back. -
Page 29: Zigzag Stitch
Zigzag Stitch Machine Setting Pattern: 07 Thread tension: 3-7 Presser foot: Zigzag foot A Foot pressure: 3 Zigzag stitch is used for various sewing needs including overcasting. It can be used on most woven fabrics. A dense zigzag stitch can also be used for appliqué. Adjusting the stitch width Press the right side of the button (+ sign) to increase the stitch width. -
Page 30: Variety Of Overcasting Stitches
Variety of Overcasting Stitches Overcasting with zigzag stitch Machine Setting Pattern: 07 Thread tension: 3-7 Presser foot: Overedge foot C Foot pressure: 3 Place the fabric edge next to the guide of the foot and then sew. 1 Edge of Fabrics 2 Guide 3 Wires on Foot CAUTION:... - Page 31 Variety of Overcasting Stitches (continued) Multiple zigzag stitch (Tricot stitch) Machine Setting Pattern: 08 Thread tension: 3-7 Presser foot: Zigzag foot A Foot pressure: 3 This stitch is used to finish a raw edge of synthetics and other stretch fabrics that tend to pucker. Sew along the fabric edge leaving an adequate seam allowance.
-
Page 32: Zipper Sewing
Zipper Sewing Machine Setting Pattern: 01 Thread tension: Presser foot: Zipper foot E Foot pressure: 3 To attach the zipper foot E Fit the pin on zipper foot E to the groove on the foot holder. 1 Groove 2 Pin 4 To sew the left side of the zipper, attach zipper foot E with the pin on the right-hand side. - Page 33 To sew c Fold back the left seam allowance. Turn the right seam allowance under to form a 0.2 to 0.3 cm (1/8“) fold. place the zipper teeth next to the fold and pin it in place. Set the stitch length and thread tension back to the original setting.
- Page 34 n Close the zipper and spread the fabric open flat with the right side facing up. Baste the opened fabric and zipper tape together. 11 Basting 12 Zipper Tap m Re-attach the zipper foot E with the left pin. Backstitch across the end of opening to 0.7 – 1 cm (3/8“).
-
Page 35: Rolled Hem
Rolled Hem Machine Setting Pattern: 01 Thread tension: 2-6 Presser foot: Rolled hem foot D Foot pressure: 3 To sew: Fold the edge of the fabric twice, 6 cm (2 3/8”) in length and 0.3 cm (1/8”) in width. Trim the corner 0.5 cm (3/16”) by 0.8 cm (1/4”) for easier insertion of the hem into the foot. -
Page 36: Blind Hem
Blind Hem Machine Setting Pattern: 13 or 14 Thread tension: 1-4 Presser foot: Blind hem foot G Foot pressure: 3 Select the pattern 13 for woven fabrics or pattern 14 fo elastic fabrics. NOTE: The stitch width of the patterns 13 and 14 cannot be changed, but the needle drop position will move. -
Page 37: Utility Stitches Buttonholes
UTILITY STITCHES Buttonholes Variety of buttonholes 16 Sensor (Square) BH This square buttonhole is widely used on medium to heavy weight fabrics. The buttonhole size is automatically determined by placing a button in the foot. 17 Automatic (Square) BH This is also a square buttonhole similar to the sensor square buttonhole, but you can manually set and memorize the buttonhole size to sew buttonholes of the same size. - Page 38 c Pull the buttonhole lever down as far as it will go. 1 Buttonhole Lever NOTE: If you start sewing without pulling down the buttonhole lever, the LED window will show a warning and the machine will stop after a few stitches. Pull the buttonhole lever down and restart the machine.
- Page 39 b Start the machine to sew the buttonhole. The buttonhole will be automatically sewn. Step 1: The machine will sew the front bartack and the left row first. Then it goes back to the starting point with straight stitch. Step 2: The machine will sew the right row. Step 3: The machine will sew the back bartack, and the machine will stop and trim the threads automatically.
-
Page 40: Double Layer Buttonhole
Double layer buttonhole To make a solid and sturdy buttonhole, sew another layer of buttonhole over the previous stitches. After the buttonhole is finished, simply start the machine again. Do not raise the foot or buttonhole lever. The machine will sew another buttonhole in the following order and stop automatically when it is completed: Step 1 Step 1: Straight stitching in reverse to go back to the... -
Page 41: Changing Buttonhole Width
Changing buttonhole width Press the stitch width adjusting button to alter the buttonhole width. The width of the buttonhole will be imdicated in the LED window. Press on “+“ to increase the buttonhole width. Press on “—“ to decrease the buttonhole width. 1 Narrower Buttonhole 2 Wider Buttonhole Changing buttonhole stitch density... -
Page 42: Automatic Buttonhole
Automatic buttonhole Machine Setting Pattern: 17 Thread tension: 1-5 Presser foot: Automatic buttonhole foot R Foot pressure: 3 z Pull the button holder of the buttonhole foot all the way out. Insert the fabric under the foot. Press the up/down needle button twice. - Page 43 c Start the machine again. The machine will automatically tack and sew down the right side of the buttonhole. Stop the machine when you are directly opposite the starting point. Press the reverse button. 6 Starting Point v Keep the foot control depressed. The machine will sew a bartack, lock the stitches and automatically stop when the buttonhole is completed.
-
Page 44: Button Sewing
Button Sewing Machine Setting Pattern: 07 Thread tension: 3-7 Presser foot: Satin stitch foot F Foot pressure: 3 Feed dog: Dropped Unthread the needle thread. Adjust the stitch width so that the needle enters both holes in the button. Place a button on the fabric and lower the needle by turning the handwheel, so that the needle enters into the left hole in the button. -
Page 45: Darning
Darning Machine Setting Pattern: 20 Thread tension: 3-6 Presser foot: Automatic buttonhole foot R Foot pressure: 3 Pull the button holder to the rear. Place the garment under the foot. Press the up/down needle button twice. Remove the fabric to the left to draw both threads under the foot and place the fabric back under the foot. -
Page 46: To Sew A Shorter Darning
To sew a shorter darning To sew a darning shorter than 2 cm (3/4”), first stop the machine after sewing the required length, then press the reverse button. The required length has been determined. Restart the machine and continue sewing until the machine stops automatically. -
Page 47: Tacking
Tacking Machine Setting Pattern: 21 Thread tension: 3-6 Presser foot: Satin stitch foot F Foot pressure: 3 Tacking is used to reinforce pockets, crotches and belt carriers where extra strength is needed. To sew Depress the foot control until the machine stops automatically. -
Page 48: Eyelet
Eyelet Machine Setting Pattern: 22 Thread tension: 1-4 Presser foot: Satin stitch foot F Foot pressure: 3 The eyelet is used for belt holes, etc. To sew Depress the foot control to sew. The machine will sew an eyelet and stop automatically when completed. -
Page 49: Patchwork And Quilting Patchwork
PATCHWORK AND QUILTING Patchwork Seaming patchwork pieces Machine Setting Pattern: 01 Thread tension: 2-6 Presser foot: 1/4” Seam foot O Foot pressure: 3 Place the patchwork pieces right sides together. Sew while guiding the edge of the fabric along the guide on the foot to keep a precise 1/4”... -
Page 50: Quilting Bar For The Zigzag Foot
Quilting bar for the zigzag foot Machine Setting Pattern: 01 Thread tension: 2-6 Presser foot: Zigzag foot A Foot pressure: 2 Reduce the foot pressure to “2” for better handling of bulky material. To attach Loosen the screw on the back of the foot holder. Insert the quilting bar into the opening and slide the quilting bar to set the width at the space of the seams you desire. -
Page 51: Clasp Stitch
Clasp stitch Machine Setting Pattern: 29 Thread tension: 3-6 Presser foot: Satin stitch foot F Foot pressure: 2-3 You can bind the thick quilt layers together with the clasp stitch. Select pattern 29. Press the memory button. Select pattern 47 (locking stitch). Press the memory button. -
Page 52: Pattern Programming And Decorative Stitches
PATTERN PROGRAMMING AND DECORATIVE STITCHES Programming a Pattern Combination Example: Programming patterns 36 and 38. Select pattern 36. Press memory button. Select pattern 38. Press memory button. NOTE: Set the thread tension at 1-4, foot pressure at 3 and use the satin stitch foot F when sewing the programmed pattern combination. -
Page 53: Pattern Combination With Auto Thread Cutting
Pattern combination with auto thread cutting Example: Programming the patterns 36 and 53 with auto thread cutting (pattern 48). Select the pattern 36. Press memory button. Select pattern 53. Press memory button. Select pattern 48 (auto thread cutting). Press the memory button. The LED signal on the thread cutter button will blink. -
Page 54: Elongation Sewing
Elongation Sewing Patterns number 36-48 can be elongated. Example: Select pattern 23. Press the elongation button. When pressing the elongatioin button, the pattern will be elongated up to 5 times of the original pattern length (L2 to L5). NOTE: The stitch density remains unchanged. -
Page 55: Fagoting
Fagoting Machine Setting Pattern: 54 Thread tension: 1-4 Presser foot: Satin stitch foot F Use this stitch to join two pieces of fabric to create an open work appearance. Fold under each fabric eadge and press. Pin the two edges to a piece of paper or tear away backing 0.3 cm apart. -
Page 56: Applique
Applique Machine Setting Pattern: 60 or 61 Thread tension:1-4 Presser foot: Satin stitch foot F Foot pressure: 2 The open toe satin stitch foot F-2 can also be used. Applique Place an applique on the fabric and baste it in place or use a fusible web to secure the applique in place. -
Page 57: Twin Needle Sewing
Twin Needle Sewing NOTES: When you sew patterns with the twin needle, press the twin needle button and test the stitches first before you begin to sew. Use the zigzag foot A or satin stitch foot F for twin needle sewing. Turn off the machine before changing the needle. - Page 58 To sew Example: Select pattern 36. Press the twin needle button . The LED above the twin needle button will turn on and the maximum stitch width is restricted to 3.0 mm. NOTE: The maximum stitch width is based on a 2 mm wide twin needle.
-
Page 59: Correcting Distorted Patterns
Correcting Distorted Stitch Patterns The sewing results of the stretch stitch patterns may vary depending upon the sewing conditions, such as sewing speed, type of the fabric, number of layers, etc. Always test sew on a scrap piece of the fabric that you wish to use. -
Page 60: Reviewing The Programmed Pattern Combination
Reviewing the Programmed Pattern Combination Example: To review the combination of patterns 36, 26 and 40. Press the twin needle button and pattern number 36 will be indicated in the LED window. Press the twin needle button again and pattern numeber 26 will be indicated. -
Page 61: Inserting A Pattern In The Programmed Combination
Inserting a Pattern in the Programmed Combination Example: To insert pattern 53 before pattern 40 in the combination of patterns 36, 26 and 40. Press the twin needle button until pattern number 40 is indicated. Select pattern 53. Press the memory button to memorize pattern 53. The LED window will indicate the next pattern, number 40. -
Page 62: Uniform Stitch Adjustment Of The Programmed Patterns
Uniform Stitch Adjustment of the Programmed Patterns The stitch length and width of the programmed patterens can be adjusted uniformly. Example: To adjust stitch lengh and width of programmed patterns 36 and 38. Program the patterns 36 and 38. The LED window will indicate "–... -
Page 63: Individual Stitch Adjustment Of The Progarmmed Pattens
Individual Stitch Adjustment of the Programmed Patterns The stitch length and width of the programmed patterens can be adjusted individually. Example: To adjust stitch width of pattern 38 in the combination of patterns 36 and 38. Program the patterns 36 and 38. The LED window will indicate "–... -
Page 64: Care Of The Machine
CARE OF THE MACHINE Cleaning the Hook Race and Feed Dog WARNING: Turn the power switch off and unplug the machine before cleaning. CAUTION: Do not dismantle the machine in any way other than what is explained on this page. Remove the needle and presser foot. -
Page 65: Replacing The Light Bulb
Replacing the Light Bulb WARNING: Turn the power off before replacing the light bulb. The bulb could be HOT, wait until it has cooled down before touching it. To remove: Remove the setscrew. Remove the faceplate. Swing the lamp socket to the left and pull out the bulb. To replace: Insert a new bulb into the opening of the socket. -
Page 66: Problems And Warning Signals
Problems and Warning Signals If a buzzer sounds and the LCD screen shows a warning sign, follow the guidance below. Warning Sign Cause Try this Lower the presser foot and start The machine is started without lowering the presser the machine. foot. - Page 67 Warning Sign Cause Try this LED blinks The power is turned on with the needle in the Press the up/down needle button down position. to raise the needle. The power is turned on again after auto thread LED blinks Press the Thread cutter button cutting has been interrupted.
-
Page 68: Troubleshooting
Troubleshooting Cause Condition Reference 1. The needle thread is not threaded properly. The needle thread Pages 14, 15 2. The needle thread tension is too tight. breaks. Page 19 3. The needle is bent or blunt. Page 18 4. The needle is incorrectly inserted. Page 18 5. - Page 69 Printed in Taiwan 846-800-738 (E)
Need help?
Do you have a question about the Sewing Machine and is the answer not in the manual?
Questions and answers