Janome Sewing Machine Instruction Book
Hide thumbs
Also See for Sewing Machine:
- Instruction book (138 pages) ,
- Getting started manual (112 pages) ,
- Instruction manual (92 pages)
Table of Contents
Advertisement
Quick Links
Advertisement
Table of Contents

Related Manuals for Janome Sewing Machine


Summary of Contents for Janome Sewing Machine
- Page 1 INSTRUCTION BOOK MANUAL DE INSTRUCCIONES LIVRET D’INSTRUCTIONS...
- Page 2 Use only attachments recommended by the manufacturer as contained in this owner’s manual. 3. Never operate this sewing machine if it has a damaged cord or plug, if it is not working properly, if it has been dropped or damaged, or dropped into water.
- Page 3 INSTRUCCIONES IMPORTANTES DE SEGURIDAD Esta máquina no fue concebida para ser usada por personas (incluyendo a los niños) con capacidades físicas, sensoriales o mentales reducidas, o bien con falta de experiencia y conocimientos, salvo si están supervisadas o han recibido instrucciones relativas al uso de la máquina por parte de una persona encargada de su seguridad.
- Page 4 INSTRUCTIONS DE SÉCURITÉ IMPORTANTES Cette machine n’est pas censée être utilisée par des personnes (y compris des enfants) ayant des capacités physiques, sensorielles ou mentales réduites ou un manque d'expérience et de connaissances, sauf si elles sont sous surveillance ou ont été instruites sur l’usage de la machine par une personne responsable de leur sécurité. Les enfants devraient être surveillés pour s’assurer qu’ils ne jouent pas avec la machine.
-
Page 5: Table Of Contents
SECTION I. ESSENTIAL PARTS Names of Parts ............................2 Standard Accessories ..........................4 SECTION II. GETTING READY TO SEW Connecting Machine to Power Supply ...................... 6 Operating Instructions ..........................6 Controlling Sewing Speed ......................... 6 Presser Foot Lifter ............................. 8 Extension Table ............................ - Page 6 SECCIÓN I. DESCRIPCIÓN DE LA MÁQUINA Nombre de las partes ..........................3 Accesorios esrádar ............................ 5 SECCION II. PREPARACION DE LA MAQUINA PARA COSER Conexión de la máquina a la red eléctrica ....................7 Instrucciones para la operación ......................... 7 Control de la velocidad de costura ......................
- Page 7 PARTIE I. PIÈCES PRINCIPALES Identification des composants ........................3 Accessoires fournis avec la marchine ....................... 5 PARTIE II. PRÉPAREZ-VOUS À COUDRE Branchez la machine ..........................7 Consignes d’utilisation ..........................7 Contrôlez la vitesse de couture ........................7 Relève-pied presseur ..........................9 Table d’extension ............................
-
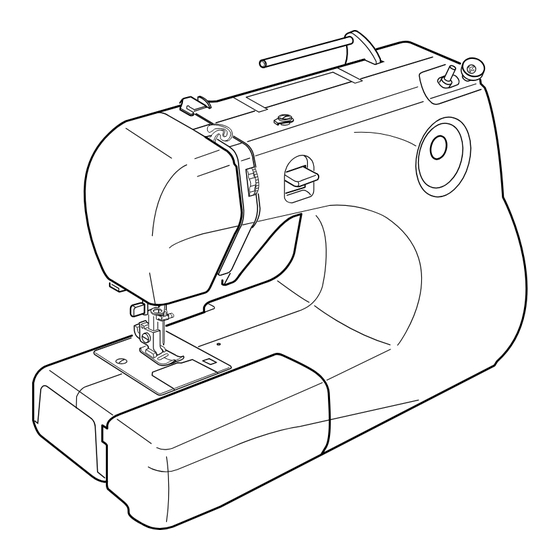
Page 8: Section I. Essential Parts
@5 Carrying handle @6 Handwheel @7 Stitch pattern selector dial @8 Power switch @9 Machine socket #0 Presser foot lifter #1 Drop feed dogs lever #2 Free-arm NOTE: Sewing machine design and specifications are subject to change without prior notice. -
Page 9: Nombre De Las Partes
SECCIÓN I. DESCRIPCIÓN DE LA MÁQUINA PARTIE I. PIÈCES PRINCIPALES Nombre de las partes Identification des composants q Pasador de carrete (página 15) q Porte-bobine (page 15) w Orificio w Trou e Devanador de canilla e Broche du dévidoir r Tira hilos r Levier releveur de fil t Guía hilos t Guide-fil... -
Page 10: Standard Accessories
Standard Accessories q Bobbins w Needle set e Sliding buttonhole foot r Serging foot: U t Seam ripper/Buttonholeopener y Large spool holder u Small spool holder i Screwdriver o Spool pin... -
Page 11: Accesorios Esrádar
Accesorios esrádar Accessoires fournis avec la marchine q Canillas q Canettes w Juego de agujas w Jeu d’aiguilles e Prensatelas para ojal incorporado e Pied à boutonnière coulissant r Prensatelas de surjet: U r Pied de surfilage: U t Cortador/Abreojales t Découd-vite/Ouvre boutonnière y Tapa-carretes grande y Grande rondelle de porte-bobine... -
Page 12: Section Ii. Getting Ready To Sew Connecting Machine To Power Supply
SECTION II. GETTING READY TO SEW Connecting Machine to Power Supply q Power switch w Machine plug e Machine socket r Power supply plug t Wall outlet Before connecting the power cord, make sure the voltage and frequency shown on the machine conform to your electrical power. -
Page 13: Conexión De La Máquina A La Red Eléctrica
SECCION II. PREPARACION DE LA PARTIE II. PRÉPAREZ-VOUS À COUDRE MAQUINA PARA COSER Branchez la machine Conexión de la máquina a la red eléctrica q Interrupteur de mise sous tension q Interruptor de encendido w Fiche de la machine w Enchufe de la máquina e Prise de courant de la machine e Toma de la máquina r Fiche d’alimentation... -
Page 14: Presser Foot Lifter
Presser Foot Lifter The presser foot lifter raises and lowers the presser foot. You can raise the foot about 1/4˝ (0.6 cm) higher than the normal up position for easy removal of the presser foot, or to help you place heavy fabric under the foot. q Lowered position w Normal up position e Extra up position... -
Page 15: Palanca De Elevación Del Prensatelas
Relève-pied presseur Palanca de elevación del prensatelas Le releveur de pied permet de relever et d’abaisser le pied El alzador del prensatelas sube y baja el prensatelas presseur. Puede subirlo hasta unos 0,6 cm por encima de la posición Vous pouvez le relever à environ 0.6 cm au-dessus de la normal para facilitar el desmontaje del prensatelas o para position relevée normale pour pouvoir retirer facilement le pied colocar tejidos pesados bajo él. -
Page 16: To Snap On And Snap Off The Presser Foot
To Snap On and Snap Off the Presser Foot <To snap off:> Turn the handwheel toward you to raise the needle to its highest position. Raise the presser foot. Press the lever on the back of the foot holder. The presser foot will drop off. * When pressing the lever, the lever should be pushed in the direction of the arrow. -
Page 17: Montaje Y Desmontaje Del Prensatelas
Montaje y desmontaje del prensatelas Mettre en place et retirer le pied presseur <Desmontaje> <Pour retirer> Gire el volante hacia usted para elevar la aguja a la posición Tourner le volant vers soi pour mettre l’aiguille dans la position más alta. la plus élevée. -
Page 18: Changing The Needle
Changing the Needle q Needle clamp screw w Needle clamp e Flat side r Gap z Turn off the power switch. Raise the needle to its highest position by turning the handwheel counterclockwise, toward you, and lowering the presser foot. Loosen the needle clamp screw q by turning it counterclockwise. -
Page 19: Cambio De Aguja
Changer l’aiguille Cambio de aguja q Vis du pince l’aiguille q Tornillo de sujeción de la aguja w Pince l’aiguille w Alojamiento de la aguja e Méplat e Lado plano r Espace r Separación z Éteignez la machine. Faites monter l’aiguille le plus haut z Apague la máquina con el interruptor de corriente. -
Page 20: Bobbin Winding
Bobbin Winding • Setting the spool pin Insert the spool pin into the hole as shown. q Spool pin w Hole • Setting the spool Place a spool of thread on the spool pin with the thread coming off the back of spool as illustrated. A: Press the large spool holder q firmly against the spool of thread. -
Page 21: Bobinado De La Canillas
Remplissage de la canette Bobinado de la canillas • Montage du porte-bobine • Montaje del pasador de carrete Insérez le porte-bobine dans le trou comme montré. IIntroduzca el pasador del carrete en el orificio. q Porte-bobine q Pasador de carrete w Trou w Orificio •... - Page 22 • Winding the bobbin z Pull the handwheel away from the machine to disengage the clutch. x Hold the thread with both hands and pass the thread under the thread guide. q Thread guide c Insert the thread firmly under the bobbin winding tension disc.
- Page 23 • Devanado de la canilla • Remplissage de la canette z Tire del volante hacia afuera. z Tirez le volant vers l’extérieur pour dégager l’embrayage. x Tire del hilo del carrete. Guíe el hilo alrededor del guía hilos. x Tirez le fil de la bobine. Guidez le fil autour du guide-fil. q Guía hilos q Guide-fil c Guíe el hilo alrededor del guía hilos del devanador.
- Page 24 • Inserting the bobbin q End of thread w Notch e Notch r Threading diagram z Place a bobbin in the bobbin holder with the thread running off counterclockwise. x Guide the thread into notch w on the front side of the bobbin holder.
- Page 25 • Colocación de la canilla en el portacanillas • Insertion de la canette q Extremo de hilo q Extrémité du fil w Ranura w Encoche e Ranura e Encoche r Esquema de enhebrado r Guide d’enfilage z Placez la canette dans son support, le fil se déroulant en z Ponga una canilla dentro del portacanillas de modo que el sens antihoraire.
-
Page 26: Threading The Machine
Threading the Machine • Threading the machine * Raise the thread take-up lever q to its highest position by turning the handwheel counterclockwise. * Raise the presser foot lifter. * Place a spool on the spool pin, with the thread coming off the back of spool (refer to page 18). -
Page 27: Enhebrado Del Hilo De La Aguja
Enhebrado del hilo de la aguja Enfilage de la machine • Enhebrado del hilo de la aguja • Enfilage de la machine * Faites monter le levier releveur tendeur de fil le plus haut * Suba el tirahilos hasta su posición más alta girando el possible en tournant le volant à... - Page 28 • Using the needle threader z Turn the handwheel toward you to raise the needle to its highest position. Hold the needle threader knob q and pull it down to its lowest position. q Needle threader knob x Push the needle threader knob q to the back so that the hook e is coming out from the backside of the needle eye.
- Page 29 • Ensartador de agujas • Enfile-aiguille intégré z Eleve la aguja hasta su posición más alta. Baje el tirador q z Soulever l’aiguille à sa position la plus élevée. Appuyer sur le bouton de l’enfile-aiguille q aussi loin que possible. del enhebrador de agujas tanto como pueda.
- Page 30 • Drawing up the bobbin thread z Raise the presser foot and hold the needle thread lightly with your left hand. q Needle thread x Turn the handwheel slowly toward you one complete turn. Bring the bobbin thread up by pulling the needle thread as illustrated.
- Page 31 • Extracción del hilo de la canilla • Remonter le fil de la canette z Suba el prensatelas y sujete el hilo de la aguja suavemente z Relevez le pied-de-biche et maintenez légèrement le fil con la mano izquierda. d’aiguille entre les doigts de votre main gauche. q Hilo de la aguja q Fil d’aiguille x Gire el volante hacia usted un giro completo.
-
Page 32: Adjust The Needle Thread Tension For A Straight Stitch
Adjust the Needle Thread Tension for a Straight Stitch • Correct tension q Needle thread (Top thread) w Bobbin thread (Bottom thread) e To loosen r To tighten The ideal straight stitch has threads locked between two layers of fabric, as illustrated (magnified to show detail). If you look at the top and bottom of a seam, look to see that the stitches are evenly balanced. -
Page 33: Ajuste De La Tensión Del Hilo De La Aguja Para Puntada Recta
Ajuste de la tensión del hilo de la aguja para Réglage de la tension du fil de l’aiguille pour le puntada recta point droit • Tensión correcta • Tension correcte q Hilo de la aguja (Hilo superior) q Fil de l’aiguille (Fil supérieur) w Hilo de la canilla (Hilo inferior) w Fil de la canette (Fil inférieur) e Para aflojar... -
Page 34: Adjust The Needle Thread Tension For A Zigzag Stitch
Adjust the Needle Thread Tension for a Zigzag Stitch For an ideal zigzag stitch, the bobbin thread does not show on the right side (Top side) of the fabric, and the needle thread shows slightly on the wrong side (Bottom side) of the fabric. -
Page 35: Ajuste De La Tensión Del Hilo De La Aguja Para Puntada Zig-Zag
Ajuste de la tensión del hilo de la aguja para Réglage de la tension du fil de l’aiguille pour le puntada zig-zag point zig-zag En la puntada zig-zag ideal, el hilo de la canilla no aparecerá Lorsqu’un point zig-zag est effectué correctement, le fil de la en la parte de arriba de la tela y el hilo de la aguja se verá... -
Page 36: Pattern Selector Dial
Pattern Selector Dial Select the pattern by turning the pattern selector dial and the selected pattern is shown in the pattern indicating window. Raise the needle above the fabrics and raise the presser foot when you turn the pattern selector dial. q Pattern selector dial w Pattern indicating window Reverse Stitch Control... -
Page 37: Perilla De Selección De Patrón
Perilla de selección de patrón Cadran de sélection du modèle de point Seleccione el patrón girando la perilla de selección hasta que Choisir votre modèle de point en tournant le cadran de el patrón deseado aparezca en la ventana indicadora. sélection. -
Page 38: Section Iii. Basic Sewing
SECTION III. BASIC SEWING Straight Stitch Machine setting q Stitch selector: w Needle thread tension: 2 – 6 e Presser foot: Zigzag foot: A • Starting to sew Raise the presser foot and position the fabric next to a seam guide line on the needle plate (5/8˝ (1.6 cm) is most common). -
Page 39: Puntada Recta
SECCION III. COSTURA DE BASICA PARTIE III. BASE DE LA COUTURE Puntada recta Point droit Configuración de la máquina Réglage de la machine q Selector de puntada: q Sélecteur de point: w Tensión del hilo de la aguja: 2 – 6 w Tension du fil de l’aiguille: 2 –... -
Page 40: Turn A Square Corner
Turn a Square Corner q Cornering guide When sewing with fabric edge at 5/8˝ seam guide, to turn a square so that sewing continues at same distance from edge. 1. Stop stitching when front edge of fabric reaches the cornering guide lines. 2. -
Page 41: Cómo Coser Una Esquina Cuadrada
Cómo coser una esquina cuadrada Pour coudre un angle droit q Guía para esquinas q Guide-virage Al coser con el borde de la tela en la guía de costura de 16 Afin de coudre un angle droit et afin d’assurer que la couture mm (5/8 de pulgada), para coser una esquina cuadrada de reste à... -
Page 42: Section Iv. Utility And Decorative Stitches
SECTION IV. UTILITY AND DECORATIVE STITCHES Side Cutter Sewing The side cutter is specially designed for cutting and overcasting the fabric edge at the same time. Machine setting q Stitch selector: w Needle thread tension: 3 – 7 e Presser foot: Serging foot: U CAUTIONS: •... -
Page 43: Costura Con Cuchilla Lateral
SECCION IV.PUNTADAS UTILES Y PARTIE IV. POINTS UTILITAIRES ET PUNTADAS DECORATIVAS DÉCORATIFS Costura con cuchilla lateral Couture avec coupeur latéral La cuchilla lateral ha sido diseñada especialmente para cortar Le coupeur latéral a été conçu spécialement pour couper et y plegar el dobladillo del borde de tela al mismo tiempo. surfiler le bord du tissu au même temps. - Page 44 To sew zMake 1.5˝ (3~4 cm) cut along the seam line at the beginning. Raise the presser foot. Position the fabric under the presser foot with the lower blade in the cut. NOTE: Thick fabric cannot be cut. When turning the handwheel slowly, the built-in side cutter may squeak.
- Page 45 Coudre Coser z Haga un corte de 3~4 cm al comienzo y a lo largo de la z Faites une entaille de 3~4 cm au début, le long du tracé línea de costura. Levante el pie prensatelas. de la couture. Levez le pied presseur. Positionnez le tissu sous le pied presseur avec la lame Posicione la tela bajo el pie prensatelas con la hoja inferior en el corte.
-
Page 46: Tricot Stitch
Tricot Stitch Machine setting q Stitch selector: w Needle thread tension: 3 – 6 e Presser foot: Zigzag foot: A • Seam finishing This stitch is used to finish the seam allowance on synthetics and other fabrics that tend to pucker. The stitch is also excellent for darning and mending tears. -
Page 47: Puntada En Forma De Concha
Puntada de múltiple zig-zag Point zig-zag multiple Configuración de la máquina Réglage de la machine q Selector de puntada: q Sélecteur de point: w Tensión del hilo de la aguja 3 – 6 w Tension du fil de l’aiguille: 3 – 6 e Prensatelas: Prensatelas para zig-zag: A e Pied presseur:... -
Page 48: Blind Hem Stitch
Blind Hem Stitch Machine setting q Stitch selector: w Needle thread tension: 2 – 6 e Presser foot: Zigzag foot: A Use the same color thread as the fabric. On heavy weight fabrics that ravel, the raw edge should be overcast first. Fold the hem, as illustrated. -
Page 49: Dobladillo Invisible
Dobladillo invisible Ourlet invisible Configuración de la máquina Réglage de la machine q Selector de puntada: q Sélecteur de point: w Tensión del hilo de la aguja: 2 – 6 w Tension du fil de I’aiguille: 2 – 6 e Prensatelas: Prensatelas para zig-zag: A e Pied presseur: Pied zig-zag: A... -
Page 50: 4-Step Buttonhole
4-Step Buttonhole Machine setting q Stitch selector: w Thread tension: 1 – 5 e Presser foot: Sliding buttonhole foot * For easier buttonhole foot attachment, move the slider all the way to the front of the foot. For easier removal, move the slider all the way to the back of the foot. -
Page 51: Ojales En 4 Pasos
Ojales en 4 pasos Boutonnière en 4 phases Configuración de la máquina Réglage de la machine q Selector de puntada: q Sélecteur de point: w Tensión del hilo de la aguja: 1 – 5 w Tension du fil de l’aiguille: 1 –... -
Page 52: Corded Buttonhole
Corded Buttonhole Machine setting q Stitch selector: w Thread tension: 1 – 5 e Presser foot: Sliding buttonhole foot z With the buttonhole foot raised, hook the filler cord on the spur at the back of the foot. Bring the ends toward you under the foot, clearing the front end. -
Page 53: Ojal Acordonado
Ojal acordonado Boutonnière cordonnet Réglage de la machine Configuración de la máquina q Sélecteur de point: q Selector de puntada: w Tension du fil de l’aiguille: w Tensión del hilo de la aguja: 1 – 5 1 – 5 e Pied presseur: e Prensatelas: Pied à... -
Page 54: Section V. Care Of Your Machine
SECTION V. CARE OF YOUR MACHINE NOTE: * Unplug the machine. * Do not dismantle the machine other than as explained in this section. * Do not store the machine in a high-humidity are a, near a heat radiator, or in direct sunlight. * Clean the outside of the machine with a soft cloth and mild soap. -
Page 55: Cambiando La Bombilla
SECCION V. MANTENIMIENTO DEL LA PARTIE V. ENTRETIEN DE VOTRE MAQUINA MACHINE REMARQUE: NOTA: * Débranchez la machine. * Desenchufe la máquina. * Ne démontez rien d’autre que ce qui est décrit dans ce * No desmonte la máquina de ninguna otra forma que la chapitre. -
Page 56: Assemble The Hook Race
Assemble the Hook Race z Insert the bobbin holder. x The knob of the bobbin holder should fit next to the Stopper in the hook race. q Stopper w Knob c Reattach the needle plate, aligning the needle plate guide pins with the guide holes on the needle plate and tighten the screw. -
Page 57: Montaje De La Carrera Del Portabobinas
Montage du logement de crochet Montaje de la carrera del portabobinas z Introduzca el portabobinas. z Insérez le support de canette x Le bouton du support decanette doit être placé près de la x La manilla del portabobinas debe encajar junto al tope de butée dans le logement de crochet. -
Page 58: Trouble Shooting
Trouble Shooting Condition Cause Reference The needle thread 1. The needle thread is not threaded properly. Page 20-22 2. The needle thread tension is too tight. breaks. Page 26-28 3. The needle is bent or blunt. Page 12 4. The needle is incorrectly inserted. Page 12 5. -
Page 59: Identificación Y Resolución De Problemas
Identificación y resolución de problemas Causa Referencia Problema 1. El hilo de la aguja no está bien enhebrado. Págnia 21-23 El hilo de la aguja 2. El hilo de la aguja está demasiado tenso. Págnia 27-29 se rompe. 3. La aguja está roma o doblada. Págnia 13 4. -
Page 60: Détecter Les Pannes
Détecter les pannes Référence Causes possibles Problème 1. Le fil de l’aiguille n’a pas été enfilé correctement. Page 21-23 Rupture du fil de 2. La tension du fil de l’aiguille est trop élevée. Page 27-29 l’aiguille. 3. L’aiguille est tordue ou émoussée. Page 13 4. - Page 61 661-800-234(E/S/F) Printed in Taiwan...
Need help?
Do you have a question about the Sewing Machine and is the answer not in the manual?
Questions and answers