Janome Sewing Machine Instruction Book
Hide thumbs
Also See for Sewing Machine:
- Instruction book (138 pages) ,
- Getting started manual (112 pages) ,
- Instruction manual (92 pages)
Table of Contents
Advertisement
Quick Links
Advertisement
Table of Contents

Subscribe to Our Youtube Channel
Related Manuals for Janome Sewing Machine


Summary of Contents for Janome Sewing Machine
- Page 1 Instruction Book Manual de Insctrucciones Manuel d’instructions...
- Page 2 3. Never operate this sewing machine if it has a damaged cord or plug, if it is not working properly, if it has been dropped or damaged, or dropped into water.
-
Page 3: Instrucciones Importantes De Seguridad
INSTRUCCIONES IMPORTANTES DE SEGURIDAD Cuando se utiliza un aparato eléctrico es necesario tomar ciertas precauciones básicas de seguridad, como las siguientes: Lea todas las instrucciones antes de utilizar este aparato. PELIGRO — Para reducir el riesgo de choque eléctrico: 1. No deje nunca el aparato sin vigilancia mientras esté enchufado. Desenchufe siempre la máquina de la toma eléctrica inmediatamente después de utilizarla y antes de limpiarla. - Page 4 CONSIGNES IMPORTANTES DE SÉCURITÉ Pour utiliser un appareil électrique, il faut toujours respecter les consignes de sécurité fondamentales, notamment les consignes suivantes : Avant d’utiliser cet appareil, lisez toutes ces instructions. DANGER : Pour réduire les risques d’électrocution. 1. Il ne faut jamais laisser un appareil sans surveillance lorsqu’il est branché. Il faut toujours débrancher cette machine à...
-
Page 5: Table Of Contents
TABLE OF CONTENTS SECTION 1. NAMES OF PARTS Names of Parts ..............................8 How to attach the spool pin ..........................8 Standard Accessories and Storage Place ......................10 Free arm ................................10 SECTION 2. GETTING READY TO SEW Connecting Machine to Power Supply ......................... 12 Controlling Sewing Speed ............................ - Page 6 INDICE SECCIÓN 1. DESCRIPCIÓN DE LA MÁQUINA Nombre de las partes ............................. 9 Como colocar el pasador de carrete ......................... 9 Accesorios estándar ............................. 11 Tabla de ampliació ............................... 11 SECCIÓN 2. PREPARATIVOS ANTES DE COSER Conexión a la alimentación ..........................13 Control de la velocidad de costura ........................
- Page 7 TABLE DES MATIÉRES SECTION 1. NOM DE PIÈCES Nom de pièces ..............................9 Accessoires standards et boîte de rangement ....................11 Table-rallonge et couture sur bras libre ......................11 SECTION 2. SE PRÉPARER À COUDRE Pour mettre le courant électrique ........................13 Variateur de la vitesse de couture ........................
-
Page 8: Section 1. Names Of Parts
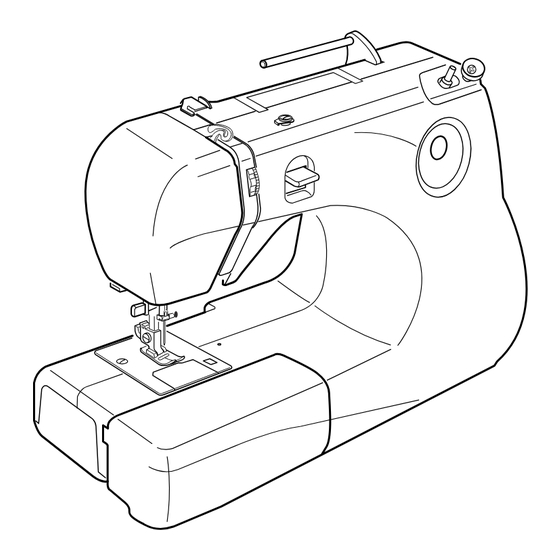
SECTION 1. NAME OF PARTS Names of Parts How to attach the spool pin q Spool pin w Setting hole * Insert the spool pin into the hole as shown. (The spool pin is in the accessory bag.) e Bobbin winder spindle r Thread take-up lever t Thread tension dial y Thread cutter... -
Page 9: Sección 1. Descripción De La Máquina Nombre De Las Partes
SECCIÓN 1. DESCRIPCIÓN DE LA MÁQUINA SECTION 1. NOM DE PIÈCES Nombre de las partes Nom de pièces Como colocar el pasador de carrete Comment attacher le tige d’enroulement de canette q Pasador de carrete q Tige d’enroulement de canette w Orificio para el pasador de carrete w Trou pour tige d’enroulement de canette * Inserte el pasador de carrete... -
Page 10: Standard Accessories And Storage Place
Standard Accessories and Storage Place The following accessories are stored in the extension table. q Bobbins w Needles e Seam ripper r Screwdriver t Overedge foot y Buttonhole foot u Spool holder (large) i Spool holder (small) o Spool pin Free arm The extension table provides an extended sewing area and can be easily removed for free arm sewing. -
Page 11: Accesorios Estándar
Accesorios estándar Accessoires standards et boîte de rangement Los accesorios siguientes se encuentran en la tabla Les accessoires sont rangés de manière pratique dans la de ampliación. boîte de rangement. q Canillas q Canettes w Agujas w Jeu d’aiguilles e Descosedor (abridor de ojales) e Découseur (Ouvre-boutonnière) r Destornillador r Tournevis... -
Page 12: Section 2. Getting Ready To Sew
The symbol “O” on a switch indicates the "off" position of a switch. Foot Controller Model YC-482J-EC or TJC-150 is used with Sewing Machine Model 661. This appliance has a polarized plug (one blade wider than the other). To reduce the risk of electric shock, this plug is intended to fit in a polarized outlet only one way. -
Page 13: Sección 2. Preparativos Antes De Coser Conexión A La Alimentación
SECCIÓN 2. PREPARATIVOS ANTES DE SECTION 2. SE PRÉPARER À COUDRE COSER Pour mettre le courant électrique Conexión a la alimentación Avant de brancher le cordon d’alimentation, assurez-vous Antes de conectar la máquina a la alimentación, que la tension et la fréquence indiquées sur la machine cerciórese de que la tensión que muestra la máquina sont conformes à... -
Page 14: Changing Needles
Changing Needles z Turn off the power switch. Raise the needle by turning the handwheel towards you and lower the presser foot. Loosen the needle clamp screw q by turning it counterclockwise. Remove the needle from the clamp. x Insert the new needle into the needle clamp with the flat side w to the rear. -
Page 15: Cambio De La Agujas
Cambio de la agujas Changement d’aiguille z Asegúrese de que ha apagado. Levante la aguja girando el volante hacia usted y z Mettez le commutateur marche/arrêt sur Arrêt. baje el pie prensatelas.Ponga el interruptor en OFF. Relevez l’aiguille dans sa position la plus haute en Afloje el tornillo de fijación de la aguja q, girándolo tournant le volant. -
Page 16: Pattern Selection
Pattern Selection Raise the needle, turn the pattern selector dial to select the desired pattern. Note: Do not turn the pattern selector dial while the needle is in the fabric, otherwise the needle may bend or break. q Pattern indication window w Pattern selector dial Presser Foot Lifter The presser foot lifter raises and lowers the presser foot. -
Page 17: Selección De Patrón
Selección de patrón Cadran de sélection de point Levante la aguja hasta la posición más alta. Tournez le cadran de sélection de point afin de Seleccione el patrón deseado girando el selector de sélectionner le motif voulu. patrón. Remarque: Nota: Avant de tourner le cadran de sélection de point, relevez Para evitar que la aguja o la tela se dañen, asegúrese l’aiguille au-dessus du tissu. -
Page 18: Preparation Of The Bobbin Thread
Preparation of the Bobbin Thread Removing the bobbin Gently slide the hook cover plate release button q to the right and remove the cover plate w. Lift out the bobbin e. q Hook cover plate release button w Hook cover plate e Bobbin Set the spool Place the spool of thread on the spool pin with the end of... -
Page 19: Devanado De Canilla
Devanado de canilla Pour enrouler le fil sur la canette Extracción de la canilla Retrait de la canette Mueva a la derecha el botón de apertura de la placa de Faites glisser la languette d’ouverture du couvercle à cubierta del portacanillas q, y saque la cubierta w. crochet q vers la droite, puis retirez le couvercle à... -
Page 20: Winding The Bobbin
Winding the bobbin z Pull the handwheel away from the machine to disengage the clutch. x Guide the thread around the thread guide q and bobbin winder thread guide w in order as illustrated. c Thread through the hole in the bobbin from the inside to the outside. -
Page 21: Devanado De La Canilla
Devanado de la canilla Remplir la canette z Tire del hilo del carrete. Guíe el hilo alrededor del guía z Tirez le volant vers l’extérieur. hilos. x Guíe el hilo alrededor del guíahilos q y del guíahilos x Entourez le fil autour du guide-fil q. Entourez le fil deldevanador w. -
Page 22: Inserting The Bobbin
Inserting the bobbin z Place the bobbin q in the bobbin holder w with the thread running off as illustrated. q Bobbin w Bobbin holder e End of thread x Guide the thread into the notch r on the front side of the bobbin holder. -
Page 23: Colocación De La Canilla
Introduction de la canette Colocación de la canilla z Placez la canette q dans le logement de la z Coloque la canilla q en el portacanillas w con el hilo canette w, le fil tournant dans le sens contraire des saliendo por donde muestra la ilustración. -
Page 24: Threading The Machine
Threading the Machine To set the needle thread Raise the needle to the highest position by rotating the hand wheel. Raise the presser foot with the presser foot lifter q. q Presser foot lifter z Lead the thread from the spool and pass it through the thread guide w. -
Page 25: Enhebrado De La Máquina
Enhebrado de la máquina Préparation la machine à coudre Para colocar el hilo de la aguja Enfilage de la machine Levez le levier tendeur à son point le plus haut en tournant Levante la palanca tira hilos hasta su posición más elevada, girando el volante. -
Page 26: Using The Needle Threader
Using the needle threader z Turn the handwheel toward you to raise the needle to its highest position. Hold the needle threader knob q and pull it down to its lowest position. q Needle threader knob x Push the needle threader knob q to the back so that the hook e is coming out from the backside of the needle eye. -
Page 27: Enhebrador De La Aguja
* El enhebrador de la aguja puede usarse con una * Le dispositif d’enfilage s’utilise avec les aiguilles aguja que sea del número 11 a 16 o con agujas para n°11 et n°16 ou les aiguilles Janome à extrémité bleue. tela élastica 103/705S. -
Page 28: Drawing Up The Bobbin Thread
Drawing up the bobbin thread z Raise the presser foot and hold the needle thread lightly with your left hand. q Needle thread x Turn the handwheel slowly towards you one complete turn. Bring the bobbin thread up by pulling the needle thread as illustrated. -
Page 29: Extracción Del Hilo De La Canilla
Pour faire remonter le fil de la canette Extracción del hilo de la canilla z Suba el prensatelas y sujete el hilo de la aguja z Relevez le pied et maintenez le fil de l’aiguille entre suavemente con la mano izquierda. les doigts. -
Page 30: Balancing Needle Thread Tension
Balancing Needle Thread Tension Correct tension The ideal straight stitch will have threads locked between the two layers of the fabric, as illustrated (magnified to show detail). If you look at the top and bottom of the seam, you will notice that there are no gaps. -
Page 31: Equilibrado De La Tensión Del Hilo De La Aguja
Équilibre de la tension du fil Equilibrado de la tensión del hilo de la aguja Tension correcte Tensión equilibrada Les points droits sont parfaits lorsque les fils se bouclent Para ajustar la tensión del hilo, gire el regulador de entre les deux épaisseurs du tissu. tensión. -
Page 32: Section 3. Basic Sewing Straight Stitch Sewing
SECTION 3. BASIC SEWING Straight Stitch Sewing Machine setting Stitch selector: Presser foot: Zigzag foot A Thread tension dial: Starting to sew Raise the presser foot and position the fabric with its edge next to a stitching guide line on the needle plate. Lower the needle into the fabric. -
Page 33: Sección 3. Costura Básica Puntada Recta
SECCIÓN 3. COSTURA BÁSICA SECTION 3. POINTS DE BASE Puntada recta Point droit Configuración de la máquina: Réglage de la machine Patrón de puntadas: Point: Pie prensatelas: Pie para zigzag (A) Pied-de-biche: Pied zigzag A Tensión del hilo: 2 – 6 Tension du fil: 2 –... -
Page 34: Using The Seam Guides On The Needle Plate
Using the seam guides on the needle plate The seam guides on the needle plate and hook cover plate help you to measure seam width. * The numbers indicate the distance between the center needle position and the guide line. Numbers on the needle plate 20 4/8˝... -
Page 35: Guías De Costura En La Placa De Agujas
Guides de couture Guías de costura en la placa de agujas Las guías de costuras en la placa de agujas ayudan a Les guides de couture tracés sur la semelle de piqûre et medir el margen entre el borde de la tela y la costura. le couvercle à... -
Page 36: Section 4. Utility Stitches Zigzag Stitching
SECTION 4. UTILITY STITCHES Zigzag Stitching Machine setting: q Stitch selector: w Presser foot: Zigzag foot A e Thread tension dial: The zigzag stitch is one of the most versatile stitches on your machine. It can be a utility stitch for sewing on buttons, buttonholing, hemming, overcasting, mending and darning. -
Page 37: Sección 4. Puntadas Prácticas Zigzag Básico
SECCIÓN 4. PUNTADAS PRÁCTICAS SECTION 4. POINTS UTILITAIRES Zigzag básico Point zigzag piqué Configuración de la máquina Réglage de la machine q Patrón de puntadas: q Point: w Pie prensatelas: Pie para zigzag (A) w Pied-de-biche; Pied zigzag A e Tensión del hilo: 2 –... -
Page 38: Blind Stitch Hemming
Blind Stitch Hemming Machine setting: q Stitch selector: w Presser foot: Zigzag foot A e Thread tension dial: How to fold the fabric On heavyweight fabrics that ravel, the raw edge should be overcast first. Then fold the hem as illustrated. q Wrong side of fabric w 0.4-0.7 cm (1/4˝-7/16˝) e Overcasting stitch... -
Page 39: Dobladillo Invisible
Dobladillo invisible L’ourlet invisible Configuración de la máquina Réglage de la machine q Selector de patrón: q Point: w Prensatelas: Pie para zigzag (A) w Pied-de-biche: Pied zigzag A e Tensión del hilo de la aguja: 1 – 4 e Tension du fil: 6 –... -
Page 40: Buttonhole
Buttonhole Machine setting: q Stitch selector: w Presser foot: Buttonhole foot e Thread tension dial: * Before you sew the actual buttonholes on the actual garment, make several trial buttonholes on a fabric sample. * Use interfacing on stretch fabrics. z Select BH 1( ). -
Page 41: Ojal Incorporado
Les boutonnières Ojal incorporado Réglage de la machine Configuración de la máquina q Point: q Patrón de puntadas: w Pied-de-biche: e Pie prensatelas: Pied pour boutonière Pie para ojales corredizo e Tension du fil: e Tensión del hilo: 1 – 5 1 –... -
Page 42: Section 5. Decorative Stitching Shell Tuck
SECTION 5. DECORATIVE STITCHING Shell Tuck Machine setting: q Stitch selector: w Presser foot: Zigzag foot A e Thread tension dial: Use a lightweight fabric (tricot, for example). Fold the fabric on the bias and stitch on the fold. Allow the needle to just clear the folded edge to create a shelled edge. -
Page 43: Sección 5. Puntadas Decorativas Retenido De Forros
SECTION 5. POINTS DÉCORATIFS SECCIÓN 5. PUNTADAS DECORATIVAS Retenido de forros Plis à effet coquille Configuración de la máquina Réglage de la machine q Patrón de puntadas: q Point: e Pie prensatelas: Pie para zigzag (A) w Pied-de-biche: Pied zigzag A e Tensión del hilo: 6 –... -
Page 44: Section 6. Care Of Your Machine
SECTION 6. CARE OF YOUR MACHINE Caution: Turn off the power switch and unplug the machine before cleaning. Do not dismantle the machine other than as explained in this section. Cleaning the hook race and feed dogs z Remove the presser foot and needle. Remove screw w on the left side of the needle plate e with the screwdriver q supplied with the machine. -
Page 45: Sección 6. Cuidados Y Mantenimiento
SECTION 6. ENTRETIEN DE VOTRE SECCIÓN 6. CUIDADOS Y MANTENIMIENTO MACHINE Atención: Remarque: Apague el interruptor o desconecte la máquina antes Débranchez la machine avant le nettoyage. de limpiar la máquina. Ne démontez rien d’autre que ce qui est décrit dans No desmonte la máquina de ninguna otra forma que cechapitre. -
Page 46: Replacing The Bobbin Holder
Replacing the bobbin holder z Insert the bobbin holder so that the knob fits next to the stopper in the race. Insert the bobbin. q Knob w Stopper x Replace the needle plate, inserting the two needle plate guide pins into the holes in the needle plate. Tighten the screw firmly with the screwdriver. -
Page 47: Cambio Del Portacanillas
Cambio del portacanillas Remise en place du porte-canette z Introduisez le porte-canette. z Introduzca el portacanillas en el recorrido. Asegúrese de que la manilla del portacanillas encaja Fixez le bouton w situé à côté de la butée q dans le logement du crochet. -
Page 48: Troubleshooting
Troubleshooting Condition Cause Reference 1. The needle thread is not threaded properly. Page 24 The needle thread 2. The needle thread tension is too tight. Page 30 breaks. 3. The needle is bent or blunt. Page 14 4. The needle is incorrectly inserted. Page 14 5. -
Page 49: Detección Y Solución De Problemas
Detección y solución de problemas Problema Causa Referencia El hilo de la aguja se rompe. 1. El hilo de la aguja no está correctamente enhebrado. Página 25 2. El hilo de la aguja está demasiado tenso. Página 31 3. La aguja está doblada o dañada. Página 15 4. -
Page 50: Dépistage Des Pannes
Dépistage des pannes Cause Anomalie Références Le fil d’aiguille casse. 1. Le fil d’aiguille n’est pas bien enfilé. Page 25 2. Le fil d’aiguille est trop tendu. Page 31 3. L’aiguille est déformée ou émoussée. Page 15 4. L’aiguille est mal positionnée. Page 15 5. - Page 52 Printed in Taiwan 661-800-201 (E/S/F)
Need help?
Do you have a question about the Sewing Machine and is the answer not in the manual?
Questions and answers