Panasonic DVD Palmcoder VDR-D250 Operating Instructions Manual
Dvd video camera
Hide thumbs
Also See for DVD Palmcoder VDR-D250:
- Operating instructions manual (180 pages) ,
- Operating instructions manual (203 pages)
Table of Contents
Advertisement
DVD PalmcordcP _
CAMCORDER
PanasoniC
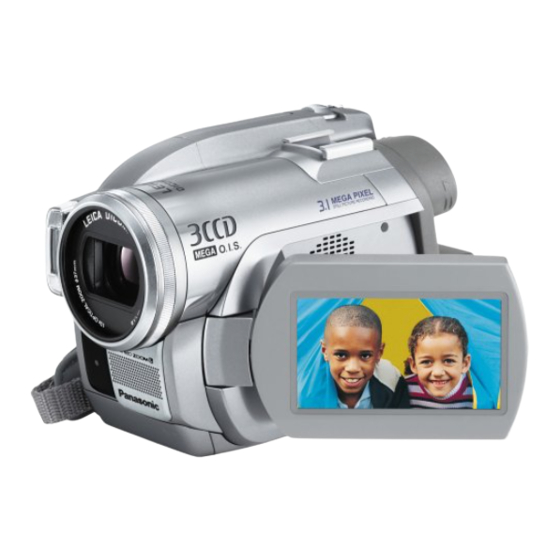
• The illustration shows VDR-D300.
• VDR-D250 does not have a built-in flash.
Operating Instructions
DVD Video Camera
Model
.oVDR-D300
VDR-D250
Beforeusing
Setup
Recording
Before connecting, operating or adjusting this
product, please read the instructions
completely.
Spanish Quick Use Guide is included.
Guia para rapida consulta en espafioi esta incluida.
Playback _iii!!!!_!!iiiii!i'iil
Editing
Discand card management
LEICA DICOMAR
(VDR-D300)
With other products
V
! D E O
RW/R
RAM
PictB_idge
With a computer
Others
[_
LSQT1011 B
Advertisement
Table of Contents

Related Manuals for Panasonic DVD Palmcoder VDR-D250


Summary of Contents for Panasonic DVD Palmcoder VDR-D250
- Page 1 DVD PalmcordcP _ PanasoniC CAMCORDER Operating Instructions DVD Video Camera .oVDR-D300 Model VDR-D250 • The illustration shows VDR-D300. • VDR-D250 does not have a built-in flash. Beforeusing Setup Recording Playback _iii!!!!_!!i Before connecting, operating or adjusting this product, please read the instructions completely.
- Page 2 Things You Should Know Date of Purchase Thank you for choosing Panasonic! Dealer Purchased From You have purchased one of the most sophisticated and reliable products on the Dealer Address market today. Used properly, we're sure it will bring you and your family years of Dealer Phone No.
- Page 3 Panasonic Model No.: VDR-D250/VDR-D300 Responsible party: Panasonic Corporation of North America One Panasonic Way, Secaucus, NJ 07094 Support Contact: Panasonic Consumer Electronics Company 1-800-211-PANA (7262) This device complies with Part 15 of the FCC Rules. Operation is subject to the following two...
- Page 4 IMPORTANT SAFETY INSTRUCTIONS 1) Read these instructions. Keep these instructions. Heed all warnings. Follow all instructions. Do not use this apparatus near water. Clean only with dry cloth. Do not block any ventilation openings. Install in accordance with the manufacturer's instructions.
- Page 5 Preca utions USE & LOCATION • AVOID SUDDEN CHANGES TEMPERATURE ... If the unit is suddenly moved from a cold place to a warm place, moisture may form on the disc and inside the • TO AVOID SHOCK HAZARD ... Your camera unit.
- Page 6 -If you see this symbol- Information on Disposal in other Countries outside the European Union This symbol is only valid in the European Union. If you wish to discard this product, please contact your local authorities or dealer and ask for the correct method of disposal, •...
-
Page 7: Table Of Contents
Contents Built-in flash (VDR-D300 only) ..Manual recording functions ..Features ......Scene mode ...... Quick Guide ....Manual focus adjustment .... White balance ....Accessories ....Manual shutter speed/ Parts identification and handling aperture adjustment ....Using the LCD monitor ....Using the viewfinder .... - Page 8 With a VCR ....Recording (dubbing) images onto other video devices ....Menus ......Menu list ......With a printer (PictBridge) ..Other menus ..... Indications ....Indications ....... Before using with a computer Messages ....... (Windows) ..... Functions that cannot be used What you can do with a computer ..
-
Page 9: Features
Features Features • Easy recording! (-) 50) No need to search for the recording start position. The new recording will not overwrite any previously recorded scene. • Easy playback! (-) 76) Recorded scenes are displayed as thumbnails. You can easily search for the scenes you want to watch. •... - Page 10 Fea tures • Using with DVD player/recorder! (-) 106, 107) Just insert the disc into a DVD player/recorder compatible with 8 cm (3") discs to ptay back the scenes recorded with this unit on it. If you have a DVD recorder with hard disk, you can copy (dub) scenes recorded on a disc with this unit to the hard disk.
-
Page 11: Quick Guide
Quick Guide Quick Guide • Charging the battery • How to turn on/offthe power Connect the AC cable to the AC adaptor While pressing the button O, set the OFF/ and the AC outlet. ON switch to ON/OFF. Put the battery on the battery mount by aligning the mark, and then securely plug it in. - Page 12 Quick Guide • Inserting/removing an SD card • Recording still pictures Open the card slot cover, • Rotate the mode dial to select 0 Insert/remove the SD card into/from the card slot. Press the PHOTO SHOT button halfway in order to adjust focusing, (For auto focusing only) Securely close the card slot cover,...
- Page 13 Quick Guide • Motion picture playback • Still picture playback • Rotate the mode dial to select I{_ - • Rotate the mode dial to select []_. Select the scene to be played back, Select the file to be played back, Press the joystick.
-
Page 14: Accessories
Accessories Accessories Check the accessories before using this unit. Remote control Battery pack CGA-DU12 N2QAEC000019 Button-type battery CR2025 PV-DAC14D VFC3506-1A AC adaptor Shoulder strap K2CA2CA00029 K! HA05CD0014 K2CA2CA00025 AC cable USB cable K2GJ2DZ00018 LSFT0643 DO cable CD-ROM AVIS cable _:z_ 8 cm (3") DVD-RAM disc K2KZ9CB0O001 (Single sided) -
Page 15: Parts Identification And Handling
Parts identification and handling Parts identification and handling 1 Lens (LEICA DICOMAR) (VDR-D300) Lens (VDR-D250) 2 Built-in flash (VDR-D300 only) (-) 68) 3 Recording lamp (-_ 144) 4 White balance/remote control sensor (-_ 74, 21) 5 Terminal cover 6 Audio-video output terminal [A/V] (-) 104, 108) 7 USB terminal [-_.] (-_ 109, 123, 137) 8 Lens cover (VDR-D300 only) - Page 16 Parts identification and handling 25 Card slot cover (-) 34) 26 27 26 Card slot (-_ 34) 27 Tripod receptacle (-_ 18) 28 Card access lamp (-_ 34) 29 Battery release lever [BATTERY RELEASE] (-> 28) 30 Speaker 31 LCD monitor (-_ 19) Due to limitations in LCD production technology, there may be some tiny bright or...
- Page 17 Parts identification and handling Put the strap through the fixture 0 and through the stopper _ so it will not come off. Extend part _) by at least 2 cm (1"). Put the opposite end of the strap through O and attach it in the same way, In order to remove the lens hood, rotate it counter-clockwise O- In order to attach it, place into slot...
- Page 18 Parts identification and handling Attach the lens cap to protect the surface of the lens. Pass the end of the lens cap cord through the belt. Pass the lens cap through the loop made by itself. 3 To attach or remove the lens cap, hold both sides of the lens cap with the tips of your finger and thumb.
-
Page 19: Using The Lcd Monitor
Parts identification and handling You can record the image while viewing it on the LCD monitor. the LCD monitor out in the direction of the arrow. OPEN .,t ooen u to Place your finger on OPEN and pull Adjust the angle of the LCD monitor according to your preference. •... -
Page 20: Using The Remote Control
If swallowed, call your doctor. Replace battery with Panasonic PART NO. CR2025 only. Use of another battery may present a risk of fire or explosion. Caution: Battery may explode if mistreated. Dispose of used battery promptly. Keep away from children. - Page 21 Parts identification and handling • Remote control usable range The distance between the remote control and the unit's remote control sensor O: Within approx. 5 m (!6 feet) Angle: Approx. !0 ° up and 15° down, left, and right • The remote control is intended for indoor operation Outdoors or under strong light, the unit may not operate properly even within the usable ranges.
- Page 22 Parts identification and handling This remote control can be used from different high and low angles. It is also handy when a tripod is used. When you do not use the remote control, attach the clip to the grip belt. Left-handed users can use this unit more easily.
-
Page 23: Discs And Cards
Discs and cards Discs and cards DVD-RAM DVD,RW DVD.R Single sided! Single sided!d0ub!e sided Sing le sided! double sided double sided RAM4 _Y,Z 1 X 8Cm <s'!) 8Cm <3'!) 8 Cm (3't)I (DVD-RAM [DVD-RW Ver. 1 1/ (DVD-R for ..................................Ver. - Page 24 • It is recommended that you use Panasonic discs. Usually discs compatible with the DVD standard can be used for recording and playback with no problems. However, some commercially available discs do not meet the DVD standard for quality and performance.
- Page 25 Discs and cards When using DVD-RW, select whether to record in DVD Video Recording format (VR format) or DVD-Video format (Video format) and then format the disc. (4 24, About format types) 1 When a brand-new DVD-RW is inserted in this unit, the screen on the right appears.
-
Page 26: Cards That You Can Use With This Unit
SD card. (4 99) • We recommend that you use a Panasonic brand SD card. • Be sure to insert miniSD Cards in the dedicated card adaptor before use. Inserting a card in this unit without the adaptor may damage the unit or the card. -
Page 27: Disc And Card Handling
Discs and cards • How to hold a disc or card Do not touch the recorded surface or the terminal surface. • If there is dirt or condensation on the disc Wipe with a damp cloth and then wipe dry. •... -
Page 28: Power Supply
• Battery charging time (_. 29) • If you use other batteries, we cannot guarantee the • We recommend using Panasonic batteries. quality of this product. Push the battery against the battery holder and slide it until it clicks. - Page 29 Power supply The times shown in the tables below are for when the temperature is 25 °C (77 °F) and the humidity is 60%. If the temperature is higher or lower than 25 °C (77 °F). the charging time will become longer.
-
Page 30: Connecting To The Ac Outlet
Power supply 1 Connect the AC cable to the AC adaptor and the AC outlet. 2 Connect the DC cable to the AC adaptor. 3 Connect the DC cable to this unit. • Do not use the AC cable for other equipment since the AC cable is exclusively designed for this unit. - Page 31 Power supply While pressing the button O, set the OFF/ON switch OFF. The status indicator O goes off when the power turns off. o--_ When the power is turned on for the first time affer changing the disc or battery, the unit carries out a recognition procedure to check that there are no problems with the disc.
-
Page 32: Inserting/Removing A Disc
Inserting/removing a disc Inserting/removing a disc When inserting or removing the disc, fit the charged battery pack or connect the AC adaptor to the unit. The cover of the disc compartment will not open unless the unit is powered. Slide the DISC EJECT lever once and release it. - Page 33 Inserting/removing a disc • Identifying recording/playback sides of disc "SIDE A" mark Single sided disc: The recording/playback side is opposite to the labetled side. Double sided disc: The "SIDE A" recording/playback side is opposite to the "SIDE A" marked side. The "SIDE B"...
-
Page 34: Inserting/Removing An Sd Card
Inserting/removing an SD card Inserting/removing an SD card Before insertinglremoving an SD card, be sure to set the OFF/ON switch to OFF. If the SD card is inserted or removed while the OFF/ON switch is set to ON, this unit may malfunction or the data recorded on the SD card may be lost. -
Page 35: Selecting A Mode
Selecting a mode Selecting a mode The mode dial is used to switch between recording and playback modes. Rotate the mode dial slowly but surely. Rotate the mode dial, and set the desired mode pictograph to the position shown in the illustration. Disc recording mode (4 50) Use this to record motion pictures on a disc. -
Page 36: How To Use The Joystick
How to use the joystick How to use the joystick This unit has a joystick for selecting functions, pedorming operations, etc. so it is easy to operate this unit with one hand. Operations on the menu screen and selection of files on the thumbnail view screen, etc. Move the joystick up, down, left, or right to select an item or scene, and then press the joystick to set it. - Page 37 How to use the joystick _>Rotate the mode dial to select or _. 1 Move the joystick up, down, left or right to select the scene to be played back and press the joystick. The selected scene is played back on the full screen. The operation icon is automatically displayed on the screen.
- Page 38 How to use the joystick Disc playback mode •/I Playback/pause Stop playback and show thumbnails Rewind, skip (during playback) •11 Reverse slow/frame playback (during pause) Fast forward, skip (during playback) I II1,,- Forward slow/frame playback (during pause) Card recording mode •...
- Page 39 How to use the joystick Card playback mode (When [PICTURE] is selected) Stop playback and show thumbnails Playback previous picture Playback next picture Card playback mode (When [SLIDE SHOW] is selected) I1_/!I Slide show start!pause Stop playback and show thumbnails Playback previous picture (during pause) Playback next picture (during pause) LSQT1011...
- Page 40 How to use the joystick • Help mode The help mode explains the operation icons displayed when the AUTO/MANUAL/FOCUS switch is set to AUTO in disc/card recording mode. _ Rotate the mode dial to select or O. 1 Press the joystick to display the icon during the recording pause.
-
Page 41: Switching The Language
Switching the language Switching the language You can switch the language on the screen dispiay or the menu screen Press the MENU button, then select [ 0J,.."_ LANGUAGE] and press the joystick. 2 Select [English] and press the joystick. LSQT1011... -
Page 42: Using The Menu Screen
Using the menu screen Using the menu screen Refer to "Menu list" (4 142) for information about the menus. 1 While stopped, press the MENU button. The menu displayed differs depending on the position of the mode dial. • Do not switch the mode dial when the menu is displayed. MENU 2 Move the joystick up or down in order to... - Page 43 Using the menu screen Move the joystick right or press the joystick. 6 Move the joystick up or down in order to select the desired item. Press the joystick to enter the selection. To get back to the previous screen Move the joystick ieft.
- Page 44 Using the menu screen The menu screen transition is the same as when the buttons on the main unit are used. Press the MENU button. Select a menu item. • Usethe direction buttons (A,Y,<,I_) and ENTER button in ptace of the joystick on the main unit.
-
Page 45: Setting Date And Time
Setting date and time Setting date and time When the unit is turned on for the first time, a message asking you to set the date and time will appear. • Select [YES] and press the joystick. Perform steps 2 and 3 below to set the date and time. If the screen shows the incorrect date and time, then adjust it. - Page 46 Setting date and time • Changing the date and time display style Press the MENU button, then select [ _[_, SETUP] [ [] DATE/ TIME] desired display style press the joystick. • You can also show or change the date and time display repeatedly pressing...
-
Page 47: Adjusting Lcd Monitor/Viewfinder
Adjusting L CD monitor/viewfinder Adjusting LCD monitor/viewfinder Press the MENU button, then select [ _[_SETUP] --_ [r-_. LCD SET] or [ _ EVF SET] --_ [YES] and press the joystick. Move the joystick up or down to select the item to be adjusted. -
Page 48: Before Recording
Before recording Before record ing Basic camera positioning Hold the camera with both hands. Run your hand through the grip belt. Do not cover the microphones or sensors with your hands. Keep your arms near your body. Slightly open your legs. •... - Page 49 Before recording • About auto mode Set the AUTO/MANUAL/FOCUS switch to AUTO, and color balance (white balance) and focusing wilI be adjusted automatically. - Auto white balance (4 163) *MANUAL Focus - Auto focusing (4 164) =AUTO Depending on the brightness of the subject etc., the aperture and shutter speed are automatically adjusted for an optimum brightness.
-
Page 50: Recording Motion Pictures
Recording motion pictures Recording motion pictures Record motion pictures onto a disc. • When the unit is purchased, the aspect ratio is set to [16:9] for recording images compatible with a wide-screen To watch images on a regular TV (4:3), change the aspect ratio setting (4 66) before recording the images... -
Page 51: Changing The Recording Mode Of The Motion Picture
Recording motion pictures Screen indications in the disc recording mode Recording mode Remaining time left for recording (When the remaining time is less than 1 minute, [R 0h00m] flashes red.) Recording time elapsed • While '=WRITING THE INFORMATION ON THE •... -
Page 52: Recording Still Pictures
Recording still pictures Recording still pictures Record the still picture on an SD card. • When this unit is purchased, [PICTURE SIZE] is set to [E_] (VDR-D3OO)/[_] (VDR-D250) for recording pictures compatible with a wide-screen TV (16:9). To record pictures with a 4:3 aspect ratio, change the [PICTURE SIZE] setting before recording (4 54)1 •... - Page 53 Recording stiff pictures Press the PHOTO SHOT button fully to take the picture. PHOTO SHOT • For information about the number of recordabte stilt • While this unit accesses the SD card ( _r_] is pictures on an SD card (4 167) displayed/the access tamp is lit), do not perform the •...
-
Page 54: Number Of Pixels And Picture Quality For Still Picture Recording
Recording still pictures • About the shutter chance mark • The shutter chance mark does not appear in • The shutter chance mark does not appear or manual focus mode. has difficulty displaying in the following • When the subject is not easily focused, focus cases. - Page 55 Recording stiff pictures PICT. QUALITY • Selecting the picture quality. Press the MENU button, then select [ J_BASIC] --_ PICT. QUALITY] --_ desired item and press the joystick. m|m: Still pictures with a high picture quality are recorded. =t,. : Priority is given to the number of still pictures recorded.
-
Page 56: Various Recording Functions
Various recording functions Various recording functions You can zoom in up to 10× optically. _ Rotate the mode dial to select _ or _. Move the zoom lever. T side: Close-up recording (zoom in) W side: Wide-angle recording (zoom out) --VOLUME+ •... -
Page 57: Recording Yourself
Various recording functions Interlocked with the zooming operation, the microphone will collect sounds clearly far away with the tele-shot or those in the vicinity with the wide-angle shot. /O Rotate the mode dial to select _. Press the MENU button, then select [ _ ADVANCED]... -
Page 58: Backlight Compensation Function
Various recording functions _QOOQ Use this function when the light is emanating from behind the subject and the subject appears dark. _ Rotate the mode dial to select _ or 0. 1 Press the joystick. Then move the joystick down to display the icon shown in the illustration. -
Page 59: Fade In/Fade Out Function
Various recording functions QQO0 Fade in: The image and audio gradually appear. Fade out: The image and audio gradually disappear. the mode dial to /_ Rotate select To fade in 1 While recording is paused, press the joystick. Then move the joystick down to display the icon shown in the illustration. - Page 60 Various recording functions Press the recording start/stop button. Pause recording, (fade out) The image/audio gradually disappears. After the image/audio completely disappears, recording stops. • After recording, the fade setting is canceled. To cancel fading Select [_']] again. To select the color for fade in/out The color which appears in fading pictures can be selected.
-
Page 61: Soft Skin Mode
Various recording functions This is more effective if you record the bust image of a person. /_ Rotate the mode dial to select _ or 0. Press the joystick. Then move the joystick down to display the icon shown in the illustration. 2 Move the joystick left to select [_]. -
Page 62: Teie Macro Function
Various recording functions By focusing only on the subject and bturring the background, the image can be impressive. VDR-D30O This unit can focus on the subject at a distance of approx. 50 cm (20"). VDR-D250 This unit can focus on the subject at a distance of approx. 40 cm (16"). /_ Rotate the mode dial to select _ or Cm. -
Page 63: Magicpix Function
Various recording functions This function allows you to record color subjects in dark locations to stand out against the background. Attach this unit to a tripod, and you can record images free from vibration. • Only manual focusing can be used. •... -
Page 64: Self-Timer Recording
Various recording functions You can record still pictures on an SD card using the timer. _ Rotate the mode dial to select 1 Press the joystick. Then move the joystick down to display the icon shown in the illustration. 2 Move the joystick left to select [_p]. -
Page 65: Wind Noise Reduction Function
Various recording functions I_]D /_ Rotate the mode dial to select _. Press the MENU button, then select [ ][ BASIC] [_/_ WIND CUT] --_ [ON] and press the joystick. To cancel the wind noise reduction function Press the MENU button, then select... -
Page 66: Wide Mode
Various recording functions _QQO This allows you to record images compatible with wide-screen TVs (16:9) and regular TVs (4:3). • Recording images with a 16:9 aspect ratio Y_Rotate the mode dial to select _. Press the MENU button, then select [ _ BASIC] --_ [lii ASPECT] --_ [16:9] and press the joystick. -
Page 67: Image Stabilizer Function
Various recording functions VDR-D300 _ VDR-D250 _ Reduces the image shaking (jitter) due to hand movement when recording. • VDR-D300 _ Rotate the mode dial to select _ or O. Press the MENU button, then select [ _ ADVANCED] --_ [[_O.I.S.]--_ [ON] and press the joystick. -
Page 68: Built-In Flash (Vdr-D300 Only)
Various recording functions Use the built-in flash in order to record still pictures in dark places. <> Rotate mode dial to select 1 Press the MENU button, then select [ _ ADVANCED] --, [{ FLASH] --, desired item and press the joystick. Forced flash {_A:... - Page 69 Various recording functions Reduces the phenomena where human eyes become red from flashes. Press the MENU button, then select [ _ ADVANCED] --_ [ @ RED EYE] --_ [ON] and press the joystick. • The flash is activated 2 times Do not move until the •...
-
Page 70: Manual Recording Functions
Manual recording functions Manual recording functions QQOOQ When you record images in different situations, this mode automatically sets optimum shutter speeds and apertures. _ Rotate the mode dial to select _ or I_1. Set the AUTO/MANUAL/FOCUS switch to MANUAL. Press the MENU button, then select [ ][ BASIC] --_ [SCN SCENE MODE] --_ desired item and press the joystick. - Page 71 Manual recording functions To cancel the scene mode function Press the MENU button, then select [ _ BASIC] _ [SCNSCENE MODE] _ [OFF] and press the joystick. • You can also cancel the scene mode function by setting the AUTO/MANUAL/FOCUS switch to AUTO.
-
Page 72: Manual Focus Adjustment
Manual recording functions If auto focusing is difficult due to the conditions, then manual focusing is available. _ Rotate the mode dial to select _ or O. Set the AUTO/MANUAL/FOCUS switch to MANUAL. Move the switch down and set it to FOCUS position. -
Page 73: White Balance
Manual recording functions The automatic white balance function may not reproduce natural colors depending on the scenes or lighting conditions. If so, you can adjust the white balance manually. ¢_ Rotate the mode dial to select _ or O. Set the AUTO/MANUAL/FOCUS switch MANUAL. - Page 74 Manual recording functions 1 Select [_], fill the screen with a white subject. 2 Move the joystick up to select [_]. When the [_] display changes from flashing to on, setting is complete. • When the [_ ] display continues flashing green, the white balance cannot be set because the place is dark etc.
-
Page 75: Manual Shutter Speed/ Aperture Adjustment
Manual recording functions QQQOQ Shutter Speed: Adjust it when recording fast-moving subjects. Aperture: Adjust it when the screen is too bright or too dark. ,_ Rotate the mode dial to select _ or O. Set the AUTO/MANUAL/FOCUS switch to MANUAL. The icon shown in the illustration is displayed automatically. -
Page 76: Motion Picture Playback
Motion picture playback Motion picture playback Play back the motion pictures recorded on the disc. 1 Rotate the mode dial to select [i_. The motion pictures recorded on the disc are displayed as thumbnails. • (VDR-D300 only) The lens cover closes. 2 Select the scene to be played back. - Page 77 Motion picture playback 1 Move the joystick up during playback to pause the playback. 2 Move and hold the joystick right. (Slow-motion pictures will be played back in reverse when you move and hold the joystick left.) • Normal playback is restored when you move the joystick up. •...
- Page 78 Motion picture playback Playing back motion pictures by date Recorded scenes are grouped by date on this unit. Scenes recorded on the same day can be played back in succession. 1 Press the MENU button, then select [[_ PLAY SETUP] --_ [ m PLAY MODE] --_ [BY DATE] and press the joystick.
-
Page 79: Still Picture Playback
Still picture playback Still picture playback Play back the still pictures recorded on the card. Rotate the mode dial to select i_. The still pictures recorded on the SD card are displayed as thumbnails. • (VDR-D300 only) The lens cover closes. 2 Select the file to be played back. -
Page 80: Playing Back Still Pictures As A Slide Show
Still picture playback Press the MENU button, then select [[_ PLAY SETUP] --_ [m PLAY MODE] --_ [SLIDE SHOW] and press the joystick. • About still picture compatibility • This unit is compliant with the unified standard DCF (Design rule for Camera File system) established by JEITA (Japan Electronics and Information Technology Industries Association). -
Page 81: Editing Scenes
Editing scenes Editing scenes The deleted scenes cannot be restored. • Scenes on DVD-RW (Video format) and DVD-R cannot be deleted. ._ Rotate the mode dial to select [_. Press the @ button during playback. 2 When the confirmation message appears, select [YES], then press the joystick. - Page 82 Editing scenes To complete editing Press the MENU button. • To delete an unwanted part of a scene, divide the • When you detete scenes, use a battery with scene first, and then delete the unnecessary part sufficient battery power or use the AC adaptor. (4 83) •...
-
Page 83: Dividing A Scene
Editing scenes To delete unnecessary portion of scene, first divide the scene, and then delete the unnecessary portion. ,_ Rotate the mode dial to select []. Press the MENU button, then select [>_ EDIT SCENE] --_ [Eli DIVIDE] and press the joystick. -
Page 84: Combining Scenes
Editing scenes _ Rotate the mode dial to select [_. 1 Press the MENU button, then select [>_ EDIT SCENE] --_ [ X COMBINE] and press the joystick. 2 Select the scene to be combined, then press the joystick. • The selected scene and the next scene are combined. •... -
Page 85: Using Playlists
Using playlists Using playlists You can create a playlist by gathering your favorites from the recorded scenes. Since the playlist is not created by copying data, you will consume little of the disc capacity by making a playlist. • If you create or delete playlists, the original scenes wilI not be modified. Editing scenes on a ptaylist will not affect the original scenes. -
Page 86: Creating A New Playiist
Using playfists /_ Rotate the mode dial to select []. 1 Press the MENU button, then select [[_ PLAY SETUP] --_ [ .=m PLAY MODE] --_ [PLAYLIST] and press the joystick. 2 Select [CREATE], then press the joystick. 3 Select the scene to be added to the playlist, then press the joystick. -
Page 87: Playing Back A Playlist
Using playlists _ Rotate the mode dial to select _-I. Press the MENU button, then select [[_ PLAY SETUP] --_ [m PLAY MODE] --_ [PLAYLIST] and press the joystick. 2 Select the playlist to be played back, then press the joystick. Scenes in the selected playIist are displayed as thumbnails. -
Page 88: Editing A Playlist
Using playfists Editing scenes on a playIist will not affect the original scenes. Adding scenes to playlist _ Select playlist playback mode. (-_ 87, steps 1 and 2) 1 Press the MENU button, then select [ >_ EDIT] and press the joystick. 2 Select the playlist to be edited, then press the joystick. - Page 89 Using playfists Moving scenes The scenes in a ptaylist can be moved. /_Select playlist playback mode. (-) 87, steps 1 and 2) Press the MENU button, then select [ >_ EDIT] and press the joystick. 2 Select the playlist to be edited, then press the joystick.
- Page 90 Using playlists Dividing a scene You can divide a scene into two parts. • Dividing scenes on a playlist will not affect the original scenes. _ Select playlist playback mode. (-_ 87, steps 1 and 2) 1 Press the MENU button, then select [ >_ EDIT] and press the joystick.
- Page 91 Using playlists L,omDin!ng scenes Two consecutive scenes can be combined into one. • Combining scenes on a playlist wilI not affect the original scenes. ._OSelectplaylist playback mode. (-) 87, steps 1 and 2) Press the MENU button, then select [ >_ EDIT] and press the joystick.
- Page 92 Using playlists Deleting scenes • Deleting scenes on a ptaylist will not affect the original scenes. Deleting scenes one at a time: /_ Select playlist playback mode. (-) 87, steps 1 and 2) 1 Press the # button during playback. 2 When the confirmation message appears, select [YES], then press the joystick.
- Page 93 Using playlists (Only when [SELECT] is selected in step 3) Press the @ button. 6 When the confirmation message appears, select [YES], then press the joystick. (Only when [SELECT] is selected in step 3) To continue deleting other scenes Repeat steps 4-6. To complete editing Press the MENU...
-
Page 94: Editing Still Pictures
Editing still pictures Editing still pictures The deleted files cannot be restored. _ Rotate the mode dial to select _. Press the @ button during playback. 2 When the confirmation message appears, select [YES], then press the joystick. Deleting multiple files from the thumbnail display _ Rotate the mode dial to select... - Page 95 Editing still pictures To complete editing Press the MENU button. • Deleting still picture files recorded on an SD card by other products A still picture file (other than JPEG) that cannot be played back on this unit may be erased. •...
-
Page 96: Locking Still Pictures
Editing still pictures Still picture files recorded on an SD card can be locked so that they may not be deleted by mistake. (However even if you lock some files on an SD card, formatting the card will delete all the files.) _ Rotate the mode dial to select _. -
Page 97: Dpof Setting
Editing still pictures You can write the data of still pictures to be printed and number of copies (DPOF data) onto the SD card. /_ Rotate the mode dial to select _. Press the MENU button, then select [1_ PLAY SETUP] --_ [=_ DPOF SET] --_ [SET] and press the joystick, Select the file to be set, then press the joystick. -
Page 98: Formatting Discs And Cards
Formatting discs and cards Formatting discs and cards Please be aware that if a disc is formatted, then all the data recorded on the disc will be erased. _ Rotate the mode dial to select [_. Press the MENU button, then select [ _J,SETUP] --_ [ _ FORMAT... -
Page 99: Formatting An Sd Card
Formatting discs and cards Please be aware that if an SD card is formatted, then all the data recorded on the card will be erased. Store important data on a computer, etc. the mode dial to select /_ Rotate Press the MENU button, then select [ _ SETUP] --_ [E_ FORMAT CARD] --_ [YES] and press the joystick. -
Page 100: Finalizing A Disc
Finalizing a disc Finalizing a disc To ptay back a DVD-RW (Video format) or a DVD-R on other devices e.g. a DVD player, finalize the disc. • Finalizing video format discs Be sure to finalize the disc on this unit, before using it on other devices. DVD-RW (Video format): After finalizing, the disc becomes play-only. -
Page 101: A Dvd-Rw
Finafizing a disc the mode dial to select /_ Rotate Press the MENU button, then select [ J[J, S ETUP] --_ [Q] UN-FINALIZE] --_ [YES] and press the joystick. 2 When the confirmation message appears, select [YES], then press the joystick. -
Page 102: Protecting A Disc
Protecting a disc Protecting a disc This is for preventing recorded contents from being deleted or edited by mistake. Further recording and editing is not possible on protected discs until the protection is released. /_ Rotate the mode dial to select [_. Press the MENU button, then select [ _ SETUP]... -
Page 103: Displaying Disc Information
Displaying disc information Displaying disc information Information such as the number of recorded scenes, the remaining space and whether or not the disc is finalized or protected is displayed. /_ Rotate the mode dial to select _. Press the MENU button, then select... -
Page 104: With A Tv
With a TV With a TV The motion pictures and still pictures recorded by this unit can be played back on a TV. • Use the AC adaptor to free you from worrying about the battery running down. 1 Connect this unit and a TV. AV/S cable (supplied) •... - Page 105 With a TV • To watch images with a 16:9 aspect ratio on a regular TV (4:3) When playing back motion pictures recorded with a 16:9 aspect ratio ([ASPECT] was set to [16:9]) or still pictures recorded with a 16:9 aspect ratio ([PICTURE SIZE] was set to [[_] (VDR-D300)/ (VDR-D250)) on a TV with a 4:3 aspect ratio, the images may be squeezed horizontally.
-
Page 106: With A Dvd Recorder/Player
With a DVD recorder/player With a DVD recorder/player • When playing back a disc on a DVD recorder/player, place the device so that the disc lies flat. Playing back a DVD'RAM or a DVD'RW (VR format) Insert the disc in the DVD recorder/player, then play it back. -
Page 107: Copying (Dubbing) Recordings Onto A Dvd Recorder's Hard Disk
With a DVD recorder/player QQO0 If you have a DVD recorder with hard disk, images recorded by this unit can be stored on the hard disk. • If you want to record (dub) a disc that the DVD recorder is not compatible with, connect this unit and the DVD recorder with the AVIS cable and then record (dub) the disc. -
Page 108: With A Vcr
With a VCR With a VCR _QQO You can record (dub) images played back on this unit onto other video devices. You can create a ptayIist by gathering the scenes you want to record (dub), then record (dub) the scenes in this playIist only to other devices. (4 86) •... -
Page 109: With A Printer (Pictbridge)
With a printer (PictBridge) With a printer (PictBridge) To print pictures by directly connecting this unit to the printer, use a printer compatible with PictBridge. (Read the operating instructions for the printer.) • Use the AC adaptor to free you from worrying about the battery running down. _lnsert an SD card with recorded images in the unit, turn on the unit and then... - Page 110 With a printer (PictBridge) Select the date print setting on [l]g DATE PRINT]. • If the printer is not capable of date printing, this setting is unavailable. 7 Select the paper size setting on [E_ PAPER SIZE]. STANDARD: Size specific to the printer INCH: L size...
-
Page 111: Before Using With A Computer (Windows)
Before using with a computer (Windows) Before using with a computer (Windows) • When using a DVD-RAM or DVD-RW (VR format) recorded on this unit • Before using DVD-RW (VR format) on a computer, be sure to finalize it on this unit. Playing back on a computer DVD-MovieAIbumSE (supplied) -
Page 112: Contents On Provided Cd-Rom
Before using with a computer (Windows) The following software applications are contained on the provided CD-ROM. • DVD-RAM Driver This is necessary to configure the unit as a drive on a computer. DVDForm: This is used to format DVD-RAM on a computer. •... - Page 113 Before using with a computer (Windows) • DVDfunSTUDIO This software is for creating a DVD-Video disc. Use this software when burning a DVD-Video disc from motion pictures edited using DVD-MovieAIbumSE. For details, refer to page 127. DVD-RAM/ Export the images from a DVD-RAM or DVD-RW (VR format) with DVD-MovieAIbumSE.
-
Page 114: Operating Environment
Before using with a computer (Windows) • A CD-ROM drive is necessary to install the supplied software applications. • When 2 or more USB devices are connected to a computer, or when devices are connected through USB hubs or by using extension cables, proper operation is not guaranteed. •... - Page 115 Before using with a computer (Windows) • DVDfunSTUDIO Personal computer IBM PC/AT compatible personal computer Microsoft Windows 2000 Professional Service Pack 4 Microsoft Windows XP Home Edition Service Pack 2 Microsoft Windows XP Professional Service Pack 2 Intel Pentium I11800 MHz or higher 256 MB or more (512 MB or more recommended) High Color (16 bit) or more Desktop resolution of 1024 x 768 pixels or more...
- Page 116 Before using with a computer (Windows) • Using Built-in SD Drive Personal computer IBM PC/AT compatible personal computer Microsoft Windows 2000 Professional Microsoft Windows XP Home Edition Microsoft Windows XP Professional Intel Pentium 1! 300 MHz or higher 32 MB or more (64 MB or more recommended) Interface USB 1.1 or Iater -- A type •...
- Page 117 Before using with a computer (Windows) Before opening the CD-ROM package, please read the following. You ("Licensee") are granted a license for the Software defined in this End User Software Agreement ("Agreement") on condition that you agree to the terms and conditions of this Agreement.
-
Page 118: Installation (Windows)
Installation (Windows) Installation (Windows) When installing the software, log on to your computer as the Administrator or with a user name with equivalent authorization. (If you do not have authorization to do this, consult your manager.) Do not connect the USB cable before installing the DVD.RAM Driverl If the DVD-RAM Driver is installed after connecting this unit and the computer with the USB cable, this unit may not be correctly recognized by the computer. - Page 119 Installation (Windows) Read carefully through the End User License Agreement (-> 117), then click [Yes]. • You cannot install the application if you click [No]. Click [Next]. Continue to follow the on-screen messages to install it. When installation is complete, some notes will appear: Check the contents, then click [x ] at the top right of ....
-
Page 120: Installing Dvd-Movieaibumse
Installation (Windows) Insert the CD-ROM into the computer. The [Setup Menu] screen will appear. • If the [Setup Menu] screen does not appear, double-click the CD-ROM drive icon in [My Computer]. 2 Click [DVD-MovieAIbum]. • The software application may not run properly if you cancel the installation at any point e.g. -
Page 121: Installing Dvdfunstudio
Installation (Windows) 1 Insert the CD-ROM into the computer. The [Setup Menu] screen will appear, • If the [Setup Menu] screen does not appear, double-click the CD-ROM drive icon in [My Computer]. 2 Click [DVDfunSTUDIO]. • The software application may not run properly if you cancel the installation at any point e.g. -
Page 122: Software Application Uninstallation
DVD-RAM Driver Select [start] _ [All Programs (Programs)] _ [DVD-RAM] _ [DVD-RAM Driver] _ [Using DVD-RAM disc]. • DVD-MovieAIbumSE Select [start] _ [All Programs (Programs)] _ [Panasonic] [DVD-MovieAIbumSE] _ [Operation Manual]. • DVDfunSTUDIO Select [start] _ [All Programs (Programs)] _ [Panasonic] [DVDfunSTUDIO] _ [Operating instructions]. -
Page 123: Connection And Recognition (Windows)
Connection and recognition (Windows) Connection and recognition (Windows) After the driver and software applications are installed, the unit must be connected to the computer and be correctly recognized by the computer. • Connect after installing the driver and software applications. •... - Page 124 Connection and recognition (Windows) • When the unit is connected to a computer, the • When a computer is accessing a disc or card in this operation mode cannot be changed and its unit, the ACCESS/PC tamp or card access tamp lights.
-
Page 125: To Disconnect Usb Cable Safely
Connection and recognition (Windows) • In card playback mode (When accessing the card) [Removable Disk] is displayed in [My Computer]. Example folder structure of an SD card: Removable Disk 100CDPFP • JPEG format still pictures (IMGA0OO].JPG etc.) are stored in the []0OCDPFP] folder. These can be opened with picture software that supports JPEG pictures. - Page 126 Connection and recognition (Windows) To verify the unit is correctly recognized by the computer, select the unit's mode, connect the unit to the computer via the USB cable and then follow the steps below. • With some computers including those made by NEC, the Device Manager may not be displayed if a mode that places restrictions on the functions has been established.
-
Page 127: Creating A Dvd-Video Disc On A Computer (Windows)
Creating a DVD-Video disc on a computer (Windows) Creating a DVD-Video disc on a computer (Windows) Using DVD-MovieAIbumSE and DVDfunSTUDIO, you can create a DVD-Video disc (DVD-RW/ DVD-R disc) from the images recorded on this unit. • Before using DVD-RW (VR format) on a computer, be sure to finalize it on this unit. •... - Page 128 Creating a DVD-Video disc on a computer (Windows) (On the computer) Select [start] --_ [All Programs (Programs)] ..... [Panasonic] --_ [DVD-MovieAIbumSE] [DVD-MovieAIbumSE]. DVD-MovieAIbumSE starts and the images recorded on the disc are displayed. When starting DVD-MovieAIbumSE, the [Mount Information] dialog box may appear or the recorded images may not be shown.
- Page 129 Creating a DVD-Video disc on a computer (Windows) When the [CollectTool] screen appears, click [OK]. The exported scene will be automatically registered on the DVDfunSTUDIO editing screen. 10 Edit the DVD menu as required. • Set the disc size to [8 cm DVD]. 11 Click [Burning].
-
Page 130: Before Using With A Computer (Macintosh)
Before using with a computer (Macintosh) Before using with a computer (Macintosh) • When using a disc recorded on this unit Before using DVD-RW (VR format), DVD-RW (Video format) and DVD-R on the computer, finalize them on this unit. DVD-RAM or DVD-RW (VR format): Playback is not possible DVD-RW (Video format) or DVD-R: Playing back on a computer Standard OS or commercially available... -
Page 131: Contents On Provided Cd-Rom
Before using with a computer (Macintosh) The following software applications are contained on the provided CD-ROM. • Pixe VRF Browser EX This software is for importing motion pictures recorded on disc to a computer. The motion pictures imported to the computer can be edited with [MPEG Editor]. The motion pictures saved on the computer with this software become the contents of the DVD-Video or Video CD disc created with ImageMixer VCD/DVD2. - Page 132 Before using with a computer (Macintosh) • ImageMixer VCD/DVD2 This software is for creating DVD-Video and Video CD discs. Use this software when burning a DVD-Video or Video CD disc from motion pictures saved using Pixe VRF Browser EX. For details, refer to page 137. •...
-
Page 133: Operating Environment
Before using with a computer (Macintosh) • A CD-ROM drive is necessary to install the supplied software. • Even if the system requirements mentioned in these operating instructions are fulfilled, some computers cannot be used. • Use the supplied USB cable when connecting to the computer. (Operation is not guaranteed with any other USB cables.) •... - Page 134 • The USB equipment operates with the driver installed as standard in OS. For technical inquiries about these software applications, contact the PIXELA Customer Support Center in your region. U.S. and Canada (Toll-Free) +1-800-458-4029 Website: http://www.pixela.co.jp/oem/panasonic/e/index.html (This website is in English only.) LSQT1011...
-
Page 135: Installation (Macintosh)
1 Insert the CD-ROM into the computer. [PANASONIC] CD-ROM icon appears. Double-click [PANASONIC] --_ [Imx for Panasonic] --_ [ImageMixer.pkg]. The installer setup screen appears. 3 Click [Continue]. Read carefully through the terms and conditions shown on the screen for the [Software License Agreement], click [Continue] and then click [Agree]. -
Page 136: Reading The Operating Instructions Of The Software Applications
Installation (Macintosh) For details on how to use the software applications, read the help. • Pixe VRF Browser After starting Pixe VRF Browser EX, select [Help] _ [Pixe VRF Browser EX Help] from the Menu Bar. • ImageMixer VCD/DVD2 After starting ImageMixer VCD/DVD2, click the [?] icon at top right of ImageMixer VCD/DVD2 screen. -
Page 137: Using Discs On A Computer (Macintosh)
• Do not use any other USB cables except the supplied one. (Operation is not guaranteed with any other USB cables.) (On the computer) Double-click the [Pixe VRF Browser EX for Panasonic] icon in the [ImageMixer for Panasonic] folder you installed. Pixe VRF Browser EX starts. Click the drive button,... - Page 138 • Check that a disc is not insertedin the drive Double-click the [ImageMixerVCDDVD2] icon in the [ImageMixer for Panasonic] folder you installed. ImageMixer VCD/DVD2 starts. 10 Click the [DVD-Video] button. 11 Use [Select folder] to select the folder containing the MPEG files saved with Pixe VRF Browser EX and then click the [Add] button.
-
Page 139: To Disconnect Usb Cable Safely
Using discs on a computer (Macintosh) 12 Click [Create Menu] (O) and edit the DVD menu as required, then click [Write to Disc] (O). 13 Check [Create disc] (_), select the drive to be used (O) and then click [Write] (_). 14 Insert a brand-new 12 cm (5") DVD-RW or DVD-R disc into the disc drive and click [OK]. -
Page 140: Using An Sd Card On A Computer (Macintosh)
Using an SD card on a computer (Macintosh) Using an SD card on a computer (Macintosh) /_ Connect this unit to the AC adaptor. _>lnsert an SD card with recorded images in the unit, turn on the unit and then rotate the mode dial to select _. -
Page 141: To Disconnect Usb Cable Safely
Using an SD card on a computer (Macintosh) Double-click the [NO_NAME] icon. The folders on the SD card are displayed. Select the file in the [IOOCDPFP] folder to copy and drag and drop it to the destination copy folder. • Example folder structure of an SD card: Cs IM... -
Page 142: Menus
Menus Menus Motion picture recording O Still picture recording menus menus • [ J_ BASIC] • [ J[ BASIC] [SCNSCENE MODE] (4 70) PICTURE SIZE] (4 54) [SONSCENE MODE] (4 70) [_i= PICT. QUALITY] (4 55) [_/!_ WIND CUT] (4 65) CLOCK SET] (4 45) REC MODE] (4 51) [it1 ASPECT] (4 66) - Page 143 Menus Motion picture playback menus I_ Still picture playback menus • DELETE] • [_ DELETE] (Only when [PLAY MODE] is set to [VIEW ALL] SELECT] (4 94) or [BY DATE]) ALL] (4 94) SELECT] (4 81) ALL] (4 81) • PLAY SETUP] PLAY MODE] (4 80) •...
-
Page 144: Other Menus
Menus • [-'.,_- REC LAMP] 1 Beep • OFF • ON When you start recording The recording lamp lights during recording and When you turn on the power flashes when the unit receives a signal from the When this unit is recognized by the computer or remote control. -
Page 145: Indications
Indications Indications • Recording indications Motion picture recording 1_ Still picture recording _ _- 0h00m00s R Oh00m 1/100 _01UXEJB 1/100 0PE_I OPEN ® "J 3'30 PM 3'30 PM 12115.2006 Remaining battery power Auto white balance ;_., Indoor mode (recording under R 0h00m Remaining time for recording incandescent... - Page 146 Indications • Playback indications Motion picture playback Still picture playback • Playback Number of recording pixels for still 3ictures Pause VDR-D30O • • / 41_1 Cue/Review playback 2048×1512 1920×1080 • 1/141 Last/first scene paused VDR-D250 /I_l_l Skip playback 1760×1320 I_/41 SIow motion playback 1760)<992 VDR-D300/VDR-D250...
- Page 147 Refer to the following support site for information RECOMMENDED TO USE PANASONIC DISC about discs that have been confirmed as compatible by Panasonic. http:llpanaeonic.co.jplpavclgloballcsle_cam (This website is in English only.) AGS MODE ON -REC The AGS function is activated.
-
Page 148: Messages
Indications The SD card is full so no further data can be recorded. Delete CARD FULL. unnecessary files ( 4 94)or insert a new SD card. An irregularity in the unit has been detected. Press the RESET PUSH THE RESET SWITCH. -
Page 149: Functions That Cannot Be Used Simultaneously
Functions that cannot be used simultaneously Functions that cannot be used simultaneously Some functions in this unit are disabled or cannot be selected due to the unit's specifications. The table below shows examples of functions restricted by various conditions. Digital zoom •... -
Page 150: Frequently Asked Questions
Frequently asked questions Frequently asked questions What kind of discs can be DVD-RAM, DVD-RW and DVD-R can be used if they are 8 cm used? (3) bare discs. (4 23) Can discs with a cartridge be used? They can be used if the cartridge is removed. They can be used. - Page 151 Frequently asked questions DVD-RAM, DVD-RW (VR format): Use DVD-MovieAIbum CopyTooI or the File Export function in DVD-MovieAIbumSE. Is it possible to copy data to • Before using DVD-RW (VR format) on a computer, be sure to finalize it on this unit. a computer (Windows)? DVD-RW (Video format), DVD-R:...
-
Page 152: Troubleshooting
Troubleshooting Troubleshooting Unit operations • Is the battery fully charged? Charge the battery using the AC adaptor. (4 28) This unit cannot be • The battery protection circuit may have operated. Attach turned on. the battery to the AC adaptor for 5 to 10 seconds. If the unit still cannot be used, the battery is faulty. - Page 153 Troubleshooting The remote control does • Has the button-type battery of the remote control run out? not function. _ Replace it with a new button-type battery. (4 20) • The disc cover will not open unless the unit is powered. The DISC EJECT lever _ Connect a charged battery or AC adaptor.
- Page 154 Troubleshooting • Is the AGS function activated? Record in the normal horizontal position or set rAGS] to recording [OFF]. (4 49) • Are you trying to record small or finely detailed objects with [PICT. QUALITY] set at [=_. ]? Recorded still pictures _ If you try to record small or finely detailed objects with are not clear.
- Page 155 Troubleshooting • The data may be destroyed. It may have been destroyed card do not look normal, static or electromagnetic waves. Store important data on a computer or other products as well. Even if a disc or a card is •...
- Page 156 Troubleshooting With a computer (Windows) • Have you set this unit to the correct mode? The unit is not recognized if it is set to a recording mode. Set Even if connected by the it to a playback mode. If it is set to card playback mode, USB cable, this unit is not disconnect the USB cable, set [USB FUNCTION] to recognized...
- Page 157 Troubleshooting • (Windows XP only) Deleting the unit name from the Device Manager and then connecting the unit and the computer again can improve this. Follow the steps below. Before proceeding, be sure to remove the disc from the unit. Cannot write to DVD- Select [start] _ ([Settings] _) [Control Panel]...
- Page 158 Troubleshooting • Is there a file with a compatible format in the folder? Check the help for ImageMixer VCD/DVD2. Cannot register the file • In [Options] in the [Select folder], confirm the small box for with ImageMixer VCD/ [Add sub-folder(s)] is checked, DVD2.
-
Page 159: Cautions For Use
Cautions for use Cautions for use • Sand or dust may damage the unit. (Care should be taken when inserting and removing a disc or a card.) • The unit, disc and card become warm after • If sea water splashes onto the unit, wipe off long operation, but this is not a malfunction. - Page 160 Cautions for use If you drop the battery accidentally, check to About the battery see if the terminals are damaged. • Attaching a battery with damaged terminals The battery used in this unit is a rechargeable can damage the unit or AC adaptor. lithium-ion battery.
- Page 161 Cautions for use • If the battery is warm, charging requires more • If there is dust, a scratch, or dirt on disc or time than normal. if it is warped, the following phenomena • If the temperature of the battery is extremely may occur: high or extremely low, the CHARGE lamp - Block noise in playback image...
- Page 162 Cautions for use About condensation • The memory capacity indicated on the label When condensation forms on the unit, the lens of an SD card is the total of the capacity for will cloud up and the unit may not work copyright protection and management and properly.
-
Page 163: Explanation Of Terms
Explanation of terms Explanation of terms Automatic white balance adjustment range, use the manual white balance adjustment mode. White balance adjustment recognizes the color of light and adjusts so the white color will White balance become a purer white. The unit determines hue of light that comes through the lens and The images recorded by the unit may become bluish or reddish under the influence of certain... - Page 164 Explanation of terms Auto focus Recording a subject that is surrounded The lens is moved forward or backward objects with glossy surfaces or by highly automatically to bring the subject into focus. reflective objects Since whatever is shiny or glistens is brought Auto focus has the following into focus, it is hard to focus on the subject to characteristics.
-
Page 165: Specifications
Specifications Specifications DVD Video Camera: In_rmation for your safety Power source: DC 7.9 V/7.2 V Power consumption: VDR-D300 8.0 W/VDR-D250 7.5 W Signal system EIA Standard: 525 lines, 60 fields NTSC color signal Recording format DVD Video Recording format (DVD-RAM, DVD-RW) DVD-Video format (DVD-RW, DVD-R) 1/6-inch 3CCD image sensor Total: 800 Kx3... - Page 166 Specifications VDR-D300 Approx. 63mm(W)× 87mm(H) × 138mm(D) Dimensions (excluding projecting [Approx. 2.48 inch (W) × 3.43 inch (H) × 5.43 inch (D)] VDR-D250 parts) Approx. 63 mm (W) × 87 mm (H) × 138 mm (D) (Approx. 2.48 inch (W) x 3.43 inch (H) x 5.35 inch (D)] Mass (without SUpplied battery, VDR-D3OO Approx.
-
Page 167: Number Of Recordabte Pictures On An Sd Card
Specifications VDR-D300 Id;ii 8 MB 16 MB 32 MB 64 MB 128 MB 256MB 512 MB 1 GB 1290 2 GB 1290 2010 1680 2630 VDR-D250 ==" 8 MB 16 MB 32 MB 64 MB 128 MB 256MB 512 MB 1010 1 GB 1330... -
Page 168: Optional Accessories
Optional accessories Optional accessories LM-AF30U 8 cm (3") DVD-RAM (single sided) LM-AF60U 8 cm (3") DVD-RAM (double sided) LM-RW30U 8 cm (3") DVD-RW (single sided) LM-RW60U 8 cm (3") DVD-RW (double sided) LM-RF30V 8 cm (3") DVD-R (single sided) PV-DAC14 AC adaptor with AC Cable and DC Cables 1150 mAh/Rechargeable Lithium Ion Battery... -
Page 169: Accessory Order Form (For Usa Customers)
[6 AM-5 PM M-F, 6 AM-10:30 AM SAT, PACIFIC TIME] MAIL THIS ORDER TO: PANASONIC SERVICES COMPANY ACCESSORY ORDER OFFICE 20421 84th Avenue South Kent, WA. 98032 In CANADA, please contact your local Panasonic dealer for more information on Accessories. LSQT1011... -
Page 170: Request For Service Notice (Usa Only)
Mail this completed form and your Proof of Purchase along with your unit to: Panasonic Services Company 410B Airport Road Elgin, IL 60123-9333 Attn: Camcorder... -
Page 171: Limited Warranty (For Usa Customers)
Park, CORPORATION OF NORTH AMERICA Carolina, Puerto Rico 00985 Panasonic Way, Secaucus, New Jersey 07094 Panasonic Video Products Limited Warranty Limited Warranty Coverage if your product does not work propedy because of a defect in materials or workmanship, Panasonic... -
Page 172: Customer Services Directory
Service in Canada: As per Sevicenter listed in Canadian warranty information 4 173 Accessory Purchases Purchase Parts, Accessories and instruction Books online for all Panasonic Products by visiting our Web Site htto:llwww.Dasc.Danasonic.com or, send your request by E-mail to: n=.p_gparts@us.panasonic.com You may also contact... -
Page 173: Warranty
PRODUCT - LIMITED WARRANTY Panasonic Canada Inc. warrants this product to be free from defects in material and workmanship and agrees to remedy any such defect for a period as stated below from the date of original purchase. Camcorder Product... -
Page 174: Index
Index Index • Numerics Locking files ......0 Lux MagicPix function ....•M •A MagicPix function ..... Manual focus ......AC adaptor ....28, 30, !61 Menu ......Aperture ......Auto focus ......Menu list ......Auto Ground-directional Standby (AGS) ... - Page 175 Index Un-finalize ......Video format ......Viewfinder ....19, 4 7, 1 62 Volume adjustment ....VR format ......White b alance ....73, ! 63 Wide m ode ......Wind n oise r eduction function ... 65 Zoom ......
-
Page 176: Spanish Quick Use Guide/Guia Espa_Ola Para El Uso Rbpido
Spanish Quick Use Guide/Guia espaSola para el uso rapido Spanish Quick Use Guide/Guia espahola para el uso rapido • Carga de la bateria • Cbmo encender/apagar alimentacion Conecte el cable electrico de CA al adaptador de CA y a la toma de la red de Mientras pulsa el boton _, ajuste el interruptor OFF/ON a ON/OFF. - Page 177 Spanish Quick Use Guide/Guia espa#ola para el uso rapido • C6mo insertar/quitar una tarjeta Pulse de nuevo el boton de inicio/ parada de la grabacibn para detener Abra la tapa de la ranura de la tarjeta, brevemente la grabacion. • Grabacion de im_genes fijas Inserte/quite la tarjeta SD en/de la...
- Page 178 Spanish Quick Use Guide/Guia espaSola para el uso rapido • Reproduccion de imageries • Reproduccion de ira&genes fijas din_micas • Gire ei selector de modo para seleccionar • Gire el selector de modo para seleccionar Seleccione el archivo a ser reproducido. Seleccione la escena a ser reproducida,...
- Page 179 Panasonic Consumer Electronics Company, Division of Panasonic Corporation of North America One Panasonic Way, Secaucus, NJ 07094 Panasonic Puerto Rico, Inc. Ave. 65 de Infanteria, Km. 9.5, San Gabriel Industrial Park, Carolina, Puerto Rico 00985 Panasonic Canada Inc. 5770 Ambler Drive, Mississauga,...
Need help?
Do you have a question about the DVD Palmcoder VDR-D250 and is the answer not in the manual?
Questions and answers