
Related Manuals for Advantech UBX-330M


Summary of Contents for Advantech UBX-330M
- Page 1 User Manual UBX-330M Intelligent edge computer with Intel Core Ultra 7, Core Ultra 5 processor...
- Page 2 No part of this manual may be reproduced, copied, translated, or transmitted in any form or by any means without the prior written permission of Advantech Co., Ltd. The information provided in this manual is intended to be accurate and reliable.
-
Page 3: Product Warranty (2 Years)
Product Warranty (2 years) Advantech warrants the original purchaser that each of its products will be free from defects in materials and workmanship for two years from the date of purchase. This warranty does not apply to any products that have been repaired or altered by persons other than repair personnel authorized by Advantech, or products that have been subject to misuse, abuse, accident, or improper installation. -
Page 4: Ordering Information
Technical Support and Assistance Visit the Advantech website at www.advantech.com/support to obtain the latest product information. Contact your distributor, sales representative, or Advantech's customer service center for technical support if you need additional assistance. Please have the following information ready before calling: –... -
Page 5: Safety Instructions
70 dB (A). The equipment should only be installed in a restricted access area. DISCLAIMER: These instructions are provided according to IEC 704-1 stan- dards. Advantech disclaims all responsibility for the accuracy of any statements contained herein. UBX-330M User Manual... -
Page 6: Consignes De Sécurité
FSP/ FSP060-DAAN2) suitable for use at TMA 60 °C (140 °F) min., and the out- put is rated 12 V , 5.0A min., ES1. If you need further assistance, contact Advantech for additional information. Consignes de Sécurité Veuillez lire attentivement ces instructions de sécurité. - Page 7 L'équipement ne doit être installé que dans une zone d'accès restreint. AVERTISSEMENT: Cet ensemble d'instructions est donné conformément à la norme CEI 704-1. Advantech décline toute responsabilité quant à l'exactitude des déclarations contenues dans ce. Ce modèle est destiné à être alimenté par une alimentation certifiée UL (adapta- teur: FSP/FSP060-DAAN2), adaptée à...
- Page 8 UBX-330M User Manual viii...
-
Page 9: Table Of Contents
Hardware Installation ......5 Introduction ....................6 UBX-330M I/O Connectors ............... 6 Figure 2.1 UBX-330M Front View..........6 Figure 2.2 UBX-330M Rear View ..........6 Hardware Installation ................7 2.3.1 DDR, Storage, and Wi-Fi Module Installation ....... 7 2.3.2 Additional I/O Board Installation..........11 2.3.3... - Page 10 UBX-330M User Manual...
-
Page 11: Chapter 1 General Information
Chapter General Information... -
Page 12: Introduction
1.1 Introduction The UBX-330M is an edge intelligent computer powered by an Intel Core Ultra 7/5 processors. This compact, NUC-sized device is designed for powerful edge comput- ing. With three AI engines, it delivers low-latency, fast response times for real-time tasks. -
Page 13: Mechanical Specifications
Power Input: DC-in 12V 1.4.2 RTC Battery Lithium: 3V/220 mAh 1.5 Environmental Specifications 1.5.1 Temperature Operating Temperature: 0 ~ 40°C Storage Temperature: -20 ~ 60°C 1.5.2 Relative Humidity 95% @40°C (104°F) (non-condensing) UBX-330M User Manual... -
Page 14: Vibration Tolerance
The system is equipped with one memory slot and two M.2 storage slots: 30G acceleration Reference IEC60068-2-27:2008, half sine, 11 ms pulse duration 1.5.5 Safety Certification UL, CB, CCC, BSMI 1.5.6 EMC Certification CE, FCC, CCC, BSMI, RED UBX-330M User Manual... -
Page 15: Chapter 2 Hardware Installation
Chapter Hardware Installation... -
Page 16: Introduction
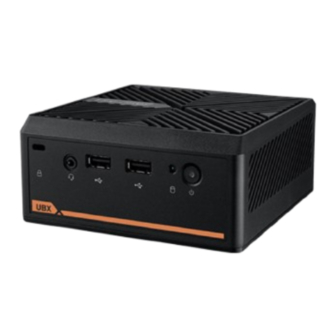
2.1 Introduction The following sections introduce I/Os of the UBX-330M and demonstrate the mem- ory, storage, and Wi-Fi module installation. 2.2 UBX-330M I/O Connectors Figure 2.1 UBX-330M Front View Figure 2.2 UBX-330M Rear View UBX-330M User Manual... -
Page 17: Hardware Installation
2.3 Hardware Installation 2.3.1 DDR, Storage, and Wi-Fi Module Installation Please follow the steps to install the Wi-Fi module for the UBX-330M. Remove the specified screws, and remove the bottom cover. Remove the specified screws and detach the front I/O bracket from the UBX- 330M. - Page 18 Please remove the screws to detach the mainboard. And then, please detach the plastic housing. Lock the Wi-Fi antenna cables. UBX-330M User Manual...
- Page 19 Re-attach the plastic housing and fix the antenna cabling. Based on the DDR5 memory, M.2 storage, and Wi-Fi module location to install the accessories. UBX-330M User Manual...
- Page 20 Lock the screws on the mainboard. Then reattach the front I/O bracket to assemble the device body. Use the screws to lock the bracket. Use the screws to lock the bottom cover. UBX-330M User Manual...
-
Page 21: Additional I/O Board Installation
2.3.2 Additional I/O Board Installation The UBX-330M has three I/O board expansion kits to fulfill different user demands. Please follow the steps to install the expansion kits for the UBX-330M. 2.3.2.1 UBX-300E-CM00 Installation: Remove the specified screws, and remove the bottom cover. - Page 22 Unpack the package and use the screws to lock the UBX-330M-CM00 I/O board. Attach the bracket of UBX-300E-CM00 and use the screws to lock the bracket. UBX-330M User Manual...
- Page 23 Use the screws to lock the bottom cover. UBX-330M User Manual...
- Page 24 2.3.2.2 UBX-300E-SA00 Installation: Remove the specified screws and bottom cover. Remove the specified screws and detach the rear I/O bracket from the UBX- 330M. UBX-330M User Manual...
- Page 25 Unpack the package and use the screws to lock the 2.5” SATA storage on the UBX-330M-SA00 I/O board into place. Use the screws to lock the UBX-300E-SA00 I/O board. UBX-330M User Manual...
- Page 26 Re-attach the rear I/O bracket and use the screws to lock it. Use the screws to lock the bottom cover. UBX-330M User Manual...
- Page 27 2.3.2.3 UBX-300E-TE00 Installation: Remove the specified screws and then remove the bottom cover. Remove the specified screws and detach the rear I/O bracket from the UBX- 330M. UBX-330M User Manual...
- Page 28 Fix the 5G module antenna cables on the mainboard. The 5G module assembly. UBX-330M User Manual...
- Page 29 Use the screws to fix the UBX-300E-TE00 I/O board. Use the screws to fix the UBX-300E-TE00 I/O board. UBX-330M User Manual...
- Page 30 Use the screws to lock the bottom cover. Connect the 5G module antennas to the UBX-330M. UBX-330M User Manual...
-
Page 31: Wall Mount Kit Installation
2.3.3 Wall Mount Kit Installation The UBX-330M supports wall mount kit installation to help users mount the UBX- 330M on the wall. Please lock the specific screw on the wall mount bracket. Please use the accessory, 4 pcs of M4*6L screws to lock the wall mount bracket. - Page 32 Please remove three screws of the UBX-330M bottom cover. Please replace the original screws with three new specific ones. UBX-330M User Manual...
- Page 33 Attach the wall mount kit on the bottom cover of the UBX-330M. Hang on the UBX-330M on the bracket. UBX-330M User Manual...
- Page 34 Turn the screw in the opposite direction to secure the UBX-330M to the wall bracket. UBX-330M User Manual...
- Page 35 UBX-330M User Manual...
- Page 36 No part of this publication may be reproduced in any form or by any means, such as electronically, by photocopying, recording, or otherwise, without prior written permission from the publisher. All brand and product names are trademarks or registered trademarks of their respective companies. ©Advantech Co., Ltd. 2024...
Need help?
Do you have a question about the UBX-330M and is the answer not in the manual?
Questions and answers