Table of Contents
Advertisement
Quick Links
Advertisement
Table of Contents

Related Manuals for DFI M2A-00B


Summary of Contents for DFI M2A-00B
- Page 1 M2A-OOB M.2 Out Of Band Module Compact BMC (cBMC) User’s Manual...
-
Page 2: Fcc And Doc Statement On Class B
Copyright FCC and DOC Statement on Class B This publication contains information that is protected by copyright. No part of it may be repro- This equipment has been tested and found to comply with the limits for a Class B digital duced in any form or by any means or used to make any transformation/adaptation without the device, pursuant to Part 15 of the FCC rules. -
Page 3: Table Of Contents
Table of Contents Chapter 1 - Introduction........................ 5 What’s OOB (Out-Of-Band) Management ................5 Key Features ........................... 5 M.2 KEY A cBMC ........................6 Chapter 2 - Getting Started ......................7 Hardware Requirements ......................7 System Requirements ......................7 OOB Normal Boot ........................7 Default Password Setting ..................... -
Page 4: About This Manual
About this Manual Static Electricity Precautions This manual can be downloaded from the website. It is quite easy to inadvertently damage your PC, system board, components or devices even before installing them in your system unit. Static electrical discharge can damage computer The manual is subject to change and update without notice, and may be based on editions that components without causing any signs of physical damage. -
Page 5: Chapter 1 - Introduction
► Recovery (Factory Mode) ► Remote BIOS setup & uefi shell (serial over lan) ► Remote BIOS update SPI-NAND ► Remote BIOS update SOL & DFI USB-Storage ► Change OOB IP address User's Manual | M.2 Out Of Band Module Compact BMC... -
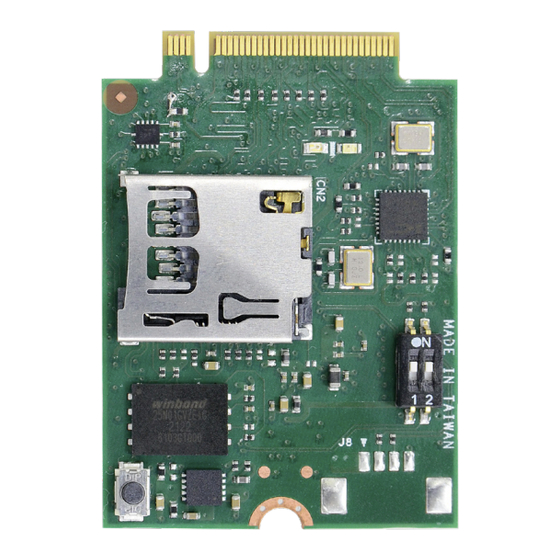
Page 6: Key A Cbmc
Chapter 1 INTRODUCTION X M.2 KEY A cBMC User's Manual | M.2 Out Of Band Module Compact BMC... -
Page 7: Chapter 2 - Getting Started
OOB x1 X System Requirements Step 2: ■ The remote PC can remotely control the DFI system which installed OOB feature. Start up the main board. Remote PC and DFI system shall be in the same network domain It takes about 2 minutes to wait for the green LED lights up. OOB has been started successfully. -
Page 8: Default Password Setting
Chapter 2 GETTING STARTED X Default Password Setting Step 1: Step 2: The default password can be obtained through the "ping" and "arp -a" commands. Use a LAN cable to connect a LAN port on PC and a LAN port (i210) on the board. After entering ping OOB IP address and execute "arp -a"... - Page 9 Type in the following information, then press OK. Change adapter options, double click Ethernet. IP address: 192.168.10.99 Subnet mask: 255.255.255.0 Note: Remote PC and DFI system shall be in the same network domain. User's Manual | M.2 Out Of Band Module Compact BMC...
- Page 10 When you enter a default password in Command Prompt, it doesn't appear or show up on the screen. After entering the password, you will see DFI. Then type in /DFI # When it displays you may now start typing in commands for each function. User's Manual | M.2 Out Of Band Module Compact BMC...
-
Page 11: Change Password
Chapter 2 GETTING STARTED Change Password To change the default password, please follow the instructions below. Please make sure to log out OOB before changing the password. Step 1: Step 2: Execute windows Command Prompt. Enter the command below. To run the command prompt: ssh root@192.168.10.100 "passwd root"... - Page 12 Chapter 2 GETTING STARTED Use SSH key Pair Login Step 2: Step 1: Please obtain a default password before logging in, and type in the information as follows: Execute windows Command Prompt. C:\users\user name> : ssh root@192.168.10.100 "mkdir -p ~/.ssh && chmod 700 ~/.ssh" To run the command prompt: ■...
- Page 13 Chapter 2 GETTING STARTED Step 3: • Use SSH key Pair Login - Change A Path and Create A Filename Please enter the command as follows: scp C:\Users\test\.ssh\id_rsa.pub root@192.168.10.100:~/.ssh/authorized_keys You can also type in a path location where you want to save the file and create a file name. For example : And then enter the password.
- Page 14 Chapter 2 GETTING STARTED Step 1: Step 2: Please obtain a default password before logging in, and type in the information as follows: Please enter the command as follows: C:\users\user name> : ssh root@192.168.10.100 "mkdir -p ~/.ssh && chmod 700 ~/.ssh" scp C:\Users\test\.ssh\a4-1c-b4-0a-b0-6a.
-
Page 15: Remote Control Pc Power On/Off
Chapter 2 GETTING STARTED X Remote Control PC Power On/Off User's Manual | M.2 Out Of Band Module Compact BMC... -
Page 16: Pc Power On/Off Status Check
Chapter 2 GETTING STARTED Turn On/Off PC Remotely PC Power On/Off Status Check After the status check, you can control PC power on/off remotely. Please complete Default Password Setting - Step 4 before entering the following command. Please complete Default Password Setting - Step 4 before entering the following command. -
Page 17: Perform A Timed Force Shutdown
Chapter 2 GETTING STARTED PC Rebooting Perform a Timed Force Shutdown To reboot the PC, please type in the following command. To forcibly shut down the PC, please type in the following command. You will hear a single beep, it means PC rebooted successfully. Please complete Default Password Setting - Step 4 before entering the following command. -
Page 18: Remote Hardware Monitor Log (Super I/O)
To start super I/O log: ./sio_start_log.sh YYYY-MM-DD hh:mm:ss hours /DFI/sio_log & Shell Script : For example: ./sio_start_log.sh 2024-05-24 09:00:00:00 24 /DFI/sio_log & Make sure to add the ampersand "&" at the end to run in the background. To stop super I/O log: ./sio_stop_log.sh... -
Page 19: How To Export Super I/O Logs From Oob
Default Password Setting - Step 4 before entering the following command. scp -r root@192.168.10.100:/DFI/sio_log C:\Users\username\.ssh Shell Script : For example: scp -r root@192.168.10.100:/DFI/sio_log C:\Users\yili.pan\.ssh The log file is saved in C drive. User's Manual | M.2 Out Of Band Module Compact BMC... -
Page 20: Using Usb Storage / Microsd Card To Run Actions
Chapter 2 GETTING STARTED X Using USB Storage / MicroSD Card to run actions The shell scripts for USB storage Please execute the following commands to switch between the USB flash drive and the mi- croSD card for the device operations. To insert a USB flash drive, please execute a shell script as following: ./insert_usb_storage.sh Shell Script :... -
Page 21: Chapter 3 - Bios
Please fast forward the video to 1:31 and follow the steps of how to request the BIOS files from DFI. Step 2: Copy BIOS bin file to its corresponding users folder in C drive. User's Manual | M.2 Out Of Band Module Compact BMC... - Page 22 Shell Script : root@192.168.10.100's password: Note: For creating a default password, please refer to Default Password Setting - Step Refresh DFI USB storage to notify windows ssh root@192.168.10.100 ./DFI/refresh_usb_storage.sh Shell Script : Step 4: Run SSH command: Please type in the information as follows: C:\users\user name>...
-
Page 23: Remote Bios Update (Via Teraterm)
Chapter 3 REMOTE BIOS UPDATE X Remote BIOS Update (Via Teraterm) ・ ・ Remote BIOS Update (SOL & DFI USB-Storage) Remote BIOS Setup & UEFI shell (Serial Over Lan) User's Manual | M.2 Out Of Band Module Compact BMC... -
Page 24: Check Bios Set Up From Usb Storage
Chapter 3 REMOTE BIOS UPDATE X Check BIOS Set Up from USB Storage BIOS set up is on USB storage Before starting BIOS update, please make sure the To check BIOS set up, please execute a shell script as following: ./insert_usb_storage.sh Shell Script : USB Storage is exist, Please eject it. - Page 25 BIOS files from DFI. Step 2: TeraTerm is already included in the DFI system. After successfully booting to OOB, you will see a USB flash drive in the DFI system. • How to Access BIOS Setup Menu When Power on Please copy the teraterm folder from the USB flash drive to the computer where you want to operate the OOB.
- Page 26 When system power is on, press "ESC" key in the teraterm window. When there is no error message displayed, the BIOS update will be completed successfully. Boot from DFI USB-Storage device &Update BIOS in uefi mode Save & Exit ---> UEFI: DFI USB-Storage Use arrow key to select User's Manual | M.2 Out Of Band Module Compact BMC...
-
Page 27: Chapter 4 - Oob Ip Address Change
Typing in following command and you will see a message to ask for a new IP address. (For example: 192.168.10.88) ssh root@192.168.10.100 ./DFI/ipconfig.sh Shell Script : Press Enter and close the current window since it is frozen and unable to operate. -
Page 28: Console Redirection
Chapter 4 OOB IP ADDRESS CHANGE X Console Redirection The old IP address Step 1: After the IP address changes, Console Redirection is unable to run commands. To fix the problme, please navigate to C:\Program Files (x86)\teraterm to look for a TTL file named 'telnet.ttl.' This file needs to be modified. After that, Console Redirection has been updated successfully.
Need help?
Do you have a question about the M2A-00B and is the answer not in the manual?
Questions and answers