Advertisement
Quick Links
Advertisement

Related Manuals for Neuation iSWIX VT


Summary of Contents for Neuation iSWIX VT
- Page 1 VT PRODUCT USER MANUAL...
- Page 3 TABLE OF CONTENTS 1. Product Description..........1.1 Introduction 1.2 Intended Use 1.3 Features 1.4 Technical Specifications 1.5 Accessories 2. Safety Precautions..........3. Installation..............3 3.1 Location 3.2 Connecting Power Adaptor 4. Standard Parts Listing......... 5. User Interface and Display....... 6. Optional Attachments & Their Installation..7.
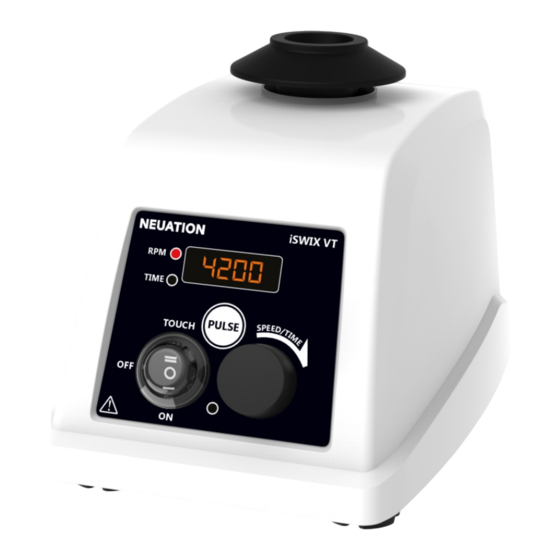
- Page 5 1. PRODUCT DESCRIPTION 1.1 INTRODUCTION This vortex mixer is designed for laboratory mixing. It assures the highest performance in terms of speed, reliability, precision and safety. The vortex mixer has a variable speed with digital control that allows low RPM start-up for gentle shaking and high speed mixing for vigorous vortexing of samples.
- Page 6 1.4 TECHNICAL SPECIFICATIONS Motor Brushless DC Motor 4 mm Orbital Diameter Speed Variable 300 - 4200 RPM Run Time & Modes 1 minute to 999 mins & infinite mode Speed Accuracy ± 10 RPM 500 gm Maximum Load Capacity Different modes Continuous &...
- Page 7 Always use the vortex mixer on a level & stable surface for best performance and maximum safety. Do not the lift vortex mixer with the attachments, as every attachment including the cup head are designed to be pulled off for interchanging.
- Page 8 3.1 LOCATION Take the unit out and place it on the leveled & stable surface near the grounded electrical outlet. The surface should be clean and free from dust to ensure that the feet grip the surface firmly. Keep a clearance of 10 cm on all sides of the unit for proper ventilation.Keep the unit away from heat &...
- Page 9 5. USER INTERFACE & DISPLAY TIME PULSE Touch Name/Symbol Function The power led shows the status of mains power. Power LED Glow - power connected, No Glow - power disconnected The speed LED will glow when the speed value Speed LED is shown or selected.
- Page 10 6. OPTIONAL ATTACHMENTS & THEIR INSTALLATION The standard attachment is normally used for vortexing samples in tubes. The vortex mixer can accommodate optional attachments when combined with the optional universal attachment. Optional attachments include the universal attachment, which can combine with other foam attachments and can be used for mixing samples in microplates, microtubes &...
- Page 11 The below additional rubber attachments, when in combination with the universal attachment, can be used for mixing samples in 250ml flask. First, always attach the universal attachment, then place the flask on the universal attachment & tighten it with the rubber attachment firmly, as shown in the figure below.
- Page 12 Center Press to attach Standard Attachment Modified shaft body Removing Standard Attachment Attaching Standard Attachment Note: Do not rotate the universal attachment or any attachments attached to the modified shaft body. To remove the universal attachment, pull the universal attachment up with both hands as shown in the figure below.
- Page 13 To attach the microtube or microplate foam attachment, first install the universal attachment then place the foam attachment as shown in the image below. Ensure that foam attachment is securely placed on the universal platform. Foam Attachment Universal attachment Place the microplate or microtubes first in the foam attachment and then place the foam attachment on the universal attachment attached to the vortex mixer.
- Page 14 7. OPERATION 7.1 CONNECTING THE POWER ADAPTOR Always connect the power adaptor to the unit first & then to the adaptor port. Before connecting to both ends, ensure that the vortex mixer is in STANDBY mode and the cup head (attachment) is firmly tightened with the modified shaft body.
- Page 15 7.3 STANDBY, TOUCH & CONTINUOUS MODE Placing the 3-way switch in the STANDBY position will keep the vortex mixer in an OFF state i.e. it will not operate as TOUCH or CONTINUOUS mode. Below is the position of the 3 way switch showing the vortex mixer is in STANDBY mode.
- Page 16 7.4 TOUCH MODE OPERATION Before operating, check that the upper cup head is firmly tightened to the modified shaft body. Set the required speed using the Press Down knob in STANDBY mode and select the “TOUCH” mode using the 3 way switch. For touch mode operation, gently press and hold the cup head using the tube as long as you want it to run.
- Page 17 pressing the cup head) at set speed and time. In continuous mode, set RPM & remaining time will be displayed alternatively. In continuous mode, at any time, the user can modify the speed by rotating the knob and can also modify time by pressing the knob once then rotating it.
- Page 18 the programmable pulse mode, the user can set the ON time & OFF time as per requirement. 7.6.1 DEFAULT PULSE (ON & OFF Time Stable) Pulse mode can be activated in the continuous mode only. To activate pulse mode, press the pulse button under continuous mode. Once activated, the power LED with start blinking indicating the activation of pulse mode.
- Page 19 of vortex action. Follow this process for all 10 similar samples. Note: To reset or modify the pulse time value, restart the pulse mode (i.e. turn off & turn ON). It is recommended to used the pulse mode with the standard attachment. Default and programmable pulse mode can be used with the universal attachment only if the maximum speed of universal attachment is taken into consideration to avoid spillage.
- Page 20 notification in compliance with the following conditions: This warranty is valid only if the product is used for its intended purpose and within the guidelines specified in this instruction manual. This warranty does not cover damage caused by accident, neglect, misuse, improper service, natural forces or other causes not arising from defects in original material or workmanship.
- Page 21 10. PRODUCT DISPOSAL In case the product is to be disposed of, the relevant legal regulations are to be observed. Information on the disposal of electrical and electronic devices in the European Community The disposal of electrical devices is regulated within the European Community by national regulations based on EU Directive 2012/19/EU on waste electrical and electronic equipment (WEEE).
- Page 24 Accumax Lab Devices Private Limited Plot No. 15, 16 & 32 GIDC Electronic Park SEZ, Sector 26, Gandhinagar, Gujarat, India - 382026. Website: www.accumaxlab.com...
Need help?
Do you have a question about the iSWIX VT and is the answer not in the manual?
Questions and answers