Advertisement
Quick Links
Advertisement

Related Manuals for SCIFIT PRO1 Series


Summary of Contents for SCIFIT PRO1 Series
- Page 1 Upper Body Exerciser Machine Owner's Manual ALL PRO1 SERIES MODELS A6568 REV CB...
- Page 3 EUROPE, MIDDLE EAST, and AFRICA (EMEA) All Other EMEA Countries and Distributor Business EMEA* North America Belgium, Netherlands, and Luxemburg Life Fitness Atlantic BV SCIFIT Life Fitness Atlantic BV Bijdorpplein 25-31 Columbia Centre III Bijdorpplein 25-31 2992 LB Barendrecht 9525 Bryn Mawr Avenue...
- Page 4 User and Service Documents Link https://lfn.fit/KnowledgeBase https://lfn.fit/SupportDocuments Additional information is available online using the links above. أ علاه إل ر إبط باستخدإم إ لإ ن تر نت على إضافية معلومات تتوفر 点击上面的链接可在线获取更多信息。 Flere oplysninger er tilgængelige online gennem linket ovenfor. Bijkomende informatie is online beschikbaar via bovenstaande link.
- Page 5 © Copyright 2024, Life Fitness, LLC. All Rights Reserved. Life Fitness, Hammer Strength, Cybex, ICG and SCIFIT are registered trademarks of Life Fitness, LLC and its affiliated companies and subsidiaries. Disclaimer: Images and specifications are current as of the date of publication and are subject to change.
- Page 6 • If warnings are missing or damaged, please contact customer service immediately for replacement warning labels. Warning labels are shipped with every product and should be installed before the product is used. SCIFIT is not responsible for missing or damaged warning labels.
- Page 7 • Do not allow other people to interfere in any way with the user or equipment during a workout. • When the product is not in use, SCIFIT recommends unplugging the product. Disconnect from the electrical outlet when not in use, and before putting on or taking off parts.
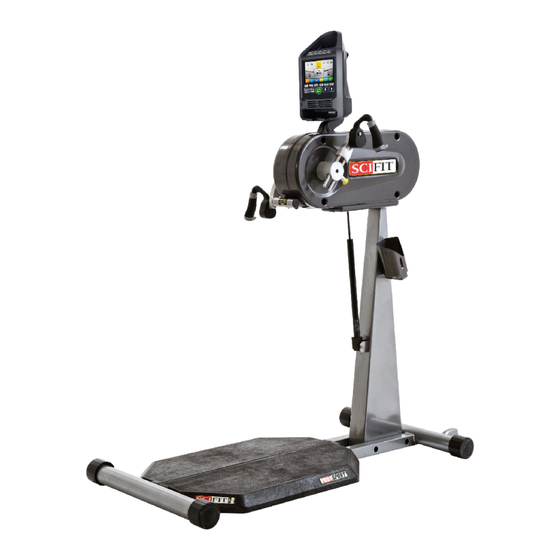
- Page 8 2. Product Overview Product Overview PRO1 Seated GEN4 Console Main Body Angle Positioning Lever Adjustable Crank Arms Ergonomic Seat Assembly (Premium Shown) Forward/Backward Seat Adjustment Foot Lever Molded Foot Rest Leveling Endcaps Transport Wheels Water Bottle Holder PRO1 Sport GEN4 Console Main Body Angle Positioning Lever Adjustable Crank Arms Molded Platforms...
- Page 9 3. Service and Technical Data Maintenance Component Action When Upholstery Clean With a Damp Cloth Daily Base Roller Track Clean With a Damp Cloth Weekly Battery Refer to “Rotary CNSL Prog. Manual” For battery Check Instruct. Monthly Molded Platform and Foot Clean With a Damp Cloth Weekly Rests...
- Page 10 4. Assembly and Relocation PRO1-PRO1 Sport Assembly Short assembly steps will be required when the machine arrives at the customer location. The following steps will show these steps for both PRO1 and PRO1 Sport machine models. Tools Required: • Torque wrench set 48 ft-lbs (65 Nm)• 12" (30.5 cm) Ratchet extension •...
- Page 11 2. NOTE: The following pertains to both PRO1 and PRO1 Sport main body to base frame attachment (PRO1 base frame shown). Starting on the left side, take the 12" extension with 5/16" hex bit, screw, split washer and flat washer, then loosely insert the hardware into the front hole of the base frame closest to the transport wheels as shown.
- Page 12 4. Starting on the right side use the torque wrench set at 48 ft-lbs (65 Nm) with the 5/16" hex bit attached and tighten the hardware in the two front holes of the main body to base frame as shown. 5.
- Page 13 PRO1 Seated Relocate 1. Remove the seat by pressing down on either left or right yellow foot levers, then slide the seat assembly off the base frame and place to the side. 2. Grab the lift handle at the back of the base frame and lift until the front transport wheels touch the floor, then move the machine to the preferred location.
- Page 14 3. Once at the location, if needed adjust the left and right end caps to make the machine level with the floor. 4. Attach both footrests onto the machine's front round tube. Page 12 of 26...
- Page 15 5. Remount the seat assembly by pressing either the left or right yellow foot levers, then slide the seat assembly onto the base frame and release the foot lever at the preferred position. RELOCATION COMPLETE Page 13 of 26...
- Page 16 PRO1 Sport Relocate 1. With both hands carefully grab the rear round tube of the base frame, then lift and move to the preferred location. 2. Once at the preferred location adjust the front and rear left/right end caps to make the machine level with the floor if needed.
- Page 17 3. NOTE: Platforms will only attach in one direction Place the left and right platform onto the base frame. Page 15 of 26...
- Page 18 In facilities where the lowest possible starting resistance is desired, please use the enclosed, UL Approved, 18 volt adapter (#P4861) to plug your SCIFIT product into an electrical outlet. While all SCIFIT products provide low starting resistance, the use of the 18 volt adapter makes a noticeable difference in lowering the starting resistance.
- Page 19 AC adapter extensions (#P4669) are available to order from our parts department. This adds 6 feet to the existing 6 foot cord on your adapter. Console Adjustment The console may be tilted forward or backward to allow a better view of the console screen during a workout. Page 17 of 26...
- Page 20 Upper Crank Adjustment NOTE: Ensure that the adjustment knob is fully engaged into the hole of the crank rod when adjusting. 9" (23 cm) Radius, 1st hole position 8" (20 cm) Radius, 2nd hole position 7" (18 cm) Radius, 3rd hole position 6"...
- Page 21 Main Body Adjustment NOTE: Pull the angle adjustment lever forward and hold, then move the main body up or down and release at the preferred angle. Page 19 of 26...
- Page 22 Rowing Motion Customers may use a feature of the PRO1 called the "Rowing Motion". This will require the right crank and handle to be repositioned in the same direction as the left. The following steps with show how this is done. TOOLS REQUIRED: •...
- Page 23 3. Turn and position the crank/handle in the same direction as the left with the curved portion of the crank facing the operator, then pull the adjustment knob outward and slide the crank rods into the holes of the hub, releasing the knob into any of the crank rod holes.
- Page 24 5. Adjust the left and right cranks to the same holes positions according to your preference before starting the workout. Page 22 of 26...
- Page 25 6. Biomechanical Positioning Machine Entry (PRO1 Seated) 1. Choose one of the following to position seat for entry. • Press and hold the yellow foot lever located on either side of the seat base (see Seat System manual), then move the seat back to allow sufficient entry space and release the foot lever, then sit on the seat assembly. •...
- Page 26 7. Specifications Specifications PRO1 Seated Weight PRO1 Seated: 248 lbs. (112 Kg.) Max User Weight 450 lbs. (204 Kg) Premium, 500 lbs (227 Kg) Standard, 600 lbs. (272 kg.) Bariatric Power Self generating w/auto recharge battery back-up. Standard low voltage AC adapter wall pack. Resistance System Electromagnetic Self Generating Bi-directional Resistance Programs...
- Page 27 SCIFIT representative. What You Must Do Register your Product online at http://www.scifit.com/warranty-registration-2/. Retain proof of purchase; use, operate and maintain the Product as specified in the Manual; notify Customer Support Services of any defect within 10 days after discovery of the defect; if instructed, return any defective part for replacement or, if necessary, the entire Product for repair.
- Page 28 servicing your country (contact information found at the front of this manual) or visit the applicable local Life Fitness website to receive the specific warranty information for your country. Changes in Warranty Not Authorized No one is authorized to change, modify or extend the terms of this limited warranty. Effects of State Laws This warranty gives you specific legal rights, and you may have other rights which vary from state to state and country by country.
Need help?
Do you have a question about the PRO1 Series and is the answer not in the manual?
Questions and answers