Advertisement
Quick Links
Advertisement

Related Manuals for Gorenje G400 GK5B41WD


Summary of Contents for Gorenje G400 GK5B41WD
- Page 1 INSTRUCTIONS FOR USE FREE STANDING COOKER...
- Page 2 The appliance has to be connected in compliance with the effective regulations, and it may only be used in well ventilated areas. Read the instructions before connecting or using the appliance. For more detailed instructions and tips, please visit http://www.gorenje.com or scan the QR code on the rating plate.
- Page 3 IMPORTANT SAFETY INSTRUCTIONS Carefully read the instructions and save them for future reference. This appliance may only be used by children aged 8 years and above and persons with reduced physical, sensory or mental capabilities or lack of experience and knowledge if supervision or instructions are provided to them concerning use of the appliance in a safe way and if they understand the hazards involved.
- Page 4 WARNING: Use only hob guards designed by the manufacturer of the cooking appliance or indicated by the manufacturer of the appliance in the instructions for use as suitable or hob guards incorporated in the appliance. The use of inappropriate guards can cause accidents. The appliance is intended to be placed directly on the floor, without any supports or plinths.
- Page 5 WARNING: In order to prevent tipping of the appliance, stabilising means must be installed. Refer to the instructions for installation. Prolonged intensive use of the appliance may call for additional ventilation, for example opening of a window, or more effective ventilation, for example increasing the level of mechanical ventilation where present.
- Page 6 In case of cooling fan failure, please stop using the appliance, switch it off and call a service technician. NOTICE In case the appliance is equipped with a glass or glass ceramic cooking surface. In case of breakage: • Immediately close the input of fuel into the burners and disconnect the electric heating elements and the appliance from the mains.
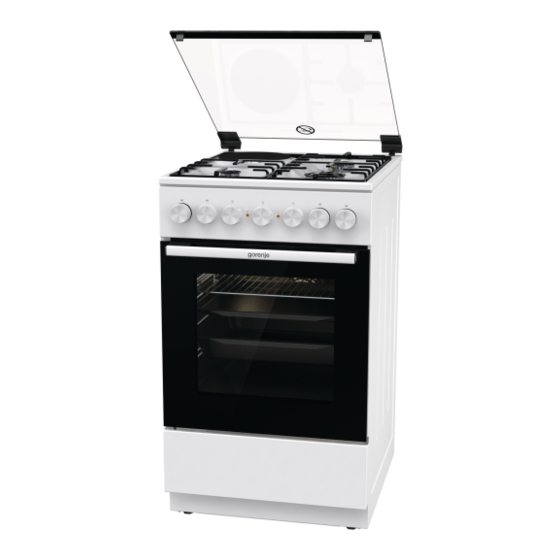
- Page 7 FREE STANDING COOKER Appliance description INFORMATION! Appliance functions and equipment depend on the model. 1 lid 2 cooking hob 3 control unit 4 door switch 5 lighting 6 guides – cooking levels 7 rating plate 8 oven door 9 door handle 10 drawer/flip down 11 plinth 12 adjustable feets...
- Page 8 APPLIANCE LID Make sure the lid is clean and that there is no liquid spilt on it before raising it. The lid may be lacquer-coated or glass. It may only be closed when the cooking zones have completely cooled down. Do not close the lid when the burner is lit! The symbol on the product or its packaging indicates that glass lids may shatter when heated.
- Page 9 As baking accessories heat up, their form may change. This does not affect their functionality and their original form will be restored when they cool down. BEFORE USING THE APPLIANCE FOR THE FIRST TIME • Upon receiving the appliance, remove all parts, including any transport equipment, from the oven. •...
- Page 10 These cooking zones are indicated with a red dot in the middle. After repeated heating and cleaning, this dot may disappear. In case of prolonged use of cast iron plates, the area of the plate and the edge of the cooking zone may discolour.
- Page 11 Burner type Container diameter Large (3,0 kW) 220-260 mm Normal (1,9 kW) 180-220 mm Auxiliary (1,0 kW) 120-180 mm BURNER IGNITION AND OPERATION Always press the knob before rotating it. Cooking power levels are indicated on the knobs with a large and a small flame symbol. Rotate the knob over the large flame position ( ) to the small flame position ( ) and back.
- Page 12 CONTROL UNIT 1. Cooking zone knob front left 2. Cooking zone knob rear left 3. Cooking zone knob rear right 4. Cooking zone knob front right 5. Cooking system selector knob 6. Oven temperature knob 7. Mechanical timer knob 8. Operation control lamp. It indicates that one of the hobs is in operation. 9.
- Page 13 System Description TOP HEATER Only the heater on the oven cavity ceiling will radiate heat onto the food. Use it to brown the upper side of your dish (final browning). Suggested temperature. 180°C. BOTTOM HEATER Only the heater on the bottom of the oven cavity will radiate heat. Use this heater to brown the lower side of the dish.
- Page 14 BAKING WITH STEAM With these systems, you can cook with the addition of steam. Steam results in better browning and more crunchiness of the surface. Place a baking sheet into the first guide when the oven is still cool. Pour a maximum of 2 dl of water onto the baking sheet.
- Page 15 Cooking with the rotisserie (depending on the model) Maximum temperature when using the rotisserie is 230°C. Insert the skewer support into the 3rd guide from the bottom and place the shallow baking sheet into the bottom (1st) guide to serve as a drip tray. Impale the meat on the skewer and tighten the screws.
- Page 16 INFORMATION! Never use aggressive or abrasive cleaners. CLEANING THE COOKING HOBS Clean the area around the cooking zones with hot water and some washing-up liquid. For stubborn dirt, use a steel wool pad soaked with detergent; then, rinse the hob and wipe it dry. Liquids containing salt, boiled-over liquids and moisture have detrimental effect on the cooking zones.
- Page 17 Place the wire guides with the catalytic inserts on the upper openings in the side walls of the oven “A“. Press them into the snap lock at the bottom “B“. Do not wash the catalytic inserts in the dishwasher. REPLACING THE BULB The bulb is a consumable and therefore not covered by warranty.
- Page 18 Before replacing the door, always check that the hinge flaps are correctly placed in the side laths of the door. You prevent the sudden closing of the hinge so, which is connected to a strong spring. The releasing of flap causes the damaging of door and a risk of injury. REMOVING AND REPLACING THE OVEN DOOR (depending on the model) •...
- Page 19 REMOVING AND INSERTING THE OVEN DOOR GLASS PANE (depending on the model) Screw out the screws on the door left and right sides and pull out the upper lath. You can pull out the glass pane of door now. Provide these steps in reverse order at returning the glass pane back. Repair or any warranty claim resulting from incorrect connection or use of the appliance shall not be covered by the warranty.
- Page 20 ADJUSTING THE HEIGHT OF THE COOKER (depending on the model) The height of the cooker is 900 mm. You can adjust the height of the appliance from 850 to 940 mm. Torx T20 • Put the cooker on the floor with back side. •...
- Page 21 PREVENTION FROM TIPPING OVER (mm) (depending on the model) According to the plan attach the holder to the wall with the added screws and anchors. If the attached screws and anchors cannot be used, use others that will ensure a secure installation on the wall. INSTALLATION OF THE DOOR LOCK (depending on the model)
- Page 22 CONNECTING TO THE POWER MAINS The electric range is a heat consumer, the installation and location of which must correspond with local standards in force. Three brass bridges are available for connection. 1 bridge is needed for three-phase connection (380 –...
- Page 23 GAS CONNECTIONS FACTORY DEFAULT SETTINGS • Gas appliances are tested and fitted with the sign. • Has appliances are supplied sealed with burners adjusted to natural gas type H or E (20 or 25 mbar), or to liquefied natural gas (50 or 30 mbar). •...
- Page 24 After connection, check the operation of the burners. The flames have to burn with clearly visible blue and green core. If the flame is unstable, increase the minimum power as necessary. Explain to the user how the burners operate and review the instruction manual together.
- Page 25 DISPOSAL Packaging is made of environmentally friendly materials that can be recycled, disposed of, or destroyed without any hazard to the environment. To this end, packaging materials are labelled appropriately. The symbol on the product or its packaging indicates that the product should not be treated as normal household waste.
- Page 26 COOKING TEST Tested in compliance with the EN 60350-1 standard. BAKING Dish Equipment Guide (from System Temperature Cooking time (°C) the bottom) (minutes) Cookies 140-150* 25-40 single level Cookies 140-150* 25-40 single level shallow enamel- coated baking sheet Cookies 2, 3 140-150* 30-45 two levels...
- Page 27 NOZZLE TABLE Gas type, pressure Auxiliary burner Normal burner Wobbe number Standard Natural gas H Nominal heat load (kW) 0,48 0,48 Wo=45,7÷54,7 MJ/m Consumption (l/h) Natural gas E, Nozzle type (1/100 mm) 72 X / 35 103 Z / 35 Natural gas E+ Nozzle ID Wo=40,9÷54,7 MJ/m...
- Page 28 GORENJE gospodinjski aparati, d.o.o Partizanska cesta 12, SI-3320 Velenje, SLOVENIA info@gorenje.com...
Need help?
Do you have a question about the G400 GK5B41WD and is the answer not in the manual?
Questions and answers