Table of Contents
Advertisement
Quick Links
Advertisement
Table of Contents

Subscribe to Our Youtube Channel
Related Manuals for Gorenje GK6B41WD


Summary of Contents for Gorenje GK6B41WD
- Page 1 INSTRUCTIONS FOR USE FREE STANDING COOKER...
- Page 2 The appliance has to be connected in compliance with the effective regulations, and it may only be used in well ventilated areas. Read the instructions before connecting or using the appliance. Instructions for use are also available at our website: http://www.gorenje.com The following symbols are used throughout the manual and they have the following meanings:...
-
Page 3: Important Safety Instructions
IMPORTANT SAFETY INSTRUCTIONS Carefully read the instructions and save them for future reference. This appliance may only be used by children aged 8 years and above and persons with reduced physical, sensory or mental capabilities or lack of experience and knowledge if supervision or instructions are provided to them concerning use of the appliance in a safe way and if they understand the hazards involved. - Page 4 WARNING: Use only hob guards designed by the manufacturer of the cooking appliance or indicated by the manufacturer of the appliance in the instructions for use as suitable or hob guards incorporated in the appliance. The use of inappropriate guards can cause accidents. The appliance is intended to be placed directly on the floor, without any supports or plinths.
- Page 5 WARNING: In order to prevent tipping of the appliance, stabilising means must be installed. Refer to the instructions for installation. Prolonged intensive use of the appliance may call for additional ventilation, for example opening of a window, or more effective ventilation, for example increasing the level of mechanical ventilation where present.
-
Page 6: Before Connecting The Appliance
In case of cooling fan failure, please stop using the appliance, switch it off and call a service technician. NOTICE In case the appliance is equipped with a glass or glass ceramic cooking surface. In case of breakage: • Immediately close the input of fuel into the burners and disconnect the electric heating elements and the appliance from the mains. -
Page 7: Free Standing Cooker
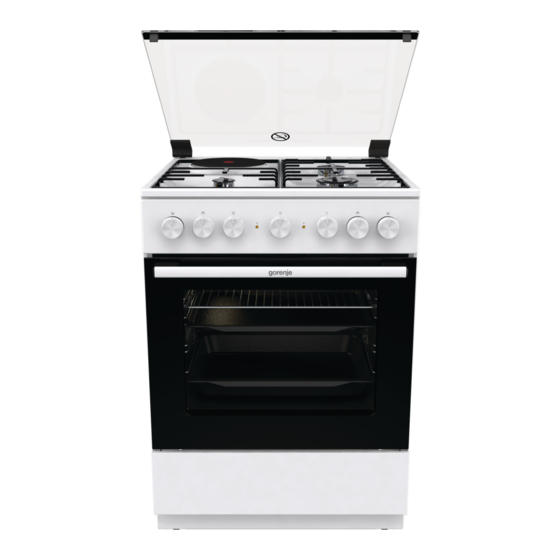
FREE STANDING COOKER Appliance description INFORMATION! Appliance functions and equipment depend on the model. 1 lid 2 cooking hob 3 control unit 4 door switch 5 lighting 6 guides – cooking levels 7 rating plate 8 oven door 9 door handle 10 drawer/flip down 11 plinth 12 adjustable feets... - Page 8 APPLIANCE LID Make sure the lid is clean and that there is no liquid spilt on it before raising it. The lid may be lacquer-coated or glass. It may only be closed when the cooking zones have completely cooled down. Do not close the lid when the burner is lit! The symbol on the product or its packaging indicates that glass lids may shatter when heated.
-
Page 9: Before Using The Appliance For The First Time
As baking accessories heat up, their form may change. This does not affect their functionality and their original form will be restored when they cool down. BEFORE USING THE APPLIANCE FOR THE FIRST TIME • Upon receiving the appliance, remove all parts, including any transport equipment, from the oven. •... -
Page 10: Gas Burners
Rapid cooking zones (only with some models) can operate with greater power than regular cooking zones, which means they can heat up more quickly. These cooking zones are indicated with a red dot in the middle. After repeated heating and cleaning, this dot may disappear. - Page 11 Triple (three-ring) burner A Nozzle TIPS REGARDING YOUR COOKWARE • Correct choice of cookware allows optimum cooking time and gas consumption. Cookware diameter is the most important in this respect • If a pot or a pan is too small, the flames reaching over the edge of its bottom will damage it. Moreover, gas consumption will be higher.
- Page 12 Electric ignition will only work if the power cord is connected to the power mains. If electric ignition does not work due to a power supply failure or damp spark plugs, the gas can still be ignited with a match or a lighter. After ignition, keep the knob depressed for approximately 5 more seconds until the flame is stabilized.
-
Page 13: Rapid Preheat
COOKING SYSTEMS System Suggested Description temperature °C 50-max RAPID PREHEAT Use this function if you wish to heat the oven to the desired temperature as quickly as possible. This function is not appropriate for cooking food. When the oven heats up to the desired temperature, the heating process is completed. -
Page 14: Aqua Clean
System Suggested Description temperature °C 190-200 BAKING FROZEN FOOD This method allows baking frozen food in a shorter period of time without pre-heating. Optimum for pre-baked frozen products (bakery products, croissants, lasagne, French fries, chicken nuggets), meat and vegetables. DEFROSTING The air circulates with no heaters activated. -
Page 15: Maintenance And Cleaning
If you do not wish to use the timer switch or if the time is either shorter than 15 minutes or longer than 120 minutes, then the manual setting is recommended. Rotate the knob to the left to select the symbol . -
Page 16: Cleaning The Cooking Hobs
Stainless steel sheet front side of the housing (depending on the model) Clean this surface only with a mild detergent (soapsuds) and a soft sponge that will not scratch the finish. Do not use abrasive cleaners or cleaners containing solvents as they may damage the housing finish. Lacquer-coated surfaces and plastic parts (depending on the model) Do not clean the knobs and buttons, door handles, stickers, and rating/type plates with abrasive cleaners or abrasive cleaning materials, alcohol-based cleaners, or with alcohol. -
Page 17: Removing And Cleaning Wire And Telescopic Extendible Guides
REMOVING AND CLEANING WIRE AND TELESCOPIC EXTENDIBLE GUIDES Only use conventional cleaners to clean the guides. Hold the guides by the bottom side and pull them towards the center of the oven cavity. Remove them from the openings at the top. Do not clean the extendible guides in the dishwasher. -
Page 18: Removing And Replacing The Oven Door
DOOR LOCK (depending on the model) Open the door lock by gently pushing it to the right with your thumb while simultaneously pulling the door outwards. When the oven door is closed, the door lock automatically returns to the initial position. REMOVING AND REPLACING THE OVEN DOOR (depending on the model) •... -
Page 19: Removing And Inserting The Oven Door Glass Pane
REMOVING AND INSERTING THE OVEN DOOR GLASS PANE (depending on the model) Oven door glass pane can be cleaned from the inside, but it has to be removed first. Remove the oven door (see chapter "Removing and replacing the oven door". •... - Page 20 INSTALLATION AND CONNECTION INSTRUCTIONS APPLIANCE PLACEMENT (mm) (depending on the model) The walls or furniture adjacent to the appliance (floor, rear kitchen wall, side walls) have to be temperature-resistant to at least 90°C. LEVELLING THE APPLIANCE AND ADDITIONAL SUPPORT (depending on the model) A) The height of the cooker is 850 mm.
- Page 21 C) Ajusting the height of the cooker (depending on the model) The height of the cooker is 900 mm. You can adjust the height of the appliance from 850 to 940 mm. Torx T20 • Put the cooker on the floor with back side. •...
- Page 22 PREVENTION FROM TIPPING OVER (mm) (depending on the model) According to the plan attach the holder to the wall with the added screws and anchors. If the attached screws and anchors cannot be used, use others that will ensure a secure installation on the wall. INSTALLATION OF THE DOOR LOCK (depending on the model)
-
Page 23: Connecting To The Power Mains
CONNECTING TO THE POWER MAINS The electric range is a heat consumer, the installation and location of which must correspond with local standards in force. Three brass bridges are available for connection. 1 bridge is needed for three-phase connection (380 –... -
Page 24: Connecting To Gas Supply
GAS CONNECTIONS FACTORY DEFAULT SETTINGS • Gas appliances are tested and fitted with the sign. • Has appliances are supplied sealed with burners adjusted to natural gas type H or E (20 or 25 mbar), or to liquefied natural gas (50 or 30 mbar). •... - Page 25 After connection, check the operation of the burners. The flames have to burn with clearly visible blue and green core. If the flame is unstable, increase the minimum power as necessary. Explain to the user how the burners operate and review the instruction manual together.
- Page 26 Gas valve with a safety device B Minimum heat input regulation screw Copreci Sabaf...
- Page 27 DISPOSAL Packaging is made of environmentally friendly materials that can be recycled, disposed of, or destroyed without any hazard to the environment. To this end, packaging materials are labelled appropriately. The symbol on the product or its packaging indicates that the product should not be treated as normal household waste.
-
Page 28: Cooking Test
COOKING TEST Tested in compliance with the EN 60350-1 standard. BAKING Dish Equipment Guide (from System Temperature Cooking time (°C) the bottom) (minutes) Cookies 140-150* 20-35 single level Cookies 140-150* 20-35 single level shallow enamel- coated baking sheet Cookies 2, 3 140-150* 30-45 two levels... -
Page 29: Nozzle Table
NOZZLE TABLE Gas type, pressure Auxiliary burner Normal burner Wobbe number Standard Natural gas H Nominal heat load (kW) 0,48 0,48 Wo=45,7÷54,7 MJ/m Consumption (l/h) Natural gas E, Nozzle type (1/100 mm) 72 X / 35 103 Z / 35 Natural gas E+ Nozzle ID Wo=40,9÷54,7 MJ/m... - Page 32 GORENJE gospodinjski aparati, d.o.o Partizanska cesta 12, SI-3320 Velenje, SLOVENIA info@gorenje.com...
Need help?
Do you have a question about the GK6B41WD and is the answer not in the manual?
Questions and answers