Table of Contents
Advertisement
Advertisement
Table of Contents

Subscribe to Our Youtube Channel
Related Manuals for Gorenje GI9221S


Summary of Contents for Gorenje GI9221S
- Page 2 Dear Customer, We desire you use the product in the most efficient way that has been produced in the modern facilities subject to strict quality control procedures. For this reason, please first read the manual thoroughly prior to use the product and keep it as reference. If you transfer the product to anybody else, please provide the manual together with it.
-
Page 3: Table Of Contents
Table of contents 1) Your product ü General view ü Technical Specifications ü Accessories 2) Important Safety Instructions ü General safety ü Safety for children ü Safety for electric-related work ü Intended use 3) Installation ü Prior to installation 9-10 ü... -
Page 4: Your Product
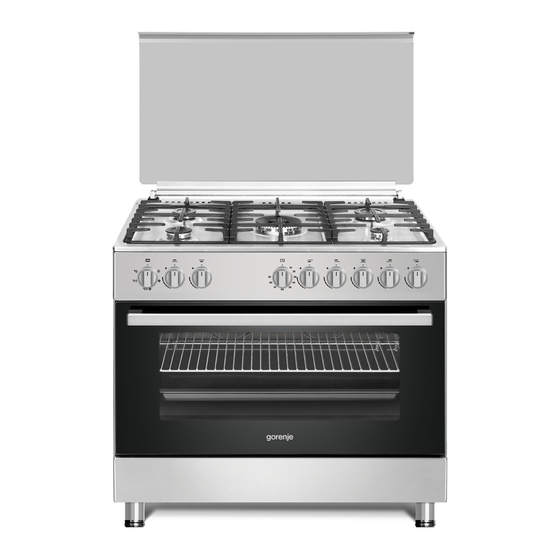
Your product GENERAL VIEW Avarage burner Wok burner Small burner Big / mini wok burner Splash back / Glass cover Cooking Hob Pan Supports Front panel Door handle 10- Front glass 11- Button 12- Timer 13- Bottom Drawer 14- Cylinder holder 15- Gas cylinder compartment 16- Legs... -
Page 5: Technical Specifications
Voltage/Frequency 220-240 V 50-60 Hz tal power consumption in. 0,006 kw/h – Max. 5,6 kw/h in. 16 A – Max. 25 A 0,75 PVC – 3 X 1 PVC – 3 X 1,5 PVC – 3 X 2,5 Cable type/section H05VV-F.. -
Page 6: Accessories
Accessories provided may vary depending on the version of the product. All accessories described in the operating manual may not be available in your product. Oven Tray: It may be used for pastry, frozen food and large frying Tray for gas cylinder compartment 90 X60 oven tray Wire rack : Used for grilling or adjusting the position of grilled meals in desired level. -
Page 7: Important Safety Instructions
2) Important safety instructions This section concerns safety instructions to help prevent risks of personal injury or property damage. Violation of these instructions will make any warranty invalid. General Safety · This product is not designed for use any persons (including children) incompetent in physical, sensual or mental capability or lack of information or experience unless they are attended by a person, who will responsible for their safety and give necessary... - Page 8 Be careful when you use alcohol in your food. Alcohol evaporates at · high temperature and may cause fire by bursting into flame when in contact with hot surfaces. Do not heat the closed tin cans and glass jars. Pressure to generate ·...
-
Page 9: Safety For Children
CAUTION: Prior to replacement of the oven lamp, disconnect the power and allow it to cool down to eliminate risk of electric shock. shelf of the oven is the lowest shelf. · Do not use the product or nylon, flammable and heat-sensitive ·... -
Page 10: Safety For Electric-Related Work
Safety for power related operations All operations to be performed on the electric equipment and · systems should be performed by competent and authorized persons. This product is not suitable for use by remote control. · In case of any damage, switch off the product and disconnect the ·... -
Page 11: Installation And Connections
product is damaged, do not have it set up. Any damaged products would create risk for your safety. Any work on the gas equipment and systems should be performed by authorized and competent persons. The products have no system for discharge of the gases released as a result of combustion. - Page 12 The product should be definitely used with an earthed line! The manufacturer will not be responsible for any damages that may occur if it is used without earthed line. Any risk of electric shock, short circuit or fire due to installation made by unprofessional persons! Connection of the product to the mains may be performed only by an authorized and competent person and the warranty of the product starts only upon correct installation...
- Page 13 Any work on the gas equipment and systems should be performed by the authorized and competent persons Prior to installation, check that the local supply conditions (gas type and gas pressure) are compliant with the product settings LPG connection Be careful that the gas hose and gas valve you use for your oven should be safe. Attach the gas supply hose at the hose end being the oven and tighten by means of clips and screw (Figure 6).
- Page 14 cylinder compartment. Take the cylinder wire inside the boiler (figure 14 ) and put it in Figure designated place inside the cylinder compartment ( Figure 15 ). Figure 15 Figure Figure 18 Figure Figure Open the door of the lower cabinet and mount the regulator to the cylinder. ·...
- Page 15 gulator This part is used in some countries or regions. If the regulator is mounted on the product, do not remove it and do not play with its adjustment. This device is fixed to prevent any failures arising from high gas pressure. In case of conversion from LPG to NG, you are not required to remove the part.
- Page 16 Lift up the burner housing sheet first in direction of arrow and then upward towards the inside of the boiler and pull towards you to take the sheet out of its place (figure 21) Remove the mounting screws of the ·...
-
Page 17: Disposal Of The Product - Destruction Of The Packaging
damaged. Set your product to the kitchen counter as a minimum according to the dimensions shown in the Figure 8. Figure Destruction of the product Packaging materials are dangerous for children. Keep the packaging materials at such a place that cannot be reached by the children. The package of the product is made of recyclable materials. -
Page 18: Disposal Of The Former Product
Dispose of the old product so that it does not give any damage to the environment. This product has a symbol (WEEE) on this product, indicating that the electric and electronic equipment waste should be collected separately. In other words, it means that in order to recycle or disassemble this equipment to minimize any effect of it on the environment, the EU Directive 2002/96/EC should be observed. -
Page 19: First Use - First Cleaning - Firkt Heating
ectric oven Take out all oven trays and wire shelf from the oven. Close the oven door. Select the static position. Select the highest temperature; see Use of the electric oven. Operate about 30 minutes. Switch off the oven; see Use of the electric oven. Smell and smoke occurs during the first heating. -
Page 20: Use Of The Electric Oven
Slide the grill wire or oven tray in the oven at the level you desire. If you put some water in the oven tray, then you may clean it more · easily. Fire risk arising from the food not suitable for grill Only grill the food suitable for intensive grill flame. -
Page 21: Use Of The Gas Range
Use of the gas burners: 1: Push the Gas burner switch and turn anticlockwise to high flame and-or temperature position on the panel. 2: Ignite the lighter according to the version of your oven 3: Set to the desired flame position. 4: When the cooking completes, bring the oven switch clockwise to the upper point to switch off the oven heater. - Page 22 4 cm Gas flow is cut off. High flame. Low flame. ble 1 PG v ersion G v ersion Power Power 0,50 0,70 ,90 KW 0 KW 0,65 0,92 ,55 KW burner burner 0,80 1,20 ,5 KW ,60 KW o k b urner 0,98 1,45 ,8 KW...
-
Page 23: Use Of The Gas Oven
Switch symbols on the control panel indicate switch position. Figure 9 Figure 10 Figure 12 Figure 11 Figure 12 Push the Gas Oven switch and turn 1-turn anticlockwise to high flame and-or temperature position on the panel. If, as shown in the Figure 12, the oven button controls the burner of the upper heater, push the switch and turn clockwise to the grill inscription or flame sign. -
Page 24: Use Of The Grill Plate
· · Use of the chicken roasting (optional) · · · Use of the electric oven... -
Page 25: Operating Modes
Switching the electric oven off of the oven timer. Operation modes Upper and Lower Heating Upper Heating Lower Heating Lower + upper + turbo fan (optional) Grill (optional) · · · Heavy Grill (optional) ·... -
Page 26: Use Of The Oven Timer
· Turbo motor (optional) Turbo resistor + turbo fan (optional) Grill + chicken roasting (optional) · · Heavy grill + turbo fan (optional) Use of the oven timer MECHANICAL TIMER (version 2) Version ANALOG TIMER (version 4) - Page 27 SETTING TIME SETTING ALARM...
- Page 28 : How long remained to ring the alarm can be viewed on the display by pressing the key TO SILENCE THE RINGING ALARM AUTOMATIC COOKING PROGRAM Example: When making the cooking program or when the program is running, you may cancel the program by pressing the key...
- Page 29 The oven will remain disabled until you reset the oven timer.
- Page 30 IN CASE OF POWER FAILURE Note: If you do not intend to operate the oven, remember to bring the switch on the oven to the ‘off’ position. THE FLASHING ‘HAND ICON’ INDICATES THAT THE OVEN IS DISABLED AND YOU SHOULD PRESS THE KEY TO SWITCH TO THE NORMAL POSITION.
-
Page 31: Cooking Durations Table
Cooking Food Cooking container Shelf position Temperature duration (m) (°C) (approx) » » Adjust the temperature to 150ºC after “minutes maximum”». Operation of the grill When grilling, turn the timer setting switch, if any, to the hand symbol. Opening the grill Switching Off the Grill... -
Page 32: Operation Of The Grill - Grilling Durations Table
Izgara süresi (yaklaşık) Use of the electric burners (hotplates) If your product is equipped with electric burner, the switching system to be used will be optionally as follows: RAPID150 RAPID RAPID 1500W 2000W... - Page 33 It is the right way of use.
-
Page 34: Maintenance And Cleaning
Maintenance and cleaning General information Caution: Glass lid may crack when heated. Switch off all burners before the glass cover is closed. · · · · Cleaning of the control panel Cleaning the oven... -
Page 35: Replacement Of The Oven Lamp
Removel of the oven door Replacement of the oven lamp Technical specifications, page 3. If your oven has a round lamp:... -
Page 36: Recommended Solutions For The Problems
Recommended solutions for the problems Product does not operate. ü ü Steam goes out when the oven operates Clanging is heard when the product is getting hot and cold. ü Oven is not getting warm. ü ü ü Oven light does not turn on ü...
Need help?
Do you have a question about the GI9221S and is the answer not in the manual?
Questions and answers