Table of Contents
Advertisement
Quick Links
Advertisement
Table of Contents

Related Manuals for Shining 3D Einstar Vega


Summary of Contents for Shining 3D Einstar Vega
- Page 2 Thank you for purchasing the Einstar Vega scanner. We hope you enjoy scanning with your new scanner. You can login to our user platform passport.shining3d. to get more information. For 3D model cloud storage and sharing, please visit cloud.shining3d.com For technical support, please visit our support center support.einstar.com...
-
Page 3: Legal Disclaimer
Legal Disclaimer This quick start guide introduces the device appearance and operation procedure of Einstar Vega, and the usage process of the desktop post-processing software StarVision. This document is related to your safety, lawful rights and responsibilities. Read it carefully before installing and using the product. -
Page 4: Packing List
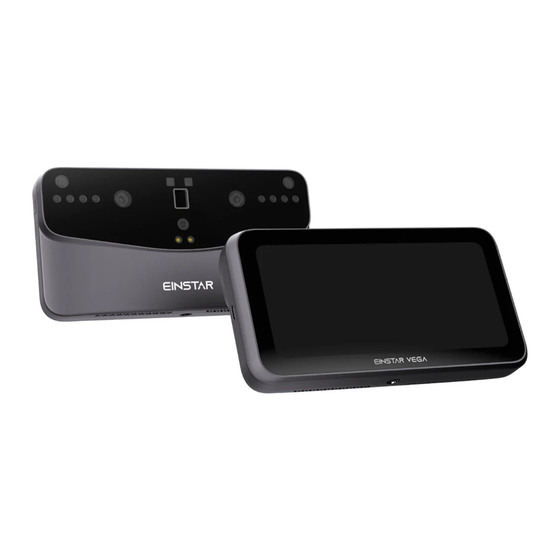
Catalogue number: X Rating: 11V 5A(MAX) Operation is subject to the following two conditions: Manufacturer: Shining 3D Tech Co., Ltd. (1)this device may not cause harmful interference. Address: NO.1398 Xiangbin Road, Wenyan, (2)this device must accept any interference received, EINSTAR3 Xiaoshan, Hangzhou, Zhejiang, China including interference that may cause undesired operation. - Page 5 Appearance Appearance Long Range Camera x2 Short Range Camera x2 MEMS Projector VCSEL Projector x2 LED Supplement Light x8 48MP Texture Camera LED Fill Light (For Texture Camera) x2 Multi-function Button Power Button USB Type-C Port 1/4”Threaded Hole Air Vents 6.4"...
-
Page 6: Specification
Specification Specification Parameter Description Device dimensions 180 mm x 95 mm x 26.5 mm Device weight limited edition: 643 g, regular edition: 535 g Working temperature Working humidity Screen 6.4-inch 2K AMOLED screen Light source Class I RGB fill light White flash LED * 2 Markers fill light Infrared fill light * 8... -
Page 7: Unboxing And Setup
First Use Unboxing and Setup Charging For the first use, please charge the Einstar Vega to more Power on To power on the device successfully, press and hold the power button for 2 seconds until the screen displays the startup animation. -
Page 8: Connect Network
If your phone number or email is not registered, it will be automatically registered after verification. ·If you choose to Skip the registration and login to directly enter the scan process, the scanned data can not be uploaded to SHINING 3D Digital Cloud or transferred to your computer. -
Page 9: Scan Preview
First Use & Update the Software STEP 5 Scan Preview Tap Next to enter the Scan Interface. Scan Mode Model Preview Scan Status Distance Indication Scan Settings Function Buttons Update the Software You can update the software on device. ·Swipe down to the top menu and find "Settings" . ·Click the "Software Update"... -
Page 10: Control Center
Control Center & Calibration Control Center To invoke the Control Center module, simply swipe down from the top of the screen. Status Bar Widget Bar Setting Function Panel Screen Brightness Calibration Calibration is required under the following conditions: ·The scanner was severely shaken or shocked, such as shocked during transportation. - Page 11 Calibration The operation steps for device calibration is as follows: 1. Place the calibration board on a flat surface as shown in the figure, and then prepare the holder. 2. Align the board to make the board match with the figure; when matched, the markers will turn green.
- Page 12 Scan Preparation If the object to be scanned has rich geometric or textural features, the scanning speed and quality can be better guaranteed; On the contrary, if the object to be scanned has fewer geometric or textural features or a high degree of feature repetition, you need to do some preparation work before scanning to enhance your scanning experience.
-
Page 13: Camera View
Scan Pre-Scan Settings After entering the scan preview interface, you can adjust scanning settings for the current project. Note: After start scanning, you can adjust the camera view or the switch for quality chromatograph & texture, but you will not be allowed to readjust the scanning distance or advanced settings. Camera View to enable camera view, it will show the black-and- white camera view and texture camera view (only shown... - Page 14 Scan Scanning Set up a scanning environment. For the first trial, just try to scan the Figure for scan with HD mode. Scanning After entering the interface of scan preview, tap in the right-side function bar to start scanning. Note: ·Move scanner steady and better to keep distance indicator in green zone.
- Page 15 Scan Pause Scan After start scanning, you can tap in the right-side function bar to pause the scan. Note: ·After the scan is paused, the model can be panned or rotated ( Reset View function to reset the model to its original position): Swipe with two fingers: Translation Swipe with one finger: Rotation ·During the scanning process, when the current frame count has reached 5000, the scan will...
- Page 16 Data Edit Data Edit After completing scanning, you can edit the point cloud data. Interface Overview Switch data Point cloud edit tools Project information Mesh tools Data Clipping On the Point interface, tap in the left-side tool bar to enable the data clipping function. Note: In the selection mode, you can hold down on any...
- Page 17 Data Edit Icon Function Description Selection Mode Use one-finger swipe to select the area. (by default) Note: In this mode, the model can not be rotated. Rotation Mode Use one-finger swipe to rotate the model. In the selection mode, rectangle lasso is chosen by default, and you can drag Rectangle Lasso with a single finger in the...
-
Page 18: Post-Processing
Post-processing Post-processing Mesh In the interface of point cloud edit, you can tap to perform one-click processing (including Fast and High detail), and mesh & texture map will be automatically generated using recommended parameters. Note: ·If the current project has already generated the mesh, it will be overwritten after one-click processing. - Page 19 Note: ·If the SHINING 3D passport has not been logged in, a login window will pop up. ·If the selected space is less than 500 MB, it will prompt that "Mesh is too large", please simplify it before uploading.
- Page 20 Einstar3d einstar3d/ SHINING 3D Technology Inc. San Leandro, United States 2450 Alvarado St #7, San Leandro, CA 94577 P: +1(888)597-5655 Tampa, United States 2807 W Busch Blvd, Suite 200, Tampa, FL 33618 Email sales@shining3d.com...
Need help?
Do you have a question about the Einstar Vega and is the answer not in the manual?
Questions and answers