Advertisement
Quick Links
Advertisement

Related Manuals for Eleiko Dual Adjustable Pulley


Summary of Contents for Eleiko Dual Adjustable Pulley
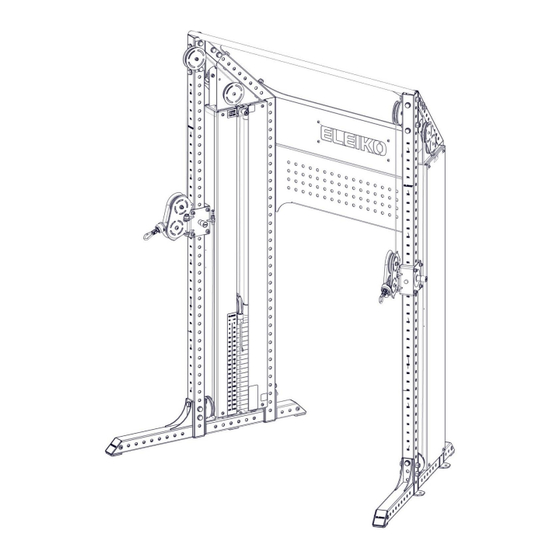
- Page 1 Art.no. 3085806 Eleiko Dual Adjustable Pulley...
- Page 3 Content Read Before Installation and Use Caution Safety instructions Preventive Maintenance and Inspections Regularly Spare parts and service Warranty Warning labels Product Info Purpose General instructions for use Description Safety Area User Guide Required tools Spare part list List of components Assembly instructions Checklist...
- Page 4 It is also the responsibility of the purchaser of ELEIKO products to assess the suitability of the floor, and to choose appropriate fasteners depending on floor type when using ELEIKO products that needs to be bolted to the ground.
- Page 5 Warranty All products manufactured by ELEIKO are warranted to the original purchaser to be free from defects in workmanship and / or materials under normal use or service as follows: · 10 years on welds on structural frame (NOT on moving parts) ·...
- Page 6 Product Info Purpose The Eleiko Prestera Dual Adjustable Pulley provides users with a wide range of excercises that target all muscle groups. All with a small footprint. General Instructions for Use 1. Use the selector pin to select training weight.
- Page 7 Safety Area Before assembly, make sure you have enough space on all sides of the equipment to create a safety area. This safety area exists to avoid personal injury when using the equipment and need to follow the measurements set below. User Guide Required Tools You need the following tools to assemble the equipment.
- Page 8 Spare Part List Contact Eleiko for spare parts. E-mail: info@eleiko.com | Phone: +46 35 17 70 70 3085601 a3 3085570 p38 2001624 2001485 2001445 3085466 p17 2000780-M12 3085570 p6 2001345 Ny bild, 2:1 2002288 2002289 (Tall Rack, 9m) Wire ø 3,3 mm, 8,2 m (9 m Tall Rack)
- Page 9 List of Components Box - Starter kit 2001937 M16 x 110 Washer M8 M16 x 100 Locking Nut M16 2001385-L110 2001385-L100 2001379 2001422 3085806p6 2001845 2001320 3085806a1 2001860a1 2001845 2001302 2001592 2001859 2001373...
- Page 10 2x Box 3085601 for 120kg 2x Box 3085850 for 90kg 3085601 p3 1x 3085601 p25 1x 3085601a14 (120kg) 1x 3085601a15 2002288 1x 3085850a2 (90kg) 3085601 a7 3085601 a8 3085601 a9 3085601 a6 3085601 a3 3085601 a1(120 kg) 3085601 a2 3085850 a1(90kg) 38x (120kg) 28x (90kg) 2001590...
- Page 11 2001845 Left side installation Remove the Top Cover Plate Save the parts in case the Cable Attachment needs to be removed in the future. Make sure this mark points up and Forward face forward.
- Page 12 Loose screws! Locking Nut Washer M16 M16x110 M16x100 Forward Point and face forward...
- Page 13 2001320 Loose screws! Washer M16 Locking Nut M16x110 M16x100 Make sure this mark points up and face forward.
- Page 14 Loose screws! Washer M16 M16x100 Locking Nut M16 Locking Nut and Washer will be installed later.
- Page 15 2001845 Right side installation Remove the Top Cover Plate Save the parts in case the Cable Attachment needs to be removed in the future. Make sure this mark points up and face forward. Forward...
- Page 16 Loose screws! Locking Nut Washer M16 M16x110 M16x100 Forward Point and face forward...
- Page 17 2001320 Loose screws! Washer M16 Locking Nut M16x110 M16x100 Make sure this mark points up and face forward.
- Page 18 Loose screws! Washer M16 M16x100 Locking Nut M16 Locking Nut and Washer will be installed later.
- Page 19 All feet should point outwards!
- Page 20 Loose screws! M16x100 Locking Nut M16 Washer M16...
- Page 21 Loose screws! Locking Nut M16 Washer M16 M16x100...
- Page 23 If you have purchased Eleiko DAP Storage Shelf Adapter and Eleiko Prestera Storage Shelves, install them before you tighten all screws! M16x100 Locking Nut M16 Washer M16 Now tighten ALL M16-screws!
- Page 24 Left side installation K6S M8x12 Washer M8 Locking Nut M16 Washer M16 M16x100...
- Page 25 M16x100 Washer M16 Locking Nut M16...
- Page 26 3085570 p33 3085570 p34 2002253 NOTE! The box contains one of these two.
- Page 28 19x (120kg) 14x (90kg)
- Page 29 Need to point forward Forward Need to point inwards Inwards...
- Page 30 Washer M8 K6S M8x30 Inwards Washer M8 K6S M8x12...
- Page 31 Remove nuts! Save for the next step. Outwards Install with existing nuts. Inwards...
- Page 32 Remove Plate. Be careful not to lose any parts! Plate Install the Cable Trolley around the beam and put back the Plate. Tighten screws, the carriage should be easy to move. Need to point in this direction. Attach Warning Sticker!
- Page 34 Locking Nut M16 Washer M16 M16x110...
- Page 35 Remove Nut...
- Page 36 Install wire! Wire The wire must go inside this pin!
- Page 37 The wire must go inside these pins!
- Page 38 The wire must go inside this pin!
- Page 39 The wire must go inside this pin!
- Page 40 Insert wire Wire lock Pull the wire through the wire lock, tighten one screw and cut the wire when you have this alignment.
- Page 41 Make a mark Loosen this screw and on the cable pull out the cable Tighten this screw Put the cable back Peel off the wire's coating, from mark to mark Make a second mark Cable lock Tighten all three screws very firmly! Recommended torque, 3 Nm Tight screws keep the cable in place!
- Page 42 K6S M8x12 Washer M8 Attach the Selector Pin to the left hole...
- Page 43 K6S M8x12 Washer M8 The Cover Plate with numbers goes to the left. Make sure to install these two plates on the same side as The selector Pin.
- Page 44 Right side installation K6S M8x12 Washer M8 M16x100 Locking Nut M16 Washer M16...
- Page 45 M16x100 Washer M16 Locking Nut M16...
- Page 46 3085570 p33 3085570 p34 2002253 NOTE! The box contains one of these two.
- Page 49 Need to point forward Forward Need to point inwards Inwards...
- Page 50 Washer M8 K6S M8x30 Inwards Washer M8 K6S M8x12...
- Page 51 Remove nuts! Save for the next step. Outwards Install with existing nuts. Inwards...
- Page 52 Remove Plate. Be careful not to lose any parts! Plate Install the Cable Trolley around the beam and put back the Plate. Tighten screws, the carriage should be easy to move. Need to point in this direction. Attach Warning Sticker!
- Page 54 Locking Nut M16 Washer M16 M16x110...
- Page 55 Remove Nut...
- Page 56 Install wire! Wire The wire must go inside this pin!
- Page 57 The wire must go inside these pins!
- Page 58 The wire must go inside this pin!
- Page 59 The wire must go inside this pin!
- Page 60 Insert wire Wire lock Pull the wire through the wire lock, tighten one screw and cut the wire when you have this alignment.
- Page 61 Make a mark Loosen this screw and on the cable pull out the cable Tighten this screw Put the cable back Peel off the wire's coating, from mark to mark Make a second mark Cable lock Tighten all three screws very firmly! Recommended torque, 3 Nm Tight screws keep the cable in place!
- Page 62 K6S M8x12 Washer M8 Attach the Selector Pin to the left hole.
- Page 63 The Cover Plate with numbers goes to the left. Make sure to install these two plates on the same side as The selector Pin. Washer M8 K6S M8x12...
- Page 64 To ensure the validity of your product warranty, make sure to review this checklist carefully. The warranty will not be applied if the checklist is not followed. Product Checklist The wire must be inside these pins. The wire must be inside this pin.
- Page 65 The top weight must be pointing in this direction. I have read and understood that Eleiko always recommends that this product should be bolted to the ground. If you are someone other than the buyer and who performed the installation, you guarantee that the buyer has been notified of this recommendation.
- Page 68 Eleiko Group AB Klastorpsvägen 18 302 62 Halmstad Sweden +46 35 17 70 00 info@eleiko.com...
Need help?
Do you have a question about the Dual Adjustable Pulley and is the answer not in the manual?
Questions and answers