Table of Contents
Advertisement
Available languages
Available languages
Quick Links
Advertisement
Table of Contents

Related Manuals for Vitea Care CROSS SMART


Summary of Contents for Vitea Care CROSS SMART
- Page 1 W459 Wózek inwalidzki o napędzie elektrycznym W459 Power wheelchair Model: CROSS SMART Numer katalogowy: DRVK0P Instrukcja używania Instructions for use Wydanie: EJ 09.2024 przejdź do go to page 3 page 37...
- Page 2 viteacare.com...
- Page 3 Osoby z niepełnosprawnością narządu wzroku mogą znaleźć pliki w formacie PDF oraz inne informacje o naszych produktach na naszej stronie internetowej pod adresem: <www.viteacare.com>. W razie potrzeby prosimy zwrócić się do specjalistycznego sprzedawcy. Użytkownik z niepełnosprawnością narządu wzroku może również zwrócić się...
-
Page 4: Table Of Contents
Spis treści Wstęp ........................5 Wskazania ................................6 Przeciwwskazania .............................6 Bezpieczeństwo użytkowania ................6 Informacje dotyczące kompatybilności elektromagnetycznej (EMC) ...........9 Kontrola bezpieczeństwa ..........................9 Opis produktu ....................10 Opis wózka ............................... 10 Parametry techniczne ..........................12 Praktyczne rady dotyczące użytkowania ............13 Przygotowanie wózka ..........................13 Przed rozpoczęciem użytkowania ...................... -
Page 5: Wstęp
Wstęp Cross Smart jest wózkiem stworzonym zgodnie z najnowszymi technologiami. Jego konstrukcja pozwala na maksymalne dostosowanie go do potrzeb użytkownika. Łączy w sobie solidną i wytrzymałą konstrukcję, nowoczesne rozwiązania sterowania elektronicznego oraz systemy zapewniające bezpieczeństwo. Dla zachowania zasad bezpieczeństwa i utrzymania jak najdłużej pełnej sprawności wózka należy poddawać... -
Page 6: Wskazania
Jeśli z wyrobu korzysta inna osoba, należy dostarczyć jej kopię tej instrukcji używania. Niniejsza instrukcja używania dotyczy konstrukcji i specyfikacji produktu w momencie jego publikacji. W związku ze zmianami konstrukcyjnymi, niektóre ilustracje i zdjęcia w instrukcji mogą nie odpowiadać zakupionemu produktowi. Zastrzegamy sobie prawo do wprowadzania zmian konstrukcyjnych. - Page 7 OSTRZEŻENIE! Nie wolno w żaden sposób modyfikować wyrobu; spowoduje to utratę gwarancji. OSTRZEŻENIE! Przekroczenie maksymalnej wagi użytkownika spowoduje utratę gwaran- cji. Producent nie odpowiada za obrażenia i uszkodzenia spowodowane nieprzestrzeganiem maksymalnej wagi użytkownika. OSTRZEŻENIE! Przed rozpoczęciem użytkowania wózka należy zapoznać się z niniejszą instrukcją...
- Page 8 ciała. l. Wózek należy przechowywać w czystych i suchych warunkach. m. Zabrania się jeździć w nocy bez odpowiedniego oświetlenia. n. Nie należy demontować kółek antywywrotnych lub transportowych. o. Podczas jazdy należy trzymać ręce i stopy z dala od ruchomych części. Należy uważać aby luźne ubrania nie zaplątały się...
-
Page 9: Informacje Dotyczące Kompatybilności Elektromagnetycznej (Emc)
Maksymalna waga użytkownika wynosi Informacje dotyczące kompatybilności elektromagnetycznej (EMC) Aby zapewnić prawidłowe użytkowanie wózka bez zakłóceń elektromagnetycznych, zaleca się korzystanie wyłącznie z dedykowanych przewodów i akcesoriów wskazanych przez producenta. Potencjalne zakłócenia elektromagnetyczne sąsiednich urządzeń nie powinny znacząco wpływać na pracę wózka podczas oczekiwanego okresu eksploatacji, o ile użytkowanie jest zgodne z przeznaczeniem i zgodne z opisem w instrukcji używania. -
Page 10: Opis Produktu
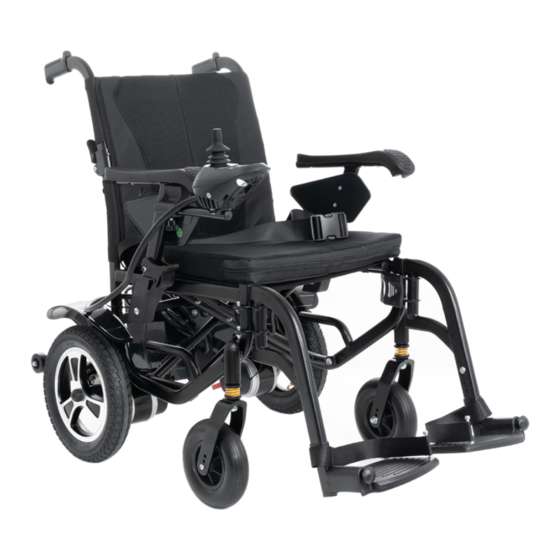
Opis produktu Wózek inwalidzki elektryczny został stworzony z myślą o osobach mających znaczące upośledzenie narządu ruchu. Sterowanie odbywa się przy pomocy joysticka lub innego urządzenia sterującego, który pozwala nadać kierunek ruchu. Jest to rozwiązanie dla osób, które nie mogą poruszać się na tradycyjnym wózku inwalidzkim. Wygodny kontroler pozwala w pełni manewrować... - Page 11 Uchwyt Kieszeń na drobne rzeczy Przycisk składania oparcia Pokrętło blokady regulacji wysunięcia Skrzynka z panelu sterującego akumulatorami Koło tylne Złącze zasilania akumulatora Blokad regulacji Silnik napędowy wysunięcia kółek antywywrotnych Dźwignia sprzęgła Kółko rozłączającego napęd antywywrotne Ilustracja 2. Tył wózka. Włącznik zasilania Diody LED poziomu naładowania Sygnał...
-
Page 12: Parametry Techniczne
Parametry techniczne Model CROSS SMART Szerokość siedziska 465 mm Maksymalna waga użytkownika 100 kg Prędkość maksymalna 6 km/h Zasięg energetyczny 20 km ± 10% Wysokość powierzchni siedziska od podłogi 520 mm Głębokość siedziska 420 mm Wysokość oparcia 410 mm Całkowita długość wózka 1100 mm Całkowita wysokość... -
Page 13: Praktyczne Rady Dotyczące Użytkowania
Praktyczne rady dotyczące użytkowania Przygotowanie wózka Wózek jest dostarczany w opakowaniu kartonowym, a delikatne części są dodatkowo zabezpieczone przed uszkodzeniem w trakcie transportu. Odpakować go ostrożnie, aby uniknąć jakichkolwiek uszkodzeń. Przed rozpoczęciem użytkowania • Sprawdź wszystkie połączenia elektryczne, upewnij się, że są stabilne i nie są sko- rodowane. -
Page 14: Rozkładanie Oparcia
Rozkładanie oparcia • Naciśnij przycisk blokady znajdujący się na oparciu pokazany na ilustracji 4. Ilustracja 5. Składanie oparcia. • Następnie pociągnij rączki w dół w celu złożenia oparcia. • Aby złożyć oparcie należy wykonać czynności w odwrotnej kolejności podnosząc oparcie, łapiąc za rączki a następnie unieść... -
Page 15: Regulacja Długości Podnóżków
• Aby zamontować podnóżek, należy zawiesić uchwyty mocowania podnóżka na wieszakach podnóżka (Ilustracja 8.) Ilustracja 8. Przygotowanie do montażu podnóżka. • Następnie opuścić platformy i obró- cić podnóżek do momentu gdy blokada odchylenia podnóżka zostanie zamknięta. Ilustracja 9. Montaż podnóżka. •... -
Page 16: Obsługa Panelu Sterującego
Obsługa panelu sterującego Elektroniczny panel sterujący jest elementem pozwalającym na kierowanie wózkiem elektrycznym. Dzięki niemu zasilane są wszystkie systemy operacyjne. Pozwala on na kontrolowanie i sterowanie ruchami wózka, monitoruje poziom naładowania akumula- tora oraz stan całego sytemu elektrycznego. Typowy panel sterujący jest umiejscowiony na jednym z podłokietników i jest połączony z akumulatorem i silnikiem. -
Page 17: Podłokietniki
Podłokietniki • Aby odchylić podłokietnik należy pocią- gnąć dźwignię blokującą pokazaną na ilustracji 14. a następnie odchylić do tyłu podłokietnik (Ilustracja 15.). Ilustracja 14. Odchylanie podłokietni- ków. Ilustracja 15. Odchylony podłokietnik. OSTRZEŻENIE! Należy zwrócić szczególną uwagę podczas odchylania podłokietników, aby żadne części garderoby ani ciała nie były zagrożone przytrzaśnięciem. Zachować... -
Page 18: Bezpieczeństwo
OSTRZEŻENIE! Nie wyłączać napędu elektrycznego jeśli nie ma osoby, która mogłaby poprowadzić wózek. Nie wyłączać napędu elektrycznego kiedy wózek znajduje się na pochyłej nawierzchni ponieważ mógłby się stoczyć co grozi urazami. Należy pamiętać, że kiedy napęd elektryczny jest wyłączony to wyłą- czony jest również... -
Page 19: Kółka Antywywrotne
Kółka antywywrotne • Aby ustawić wysunięcie kółek antywy- wrotnych należy wyciągnąć blokadę • Następnie wysunąć szynę mocowania kółek i dopasować otwory tak aby możliwe było ponowne wpięcie blo- kady (Ilustracja 17.). Ilustracja 17. Kółka antywywrotne. Transport wózka Wózek powinien być transportowany tylko środkami do tego przystosowanymi. Koła powinny być... -
Page 20: Pompowanie Opon
Pompowanie opon • Należy odkręcić i zdjąć plastikowy kap- turek z zaworu i odłożyć w bezpieczne miejsce. Ważne jest, by go nie zgubić, ponieważ zawory będą ulegać zabru- dzeniu, co doprowadzi do trudności w pompowaniu oraz szybszej utraty powie- trza. •... -
Page 21: Trening Prowadzenia Wózka
Trening prowadzenia wózka 1. Należy dobrze opanować posługiwanie się wózkiem i wykonywanie wszystkich manewrów, aby poruszać się bezpiecznie. Najpierw należy opanować poruszanie się w przód. Upewnić się, że ustawiona została prędkość minimalna. 2. Kiedy opanuje się poruszanie po prostej w przód, należy postarać się jeździć zakre- ślając wózkiem kształt litery S. -
Page 22: Akumulatory
Akumulatory Wózek wyposażony jest w akumulatory o długiej żywotności. Akumulatory są zabez- pieczone i nie wymagają konserwacji (tzw. akumulatory bezobsługowe). • Przed pierwszym użyciem wózka należy wykonać pełny cykl ładowania wynoszący przynajmniej 12 godzin. • Aby zachować najlepszą wydajność akumulatora należy wykonać 5 cyklów pełnego ładowania. -
Page 23: Proces Ładowania
• Jeśli wskaźnik procesu ładowania się nie świeci należy odłączyć przewody na 10 minut i po tym czasie spróbować podłączyć je ponownie. Jeśli to nie pomoże, należy skontaktować się z dystrybutorem. • Należy skontaktować się z dystrybutorem jeśli wskaźnik poziomu naładowania pozostaje żółty po ładowaniu dłuższym niż... -
Page 24: Akumulatory - Przechowywanie
Akumulatory - przechowywanie • Jeśli wózek przez dłuższy czas ma być nieużywany należy wyjąć akumulatory i prze- chowywać je w suchym i chłodnym miejscu. • Należy unikać całkowitego rozładowywania akumulatorów. • Jeśli korzysta się z wózka codziennie należy ładować akumulatory codziennie. •... -
Page 25: Dezynfekcja
OSTRZEŻENIE! Stosuj się do instrukcji bezpieczeństwa podanych przez producenta środków czyszczących i dezynfekcyjnych. Niezastosowanie się do tego wymogu może spowodować podrażnienie skóry lub przedwczesne zniszczenie tapicerki lub wózka elektrycznego. Nie wolno stosować: • rozpuszczalników, • środków do czyszczenia WC, • środków z zawartością chloru, •... -
Page 26: Utylizacja Wózka Elektrycznego
Utylizacja wózka elektrycznego Wózek elektryczny musi być utylizowany zgodnie z obowiązującymi przepisami lokal- nymi i krajowymi. Informacje na temat prawidłowej utylizacji opakowania, metalowych elementów ramy, elementów plastikowych, układów elektronicznych, akumulatorów, materiałów neoprenowych, silikonowych i poliuretanowych można uzyskać w lokalnej firmie zajmującej się utylizacją odpadów lub u autoryzowanego dostawcy. Plan konserwacji Kiedy Zakres kontroli... - Page 27 Włącz kontroler i zmniejsz poziom prędkości fotela elek- trycznego. Po upływie jednej sekundy sprawdź wskazania poziomu naładowania akumulatora - upewnij się, że świa- tło LED pozostaje włączone. Powoli popchnij joystick do Co miesiąc przodu, aż usłyszysz kliknięcie hamulców elektromagne- Sprawdzenie hamulców tycznych - natychmiast zwolnij joystick.
-
Page 28: Wymiana Szczotek Silnika
Wymiana szczotek silnika Aby sprawdzić lub wymienić szczotki sil- nika, wykonaj następujące kroki: • Odkręcić zaślepki szczotek silnika (Ilu- stracja 20.) • Wyjąć szczotki. • Sprawdź, czy są zużyte (Ilustracja 19). Ilustracja 19. Szczotka silnika • Jeśli to konieczne, należy wymienić szczotki silnika. - Page 29 1. Ładowarka jest Odłączyć akumulator od kontrolera uszkodzona. i podłączyć ładowarkę do kontrolera Nie działa po 2. Akumulator jest - jeśli można włączyć, ładowarka i naładowaniu uszkodzony. kontroler są w dobrym stanie. Może akumulatora. 3. Kontroler jest być uszkodzony akumulator. Należy uszkodzony.
- Page 30 Sygnały dźwiękowe i Możliwa usterka ste- Należy skontaktować się z dystrybu- świetlne rownika. torem. migają 8-razy. Sygnały dźwiękowe i Możliwa usterka ste- Należy skontaktować się z dystrybu- świetlne rownika. torem. migają 9-razy. Podczas ładowania, Możliwa usterka ste- Należy skontaktować się z dystrybu- sterownik rownika.
- Page 31 Silnik działa, Rozłączone sprzęgło Należy przełączyć sprzęgło do trybu ale wózek się napędu silnika. jezdnego. Spojrzeć strona 17. nie porusza. Nie można Należy skontaktować się z dystrybuto- rozłączyć Usterka sprzęgła rem. Należy wymienić sprzęgło napędu sprzęgła napędu. silnika. napędu. Podnóżek nie blokuje się...
-
Page 32: Symbole
Symbole Symbole użyte poniżej na wózku elektrycznym służą do identyfikacji ostrzeżeń, działań obowiązkowych i działań zabronionych. Należy wszystko przeczytać i zrozumieć ich znaczenie. Wyrób medyczny Data produkcji Producent (wytwórca) Upoważniony przedstawiciel we Wspólnocie Europejskiej Dystrybutor Conformité Européene (zgodność z wymogami UE) Numer katalogowy (do ponownego zamówienia) Numer seryjny Kod partii... - Page 33 Dopuszczalna temperatura Do użytku wewnątrz i na zewnątrz Maksymalna waga użytkownika Dopuszczalna masa całkowita Maksymalne bezpieczne nachylenie Produkt przeznaczony jest do transportu samochodem Produkt nie jest przeznaczony do stosowania jako siedzenie do transportu w pojeździe silnikowym SELEKTYWNA ZBIÓRKA URZĄDZEŃ ELEKTRYCZNYCH I ELEKTRONICZ- NYCH.
-
Page 34: Dane Kontaktowe
Dane kontaktowe Producent mdh Sp. z o.o. Adres: ul. Maratońska 104, 94-007 Łódź, Polska tel. +48 42 674 83 84, fax. +48 42 636 52 21 www.mdh.pl www.viteacare.com Zastrzegamy sobie prawo do zmian technicznych uwarunkowanych postępem technicznym. viteacare.com... - Page 35 English version on next page viteacare.com...
- Page 36 viteacare.com...
- Page 37 Users with visual impairments can find the PDF files together with further information on our website: < www.viteacare.com>. Contact your specialist dealer when required. Alternatively users with visual impairments can have the documentation read out by a helper. viteacare.com...
- Page 38 Table of contents Introduction ....................... 39 Indications ....................................40 Contraindications ..................................40 Safety of use ....................... 40 Information on electromagnetic compatibility (EMC) .....................43 Safety control ..................................43 Product description ................... 44 Wheelchair description ................................44 Technical specifications ...............................46 Practical advice on use ..................47 Preparing the wheelchair..............................47 Before use ....................................47 Folding the backrest ................................48...
-
Page 39: Introduction
Introduction Cross Smart is a wheelchair created in accordance with the latest technologies. Its design allows for maximum adaptation to the user's needs. It combines a robust and durable construction, modern electronic control solutions and safety systems. In order to maintain safety and maintain the full efficiency of the product as long as possible, it should be regularly inspected at the service point (at least once a year). -
Page 40: Indications
If the device is used by another person, a copy of these instructions for use must be provided. These instructions for use apply to the design and specification of the product at the time of publication. Due to design changes, some illustrations and photos in the manual may not correspond to the product purchased. - Page 41 WARNING! Do not modify the product in any way; this will void the warranty. WARNING! Exceeding the maximum user weight will void the warranty. The manufac- turer is not responsible for injury and damage if the maximum user weight is exceeded. WARNING! Please read these instructions for use before using the wheelchair and keep them for future reference.
- Page 42 p. Do not connect the battery charger to the extension cord. q. Disassembly of the controller, engine or charger by persons other than the authorized service is prohibited and invalidates all applicable warranty conditions. r. It is forbidden to move the wheelchair on motorways. When moving on public roads, follow all current traffic rules for the country.
-
Page 43: Information On Electromagnetic Compatibility (Emc)
The maximum user weight is 120 kg Information on electromagnetic compatibility (EMC) Despite complying with applicable EMC directives and standards, an electrically powered wheelchair may interfere with the operation of other electrical devices, such as mobile phones or alarm systems. In addition, this may affect the performance of the wheelchair itself. -
Page 44: Product Description
Product description The electric wheelchair for people with disabilities has been designed for people who experience significant limitation of movement. The control is carried out using a joystick or other control device that allows you to set the direction of movement. It is a solution for people who cannot move in a traditional wheelchair. - Page 45 Handle Pocket for small things Backrest folding button Control panel extension adjustment lock knob Battery box Rear wheel Battery power supply connector Anti-tipping Drive motor wheel extension adjustment lock Drive disengagement Anti-tip wheel clutch lever Illustration 2. The back of the wheelchair. Power switch Charge level LEDs Warning signal (horn)
-
Page 46: Technical Specifications
Technical specifications Model CROSS SMART Seat width 430 mm Maximum user weight 120 kg Total permissible mass 120 kg Maximum speed forward 6 km/h Maximum speed reverse 2,5 km/h Energy range 20 km ± 10% Battery 20Ah/24V (gel) Engine power... -
Page 47: Practical Advice On Use
Practical advice on use Preparing the wheelchair The wheelchair is delivered in a cardboard package, and the fragile parts are additionally protected against damage during transport. Unpack it carefully to avoid any damage. Before use • Check all electrical connections, make sure that they are stable and not corroded. •... -
Page 48: Folding The Backrest
Folding the backrest • Press the lock button located on the backrest shown in illustration 4. Illustration 4. Folding the backrest. • Then pull the handles down to fold the backrest. • To fold the backrest, perform the steps in the reverse order by lifting the back- rest, grabbing the handles and then lifting it up until the folding lock does not click, which will be indicated by a... -
Page 49: Footrest Length Adjustment
• To install the footrest, hang the foot- rest mounting brackets on the footrest hangers (Illustration 8.) Illustration 8. Preparing to install the footrest. • Then lower the platforms and rotate the footrest until the footrest tilt lock is closed. Illustration 9. -
Page 50: Control Panel Operation
Control Panel operation The electronic control panel is an element that allows you to steer the power wheel- chair. It powers all operating systems. It allows control and steering of the wheelchair's movements, monitors the battery charge level and the status of the entire electrical system. -
Page 51: Option - Rear Caregiver Control Panel
OPTION - Rear caregiver control panel The electric rear wheelchair power steering controller is an intelligent motor drive control system. The controller uses intelligent control that provides a reliable, stable and efficient speed control scheme. The intuitive LCD display makes it easy to control a wheelchair. - Page 52 Increase / decrease wheelchair speed button. The caregiver can adjust the speed to their own preference or to the conditions while driving the wheelchair. The speed is divided into three sections , which are 20%, 40% and 60% of the maximum speed.
-
Page 53: Option - Wireless Remote Control
Rear controller safety • It is forbidden to repair independently. • It is the user's responsibility to keep the wheelchair in good working order and to ensure that all parts, including cables, are protected as much as possible to prevent damage. - Page 54 LED light information signals. Operating status of the LED indicator color and status remote control The red and green lights flash alternately for 1 Activated second. The red light flashes quickly for 1 second. Remote control and wheel- The light flashes continuously alternating red chair connection and green.
- Page 55 Illustration 17. Connection of the wireless remote control to the wheelchair control- ler. Automatic wireless remote control connection process: • Make sure that the controller in the wheelchair to be connected is turned on and the other controllers are disconnected from the power supply. •...
- Page 56 Deleting a saved connection (preparing for a new connection): • Turn off the power of the wireless remote control. • Press and hold the buttons at the same time for more than 3 seconds as shown in illustration 18, and the red and green light of the indicator lights will illuminate 3 times (if the wheelchair controller is on, the connection to the remote control will be automatically removed).
-
Page 57: Armrests
Armrests • To tilt the armrest, pull the locking lever shown in illustration 19. and then tilt the armrest back (Illustration 20.). Illustration 19. Reclining armrests. Illustration 20. Reclining armrests. WARNING! Special care should be taken when folding the wheelchair to ensure that no clothing or body parts are at risk of being trapped. -
Page 58: Safety
WARNING! Remember that when the electric drive is switched off, the electromag- netic brake system is also switched off. Always stand behind the wheelchair when the electric drive is switched off. It is forbidden to do this while sitting in a wheelchair. After moving the wheel- chair to the desired place, remember to switch the electric drive back on. -
Page 59: Anti-Tip Wheels
Anti-tip wheels • To set the extension of the anti-tipping wheels, pull the lock • Then slide out the wheel mounting rail and adjust the holes so that the lock can be reinserted (Illustration 23.). Illustration 23. Anti-tip wheels. Transporting the wheelchair The wheelchair should only be transported by vehicles adapted for this purpose. -
Page 60: Inflating Tires
Inflating tires • Unscrew and remove the plastic cap from the valve and put it in a safe place. It is important not to lose it, because the valves will get dirty, which will lead to difficulties in pumping and faster air loss. •... -
Page 61: Wheelchair Driving Training
Wheelchair driving training 1. Handling the wheelchair and performing all manoeuvres must be well mastered in order to move safely. First, you need to master moving forward. Ensure that the minimum speed is set. 2. When you have mastered moving straight forward, try to drive by circling the shape of the letter S with a wheelchair. -
Page 62: Batteries
Batteries The wheelchair is equipped with long-lasting batteries. Batteries are secured and maintenance-free. • Perform a full charge cycle of at least 12 hours before using the wheelchair for the first time. • In order to maintain the best performance of the battery, 5 cycles of full charging should be performed. -
Page 63: Charging Process
Charging process 1. Park the wheelchair as close to the grounded socket as possible. 2. Switch off the wheelchair. 3. Make sure that the wheelchair is powered on (the clutch is in the right position – travel mode). 4. Connect the charger to the charging socket in the wheelchair. 5. -
Page 64: Batteries - Storage
Batteries - Storage • If the wheelchair is to be unused for a long time, remove the batteries and store them in a dry and cool place. • Avoid completely discharging the batteries. • If you use the wheelchair every day, charge the batteries every day. •... -
Page 65: Disinfection
WARNING! Observe the safety instructions given by the manufacturer of cleaning and disinfecting products. Failure to do so may result in skin irritation or premature damage to the upholstery of the electric wheelchair. It is not permitted to use: • solvents, •... -
Page 66: Disposal Of The Electric Wheelchair
Disposal of the electric wheelchair The electric wheelchair must be disposed of in accordance with current local and national regulations. For proper disposal of packaging, metal components, plastic components, neoprene, silicone and polyurethane materials, contact your local waste disposal company or authorised distributor. Maintenance plan When Scope of control... - Page 67 Turn on the controller and reduce the speed level of the electric wheelchair. After one second, check the battery level indications - make sure that the LED light remains on. Slowly push the joystick forward until you Monthly hear the electromagnetic brakes click - release the Checking the brakes joystick immediately.
-
Page 68: Fault Codes And Troubleshooting
Fault codes and troubleshooting The table below describes the error indication and some possible actions that can be taken to correct the problem. The listed activities are not ordered in any specific order and are only suggestions. The intention is that one of the suggestions can help to solve the problem. - Page 69 The acoustic and light Right engine discon- Reconnect the plug. signals nected. flicker 4 times. The acoustic and light Right motor brake fault. Reconnect the plug. signals flicker 5 times. The acoustic 1. Restart the control panel. and light Possible overcurrent of 2.
-
Page 70: Symbols
Check output voltage of charger and Unable to battery. The normal voltage of the char- Possible malfunction charge bat- ger should be in the range of 26.4~ of charger or battery. tery. 28.4V, and the battery voltage 19.4~ 28.4V.Contact the distributor. The motor is running Motor damage. - Page 71 Authorized representative in the European Union Distributor Conformité Européene (compliance with the European Union) Catalog number (to re-order) Serial number Batch code Unique Device Identifier Please refer to the instructions for use Please refer to the instructions for use Warning Protect from moisture Possibility of jamming fingers Permitted temperature...
-
Page 72: Contact Information
Maximum safe inclination The product is designed to be transported by car The product is not intended to be used as a seat for transport in a motor vehicle SELECTIVE COLLECTION OF ELECTRICAL AND ELECTRONIC EQUIPMENT. This symbol on the products or accompanying documents indicates that used electrical or electronic products and batteries must not be disposed of in municipal waste.
Need help?
Do you have a question about the CROSS SMART and is the answer not in the manual?
Questions and answers