Table of Contents
Advertisement
Quick Links
SIP Industrial Products Limited
Gelders Hall Road
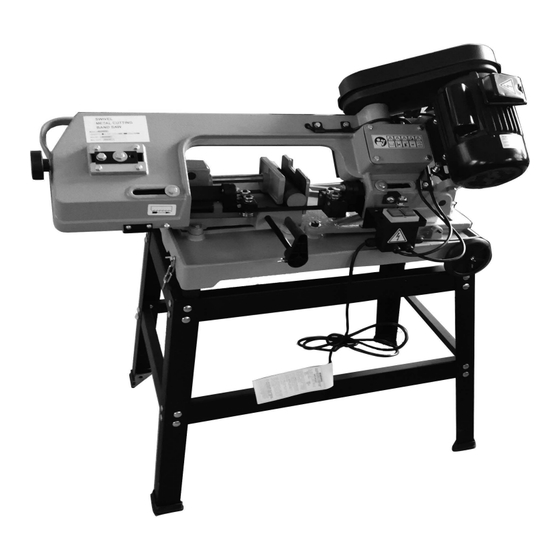
SIP 6" Swivel Head
Shepshed
Loughborough
Metal Cutting
Leicestershire
LE12 9NH
United Kingdom
Bandsaw
SIP Code 01572
For help or advice please
contact your distributor, or sip
directly on: Tel.: 01509 500400
Email:sales@sip-group.com or
customerservice@sip-group.com
www.sip-group.com
Advertisement
Table of Contents

Related Manuals for SIP 01572


Summary of Contents for SIP 01572
- Page 1 SIP Industrial Products Limited Gelders Hall Road SIP 6" Swivel Head Shepshed Loughborough Metal Cutting Leicestershire LE12 9NH United Kingdom Bandsaw SIP Code 01572 For help or advice please contact your distributor, or sip directly on: Tel.: 01509 500400 Email:sales@sip-group.com or customerservice@sip-group.com www.sip-group.com...
-
Page 3: Table Of Contents
CONTENTS Safety Instructions 4 - 6 Technical Specification Guarantee Getting To Know Your Bandsaw Electrical Connection Assembly 10 - 12 Operating Instructions 13 - 16 Troubleshooting 17 - 18 Wiring Diagram Exploded Drawing Parts List 20 - 21 UK - Declaration of Conformity EU - Declaration of Conformity... -
Page 4: Safety Instructions
SAFETY INSTRUCTIONS SAFETY SYMBOLS USED THROUGHOUT THIS MANUAL Danger / Caution: This image indicates risk of personal injury and/or the possibility of damage. Warning: This image indicates risk of electrical injury or damage! Note: This image indicates supplementary information. Important: Please read the following instructions carefully, failure to do so could lead to serious personal injury and / or damage to the item. -
Page 5: General Safety Information
SAFETY INSTRUCTIONS GENERAL SAFETY INFORMATION Extreme caution should be used when operating all power tools. Know your power tool, be familiar with its operation, read through the owner’s manual and practice safe usage procedures at all times. ALWAYS read understand router bits, shaper... - Page 6 SAFETY INSTRUCTIONS SAFETY INSTRUCTION - SWIVEL HEAD BANDSAW NEVER LEAVE This machine is designed to cut metal only. band unattended while it is running. Turn the ALWAYS inspect blade switch to the OFF position and unplug crack or missing teeth before operating the the cord before you leave.
-
Page 7: Technical Specification
Packaged Dimensions L x W x H 1020 x 420 x 430mm Weight 68.45kg GW / 66kg NW GUARANTEE This SIP Bandsaw is covered by a 24 month parts and labour warranty covering failure due to manufacturers defects. This does... -
Page 8: Getting To Know Your Bandsaw
GETTING TO KNOW YOUR BANDSAW Pulleys & Belt Blade Cover Blade Guide Motor Table Vice Quick release handle for vice Blade Tension Knob Swivel Head Scale Vice Pull-push handle ON/OFF Switch Material Stop Base wheels Stand... -
Page 9: Electrical Connection
Connecting to the 1 phase power supply: This SIP bandsaw is fitted with a standard 230v ~ 13 amp type plug. Before using the bandsaw, inspect the mains lead and plug to ensure that neither are damaged. If any damage is visible have the bandsaw inspected / repaired by a suitably qualified person. -
Page 10: Assembly
ASSEMBLY UNPACKING The machine is properly packaged and shipped completely in a box for safe transportation. When unpacking, carefully inspect the box and ensure that nothing has been damaged during transit. Open the box and check that the machine and the parts are in good condition. NOTE: While doing inventory, if you can not find any part, check if the part has already been installed on the machine. - Page 11 ASSEMBLY cont... STAND ASSEMBLY To assemble the metal cutting band saw, follow the instructions given below: Firstly assemble the stand refer to below picture of stand by using carriage bolts, washers and nuts provided. See figure-3 Get the help of an assistant and lift the band saw up, onto the stand making sure that the rubber feet on the band saw base are sitting on the four corners of the stand .
- Page 12 ASSEMBLY cont... Insert the material stop rod through the hole in the bed of the saw and lock it in position by tightening the set screw shown in figure-7. Now, take the work stop and slide it over the rod and secure it by tightening the thumb screw shown.
-
Page 13: Operating Instructions
OPERATING INSTRUCTIONS Once have completed assembling your machine, it is time for a test run to make sure that the machine works properly and is ready for operation. tools used assembling machine should removed and cleared away during the test run. Before starting the machine , make sure that you have read and understood the manual and you are familiar with the functions and safety features on this machine. - Page 14 OPERATING INSTRUCTIONS cont... VICE This saw is equiped with one quick clamp and release heavy locking bolt duty vice to hold workpiece to get safe and accurate cutting To use the vice: Lift the saw arm and place the work-piece between the angle jaws of the vise.
- Page 15 OPERATING INSTRUCTIONS cont... BLADE SELECTION - GENERAL INFORMATION To adjust the blade tension: Turn the saw OFF and disconnect the plug from the The choice of the blade pitch is governed by the thickness mains supply. of the work-piece to be cut. The thinner the work-piece, the blade with more teeth Turn blade...
-
Page 16: Maintenance And Storage
OPERATING INSTRUCTIONS cont... Adjust the blade tension knob clockwise until it is just right enough so that no blade slippage occurs. Install the back cover. Apply a few drops of oil on the blade. Square the blade to the base. See Figure 15 for details. -
Page 17: Troubleshooting
TROUBLESHOOTING SYMPTOM POSSIBLE CAUSE CORRECTIVE ACTION 1. Incorrect blade tension 1. Adjust to where blade just does not slip on wheel 2. Incorrect speed or feed 2. Check machinist handbook 3. Material loose in vise 3. Clamp work securely 4. Blade rubs on wheel flange 4. -
Page 18: Wiring Diagram
TROUBLESHOOTING cont... SYMPTOM POSSIBLE CAUSE CORRECTIVE ACTION Blade Cuts 1. Too much speed or feed 1. Reduce speed and feed (Rough) 2. Blade is too coarse 2. Replace with finder blade 1. Cut is binding blade 1. Decrease feed pressure Blade is Twisting 2. -
Page 19: Exploded Drawing
EXPLODED DRAWING... -
Page 20: Parts List
PARTS LIST Item Description Item Description SCREW AXLE W36-1 HEX NUT BASE SPRING ANGLE POINTER WASHER SCALE FLOOR STAND VICE BASE WHEEL ASSY SCREW ELECTRIC CABLE SQUARE NECK BOLT MITRE PLATE SCREW WASHER MITRE VICE JAW HEX HEAD SCREW SPRING WASHER HEX HEAD SCREW HEX NUT WASHER... - Page 21 PARTS LIST Item Description Item Description SWITCH CUT OFF TRIP SLIDING PLATE DRAW BLK BLADE WHEEL (FRONT) BLADE WHEEL SHAFT BID. TENSION ADJUSTER KNOB. SHAFT BLOCK SPRING BLADE TENSION GUIDES BODY FRAME MOTOR PULLEY COVER COVER KNOB 110A HEX. HEAD SCREW SCREW 110B MOTOR MOUNT PLATE...
-
Page 22: Uk Declaration Of Conformity
England As the manufacturer within the UK, England, Scotland & Wales, declare that the SIP 6" Swivel Head Metal Cutting Bandsaw - SIP Code 01572 Conforms to the requirements of the following directive(s), as indicated. Supply of Machinery (Safety) Regulations 2008... -
Page 23: Eu Declaration Of Conformity
County Louth Republic of Ireland As the manufacturer's authorised representative within the EC declare that the SIP 6” Swivel Head Metal Cutting Bandsaw - SIP Pt. No. 01572 Conforms to the requirements of the following directive(s), as indicated. 2006/42/EC Machinery Directive... - Page 24 FOR HELP OR ADVICE ON THIS PRODUCT PLEASE CONTACT Please dispose of packaging for the product in a YOUR DISTRIBUTOR, OR SIP responsible manner. It is suitable for recycling. Help DIRECTLY ON: TEL: 01509 500400 to protect the environment, take the packaging to EMAIL: sales@sip-group.com...
Need help?
Do you have a question about the 01572 and is the answer not in the manual?
Questions and answers