
Related Manuals for FUFU & GAGA KF460028


Summary of Contents for FUFU & GAGA KF460028
- Page 1 Contents English -------------------- 01-17 Français ------------------ 18-34 Español ------------------- 35-51 Deutsch ------------------- 52-68...
- Page 2 Shelf Version:460028-01-24A-LJ 1/68...
- Page 3 IMPORTANT INFORMATION! please read the entire manual before starting to assemble and/or using this product.follow the manual thoroughly and keep it for further reference. AVOID SCRATCHES! In order to avoid scratching this furnuture should be assembled on a soft layer-could be a rug. IMPROVE EFFICIENCY ! Try to find a partner to install with you, which can speed up...
-
Page 4: Table Of Contents
Please prepare the following tools When installing, please carefully confirm whether each screw corresponds to the manual, accessories with similar shapes can be distinguished by size A x 46 B x 46 C x 25 D x 14 6 x 35 mm 15 x 10 mm 6 x 30 mm 5 x 40 mm... - Page 5 ALWAYS install Anti-tip device provided. NEVER put a TV on this product. NEVER allow children to stand,climb or hang on drawers,doors,or shelves. NEVER open more than one drawer at a time. Place heaviest items in the lowest drawers. This is a permanent label. Do not remove! 4/68...
-
Page 6: A X 14
A x 14 6 x 35 mm Screw eccentric rod(A) into board 13 and 14 as shown. 5/68... -
Page 7: B X 8
B x 8 C x 4 15 x 10 mm 6 x 30 mm Connect board 1 and 3 to board 13 using wooden dowel(C) respectively, add cam lock(B) into board 1,3 and turn clockwise to tighten as shown. Connect board 4 and 5 to board 14 using wooden dowel(C) respectively, add cam lock(B) into board 4,5 and turn clockwise to tighten as shown. -
Page 8: D X 8
D x 8 5 x 40 mm Fix board 11 to board 5, 4, 3 and 1 with screw(D) as shown. Insert bottom board 10 along available grooves as shown. 7/68... - Page 9 A x 18 6 x 35 mm Screw eccentric rod(A) into board 6 and 7 as shown. 8/68...
- Page 10 A x 2 B x 16 C x 8 6 x 35 mm 15 x 10 mm 6 x 30 mm Connect board 6 and 7 to board 1, 13, 3, 14, 4 and 5 using wooden dowel(C), add cam lock(B) into and turn clockwise to tighten as shown.
-
Page 11: I X 2
A x 12 I x 2 6 x 35 mm Screw eccentric rod(A) into board 8 and 9 as shown. Knock foot peg(I) into board 8 and 9 as shown. 10/68... - Page 12 B x 6 C x 3 15 x 10 mm 6 x 30 mm Connect board 4 and 2 to board 13 using wooden dowel(C) respectively, add cam lock(B) into board 4,2 and turn clockwise to tighten as shown. Connect board 3 to board 14 using wooden dowel(C) respectively, add cam lock(B) into board 3 and turn clockwise to tighten as shown.
- Page 13 D x 6 5 x 40 mm Fix board 12 to board 2, 4 and 3 with screw(D) as shown. Insert bottom board 10 along available grooves as shown. 12/68...
- Page 14 B x 12 C x 6 I x 2 15 x 10 mm 6 x 30 mm 180° Connect board 8 and 9 to board 14, 3, 4, 13 and 2 using wooden dowel(C), add cam lock(B) into and turn clockwise to tighten as shown.
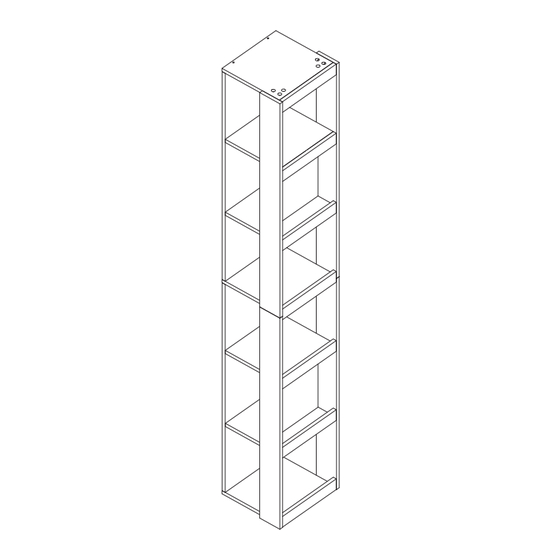
- Page 15 B x 4 C x 4 15 x 10 mm 6 x 30 mm 180° Connect the two components using wooden dowel(C), add cam lock(B) into and turn clockwise to tighten as shown. 14/68...
- Page 16 E x 2 F x 2 3.5 x 14 mm G x 2 Install anti-tipping device as shown. 15/68...
-
Page 17: Warranty Claims
WARRANTY WARRANTY CLAIMS •There is a 30-day warranty for broken furniture or any other problems that do not work properly. The warranty will start from the date of purchase which must be verified by proof of purchase. •Before making a claim, we may be able to answer your query, simply call us. Please leave your purchase order number, along with some details of the problem, if you want a replacement part. - Page 18 RETURNS CHANGED YOUR MIND AND NEED TO RETURN YOU ITEM? PLEASE FOLLOW THE BELOW INSTRUCTIONS: •If you have purchased and have simply changed your mind, follow the retailer’s instructions for returns. DEFECTIVE ITEMS •If your item is defective in any way, i.e. it doesn’t work but you can’t identify why, in the first instance, please call us.
- Page 19 Étagère Version:460028-01-24A-LJ 18/68...
- Page 20 WARNEN! Bitte lesen Sie das gesamte Handbuch, bevor Sie mit der Montage und /oder Verwendung dieses Produkts beginnen. Befolgen Sie das Handbuch sorgfältig und bewahren Sie es zum späteren Nachschlagen auf. KRATZER VERMEIDEN! Um Kratzer zu vermeiden, sollten diese Möbel auf einer weichen Schicht montiert werden - könnte ein Teppich sein EFFIZIENZ STEIGERN!
- Page 21 Veuillez préparer les outils suivants Lors de l'installation, vérifiez soigneusement si chaque vis correspond au manuel, les accessoires de forme similaire peuvent être distingués par leur taille C x 25 D x 14 A x 46 B x 46 5 x 40 mm 6 x 35 mm 15 x 10 mm 6 x 30 mm...
- Page 22 ALWAYS install Anti-tip device provided. NEVER put a TV on this product. NEVER allow children to stand,climb or hang on drawers,doors,or shelves. NEVER open more than one drawer at a time. Place heaviest items in the lowest drawers. This is a permanent label. Do not remove! ASSEMBLÉ...
- Page 23 A x 14 6 x 35 mm Visser la tige excentrique (A) dans les panneaux 13 et 14 comme indiqué. 22/68...
- Page 24 B x 8 C x 4 15 x 10 mm 6 x 30 mm Relier les planches 1 et 3 à la planche 13 à l'aide d'une cheville en bois (C) respectivement, ajouter le verrou à came (B) dans la planche 1, 3 et tourner dans le sens des aiguilles d'une montre pour serrer comme indiqué.
- Page 25 D x 8 5 x 40 mm Fixer la planche 11 aux planches 5, 4, 3 et 1 à l'aide des vis (D) comme indiqué. Insérer la planche inférieure 10 le long des rainures disponibles comme indiqué. 24/68...
- Page 26 A x 18 6 x 35 mm Visser la tige excentrique (A) dans les panneaux 6 et 7 comme indiqué. 25/68...
- Page 27 A x 2 B x 16 C x 8 6 x 35 mm 15 x 10 mm 6 x 30 mm Relier les planches 6 et 7 aux planches 1, 13, 3, 14, 4 et 5 à l'aide d'une cheville en bois (C), ajouter le verrou à...
- Page 28 A x 12 I x 2 6 x 35 mm Visser la tige excentrique(A) dans les planches 8 et 9 comme indiqué. Enfoncer la cheville de pied(I) dans la planche 8 et 9 comme indiqué. 27/68...
- Page 29 B x 6 C x 3 15 x 10 mm 6 x 30 mm Relier les planches 4 et 2 à la planche 13 à l'aide de chevilles en bois (C) respectivement, ajouter le verrou à came (B) dans la planche 4,2 et tourner dans le sens des aiguilles d'une montre pour serrer comme indiqué.
- Page 30 D x 6 5 x 40 mm Fixer la planche 12 aux planches 2, 4 et 3 à l'aide des vis (D) comme indiqué. Insérer la planche inférieure 10 le long des rainures disponibles comme indiqué. 29/68...
- Page 31 B x 12 C x 6 I x 2 15 x 10 mm 6 x 30 mm 180° Relier les planches 8 et 9 aux planches 14, 3, 4, 13 et 2 à l'aide d'une cheville en bois (C), ajouter le verrou à came (B) dans et tourner dans le sens des aiguilles d'une montre pour dans le sens...
- Page 32 B x 4 C x 4 15 x 10 mm 6 x 30 mm 180° Relier les deux composants à l'aide d'une cheville en bois (C), ajouter le verrou à came (B) et tourner dans le sens des aiguilles d'une montre pour serrer.
- Page 33 E x 2 F x 2 3.5 x 14 mm G x 2 Installer le dispositif anti-basculement comme indiqué. 32/68...
-
Page 34: Garantie
GARANTIE RÉCLAMATIONS DE GARANTIE Il existe une garantie de 30 jours pour les meubles cassés ou tout autre problème qui ne fonctionne pas correctement. La garantie commencera à partir de la date d'achat qui doit être vérifiée par une preuve d'achat. Avant de faire une réclamation, nous pourrons peut-être répondre à... - Page 35 RETOUR VOUS AVEZ CHANGE D'AVIS ET VOUS AVEZ BESOIN DE RETOURNER VOTRE ARTICLE ? VEUILLEZ SUIVRE LES INSTRUCTIONS CI-DESSOUS: Si vous avez acheté et que vous avez simplement changé d’avis, suivez les instructions du détaillant pour les retours. ARTICLES DÉFECTUEUX Si votre article est défectueux de quelque manière que ce soit, c’est-à-dire qu’...
- Page 36 Estante Version:460028-01-24A-LJ 35/68...
- Page 37 ¡INFORMACIÓN IMPORTANTE! lea todo el manual antes de empezar a montar y/o utilizar este producto.siga el manual atentamente y consérvelo para futuras consultas. ¡EVITE LOS ARAÑAZOS! Para evitar arañazos, este mueble debe montarse sobre una capa suave, que puede ser una alfombra.
- Page 38 Prepare las siguientes herramientas Al instalar, confirme cuidadosamente si cada tornillo corresponde al manual, los accesorios con formas similares pueden distinguirse por el tamaño A x 46 B x 46 C x 25 D x 14 6 x 35 mm 15 x 10 mm 6 x 30 mm 5 x 40 mm...
- Page 39 ALWAYS install Anti-tip device provided. NEVER put a TV on this product. NEVER allow children to stand,climb or hang on drawers,doors,or shelves. NEVER open more than one drawer at a time. Place heaviest items in the lowest drawers. This is a permanent label. Do not remove! montado por 2 adultos 38/68...
- Page 40 A x 14 6 x 35 mm Atornille la varilla excéntrica (A) en la placa 13 y 14 como se muestra. 39/68...
- Page 41 B x 8 C x 4 15 x 10 mm 6 x 30 mm Conecte los tableros 1 y 3 al tablero 13 utilizando tacos de madera (C) respectivamente, añada el cierre de leva (B) en los tableros 1,3 y gírelo en el sentido de las agujas del reloj para apretarlo como se muestra.
- Page 42 D x 8 5 x 40 mm Fije la placa 11 a las placas 5, 4, 3 y 1 con tornillos (D) como se muestra en la ilustración. 41/68...
- Page 43 A x 18 6 x 35 mm Atornille la varilla excéntrica (A) en la placa 6 y 7 como se muestra. 42/68...
- Page 44 A x 2 B x 16 C x 8 6 x 35 mm 15 x 10 mm 6 x 30 mm Conecte los tableros 6 y 7 a los tableros 1, 13, 3, 14, 4 y 5 utilizando un pasador de madera (C), añada el cierre de leva (B) y gírelo en el sentido de las agujas del reloj para apretarlo como...
- Page 45 A x 12 I x 2 6 x 35 mm Atornille la varilla excéntrica(A) en el tablero 8 y 9 como se muestra. Golpee la clavija del pie(I) en el tablero 8 y 9 como se muestra. 44/68...
- Page 46 B x 6 C x 3 15 x 10 mm 6 x 30 mm Conecte las placas 4 y 2 a la placa 13 utilizando el pasador de madera (C) respectivamente, añada el cierre de leva (B) en la placa 4,2 y gire en el sentido de las agujas del reloj para apretar como se muestra.
- Page 47 D x 6 5 x 40 mm Fije la placa 12 a las placas 2, 4 y 3 con tornillos (D) como se muestra en la ilustración. 46/68...
- Page 48 B x 12 C x 6 I x 2 15 x 10 mm 6 x 30 mm 180° Conecte las tablas 8 y 9 a las tablas 14, 3, 4, 13 y 2 utilizando clavijas de madera(C), añada el cierre de leva(B) en y gire en sentido horario para como se muestra.
- Page 49 B x 4 C x 4 15 x 10 mm 6 x 30 mm 180° Conecte los dos componentes utilizando el pasador de madera (C ), añada el cierre de leva (B) y gírelo en el sentido de las agujas del reloj para apretarlo.
- Page 50 E x 2 F x 2 3.5 x 14 mm G x 2 Instale el dispositivo antivuelco como se muestra. 49/68...
- Page 51 ADVERDENCIA RECLAMACIONES DE GARANTÍA •Existe una garantía de 30 días para los muebles rotos o que no funcionen correctamente. La garantía empezará a contar a partir de la fecha de compra que deberá ser comprobada mediante el justificante de compra. •Antes de presentar una reclamación, es posible que podamos responder a su consulta, sólo tiene que llamarnos.
- Page 52 DEVOLUCIONES ¿HA CAMBIADO DE OPINIÓN Y NECESITA DEVOLVER EL ARTÍCULO? SIGA LAS INSTRUCCIONES QUE SE INDICAN A CONTINUACIÓN: •Si ha comprado y simplemente ha cambiado de opinión, siga las instrucciones d el minorista para las devoluciones. ARTÍCULOS DEFECTUOSOS •Si su artículo presenta algún tipo de defecto, es decir, no funciona pero no puede identificar el motivo, en primer lugar, llámenos.
- Page 53 Regal Version:460028-01-24A-LJ 52/68...
- Page 54 WARNEN! Bitte lesen Sie das gesamte Handbuch, bevor Sie mit der Montage und /oder Verwendung dieses Produkts beginnen. Befolgen Sie das Handbuch sorgfältig und bewahren Sie es zum späteren Nachschlagen auf. KRATZER VERMEIDEN! Um Kratzer zu vermeiden, sollten diese Möbel auf einer weichen Schicht montiert werden - könnte ein Teppich sein EFFIZIENZ STEIGERN!
- Page 55 Bitte breiten Sie die folgenden Hilfsmittel vor. Bitte prüfen Sie beim Einbau sorgfältig, ob jede Schraube der Anleitung entspricht, können Zubehörteile mit ähnlicher Form durch ihre Größe unterschieden werden. A x 46 B x 46 C x 25 D x 14 6 x 35 mm 15 x 10 mm 6 x 30 mm...
- Page 56 2 Personen Montage 55/68...
- Page 57 A x 14 6 x 35 mm Schrauben Sie die Exzenterstange (A) wie gezeigt in die Bretter 13 und 14. 56/68...
- Page 58 B x 8 C x 4 15 x 10 mm 6 x 30 mm Verbinden Sie Brett 1 und 3 mit Brett 13 mit Hilfe eines Holzdübels (C). (B) in Brett 1,3 ein und drehen Sie es im Uhrzeigersinn, um es wie gezeigt festzuziehen.
- Page 59 D x 8 5 x 40 mm Befestigen Sie die Platte 11 an den Platten 5, 4, 3 und 1 mit Schrauben (D) wie abgebildet und setzen Sie die untere Platte 10 entlang der vorhandenen Nuten ein. 58/68...
- Page 60 A x 18 6 x 35 mm Schrauben Sie die Exzenterstange (A) wie gezeigt in die Bretter 6 und 59/68...
- Page 61 A x 2 B x 16 C x 8 6 x 35 mm 15 x 10 mm 6 x 30 mm Verbinden Sie die Bretter 6 und 7 mit den Brettern 1, 13, 3, 14, 4 und 5 mit Hilfe des Holzdübels (C), setzen Sie den Nockenverschluss (B) ein und drehen Sie ihn im Uhrzeigersinn fest, wie abgebildet.
- Page 62 A x 12 I x 2 6 x 35 mm Schrauben Sie die Exzenterstange (A) wie gezeigt in die Bretter 8 und 9. Klopfen Sie den Fußzapfen (I) wie gezeigt in die Bretter 8 und 9. 61/68...
- Page 63 B x 6 C x 3 15 x 10 mm 6 x 30 mm Verbinden Sie Brett 4 und 2 mit Brett 13 mit Hilfe eines Holzdübels (C). Schloss(B) in Brett 4,2 ein und drehen Sie es im Uhrzeigersinn fest, wie gezeigt. Verbinden Sie die Platte 3 mit der Platte 14 mit Hilfe eines Holzdübels (C), setzen Sie die Nockensperre...
- Page 64 D x 6 5 x 40 mm Befestigen Sie die Platte 12 an den Platten 2, 4 und 3 mit den Schrauben (D) wie abgebildet und setzen Sie die untere Platte 10 entlang der vorhandenen Nuten wie abgebildet ein. 63/68...
- Page 65 B x 12 C x 6 I x 2 15 x 10 mm 6 x 30 mm 180° Verbinden Sie die Bretter 8 und 9 mit den Brettern 14, 3, 4, 13 und 2 mit einem Holzdübel (C), den Nockenverschluss (B) in und im Uhrzeigersinn drehen, um...
- Page 66 B x 4 C x 4 15 x 10 mm 6 x 30 mm 180° Verbinden Sie die beiden Teile mit dem Holzdübel (C), setzen Sie die Nockensperre (B) ein und drehen Sie sie im Uhrzeigersinn fest. wie gezeigt. 65/68...
- Page 67 E x 2 F x 2 3.5 x 14 mm G x 2 Montieren Sie die Kippsicherung wie abgebildet. 66/68...
- Page 68 GARANTIE GEWÄHRLEISTUNGSANSPRÜCHE Es gibt eine 30-tägige Garantie für kaputte Möbel oder andere Probleme, die nicht richtig funktionieren. Die Garantie beginnt mit dem Kaufdatum, das verifiziert durch Kaufbeleg. Bevor Sie einen Anspruch geltend machen, können wir Ihre Anfrage möglicherweise beantworten. Rufen Sie uns einfach an. Bitte hinterlassen Sie Ihre Bestellnummer zusammen mit einigen Details des Problems, wenn Sie ein Ersatzteil wünschen.
- Page 69 Rücksendung SIE HABEN IHRE MEINUNG GEÄNDERT UND MÜSSEN IHREN ARTIKEL ZURÜCKGEBEN? BITTE BEFOLGEN SIE DIE FOLGENDEN ANWEISUNGEN: Wenn Sie gekauft haben und einfach Ihre Meinung geändert haben, befolgen Sie die Anweisungen des Händlers für die Rückgabe. DEFEKT EARTIKEL Wenn Ihr Artikel in irgendeiner Weise defekt ist, d.h. es funktioniert nicht, aber Sie können nicht erkennen, warum in erster Instanz, rufen Sie uns bitte BESCHÄDIGTE ARTIKEL Wenn Sie vom Händler eine Bestellung mit offensichtlichen...
Need help?
Do you have a question about the KF460028 and is the answer not in the manual?
Questions and answers