Parkside PSBSA 20-Li D4 (436783-2304) - Impact Driver Manual
- Original instructions manual (95 pages) ,
- Translation of the original instructions (163 pages)
Advertisement
Introduction
You have chosen a high-quality product. The operating instructions are part of this product. They contain important information about safety, usage and disposal. Before using the product, please familiarise yourself with all operating and safety instructions. Use the product only as described and for the range of applications specified. Please also pass these operating instructions on to any future owner.
Intended use
This appliance is intended for screwing in and removing screws as well as drilling in wood, metal, ceramic and plastic and impact drilling in bricks and masonry. It is not suitable for impact drilling in natural stone such as granite. The light on this appliance is intended to illuminate the immediate work area of the appliance.
Use this product only as described and for the areas of applications specified. The appliance is not intended for commercial use. Any other usage or modification of the appliance is deemed to be improper and carries a significant risk of accidents. The manufacturer accepts no responsibility for damage(s) attributable to misuse.
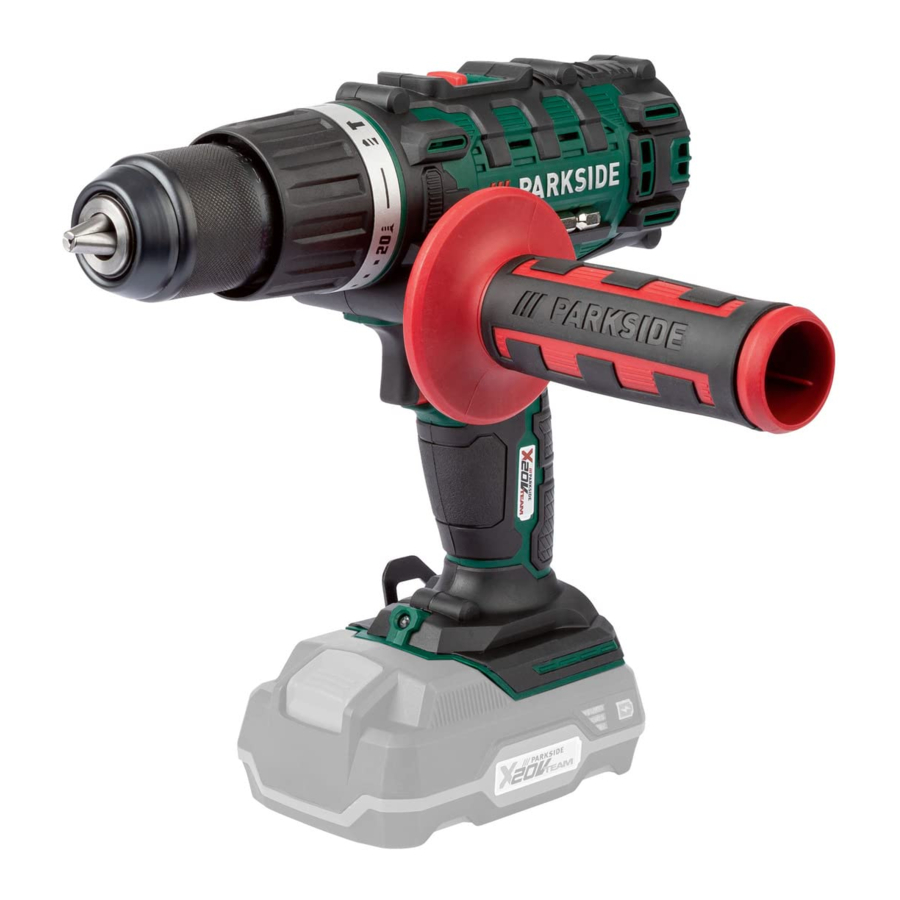
Features

- Speed selector
- Rotation direction switch/lock
- ON/OFF switch / Speed control
- Bit
- Battery charge level button
- Battery display LED
- Battery pack*
- Release button for the battery pack
- LED work light
- Additional handle
- Chuck
- T orque preselection ring
- High-speed charger*
- Red charge control LED
- Green charge control LED
Package contents
1 3-in-1 Cordless impact driver 20 V PSBSA 20-Li D4
1 additional handle
2 bits PZ1 & PZ2 (50mm)
1 carrying case
1 set of operating instructions
Technical data
3-in-1 Cordless impact driver 20 V:
PSBSA 20-Li D4
| Rated voltage: | 20 V  (DC) (DC) |
| Gearbox: | 2 speed gearbox |
| Rated idle speed: | 1st gear: n0 0–440 rpm |
| 2nd gear: n0 0–1650 rpm | |
| Hammer frequency: | 0–26400 bpm |
| Max. torque: | 45 Nm |
| Torque levels: | 1–20 + 1 drill level / + 1 hammer level |
Chuck capacity: : : | Ø max. 13 mm |
| Max. drill diameter: | 30 mm for wood |
| 15 mm for tiles | |
| 13 mm for steel |
Battery: PAP 20 B1*
| Type: | LITHIUM ION |
| Rated voltage: | 20 V (DC) |
| Capacity: | 2 Ah |
| Cells: | 5 |
High-speed battery charger: PLG 20 C2*
INPUT:
| Rated voltage: | 230–240 V ~, 50 Hz (AC) |
| Rated power consumption: | 85 W |
| Fuse (internal): | 3.15 A |
OUTPUT:
| Rated voltage: | 21.5 V (DC) |
| Rated current: | 3.5 A |
| Charging time: | approx. 45 min |
| Protection class: | II /  (double insulation) (double insulation) |
*BATTERY AND CHARGER ARE NOT INCLUDED
Noise emission value:
Noise measurement value determined in accordance with EN 62841. The A-rated noise level of the power tool is typically as follows:
| Sound pressure level: | LPA = 72.8 dB (A) |
| Uncertainty K: | KPA = 5 dB |
| Sound power level: | LWA = 83.8 dB (A) |
| Uncertainty K: | KWA = 5 dB |
Vibration emission value:
Total vibration values (vector total of three directions) determined in accordance with EN 62841:
Hammer drilling in concrete:
ah, ID = 10.381 m/s2
Drilling in metal: ah, D = 3.279 m/s2 Uncertainty K = 1.5 m/s2
Screws:
<2.5 m/s2
Uncertainty K = 1.5 m/s2
Wear hearing protection!
NOTE
- The vibration emission values and the noise emission values given in these instructions have been measured in accordance with a standardised test procedure and can be used for comparison of the power tool with another tool.
- The specified total vibration values and the noise emission values can also be used to make a provisional load estimate.

- Depending on the manner in which the power tool is being used, and in particular the kind of workpiece that is being worked, the vibration and noise emission values can deviate from the values given in these instructions during actual use of the power tool.
- Try to keep the load as low as possible. Measures to reduce the vibration load are, e.g. wearing gloves and limiting the working time. Wherein all states of operation must be included (e.g. times when the power tool is switched off and times where the power tool is switched on but running without load).
General power tool safety warnings
- Read all safety warnings, instructions, illustrations and specifications provided with this power tool. Failure to follow all instructions listed below may result in electric shock, fire and/or serious injury.
![]()

Save all warnings and instructions for future reference.
The term „power tool" in the warnings refers to your mains-operated (corded) power tool or battery-operated (cordless) power tool.
- Work area safety
- Keep work area clean and well lit. Cluttered or dark areas invite accidents.
- Do not operate power tools in explosive atmospheres, such as in the presence of flammable liquids, gases or dust. Power tools create sparks which may ignite the dust or fumes.
- Keep children and bystanders away while operating a power tool. Distractions can cause you to lose control.
- Electrical safety
- Power tool plugs must match the outlet. Never modify the plug in any way. Do not use any adapter plugs with earthed (grounded) power tools. Unmodified plugs and matching outlets will reduce risk of electric shock.
- Avoid body contact with earthed or grounded surfaces, such as pipes, radiators, ranges and refrigerators. There is an increased risk of electric shock if your body is earthed or grounded.
- Do not expose power tools to rain or wet conditions. Water entering a power tool will increase the risk of electric shock.
- Do not abuse the cord. Never use the cord for carrying, pulling or unplugging the power tool. Keep cord away from heat, oil, sharp edges or moving parts. Damaged or entangled cords increase the risk of electric shock.
- When operating a power tool outdoors, use an extension cord suitable for outdoor use. Use of a cord suitable for outdoor use reduces the risk of electric shock.
- If operating a power tool in a damp location is unavoidable, use a residual current device (RCD) protected supply. Use of an RCD reduces the risk of electric shock.
- Personal safety
- Stay alert, watch what you are doing and use common sense when operating a power tool. Do not use a power tool while you are tired or under the influence of drugs, alcohol or medication. A moment of inattention while operating power tools may result in serious personal injury.
- Use personal protective equipment. Always wear eye protection. Protective equipment such as a dust mask, non-slip safety shoes, hard hat or hearing protection used for appropriate conditions will reduce personal injuries.
- Prevent unintentional starting. Ensure the switch is in the off-position before connecting to power source and/or battery pack, picking up or carrying the tool. Carrying power tools with your finger on the switch or energising power tools that have the switch on invites accidents.
- Remove any adjusting key or wrench before turning the power tool on. A wrench or a key left attached to a rotating part of the power tool may result in personal injury.
- Do not overreach. Keep proper footing and balance at all times. This enables better control of the power tool in unexpected situations.
- Dress properly. Do not wear loose clothing or jewellery. Keep your hair and clothing away from moving parts. Loose clothes, jewellery or long hair can be caught in moving parts.
- If devices are provided for the connection of dust extraction and collection facilities, ensure these are connected and properly used. Use of dust collection can reduce dust-related hazards.
- Do not let familiarity gained from frequent use of tools allow you to become complacent and ignore tool safety principles. A careless action can cause severe injury within a fraction of a second.
- Power tool use and care
- Do not force the power tool. Use the correct power tool for your application. The correct power tool will do the job better and safer at the rate for which it was designed.
- Do not use the power tool if the switch does not turn it on and off. Any power tool that cannot be controlled with the switch is dangerous and must be repaired.
- Disconnect the plug from the power source and/or remove the battery pack, if detachable, from the power tool before making any adjustments, changing accessories, or storing power tools. Such preventive safety measures reduce the risk of starting the power tool accidentally.
- Store idle power tools out of the reach of children and do not allow persons unfamiliar with the power tool or these instructions to operate the power tool. Power tools are dangerous in the hands of untrained users.
- Maintain power tools and accessories. Check for misalignment or binding of moving parts, breakage of parts and any other condition that may affect the power tool's operation. If damaged, have the power tool repaired before use. Many accidents are caused by poorly maintained power tools.
- Keep cutting tools sharp and clean. Properly maintained cutting tools with sharp cutting edges are less likely to bind and are easier to control.
- Use the power tool, accessories and tool bits etc. in accordance with these instructions, taking into account the working conditions and the work to be performed. Use of the power tool for operations different from those intended could result in a hazardous situation.
- Keep handles and grasping surfaces dry, clean and free from oil and grease. Slippery handles and grasping surfaces do not allow for safe handling and control of the tool in unexpected situations.
- Battery tool use and care
- Recharge only with the charger specified by the manufacturer. A charger that is suitable for one type of battery pack may create a risk of fire when used with another battery pack.
- Use power tools only with specifically designated battery packs. Use of any other battery packs may create a risk of injury and fire.
- When battery pack is not in use, keep it away from other metal objects, like paper clips, coins, keys, nails, screws or other small metal objects, that can make a connection from one terminal to another. Shorting the battery terminals together may cause burns or a fire.
- Under abusive conditions, liquid may be ejected from the battery; avoid contact. If contact accidentally occurs, flush with water. If liquid contacts eyes, additionally seek medical help. Liquid ejected from the battery may cause irritation or burns.
- Do not use a battery pack or tool that is damaged or modified. Damaged or modified batteries may exhibit unpredictable behaviour resulting in fire, explosion or risk of injury.
- Do not expose a battery pack or tool to fire or excessive temperature. Exposure to fire or temperature above 130°C (265°F) may cause explosion.
- Follow all charging instructions and do not charge the battery pack or tool outside the temperature range specified in the instructions. Charging improperly or at temperatures outside the specified range may damage the battery and increase the risk of fire.

RISK OF EXPLOSION! Never charge non-rechargeable batteries!
Protect the rechargeable battery from heat, for example from continuous exposure to sunlight, fire, water and moisture. There is a risk of explosion.

- Service
- Have your power tool serviced by a qualified repair person using only identical replacement parts. This will ensure that the safety of the power tool is maintained.
- Never service damaged battery packs. Service of battery packs should only be performed by the manufacturer or authorized service providers.
Safety instructions for drills
Safety instructions for all work
- Wear ear muffs when hammer-drilling. Exposure to loud noise can lead to hearing loss.
- Use the additional handle. Loss of control can lead to injuries.
- Hold the power tool only by the insulated handles when you are carrying out work in which the accessory tool may come into contact with concealed power cables or the tool's own power cord. Contact with a live wire may electrify exposed metal parts of the tool and could give the operator an electric shock.
- You can collect any dust produced using a vacuum cleaner, for example.
Safety information for using long drill bits
- Do not use a higher rotational speed than the maximum permissible speed. At higher speeds, the drill bit can bend slightly if allowed to turn freely without being in contact with the workpiece and this can lead to injuries.
- Always start drilling at a low speed and with the drill bit in contact with the workpiece. At higher speeds, the drill bit can bend slightly if allowed to turn freely without being in contact with the workpiece and this can lead to injuries.
- Do not exert excessive pressure and only along the length of the drill bit (no lateral pressure). Drill bits can bend and break, which can lead to a loss of control and injuries.
Original accessories / auxiliary equipment
- Use only the accessories and additional equipment which are specified in the operating instructions and are compatible with the appliance.
- Do not use any accessories which are not recommended by PARKSIDE. This can lead to an electric shock and fire.
Safety guidelines for battery chargers
- This appliance may be used by children aged 8 years and above and by persons with limited physical, sensory or mental capabilities or lack of experience and knowledge, provided that they are under supervision or have been told how to use the appliance safely and are aware of the potential risks. Do not allow children to use the appliance as a toy. Cleaning and user maintenance tasks may not be carried out by children unless they are supervised.
- To avoid potential risks, damaged mains cables should be replaced by the manufacturer, their customer service department or a similarly qualified person.
![]()
The charger is suitable for indoor use only.

- To avoid potential risks, damaged mains cables should be replaced by the manufacturer, their customer service department or a similarly qualified person.
 ATTENTION!
- This charger can only charge the following batteries: PAP 20 A1/PAP 20 A2/PAP 20 A3/PAP 20 B1/PAP 20 B3/PAPS 204 A1/PAPS 208 A1.
- A current list of battery compatibility can be found at www.lidl.de/Akku.
Before use
Charging the battery pack (see fig. A)

- Always unplug the appliance before you remove the battery pack from or connect the battery pack to the charger.
- Connect the battery pack
![]() to the high-speed battery charger
to the high-speed battery charger ![]() (see fig. A).
(see fig. A). - Insert the power plug into the socket. The control LED
![]() lights up red.
lights up red. - The green LED
![]() indicates that the charging process is complete and the battery pack is ready.
indicates that the charging process is complete and the battery pack is ready.
- If the red control LED
![]() flashes, this means that the battery pack
flashes, this means that the battery pack ![]() has overheated and cannot be charged.
has overheated and cannot be charged. - If the red and green control LEDs
![]()
![]() both flash, this means that the battery pack is broken.
both flash, this means that the battery pack is broken. - Push the battery pack
![]() back into the appliance.
back into the appliance. - Switch off the charger for at least 15 minutes between successive charging sessions. Also disconnect the power plug from the mains power socket.
 flashes, this means that the battery pack
  has overheated and cannot be charged.
 both flash, this means that the battery pack is broken.
Attaching/disconnecting the battery pack to/from the appliance
Inserting the battery pack:
- Push the rotation direction switch
![]() into the middle position (lock). Allow the battery pack
into the middle position (lock). Allow the battery pack ![]() to click into the handle.
to click into the handle.
Removing the battery pack:
- Press the release button
![]() and remove the battery pack.
and remove the battery pack.
Checking the battery charge level
- Press the battery charge level button
![]() to check the status of the battery (see also main diagram).
to check the status of the battery (see also main diagram).
The status/remaining charge will be shown on the battery display LED![]() as follows:
as follows:
RED/ORANGE/GREEN = maximum charge
RED/ORANGE = medium charge
RED = low charge – charge the battery
Fitting the additional handle
- Screw the additional handle
![]() onto the left or right of the appliance depending on how you work.
onto the left or right of the appliance depending on how you work.
Changing tools
Your cordless screwdriver has a fully automatic spindle lock  .
.
When the motor is stopped, the power train locks so that the chuck  can be opened by turning it
 ![]() . Once you have attached the desired tool and tightened it by turning the chuck
. Once you have attached the desired tool and tightened it by turning the chuck ![]() , you can continue working. The spindle lock is automatically released when the motor starts (ON/OFF switch
, you can continue working. The spindle lock is automatically released when the motor starts (ON/OFF switch ![]() pressed).
pressed).
Torque preselection/selecting the operating mode
You can adjust the torque on the torque preselector ![]() and select between the drill setting
and select between the drill setting ![]() and the hammer drill setting
and the hammer drill setting ![]() .
.
- Select a low level for small screws or soft materials.
- Select a high level for large screws, hard materials or removing screws.
- Select the drill setting for drilling work by adjusting the torque selection ring to the position
![]() .
. - Select the hammer drill setting for hammer drilling work by adjusting the torque selection ring to the position
![]() .
.
2-speed gearbox
- Operate the speed selection switch
![]() only when the appliance is at a standstill. Otherwise the appliance can be damaged.
only when the appliance is at a standstill. Otherwise the appliance can be damaged.
In first gear (speed selector switch  in position: 1)
you can reach a speed of approx. 440 rpm and a high torque. This setting is suitable for all screwing work but also for the use of accessories.
In second gear (speed selector switch ![]() in position: 2)
in position: 2)
you can reach a speed of approx. 1650 rpm for carrying out drilling work.
Use
Switching on and off
Switching on:
- To start the appliance, press the ON/OFF switch
![]() and keep it pressed in.
and keep it pressed in.
The LED work light![]() lights up when the ON/OFF switch
lights up when the ON/OFF switch ![]() is depressed lightly or fully. This allows for illumination of the work area in low lighting.
is depressed lightly or fully. This allows for illumination of the work area in low lighting.
 and keep it pressed in.
Switching off:
- Release the ON/OFF switch
![]() to switch off the appliance.
to switch off the appliance.
Adjusting the rotational speed
Press the ON/OFF switch ![]() lightly for a low speed. Increasing the pressure increases the speed.
lightly for a low speed. Increasing the pressure increases the speed.
NOTE
- The integrated motor brake ensures rapid stoppage.
Changing the direction of rotation
- Change the direction of rotation by pressing the rotational direction switch
![]() towards the left or right.
towards the left or right.
Tips and tricks
Tip! This symbol indicates proper baviour.
- Before operating the appliance, check whether the screw or drill bit is correctly positioned, i.e. centred in the drill chuck.
- Screw bits are labelled according to their dimensions and their shape. If you are uncertain, always check whether the bit fits tightly in the screw head without any free play.
Torque:
- Smaller screws/bits can be damaged if you set the torque or rotational speed too high.
Hard screw joints (in metal):
- Particularly high torques occur, for example, in metal screw joints made using drive sockets.
Select a low rotational speed.
Soft screw joints (e.g. in soft wood):
- Again, use a low rotational speed, for example to avoid damaging the surface of the wood on contact with the screw head. Use a countersink.
When drilling in wood, metal and other materials, observe the following:
- Use a high speed for drill bits with small diameter and a low speed for drill bits with large diameter.
- Select a low speed for hard materials and a high speed for soft materials.
- Mark the spot where you want to drill using a centre punch or nail. Select a low rotational speed when starting.
- Pull the rotating drill bit from the hole repeatedly to remove dust and chips and clear the hole.
Drilling in metal:
- Use a metal drill (HSS). For optimum results, you should cool the drill bit with oil.
Metal drill bits can also be used to drill into plastics. Start with a 3 mm diameter drill bit and then increase the size until the desired hole diameter is achieved.
Drilling in brick:
- Use a carbide-tipped masonry drill. (max. recommended hole diameter: Ø 15 mm)
Drilling in wood:
- Use a wood drill with a lathe centre; for deep holes, use an auger bit; for large-diameter holes, use a Forstner bit. Small screws can be screwed directly into soft wood.
Maintenance and cleaning
RISK OF INJURY! Always switch the appliance off and remove the battery before carrying out any work on the appliance.
The cordless combi drill is maintenance-free.
- The appliance must always be kept clean, dry and free from oil or grease.
- Never allow liquids to get into the appliance.
- Use a soft, dry cloth to clean the housing. Never use petrol, solvents or cleansers which can damage plastic.
- If a lithium-ion battery is to be stored for an extended period, the charge level should be checked regularly. The optimum charge level is between 50% and 80%. The optimum storage environment is cool and dry.
NOTE
- Replacement parts not listed (such as carbon brushes, switch) can be ordered via our service hotline.
Service
- Have the power tool repaired by the service centre or a qualified electrician and only using genuine replacement parts. This will ensure that the safety of the appliance is maintained.
- Always ensure that the power plug or the mains cable is replaced only by the manufacturer of the appliance or by an approved customer service provider. This will ensure that the safety of the appliance is maintained.
Service Great Britain
Tel.: 0800 404 7657
E-Mail: kompernass@lidl.co.uk
Service Ireland
Tel.: 1800 101010
E-Mail: kompernass@lidl.ie
www.kompernass.com
Ordering a replacement battery and charger
You can easily order a replacement battery or charger on the Internet at www.kompernass.com.


X20V 4 Ah


X20V 2 Ah


PDSLG 20 A1
- Scan the QR code with your smartphone/tablet.
You can use this QR code to go directly to our website to view and order the available replacement parts.
NOTE
- If you have problems with your online order, you can contact our service centre by phone or email.
- Always quote the article number (IAN) 436783_2304 in your order.
- Please note that online ordering of replacement parts is not possible for all countries.
 All Parkside tools and the chargers PLG 20 A1/A4/C1/A2/C2/A3/C3/PDSLG 20 A1/ PLGS 2012 A1 of the X20V Team series are compatible with the PAP 20 A1/A2/A3/B1/B3/ PAPS 204 A1/PAPS 208 A1 battery pack.
| Charging times Charging currents | max. 2,4 A Charger PLG 20 A1/A4/C1 | max. 3,5 A Charger PLG 20 A2/C2 | max. 4,5 A Charger PLG 20 A3/C3 | max. 4,5 A Charger PDSLG 20 A1 | max. 12,0 A Charger PLGS 2012 A1 |
| 2 Ah PAP 20 A1/B1 Battery pack | 60 min 2,4 A | 45 min 3,5 A | 35 min 3,8 A | 35 min 3,8 A | 35 min 3,8 A |
| 3 Ah PAP 20 A2 Battery pack | 90 min 2,4 A | 60 min 3,5 A | 45 min 4,5 A | 45 min 4,5 A | 32 min 5,3 A |
| 4 Ah PAP 20 A3/B3 Battery pack | 120 min 2,4 A | 80 min 3,5 A | 60 min 4,5 A | 60 min 4,5 A | 35 min 7,8 A |
| 4 Ah PAPS 204 A1 Battery pack | 120 min 2,4 A | 80 min 3,5 A | 50 min 4,5 A | 50 min 4,5 A | 35 min 6,0 A |
| 8 Ah PAPS 208 A1 Battery pack | 210 min 2,4 A | 165 min 3,5 A | 120 min 4,5 A | 120 min 4,5 A | 45 min 12,0 A |
Documents / Resources
References
Download manual
Here you can download full pdf version of manual, it may contain additional safety instructions, warranty information, FCC rules, etc.
Download Parkside PSBSA 20-Li D4 (436783-2304) - Impact Driver Manual
Advertisement


Need help?
Do you have a question about the PSBSA 20-Li D4 and is the answer not in the manual?
Questions and answers